Introduction
Welcome to the world of cryptocurrencies! If you’re looking to dive into the world of Bitcoin and want a convenient way to buy, sell, and hold it, Cash App has got you covered. In this guide, we will walk you through the process of enabling Bitcoin on Cash App and take you step by step on how to use this feature.
Bitcoin, the first and most famous cryptocurrency, has gained significant popularity in recent years. Its decentralized and secure nature has attracted millions of users worldwide. With Cash App’s integration of Bitcoin, you can now easily access and manage your digital assets right from your mobile device.
Whether you’re a seasoned Bitcoin enthusiast or just stepping into the crypto world for the first time, Cash App provides a user-friendly platform that simplifies the process of buying, selling, and transacting with Bitcoin.
With Cash App’s Bitcoin feature, you can take advantage of the real-time price fluctuations, making it an attractive option for both long-term investment and quick transactions. Plus, with the ease of use and seamless integration with your Cash App account, managing your Bitcoin holdings becomes a breeze.
In this guide, we will cover how to download the Cash App, set up your account, verify your identity, add funds to your Cash App wallet, enable the Bitcoin feature, buy and sell Bitcoin, send and receive Bitcoin within Cash App, and even transfer Bitcoin to an external wallet if needed.
Before we dive in, it’s important to note that while Cash App provides a secure environment for your Bitcoin transactions, it’s essential to be cautious and follow safety guidelines to protect your digital assets. Now, let’s get started and unleash the power of Bitcoin on Cash App!
Downloading the Cash App
To get started with using Bitcoin on Cash App, the first step is to download the Cash App on your mobile device. Cash App is available for both Android and iOS devices, making it accessible to a wide range of users.
Here’s how you can download the Cash App:
- Open the App Store on your iPhone or the Google Play Store on your Android device.
- Search for “Cash App” in the search bar.
- Look for the official Cash App icon, which is a green square with a white dollar sign ($).
- Tap on the Cash App icon to open the app’s page.
- Click on the “Install” button (for Android) or the “Get” button (for iOS) to start the download.
- Wait for the app to download and install on your device. This may take a few moments depending on your internet speed.
- Once the installation is complete, you can find the Cash App icon on your home screen or app drawer. Tap on it to open the app.
Now that you have successfully downloaded and installed the Cash App on your device, you can move on to the next step, which is setting up your Cash App account. In the next section, we will guide you through the process of creating your account and getting it ready for Bitcoin transactions.
Setting up a Cash App account
Now that you have the Cash App installed on your mobile device, it’s time to set up your account. Follow these steps to create your Cash App account:
- Open the Cash App on your device by tapping on the app icon.
- You will be greeted with a welcome screen. Tap on the “Sign Up” button to begin the account creation process.
- Enter your email address or phone number when prompted. Make sure to use a valid email address or phone number that you have access to.
- Create a unique and secure password for your Cash App account. Make sure to choose a password that is easy for you to remember but difficult for others to guess.
- Once you have entered your email/phone number and password, tap on the “Next” button.
- On the next screen, you will be asked to enter the referral code (if you have one). This step is optional, so you can skip it if you don’t have a referral code.
- Review the terms of service and privacy policy, and then tap on the “Agree” button to proceed.
- In the next step, you will need to verify your email address or phone number. Cash App will send you a verification code to the provided email address or phone number. Enter the code when prompted to complete the verification process.
- Once your email/phone number is verified, you will be asked to link a debit card or bank account to your Cash App. This will allow you to add funds to your Cash App account and make transactions. Follow the on-screen instructions to link your preferred payment method.
- After adding a payment method, you will have the option to set up a $Cashtag. This is a unique username that can be used to send and receive money. You can either choose a suggested $Cashtag or create your own. Remember to choose a $Cashtag that is easy to remember and represents you or your brand.
Congratulations! You have successfully set up your Cash App account. Now it’s time to verify your identity in order to unlock all the features, including enabling Bitcoin on Cash App. The next section will guide you through the verification process.
Verifying your identity
To ensure a secure and compliant platform, Cash App requires users to verify their identity before they can fully utilize all the features, including buying, selling, and sending Bitcoin. Here’s how you can verify your identity on Cash App:
- Open the Cash App on your device and log in to your account.
- Tap on your profile icon or the account balance at the top of the screen to access your account settings.
- Scroll down and select the “Personal” or “Profile” option, depending on your device.
- Tap on the “Verify Identity” option.
- Follow the on-screen instructions to provide the required information.
- You will need to enter your full name, date of birth, and the last four digits of your Social Security Number (SSN).
- Ensure that the information you provide matches the details on your government-issued identification.
- After entering the necessary information, Cash App will prompt you to take a photo of your valid driver’s license, passport, or state-issued ID. Make sure the photo is clear and includes all relevant details.
- Review the uploaded photo to ensure its clarity and legibility.
- Finally, tap on the “Submit” or “Continue” button to initiate the verification process.
Note that the verification process may take some time to complete. Cash App will review the information and documentation you have provided to confirm your identity. Once your identity is verified, you will receive a notification, and you can proceed to enable the Bitcoin feature on your Cash App account.
Verifying your identity not only allows you to access the full functionality of Cash App but also strengthens the security measures in place, protecting your account and ensuring a safer Bitcoin experience.
Now that your identity is verified, it’s time to add funds to your Cash App account so that you can start buying Bitcoin. The next section will guide you through the process of adding funds.
Adding funds to your Cash App account
Now that you have set up your Cash App account and verified your identity, the next step is to add funds so that you can start buying Bitcoin. Cash App offers multiple ways to add funds to your account:
- Open the Cash App on your device and log in to your account.
- Tap on the “Banking” icon at the bottom of the screen to access the banking menu.
- Select the “Add Cash” option to begin the process of adding funds.
- Enter the amount you wish to add to your Cash App account. You can either enter a specific amount or choose from the available options.
- Tap on the “Add” button to proceed, and Cash App will prompt you to verify your identity once again for security purposes.
- After verifying your identity, you will be prompted to link a debit card or bank account.
- If you choose to link a debit card, enter the required information, including the card number, expiration date, and CVV.
- If you prefer to link a bank account, Cash App will guide you through the process of linking your account by providing your bank’s routing number and your account number.
- Follow the on-screen instructions to complete the linking process.
- Once your debit card or bank account is successfully linked, you can proceed to add funds by tapping on the “Add” button.
- Review the details of your transaction, including the amount being added to your Cash App account, and then confirm the transaction.
- Wait for the funds to be transferred to your Cash App account. This may take a few moments depending on your bank or card issuer.
After the funds are successfully added to your Cash App account, you can proceed to enable the Bitcoin feature and start buying, selling, and sending Bitcoin. The next section will guide you through the process of enabling Bitcoin on Cash App.
Enabling the Bitcoin feature
With your Cash App account funded, it’s time to enable the Bitcoin feature so that you can start buying, selling, and transacting with Bitcoin. Here’s how you can enable the Bitcoin feature on Cash App:
- Open the Cash App on your device and log in to your account.
- Tap on the “Investing” icon at the bottom of the screen to access the investing menu.
- Scroll down and select the “Bitcoin” option to proceed.
- You will be prompted with information about Bitcoin and its risks. Take some time to read through the provided information.
- Tap on the “Enable Bitcoin” button to enable the Bitcoin feature on your Cash App account.
- After enabling Bitcoin, Cash App may prompt you to set up a security measure, such as a PIN code or biometric authentication, to protect your Bitcoin transactions. Follow the on-screen instructions to set up your preferred security measure.
- Congratulations! You have successfully enabled the Bitcoin feature on your Cash App account.
Enabling the Bitcoin feature gives you access to a wide range of Bitcoin-related options, including buying Bitcoin, selling Bitcoin, sending Bitcoin to others within Cash App, and even transferring Bitcoin to an external wallet. Continue reading to learn more about these features and how to use them effectively.
Now that you have enabled the Bitcoin feature, let’s move on to the next sections where we will guide you on how to buy, sell, and send Bitcoin on Cash App.
Buying Bitcoin on Cash App
Now that you have enabled the Bitcoin feature on your Cash App account, you can easily buy Bitcoin with just a few steps. Follow these instructions to buy Bitcoin on Cash App:
- Open the Cash App on your device and log in to your account.
- Tap on the “Investing” icon at the bottom of the screen to access the investing menu.
- Select the “Bitcoin” option to proceed.
- Tap on the “Buy” button.
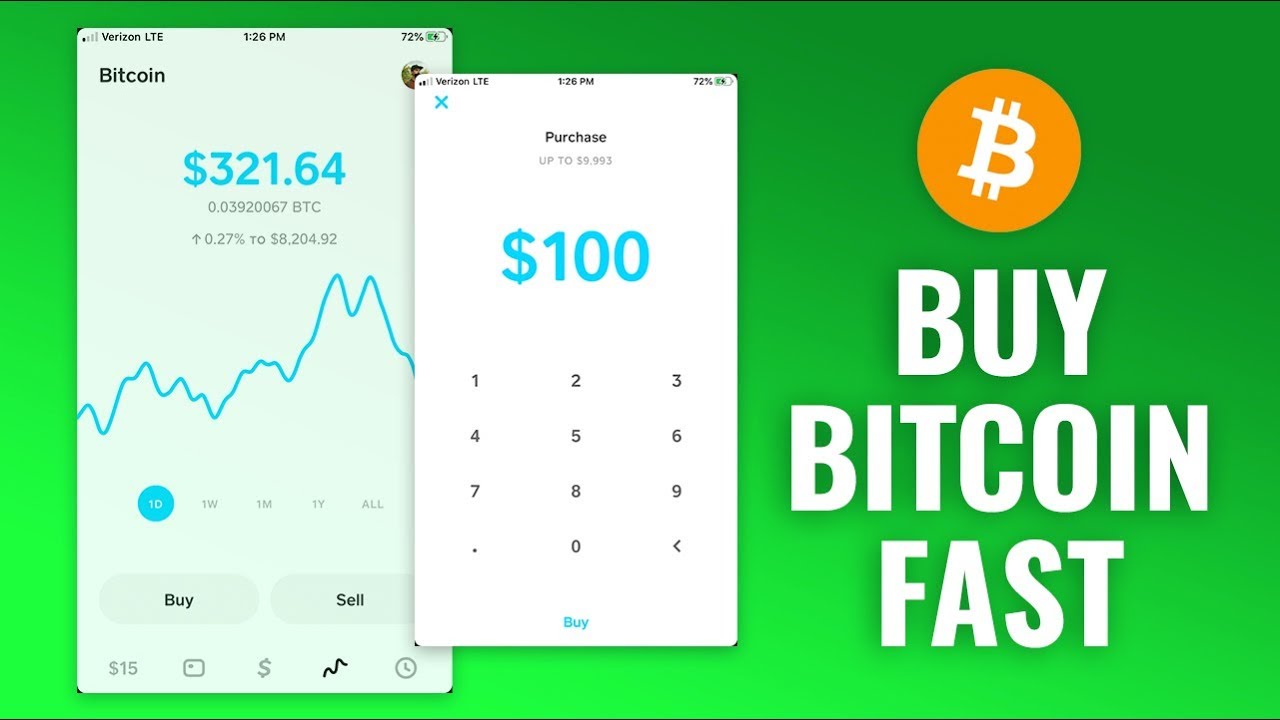
- Enter the amount of Bitcoin you want to purchase.
- You can either enter a specific amount of Bitcoin or use the available options (such as $10, $25, $50, or $100).
- Review the transaction details, including the current Bitcoin price, fees, and the total amount to be deducted from your Cash App balance or linked payment method.
- Tap on the “Confirm” button to proceed with the purchase.
- Wait for the transaction to be processed. This may take a few moments to complete.
- Once the purchase is successful, you will see the amount of Bitcoin you bought in your Cash App Bitcoin balance.
Buying Bitcoin on Cash App is quick and straightforward, allowing you to take advantage of the cryptocurrency’s potential. With access to real-time prices, you can make informed decisions and buy Bitcoin at the right time for you.
Now that you have bought Bitcoin, you may be wondering how to sell it if needed. The next section will guide you through the process of selling Bitcoin on Cash App.
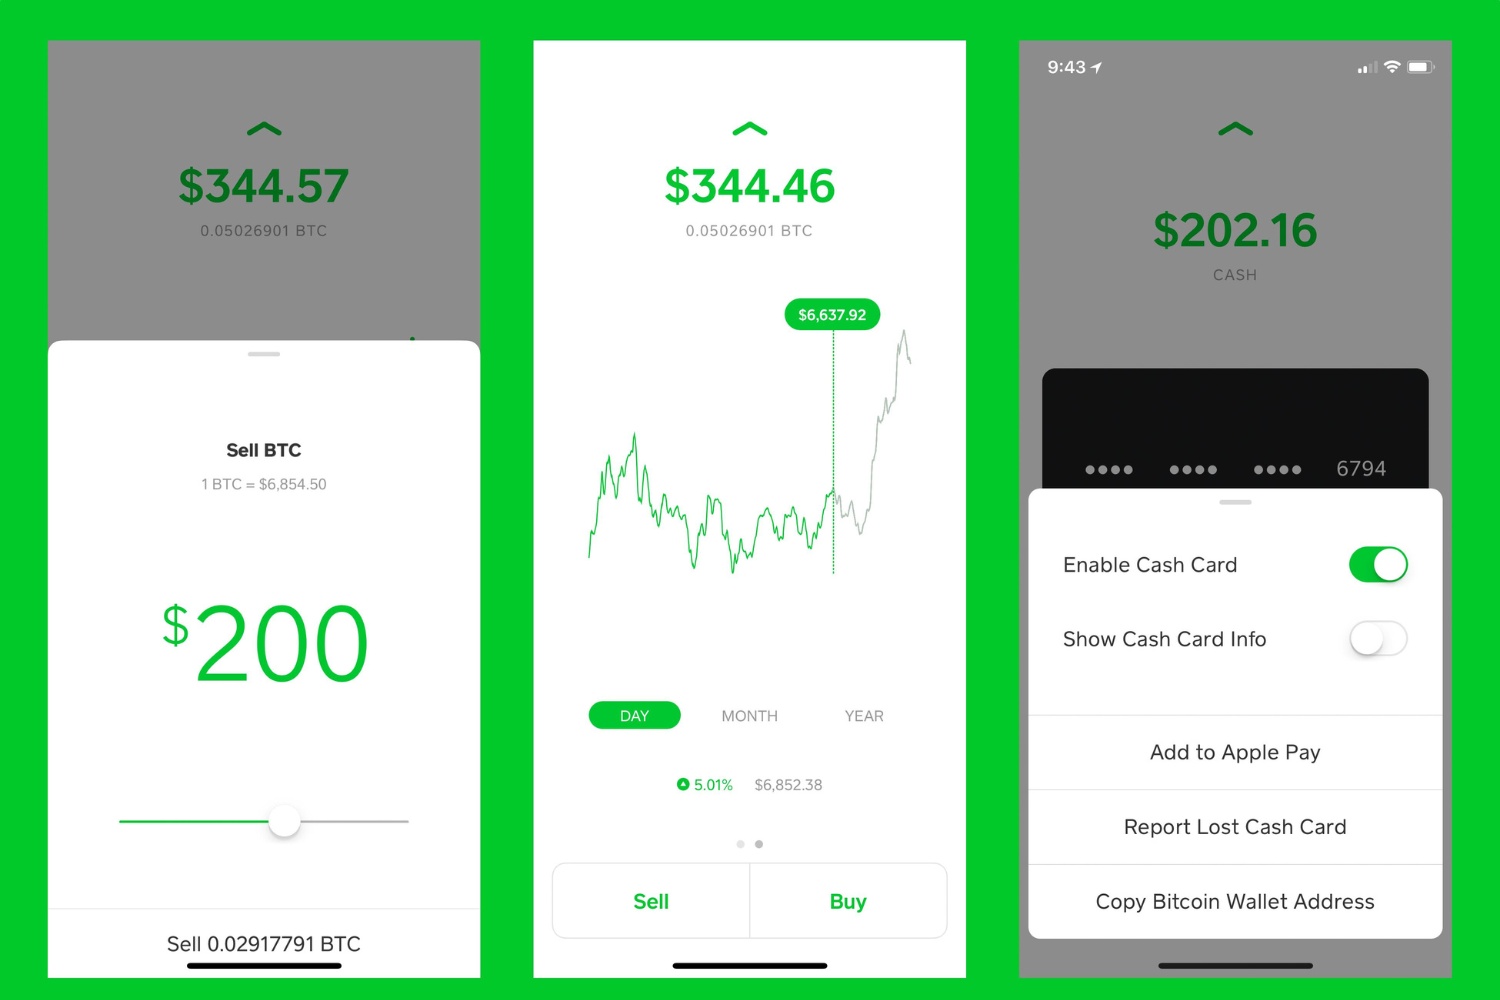
Selling Bitcoin on Cash App
Selling Bitcoin on Cash App is just as easy as buying it. If you want to sell your Bitcoin and convert it back into fiat currency, follow these steps:
- Open the Cash App on your device and log in to your account.
- Tap on the “Investing” icon at the bottom of the screen to access the investing menu.
- Select the “Bitcoin” option.
- Tap on the “Sell” button.
- Enter the amount of Bitcoin you want to sell.
- You can choose to sell your entire Bitcoin balance or enter a specific amount to sell.
- Review the transaction details, including the current Bitcoin price, fees, and the total amount you will receive in your Cash App balance.
- Tap on the “Confirm” button to proceed with the sale.
- Wait for the transaction to be processed. This may take a few moments to complete.
- Once the sale is successful, you will see the amount of fiat currency (such as USD) credited to your Cash App balance.
Selling Bitcoin on Cash App gives you the flexibility to convert your Bitcoin holdings into traditional currency whenever you need it. Whether you want to cash out your profits or cover expenses, Cash App allows for quick and hassle-free transactions.
Now that you know how to buy and sell Bitcoin on Cash App, let’s move on to the next sections where we will explain how to send and receive Bitcoin within Cash App, as well as how to transfer Bitcoin to an external wallet if needed.
Sending Bitcoin from Cash App
Sending Bitcoin to others within Cash App is a seamless and straightforward process. Follow these steps to send Bitcoin from your Cash App account:
- Open the Cash App on your device and log in to your account.
- Tap on the “Investing” icon at the bottom of the screen to access the investing menu.
- Select the “Bitcoin” option.
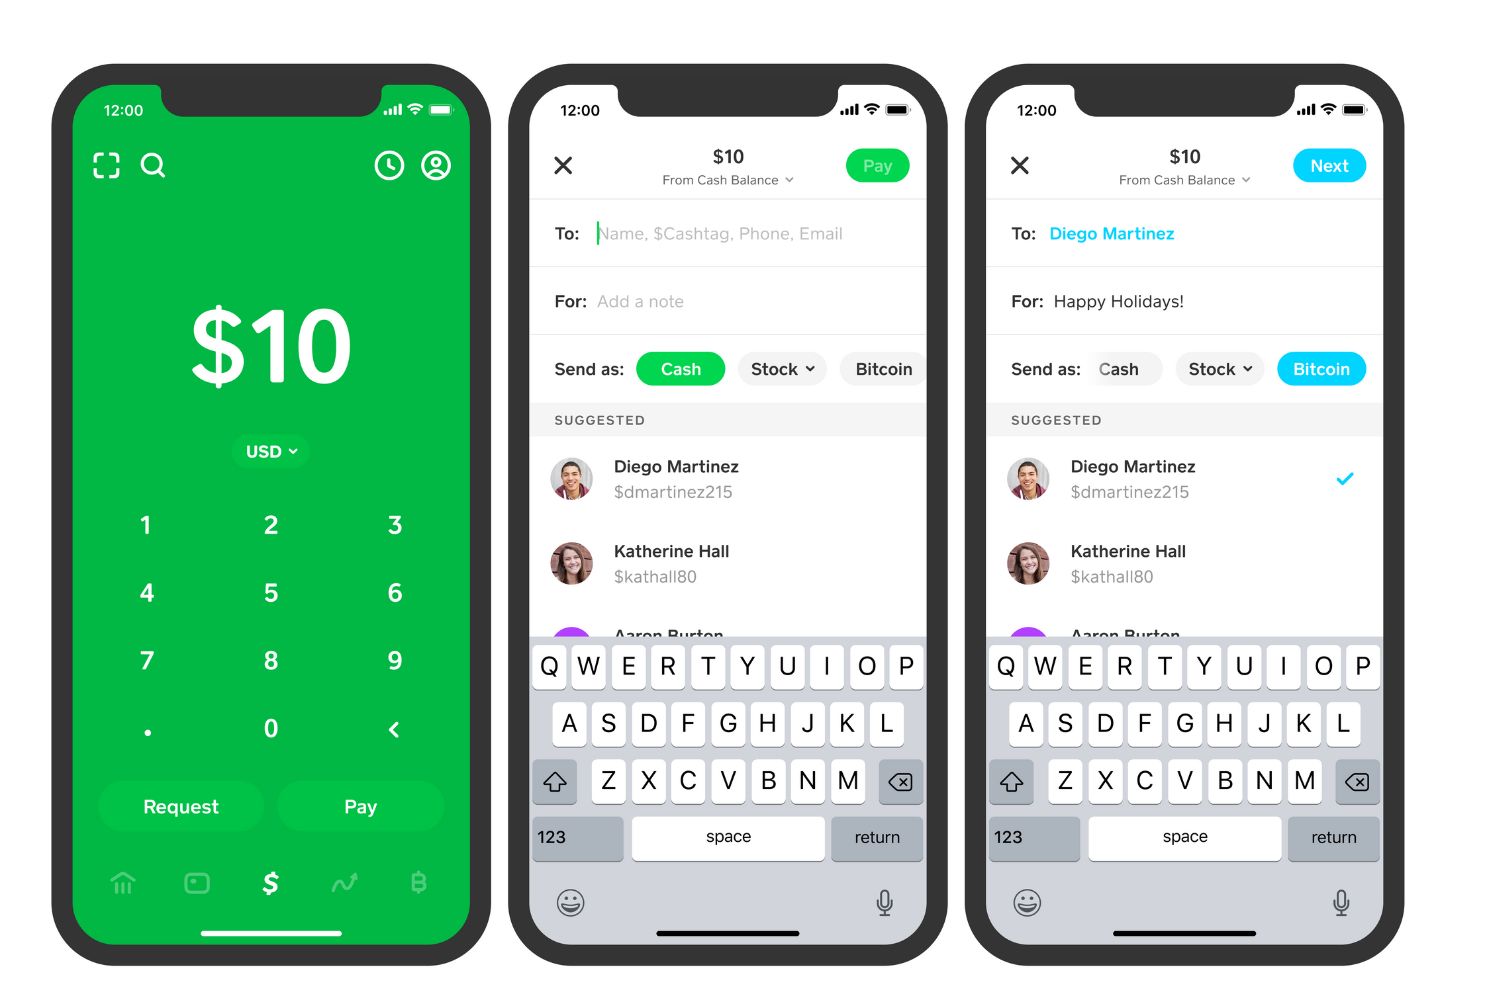
- Tap on the “Send” button.
- Enter the recipient’s Bitcoin address or scan their Bitcoin QR code.
- Double-check the address or QR code to ensure accuracy.
- Enter the amount of Bitcoin you wish to send.
- Review the transaction details, including the Bitcoin amount, current price, and fees (if applicable).
- Tap on the “Confirm” button to proceed with the Bitcoin transfer.
- Wait for the transaction to be processed and confirmed on the blockchain network. This may take some time depending on network congestion.
- Once the transfer is complete, the recipient will receive the Bitcoin in their Cash App or external Bitcoin wallet.
When sending Bitcoin, it’s crucial to ensure the accuracy of the recipient’s Bitcoin address. Double-check the address or use a QR code scanner to eliminate any risk of sending Bitcoin to the wrong address.
Now that you know how to send Bitcoin within Cash App, let’s explore the process of receiving Bitcoin on Cash App in the next section.
Receiving Bitcoin on Cash App
Receiving Bitcoin on Cash App is a simple process that allows you to accept Bitcoin from others directly into your Cash App account. Here’s how you can receive Bitcoin on Cash App:
- Open the Cash App on your device and log in to your account.
- Tap on the “Investing” icon at the bottom of the screen to access the investing menu.
- Select the “Bitcoin” option.
- Tap on the “Receive” button.
- You will be provided with a Bitcoin address and a QR code.
- Share the Bitcoin address or QR code with the person who is sending you Bitcoin.
- Make sure to provide them with the correct information to ensure accurate and secure transfer.
- Once the sender initiates the Bitcoin transfer to your address, you will see the incoming Bitcoin transaction in your Cash App account.
Receiving Bitcoin on Cash App is fast and convenient. Whether you’re receiving Bitcoin for commerce, payment, or personal transactions, Cash App provides a seamless experience for accepting and managing your digital assets.
Now that you know how to receive Bitcoin on Cash App, let’s explore the process of sending Bitcoin to an external wallet if needed.
Sending Bitcoin to an external wallet
If you want to transfer your Bitcoin from Cash App to an external wallet, you have the flexibility to do so. Follow these steps to send Bitcoin from Cash App to an external wallet:
- Open the Cash App on your device and log in to your account.
- Tap on the “Investing” icon at the bottom of the screen to access the investing menu.
- Select the “Bitcoin” option.
- Tap on the “Withdraw Bitcoin” or “Transfer Out” option.
- You will be prompted to enter the recipient’s wallet address.
- Double-check the address to ensure accuracy and avoid sending Bitcoin to the wrong address.
- Enter the amount of Bitcoin you wish to send.
- Review the transaction details, including the Bitcoin amount and any applicable fees.
- Tap on the “Confirm” or “Send” button to initiate the transfer.
- Wait for the transfer to be processed and confirmed on the blockchain network. This may take some time depending on network congestion.
- Once the transfer is complete, the Bitcoin will be sent to the external wallet address you provided.
When sending Bitcoin to an external wallet, it’s important to remember that the transaction cannot be reversed. Double-check the recipient’s wallet address to ensure accuracy and take precautionary measures to safeguard your Bitcoin.
By transferring Bitcoin to an external wallet, you gain full control over your digital assets and can choose a wallet that aligns with your security preferences and needs.
Now that you know how to send Bitcoin to an external wallet, let’s move on to the next section where we will provide some safety and security tips for using Bitcoin on Cash App.
Safety and security tips for using Bitcoin on Cash App
When using Bitcoin on Cash App, it’s essential to prioritize safety and security to protect your digital assets. Follow these tips to enhance your security measures:
- Enable two-factor authentication (2FA): Enable 2FA on your Cash App account to add an extra layer of security. This will require a verification code in addition to your password when logging in or making transactions.
- Use a strong, unique password: Create a strong and unique password that combines letters, numbers, and special characters. Avoid using easily guessable information or reusing passwords from other accounts.
- Be cautious of phishing attempts: Be wary of any suspicious emails, links, or messages that request your Cash App account information. Cash App will never ask for your account details outside of the app. Avoid clicking on suspicious links and only download the Cash App from official sources.
- Keep your app up to date: Regularly update your Cash App to ensure you have the latest security patches and features. These updates often include important security enhancements.
- Verify transactions before confirming: Always double-check the transaction details, including the recipient’s address and the amount of Bitcoin, before confirming any Bitcoin transactions. Once a Bitcoin transaction is confirmed, it cannot be reversed.
- Secure your device: Keep your mobile device secure by setting up a unique lock screen password or biometric authentication. This will help protect your Cash App account and Bitcoin holdings in case your device is lost or stolen.
- Keep your recovery phrase safe: Cash App provides a recovery phrase that can be used to restore your account if needed. Make sure to keep this phrase in a safe place and never share it with anyone.
- Monitor your account activity: Regularly review your Cash App account activity for any unauthorized transactions. If you notice any suspicious activity, report it to Cash App support immediately.
By following these safety and security tips, you can minimize the risk of unauthorized access to your Cash App account and protect your Bitcoin holdings from potential threats.
Now that you’re familiar with the safety and security measures, you can confidently navigate the world of Bitcoin on Cash App. Ensure that you stay updated with the latest security practices and exercise caution in your Bitcoin transactions.
Conclusion
Congratulations! You have learned how to enable and use the Bitcoin feature on Cash App. With Cash App’s integration of Bitcoin, you now have a convenient and user-friendly platform that allows you to buy, sell, and hold Bitcoin directly from your mobile device.
We covered the step-by-step process of setting up a Cash App account, verifying your identity, adding funds, and enabling the Bitcoin feature. We also explained how to buy and sell Bitcoin on Cash App, as well as how to send and receive Bitcoin within the app. Additionally, we provided guidance on sending Bitcoin to an external wallet and shared some important safety and security tips for using Bitcoin on Cash App.
As you continue your Bitcoin journey on Cash App, always prioritize safety and security by enabling 2FA, using a strong password, and monitoring your account activity. Be cautious of phishing attempts and ensure that you verify transactions before confirming them. These measures will help safeguard your Bitcoin investments and protect your Cash App account.
Remember, the world of Bitcoin is dynamic, and it’s important to stay informed about the latest trends, regulations, and security practices. Stay curious, educate yourself, and explore the endless possibilities that Bitcoin offers.
Now that you have the knowledge and tools to navigate Bitcoin on Cash App, it’s time to dive in and make the most out of this transformative technology. Start small, familiarize yourself with the features, and gradually explore more advanced functionalities.
With Cash App and your newfound understanding of Bitcoin, you are well-equipped to embrace the exciting opportunities and potential that cryptocurrencies offer. Happy Bitcoin transactions, and best of luck on your journey!