How To Block Someone On Splitwise
Introduction
Splitwise is a popular expense-sharing app that simplifies the process of splitting bills and managing expenses among friends and groups. However, there may be instances where you come across individuals who you no longer wish to interact with or share expenses with on the platform. In such cases, blocking someone on Splitwise can help maintain privacy and avoid potential conflicts.
Blocking someone on Splitwise restricts their access to your account and prevents them from viewing your shared expenses, sending you messages, or initiating transactions with you. It gives you control over who can interact with you on the platform, ensuring a more comfortable and stress-free experience.
In this guide, we will walk you through the step-by-step process of blocking someone on Splitwise, allowing you to take control of your connections and maintain a positive user experience. Whether you have had a falling out with a friend or simply prefer to limit your interactions with someone, blocking them on Splitwise is a straightforward way to protect your privacy and peace of mind.
How To Block Someone On Splitwise
Step 1: Open Splitwise App
The first step to blocking someone on Splitwise is to access the Splitwise app on your mobile device. Ensure that you have downloaded and installed the latest version of the app from the App Store if you are an iOS user or from the Google Play Store if you are an Android user.
Once the app is installed on your device, locate the Splitwise icon on your home screen or app drawer and tap on it to launch the app. Wait for the app to load and log in to your Splitwise account using your credentials. If you do not have an account yet, you can create one by following the sign-up process within the app.
After signing in, you will be directed to the home screen of the Splitwise app, where you can see a summary of your expenses and recent activity. Now that you have successfully opened the Splitwise app, you are ready to proceed to the next step of blocking someone on the platform.
How To Block Someone On Splitwise
Step 2: Go to the “Settings” Menu
Once you are logged into the Splitwise app, navigate to the “Settings” menu. To access the settings, look for the icon that resembles three horizontal lines or bars. This icon is commonly located in the top-left or bottom-right corner of the app, depending on your device and operating system.
Tap on the settings icon to open the “Settings” menu. Here, you will find a range of options to customize your Splitwise experience and manage your account settings. The “Settings” menu is where you can make changes to your account information, notification preferences, and more.
Scroll through the options in the “Settings” menu until you find the relevant section. The location of the option may vary slightly depending on the version of the app you are using, but it is usually labeled as “Account Settings” or “Privacy Settings.”
Once you locate the appropriate section, tap on it to proceed to the next step. You are now one step closer to blocking someone on Splitwise and taking control of your interactions on the platform.
How To Block Someone On Splitwise
Step 3: Select “Friends & Groups”
In order to block someone on Splitwise, you need to navigate to the “Friends & Groups” section within the app’s settings. This section allows you to manage your connections on the platform and control who you interact with.
From the “Settings” menu, scroll down until you find the option labeled as “Friends & Groups.” This option is typically located towards the middle or bottom of the list, but the exact placement may vary depending on the version of the app you are using.
Tap on “Friends & Groups” to access the section and view your current connections on Splitwise. Here, you will find a list of the friends and groups you have added to your account. This is where you can manage your friends, including blocking or unblocking specific individuals.
It’s important to note that blocking someone on Splitwise will only affect your interactions with them on the platform. It does not block or restrict them from other communication channels outside of Splitwise.
Once you have selected the “Friends & Groups” option, you are ready to proceed to the next step of blocking someone and ensuring a more personalized experience on Splitwise.
How To Block Someone On Splitwise
Step 4: Find the Person You Want to Block
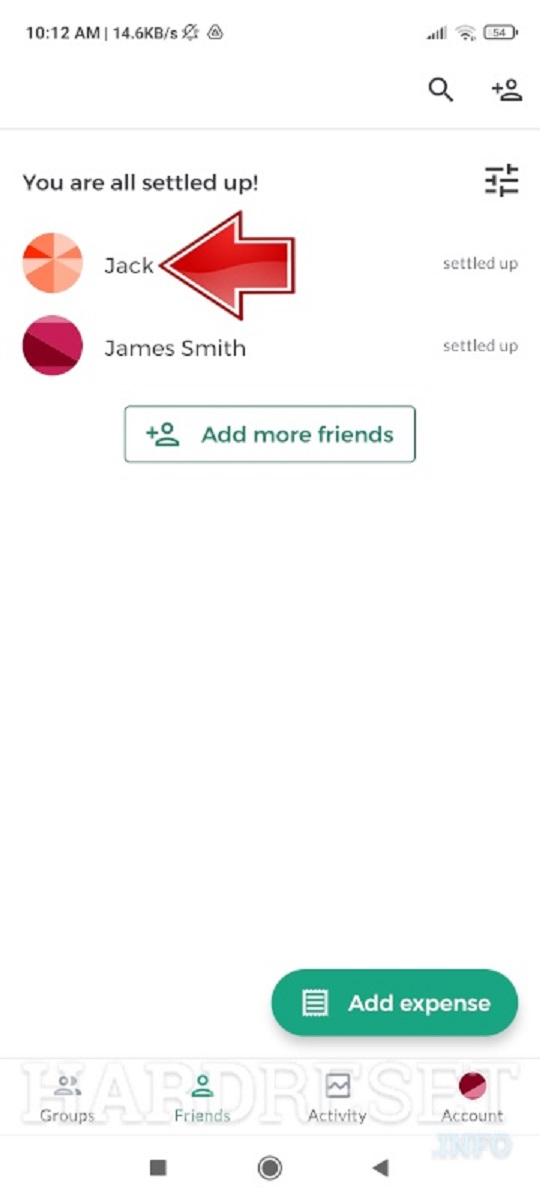
After accessing the “Friends & Groups” section in Splitwise settings, you will be able to view the list of your friends and groups. To block someone, you need to locate the person you want to block from your connections.
Scroll through the list and look for the individual you wish to block. You can identify them by their name or profile picture. If you have a long list of friends, you may find it helpful to use the search or filter options provided by the app to quickly locate the person you have in mind.
Once you have found the person you want to block, tap on their name to access their profile. This will allow you to view more details about the person and the shared expenses you have with them. Take a moment to ensure that you have identified the correct individual before proceeding to the next step.
Keep in mind that blocking someone on Splitwise should be done thoughtfully and for valid reasons. Blocking should be a last resort option when you want to maintain privacy or distance yourself from certain individuals within the app.
Now that you have successfully located the person you want to block, you are ready to proceed to the next step and prevent further interactions with them on Splitwise.
How To Block Someone On Splitwise
Step 5: Block the Person
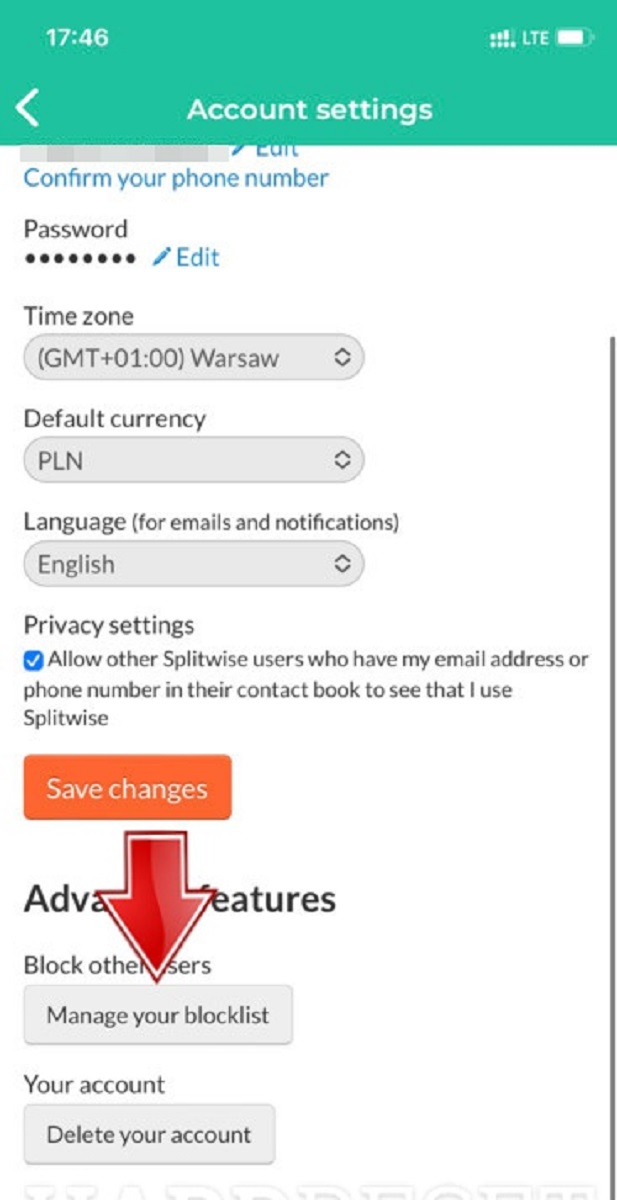
Once you have selected the profile of the person you want to block, you are just a few steps away from restricting their access on Splitwise. To block the person, look for the “Block” option within their profile page.
The placement of the “Block” option may vary depending on the version of the app. It is usually displayed prominently, allowing you to easily identify and activate the block feature. Tap on the “Block” option to proceed with blocking the person.
After selecting the “Block” option, a confirmation message may appear, informing you about the consequences of blocking someone. This message typically includes details about the actions that will be restricted for the blocked person, such as viewing your expenses or sending you messages.
Read the confirmation message carefully to ensure that you understand the implications of blocking the person. If you still wish to proceed, follow the prompts or select the “Block” button to confirm your decision.
Once the block is in effect, the person will no longer be able to view your shared expenses, send messages to you, or initiate transactions with you. You will also be unable to perform these actions with the blocked person. This ensures that your interactions and privacy within the Splitwise app are protected.
Congratulations! You have successfully blocked the person on Splitwise, giving yourself more control over your connections and personal space within the app.
How To Block Someone On Splitwise
Step 6: Confirm the Block
After selecting the “Block” option and understanding the consequences, you may need to confirm the block to ensure that it is applied successfully. Depending on the version of the Splitwise app, this step may be automated or require your confirmation.
In some cases, confirming the block may involve clicking on a “Confirm” or “Block” button to finalize your decision. This step is important to prevent accidental blocks and to ensure that you are intentionally blocking the person from your Splitwise connections.
Once you have confirmed the block, the person will be officially blocked within the Splitwise app. You will no longer have any interactions or shared expenses with them, and they will not be able to access your account or contact you through the platform.
It is important to note that blocking someone on Splitwise does not remove any previous expenses or transactions you had with them. The blocked person will still be able to see the historical data of expenses shared in the past, but they will not have access to any new or future updates.
Remember that blocking is a measure that should be used judiciously and for valid reasons. If you no longer wish to block the person or want to unblock them in the future, you can follow similar steps within the settings of the Splitwise app to reverse the block.
By confirming the block, you have successfully managed your connections on Splitwise and created a more personalized and comfortable experience within the app.
How To Block Someone On Splitwise
Conclusion
Blocking someone on Splitwise can provide a sense of control and privacy within the app, allowing you to manage your connections and interactions according to your preferences. By following the step-by-step process outlined in this guide, you can effectively block someone and ensure a more comfortable experience on Splitwise.
Remember that blocking should be done thoughtfully and for valid reasons. It is a decision that should be considered carefully, as it restricts the person’s access to your shared expenses and communication within the app.
If you ever decide to unblock someone you have previously blocked, you can easily do so by following similar steps within the Splitwise app settings. This allows you to adjust your connections and interactions on the platform as needed.
By taking advantage of the blocking feature on Splitwise, you can maintain privacy, avoid unnecessary conflicts, and create a more personalized experience within the app. Whether you need to distance yourself from certain individuals or simply want to have more control over who can access your shared expenses, blocking someone on Splitwise empowers you to do so.
We hope that this guide has provided you with clear and concise instructions on how to block someone on Splitwise. Follow these steps and enjoy a smoother and more enjoyable experience on the app.