Introduction
Welcome to the world of convenient and secure online payments with the Payoneer Prepaid Mastercard. Whether you are a freelancer, an e-commerce entrepreneur, or simply someone who needs a hassle-free international payment solution, the Payoneer Prepaid Mastercard is your ticket to a seamless financial experience.
With the Payoneer Prepaid Mastercard, you can receive payments from clients and marketplaces worldwide, withdraw cash at ATMs, shop online or in-store, and even make payments to other Payoneer users. It offers a variety of features, including low fees, competitive exchange rates, and the ability to hold multiple currencies.
Applying for a Payoneer Prepaid Mastercard is a straightforward process that can be completed online, saving you time and effort. In this guide, we will walk you through the steps to successfully apply for and activate your Payoneer Prepaid Mastercard, enabling you to manage your funds with ease and convenience.
Before we dive into the application process, it’s worth mentioning that the Payoneer Prepaid Mastercard is not available to everyone. Eligibility requirements may vary depending on your country of residence and the services you provide. To check if you meet the criteria, visit the Payoneer website and review their guidelines.
Now, let’s get started on your journey to obtain a Payoneer Prepaid Mastercard, opening doors to endless financial possibilities!
Step 1: Go to the Payoneer website
To apply for a Payoneer Prepaid Mastercard, the first step is to visit the official Payoneer website. Open your preferred web browser and type in the web address: www.payoneer.com. Press the “Enter” key, and you will be directed to the Payoneer homepage.
The Payoneer website is designed to provide a user-friendly experience, making it easy to navigate and find the information you need. On the homepage, you will find an array of options and features tailored to different user profiles. Take a moment to explore the various sections, including “Solutions,” “Pricing,” and “Resources,” to familiarize yourself with the platform.
As you browse the website, you will come across testimonials, success stories, and informative blog articles that showcase the benefits and capabilities of the Payoneer Prepaid Mastercard. These resources can be helpful in understanding how the card can cater to your specific needs.
In addition to the desktop version, Payoneer also offers a mobile app for iOS and Android devices. This allows you to manage your account, view transactions, and access customer support conveniently from your smartphone or tablet. If you prefer to use mobile devices, make sure to download the Payoneer app from the App Store or Google Play.
Once you have familiarized yourself with the Payoneer website and its features, you are ready to move on to the next step of the application process. Keep reading to learn how to create your Payoneer account and begin your journey towards obtaining a Payoneer Prepaid Mastercard.
Step 2: Click on “Sign Up”
After accessing the Payoneer website, the next step in applying for a Payoneer Prepaid Mastercard is to locate the “Sign Up” button. This button is typically located at the top right corner of the homepage or in the main navigation menu. Click on it to begin the registration process.
Upon clicking “Sign Up,” you will be directed to the registration page where you will need to provide your personal details. This information is necessary for creating your Payoneer account and initiating the application process for your Prepaid Mastercard.
Prior to filling out the registration form, it is recommended that you read and understand Payoneer’s terms and conditions. These terms outline the rights and responsibilities associated with using the Payoneer services, ensuring that you are fully informed before proceeding.
Once you are ready, you can start entering your personal details into the registration form. The form will typically request information such as your full name, email address, date of birth, phone number, and residential address. Make sure to double-check the accuracy of the information before proceeding to the next step.
In addition to personal details, you will also be prompted to create a username and password for your Payoneer account. It is advisable to choose a strong and unique password to enhance the security of your account. Payoneer may also require you to answer security questions as an extra layer of protection for your account.
Once all the required information has been filled in, review the information one more time to ensure its accuracy. Payoneer places great emphasis on the accuracy and integrity of the information provided, so it is crucial to avoid any mistakes or typographical errors.
Once you are confident that all the information is correct, click on the “Next” button to proceed to the next step of the application process. In the following steps, you will be required to complete the Payoneer application, provide identification documents, and await approval for your Prepaid Mastercard.
Step 3: Fill out the registration form
After clicking on “Sign Up” on the Payoneer website, you will be directed to the registration form. This form is where you will provide essential details to complete the application process and create your Payoneer account.
The registration form will typically require information such as your full name, email address, date of birth, phone number, and residential address. It is important to provide accurate and up-to-date information to ensure a smooth application process. Payoneer places great emphasis on the integrity of the information provided, and any discrepancies may delay the approval of your account.
When filling out the form, be aware of any red asterisks (*) next to certain fields, as they indicate mandatory information that must be provided. This includes fields such as your full name and email address.
In addition to personal information, you will be required to create a username and password for your Payoneer account. It is crucial to choose a strong password that is unique and not easily guessable. This helps to protect your account and ensure the security of your financial transactions.
Payoneer may also prompt you to select security questions and provide answers as an added layer of protection for your account. These security questions will be used to verify your identity when accessing your account or contacting customer support.
Take your time to carefully review the information you have provided in the registration form. Ensure that all details are accurate and free of errors. Mistakes can lead to delays in the approval process and may even result in account suspension.
Once you are satisfied that all the information is correct, click on the “Next” or “Continue” button to proceed to the next step of the application process. In the upcoming steps, you will be asked to complete the Payoneer application, provide necessary identification documents, and submit your application for review.
Step 4: Verify your email address
After filling out the registration form on the Payoneer website, an important step in the application process is to verify your email address. Verifying your email is essential for account security and to ensure that you receive important notifications and updates from Payoneer.
Upon completing the registration form, Payoneer will send you an email to the address you provided during the registration process. This email will contain a verification link or a verification code that you need to click or enter to confirm your email address.
To verify your email address, access your email account and locate the email from Payoneer. It is recommended to check your spam or junk folder if you do not see the email in your inbox. Sometimes, email providers may mistakenly categorize automated messages as spam.
Open the email from Payoneer and look for the verification link or the verification code provided. Click on the verification link or enter the verification code in the designated field on the Payoneer website. This step confirms that you have access to the email address provided during the registration process.
Verifying your email address is an essential security measure to protect your Payoneer account from unauthorized access. It also ensures that you receive important communication, such as updates on your application status or any changes to Payoneer policies.
After successfully verifying your email address, you can proceed to the next steps of the application process, which involve completing the Payoneer application, providing identification documents, and submitting your application for review. Verifying your email is a quick and simple step that paves the way for a seamless application process for your Payoneer Prepaid Mastercard.
Step 5: Complete the Payoneer application
After verifying your email address, the next step in obtaining a Payoneer Prepaid Mastercard is to complete the Payoneer application. The application form gathers additional information about your business or personal details to assess your eligibility for a Payoneer account and Prepaid Mastercard.
The application form may ask for details such as your business name (if applicable), website (if applicable), estimated monthly revenue, and the primary purpose of using the Payoneer services. Make sure to provide accurate and honest information to avoid any issues with your application.
In addition to these details, the application form may also require you to answer questions related to your business or occupation, such as your industry, target audience, and the types of services or products you offer. Providing comprehensive and honest answers will help Payoneer better understand your business and tailor the account features to your needs.
If you are applying as an individual for personal use, the application may ask for information such as your employment status, reasons for using Payoneer, and any previous payment solutions you have used. Answer these questions truthfully to ensure a smooth application process.
Payoneer may also request additional information or supporting documents to verify your identity or business details. This could include documents such as a government-issued ID, proof of address, or business registration certificates. Follow the instructions provided by Payoneer and provide the required documents promptly to avoid delays in the approval process.
Take your time to carefully review each section of the application form before submitting it. Ensure that all the information provided is accurate, up-to-date, and complete. Double-check for any spelling errors or missing details that could hinder the approval process.
Once you are satisfied with the information provided, click on the “Submit” or “Finish” button to submit your application to Payoneer for review. Payoneer will assess your application based on the information provided and determine your eligibility for a Payoneer Prepaid Mastercard.
After completing the Payoneer application, the next step is to provide the necessary identification documents as part of the verification process. Read on to learn more about this crucial step in obtaining your Payoneer Prepaid Mastercard.
Step 6: Provide identification documents
Once you have submitted your Payoneer application, the next step in obtaining a Payoneer Prepaid Mastercard is to provide identification documents. Payoneer requires these documents to verify your identity and comply with regulatory requirements.
When it comes to identification documents, Payoneer typically requests a government-issued ID, such as a passport, national ID card, or driver’s license. The document must be valid and legible, with your name, photo, and date of birth clearly visible.
If you are applying as a business, you may also be required to provide additional documents, such as your business registration certificate, tax identification number, or proof of address for the business premises. Payoneer may have specific guidelines regarding the types of documents accepted, so read the instructions carefully to ensure compliance.
To provide the identification documents, Payoneer usually offers two options:
- Upload the documents directly on the Payoneer website: This method allows you to scan or take a clear photo of your identification documents using a smartphone or scanner. Save the documents in a supported file format (such as JPG or PDF) and upload them securely on the Payoneer website.
- Send the documents via email: In some cases, Payoneer may request that you send the identification documents via email. Ensure that the email is sent from the email address associated with your Payoneer account for proper identification.
When submitting your identification documents, it is crucial to ensure that they are clear, complete, and free from any alterations or modifications. Any tampering or unclear information may lead to delays in the approval process or a request for additional documentation.
Payoneer takes security and privacy seriously, so rest assured that your identification documents will be handled securely and in compliance with applicable data protection regulations. Payoneer will only use your documents for the purpose of verifying your identity and ensuring regulatory compliance.
Once you have uploaded or submitted the required identification documents, the Payoneer team will review them and verify your identity. Typically, this process takes a few business days, but it may vary depending on the volume of applications and the complexity of the documents.
Continue reading to learn about the next steps in the application process, including the submission of your application and the waiting period for approval of your Payoneer Prepaid Mastercard.
Step 7: Submit the application
After completing all the necessary steps, it’s time to submit your Payoneer application. This step is crucial in the process of obtaining a Payoneer Prepaid Mastercard.
Before submitting your application, take a moment to review all the information you have provided. Make sure that all the details are accurate, up-to-date, and complete. Double-check for any spelling errors or missing information that may hinder the approval process.
Once you are confident that everything is correct, click on the “Submit” or “Finish” button to formally submit your application to Payoneer. This action indicates that you have completed all the required steps and are ready for Payoneer to review your application.
After submitting your application, Payoneer will initiate the process of evaluating your eligibility for a Payoneer Prepaid Mastercard. This evaluation typically includes a review of your application details, verification of your identification documents, and compliance checks with regulatory requirements.
The time it takes for Payoneer to review and approve your application may vary depending on various factors, including the volume of applications received and the complexity of the verification process. Generally, you can expect to receive a response within a few business days.
During the review process, Payoneer may reach out to you if further information or clarification is needed. If such a situation arises, ensure that you respond promptly and provide the requested information to avoid any unnecessary delays in the approval process.
Payoneer prioritizes the security and privacy of your application and personal information. Rest assured that your data will be handled securely and in compliance with relevant data protection regulations.
While you wait for the approval of your application, it’s a good time to familiarize yourself with the features, benefits, and offers associated with the Payoneer Prepaid Mastercard. This will enable you to maximize the advantages of the card and enhance your financial management capabilities.
Continue reading to learn about the final steps in the process, including the activation of your Payoneer Prepaid Mastercard and the benefits it offers.
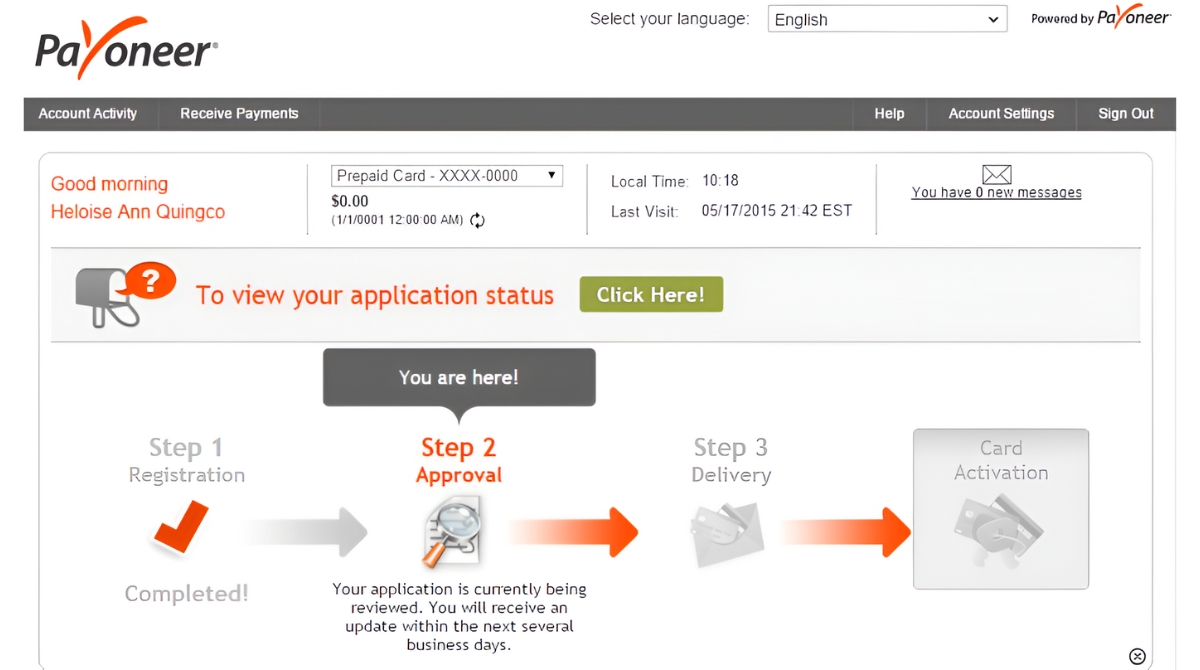
Step 8: Wait for approval
After submitting your application, the next step in obtaining a Payoneer Prepaid Mastercard is to patiently wait for approval. Payoneer will review and assess your application to determine your eligibility for the card, taking into consideration various factors including your application details, identification documents, and compliance with regulatory requirements.
The time it takes for Payoneer to review and approve your application can vary, as it depends on factors such as the volume of applications received and the complexity of the verification process. Generally, you can expect to receive a response within a few business days.
While you wait for the approval of your application, it’s important to regularly check your email for any updates or communication from Payoneer. Payoneer may reach out to you if they require further information or clarification regarding your application.
If Payoneer does request additional information, promptly provide the requested documents or details to avoid any unnecessary delays in the approval process. Responding to Payoneer’s queries in a timely manner helps to expedite the review process and ensures a smooth application experience.
During the waiting period, take the opportunity to familiarize yourself with Payoneer’s services, features, and benefits. Explore the Payoneer website or mobile app to gain a better understanding of how the Payoneer Prepaid Mastercard can assist you in managing your finances, receiving payments, and making transactions globally.
It’s worth noting that Payoneer values the security and privacy of your application and personal information. Rest assured that your data will be handled securely and in compliance with applicable data protection regulations.
Once Payoneer has completed the review process, you will receive a notification regarding the outcome of your application. If your application is approved, you will be one step closer to obtaining your Payoneer Prepaid Mastercard and enjoying its array of features and benefits.
If, unfortunately, your application is not approved, Payoneer will provide you with information on the reason for the decision. In some cases, you may have the opportunity to provide additional information or make corrections to your application to enhance your chances of approval in the future.
Remember to exercise patience during the waiting period and remain hopeful for a positive outcome. The next step in the process involves activating your Payoneer Prepaid Mastercard, which will allow you to start utilizing its benefits and managing your finances more efficiently.
Step 9: Activate your Payoneer Prepaid Mastercard
After receiving approval for your Payoneer Prepaid Mastercard, the final step is to activate it. Activation is necessary to start using your card for online and offline transactions, withdrawing cash from ATMs, and accessing the various features and benefits offered by Payoneer.
The activation process typically involves the following steps:
- Locate the activation instructions: Payoneer will provide you with clear instructions on how to activate your Prepaid Mastercard. This information can be found in the communication you received regarding the approval of your application. Make sure to read and follow the activation instructions carefully.
- Access your Payoneer account: To activate your card, you will need to log into your Payoneer account. Visit the Payoneer website or use the Payoneer mobile app to access your account. Enter your username and password to gain access.
- Find the activation option: Once you are logged into your account, navigate to the section or menu where the card activation option is located. This can vary depending on the Payoneer platform you are using.
- Enter the required information: Follow the prompts provided by Payoneer to complete the activation process. You may be required to enter details such as the 16-digit card number, the CVV code, and the expiration date of your Prepaid Mastercard. Double-check that all the information entered is accurate.
- Submit the activation request: After providing the required information, submit the activation request. Payoneer will process the request, and once the activation is successful, you will be notified that your card is now ready to use.
Once your Payoneer Prepaid Mastercard is activated, you can start taking advantage of its numerous benefits and features. These include making online and in-store purchases, receiving payments from clients and marketplaces worldwide, and withdrawing cash from ATMs that accept Mastercard.
Ensure that you familiarize yourself with Payoneer’s terms and conditions, as well as the fees and limits associated with using the Prepaid Mastercard. This will help you make informed decisions and maximize the advantages of your card.
Remember to keep your card and account information safe and secure. In case of any loss, theft, or suspicious activity, immediately notify Payoneer’s customer support to protect your funds and prevent unauthorized use of your Prepaid Mastercard.
Congratulations! By completing the activation process, you are now ready to embark on a seamless and convenient financial journey with your Payoneer Prepaid Mastercard.
Conclusion
Obtaining a Payoneer Prepaid Mastercard opens up a world of possibilities for convenient and secure online payments. By following the steps outlined in this guide, you can successfully apply for and activate your Payoneer Prepaid Mastercard, providing you with a seamless financial experience.
From visiting the Payoneer website and completing the registration form to verifying your email address and submitting the application, each step is essential in the process. Payoneer may require additional documents and information to verify your identity, so it’s important to provide accurate and up-to-date details throughout the application process.
Once you receive approval for your Payoneer Prepaid Mastercard, don’t forget to activate it. This final step allows you to unlock the card’s features and benefits, enabling you to make payments, receive funds, and manage your finances conveniently and securely.
Throughout the entire process, it’s crucial to remain patient and attentive. Payoneer’s review and approval process may take a few business days, so it’s important to regularly check your email for updates or requests for further information.
Remember to familiarize yourself with Payoneer’s terms and conditions, fees, and transaction limits. This knowledge will help you make informed decisions and get the most out of your Payoneer Prepaid Mastercard.
As you embark on your journey with the Payoneer Prepaid Mastercard, we hope it brings you convenience, security, and flexibility in managing your financial transactions. Whether you’re a freelancer, e-commerce entrepreneur, or a global professional, the Payoneer Prepaid Mastercard is designed to simplify your financial life and empower your international business endeavors.
Start the application process today and experience the world of seamless online payments with Payoneer Prepaid Mastercard!