Introduction
Welcome to the world of digital photography, where capturing moments is not just an art but also a science. As a proud owner of a Canon DSLR camera, you understand the power and precision of this sophisticated piece of technology. However, even the most advanced cameras are susceptible to a common nuisance known as sensor dust. This pesky issue can detract from the quality of your photographs, leading to frustrating post-processing efforts to remove unwanted spots and blemishes. Fear not, as this guide will equip you with the knowledge and techniques to effectively clean the sensor of your Canon DSLR camera.
A clean sensor is crucial for producing pristine images, free from distracting specks and smudges. Whether you are a seasoned professional or an enthusiastic amateur, maintaining a clean sensor is essential for achieving the best results from your Canon DSLR camera. By understanding the nature of sensor dust and following the proper cleaning procedures, you can ensure that your camera consistently delivers stunning, blemish-free images.
In the following sections, we will delve into the intricacies of sensor dust, explore the necessary preparations for sensor cleaning, and provide a step-by-step guide to safely and effectively clean the sensor of your Canon DSLR camera. Additionally, we will discuss the importance of testing the sensor after cleaning to verify the results. By the end of this comprehensive guide, you will have the confidence and expertise to keep your Canon DSLR camera's sensor in optimal condition, allowing you to focus on what truly matters – capturing unforgettable moments with precision and clarity. Let's embark on this journey to unlock the full potential of your Canon DSLR camera by mastering the art of sensor cleaning.
Understanding Sensor Dust
Before delving into the process of cleaning your Canon DSLR camera’s sensor, it’s essential to grasp the nature of sensor dust and its impact on your photographic endeavors. Sensor dust consists of tiny particles, such as dirt, lint, or pollen, that find their way onto the camera’s sensor over time. These minuscule intruders can result from changing lenses, environmental factors, or simply regular camera usage. Once settled on the sensor’s surface, these particles manifest as visible spots or blemishes in your images, especially when using narrow apertures or capturing uniform surfaces.
Understanding the implications of sensor dust is crucial for maintaining the quality of your photographs. These unwanted particles can mar the clarity and detail of your images, requiring time-consuming editing to remove them in post-processing. Moreover, they can be particularly conspicuous in areas of uniform color or brightness, detracting from the overall visual impact of your photographs. As a photographer, it’s imperative to recognize the signs of sensor dust and take proactive measures to address this common issue.
While sensor dust is an inevitable aspect of digital photography, its presence should not hinder your creative pursuits. By familiarizing yourself with the characteristics and consequences of sensor dust, you can appreciate the significance of regular sensor maintenance and cleaning. In the next section, we will discuss the essential preparations for sensor cleaning, laying the foundation for a systematic and effective approach to preserving the pristine condition of your Canon DSLR camera’s sensor.
Preparing for Sensor Cleaning
Before embarking on the sensor cleaning process, it is crucial to make thorough preparations to ensure a smooth and successful operation. The following steps will guide you through the essential measures to take before initiating the cleaning procedure for your Canon DSLR camera’s sensor:
- Choose a Controlled Environment: Select a clean and well-lit workspace for sensor cleaning. A controlled environment minimizes the risk of introducing additional dust or particles during the process.
- Fully Charge the Camera Battery: Ensure that your camera’s battery is fully charged to prevent any unexpected power loss during the sensor cleaning, which could lead to potential damage.
- Remove the Lens: Carefully detach the lens from your Canon DSLR camera, exposing the sensor for inspection and cleaning. Handle the lens and camera body with care to avoid introducing further contaminants.
- Activate the Sensor Cleaning Function: Utilize the built-in sensor cleaning function of your camera, if available, to engage the sensor’s internal vibration mechanism, dislodging loose particles before manual cleaning.
- Inspect the Sensor: Use a specialized sensor loupe or inspection tool to examine the sensor for visible dust or debris. Take note of the location and severity of any contaminants to inform your cleaning approach.
- Acquire the Necessary Cleaning Tools: Gather the essential tools for sensor cleaning, including a sensor cleaning kit with swabs, sensor-safe cleaning solution, and a blower brush. These tools are designed to facilitate safe and effective sensor maintenance.
- Exercise Patience and Precision: Approach sensor cleaning with patience and precision, as haste or carelessness can lead to unintended damage. Familiarize yourself with the camera’s manual and cleaning tools to ensure a methodical and meticulous approach.
By meticulously preparing for sensor cleaning and adhering to these fundamental guidelines, you can set the stage for a successful and stress-free sensor maintenance process. The next section will delve into the intricacies of cleaning the sensor of your Canon DSLR camera, empowering you with the knowledge and techniques to address sensor dust with confidence and precision.
Cleaning the Sensor
As you embark on the sensor cleaning process for your Canon DSLR camera, it’s essential to approach this task with caution and precision. Follow these step-by-step instructions to effectively clean the sensor and rid it of unwanted dust and particles:
- Prepare the Cleaning Tools: Ensure that you have the necessary sensor cleaning tools readily available, including sensor swabs, a sensor-safe cleaning solution, and a blower brush. These specialized tools are designed to facilitate safe and thorough sensor maintenance.
- Power Off the Camera: Turn off your Canon DSLR camera to prevent any accidental movement of the mirror or shutter during the cleaning process, which could lead to damage to the sensor or other internal components.
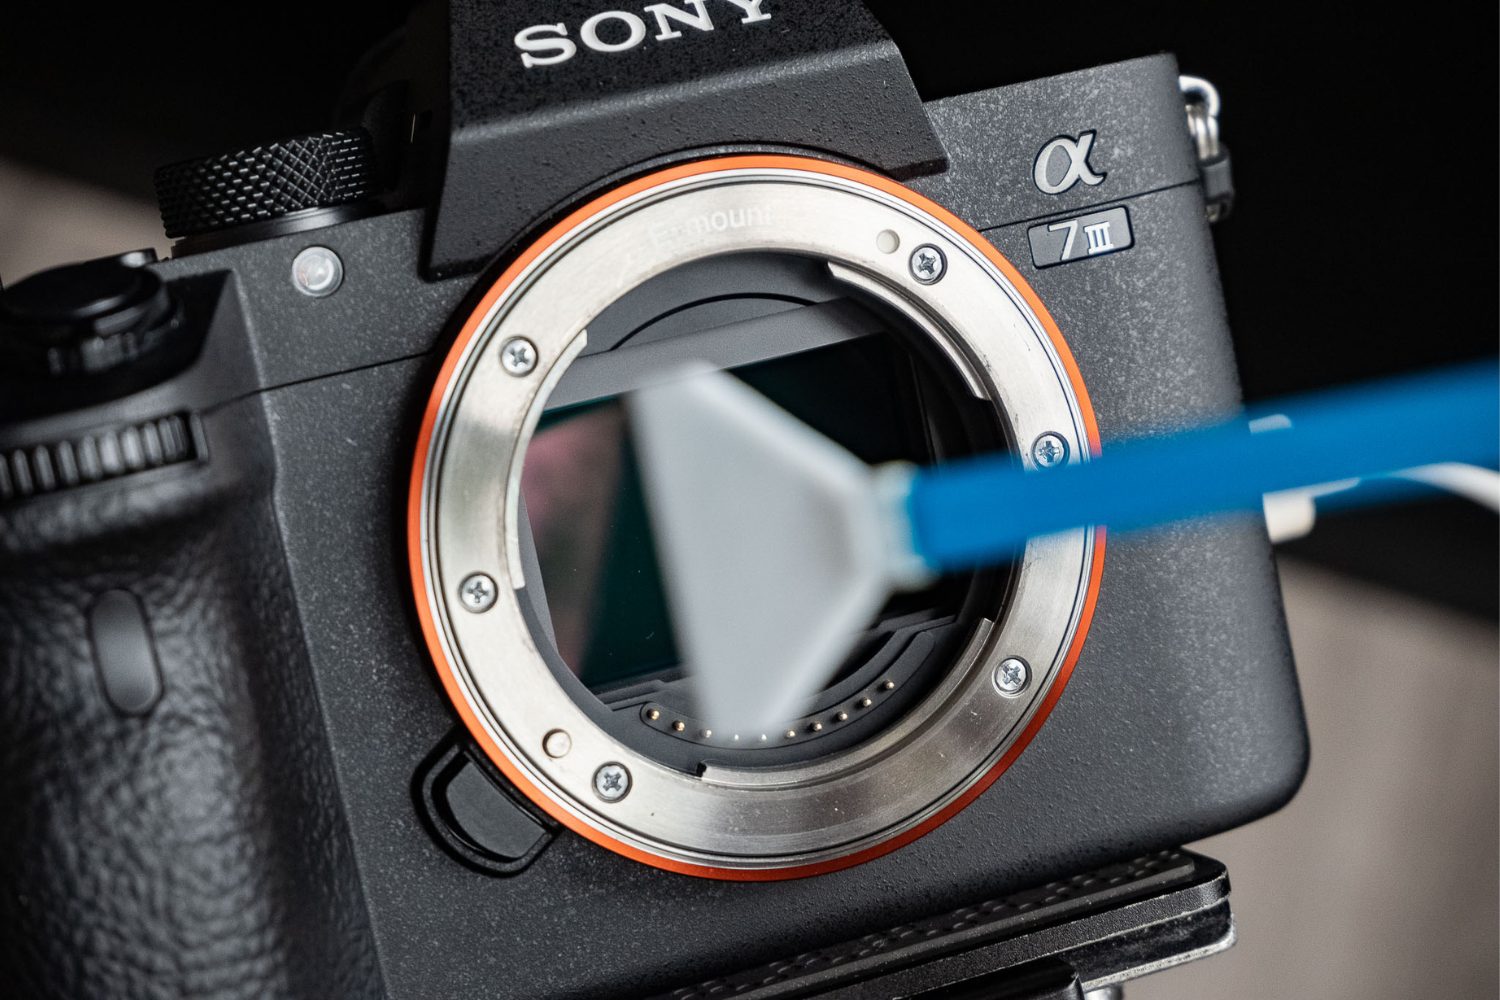
- Use a Blower Brush: Gently employ a blower brush to remove any loose dust or particles from the sensor’s surface. Exercise caution to avoid direct contact with the sensor, utilizing the blower brush to dislodge and expel debris effectively.
- Apply Sensor Cleaning Solution: With a steady hand, apply a minimal amount of sensor-safe cleaning solution to a sensor swab. Ensure that the swab is not excessively saturated to prevent any liquid from seeping into the camera body.
- Carefully Swipe the Sensor: With controlled and deliberate movements, lightly swipe the sensor with the dampened sensor swab, starting from one side and moving across to the other. Avoid applying excessive pressure and refrain from reusing the swab to prevent redistributing contaminants.
- Inspect the Sensor: After the cleaning process, use a sensor loupe or inspection tool to examine the sensor for any remaining dust or smudges. If necessary, repeat the cleaning procedure with a fresh swab to achieve optimal results.
- Reassemble the Camera: Once satisfied with the sensor’s cleanliness, carefully reattach the lens to your Canon DSLR camera, ensuring that the environment remains dust-free during reassembly.
By methodically following these steps and exercising precision and care throughout the sensor cleaning process, you can effectively mitigate the impact of sensor dust on your photographic endeavors. The next section will explore the crucial aspect of testing the sensor after cleaning, allowing you to verify the effectiveness of your cleaning efforts and ensure the optimal performance of your Canon DSLR camera’s sensor.
Testing the Sensor
After completing the sensor cleaning process for your Canon DSLR camera, it is imperative to conduct a thorough test to evaluate the effectiveness of the cleaning and ensure the sensor’s optimal functionality. The following steps will guide you through the essential procedures for testing the sensor and verifying the quality of your cleaning efforts:
- Select a Uniform Background: Set your camera to a narrow aperture and capture a series of test shots against a plain, evenly lit background. This approach facilitates the visibility of any remaining sensor dust or blemishes in the resulting images.
- Review the Test Images: Transfer the test images to your computer and meticulously inspect them at 100% magnification using image viewing software. Pay close attention to the presence of any visible spots, smudges, or irregularities that may indicate residual sensor dust.
- Zoom and Pan Across the Images: Zoom in and pan across the test images to thoroughly examine various areas of the frame for potential sensor dust artifacts. Take note of any anomalies and assess their impact on the overall image quality.
- Perform Image Editing Tests: If necessary, open the test images in image editing software and experiment with adjusting the contrast, exposure, and levels to reveal any hidden sensor dust. This process can unveil subtle imperfections that may not be immediately apparent in the unedited images.
- Repeat the Cleaning Process, if Required: If the test results reveal persistent sensor dust or smudges, consider repeating the sensor cleaning process using fresh cleaning tools and meticulous techniques. Address any remaining contaminants with precision and care to achieve optimal sensor cleanliness.
By diligently conducting these testing procedures and scrutinizing the test images with attention to detail, you can ascertain the efficacy of the sensor cleaning and address any residual sensor dust with confidence. Additionally, the testing phase empowers you to fine-tune your cleaning approach and maintain the sensor of your Canon DSLR camera in impeccable condition, ensuring consistently outstanding image quality.
Conclusion
Congratulations on mastering the art of sensor cleaning for your Canon DSLR camera. By gaining a comprehensive understanding of sensor dust, meticulously preparing for the cleaning process, and employing precise techniques to cleanse the sensor, you have equipped yourself with the knowledge and skills to maintain the optimal performance of your camera’s sensor.
As you navigate the realm of digital photography, the significance of sensor maintenance cannot be overstated. Regular sensor cleaning not only ensures the production of pristine, blemish-free images but also contributes to the longevity and reliability of your Canon DSLR camera. By adhering to the guidelines outlined in this comprehensive guide, you have embraced the responsibility of safeguarding the sensor’s integrity and preserving the exceptional image quality that your camera is capable of delivering.
Remember that sensor cleaning is a delicate process that demands patience, precision, and a keen eye for detail. By approaching this task with care and attentiveness, you are safeguarding the heart of your camera, allowing it to consistently capture the world around you with clarity and brilliance.
Embrace the testing phase as an opportunity to refine your sensor cleaning techniques and achieve an unparalleled level of sensor cleanliness. The meticulous evaluation of test images empowers you to detect and address any residual sensor dust, ensuring that your photographic endeavors are free from the distractions of unwanted blemishes and imperfections.
With your newfound expertise in sensor cleaning, you are poised to embark on a seamless photographic journey, capturing moments with unparalleled precision and clarity. By integrating sensor maintenance into your regular camera care routine, you are nurturing a symbiotic relationship with your Canon DSLR camera, allowing it to unleash its full potential with every click of the shutter.
As you continue to explore the boundless possibilities of digital photography, may your sensor remain pristine, your images immaculate, and your creative vision unencumbered by the nuisances of sensor dust. Here’s to capturing countless unforgettable moments with your impeccably maintained Canon DSLR camera.