Introduction
Welcome to the world of virtual drum machines! Whether you're a seasoned music producer or just starting out, using a drum machine VST (Virtual Studio Technology) can add depth, rhythm, and energy to your music compositions. These software-based drum machines offer a wide range of sounds, patterns, and features that can elevate your music production to new heights. In this guide, we'll explore the ins and outs of using a drum machine VST, from choosing the right one to creating captivating drum patterns and adding effects.
Drum machine VSTs are powerful tools that can emulate the sound and feel of traditional drum machines, offering an extensive library of drum kits, percussion instruments, and electronic beats. Whether you're aiming for the classic sound of analog drum machines or the modern punch of electronic beats, a drum machine VST provides a versatile platform for shaping your unique sound.
In the following sections, we'll delve into the essential aspects of using a drum machine VST, including selecting the right VST for your needs, setting it up within your digital audio workstation (DAW), understanding the interface, creating dynamic drum patterns, applying effects and processing, and exporting your drum tracks for use in your music projects.
By the end of this guide, you'll have a solid understanding of how to harness the full potential of a drum machine VST, allowing you to infuse your music with captivating rhythms and beats. So, let's dive in and explore the exciting world of drum machine VSTs, where creativity knows no bounds!
Choosing the Right Drum Machine VST
When it comes to selecting a drum machine VST, the options can be overwhelming. However, considering a few key factors can help you narrow down your choices and find the perfect fit for your music production needs.
Sound Quality: One of the most critical aspects to consider is the sound quality of the drum machine VST. Look for VSTs that offer high-definition samples, realistic drum sounds, and a diverse range of percussion instruments. The ability to customize and tweak the sound of each drum component is also a valuable feature to have.
Compatibility: Ensure that the drum machine VST is compatible with your digital audio workstation (DAW) and operating system. Most VSTs are designed to work seamlessly with popular DAWs such as Ableton Live, FL Studio, Logic Pro, and others. Checking for compatibility will save you from potential technical issues down the line.
Features and Flexibility: Consider the features offered by the drum machine VST, such as pattern sequencers, step sequencers, MIDI mapping, and automation capabilities. The flexibility to create and manipulate drum patterns with ease is essential for unleashing your creativity.
User Interface: A user-friendly interface can significantly impact your workflow. Look for a drum machine VST with an intuitive layout, clear controls, and easy navigation. A well-designed interface can streamline your music production process and inspire creativity.
Community and Support: Research the developer's reputation and the community surrounding the drum machine VST. Active user forums, regular updates, and responsive customer support can make a substantial difference in your experience with the VST, ensuring that any issues or queries are addressed promptly.
By carefully evaluating these factors and considering your specific music production requirements, you can make an informed decision when choosing a drum machine VST. Remember that the right VST can become an invaluable asset in shaping the sonic landscape of your music, so take the time to explore and select the VST that resonates with your creative vision.
Setting Up the Drum Machine VST
Once you’ve chosen the perfect drum machine VST for your music production, the next step is to set it up within your digital audio workstation (DAW) and integrate it seamlessly into your workflow. Here’s a step-by-step guide to help you get started:
Installation: Begin by installing the drum machine VST according to the developer’s instructions. This typically involves downloading the VST file and placing it in the appropriate folder on your computer. Once installed, open your DAW and locate the VST within the plugin instruments or effects section.
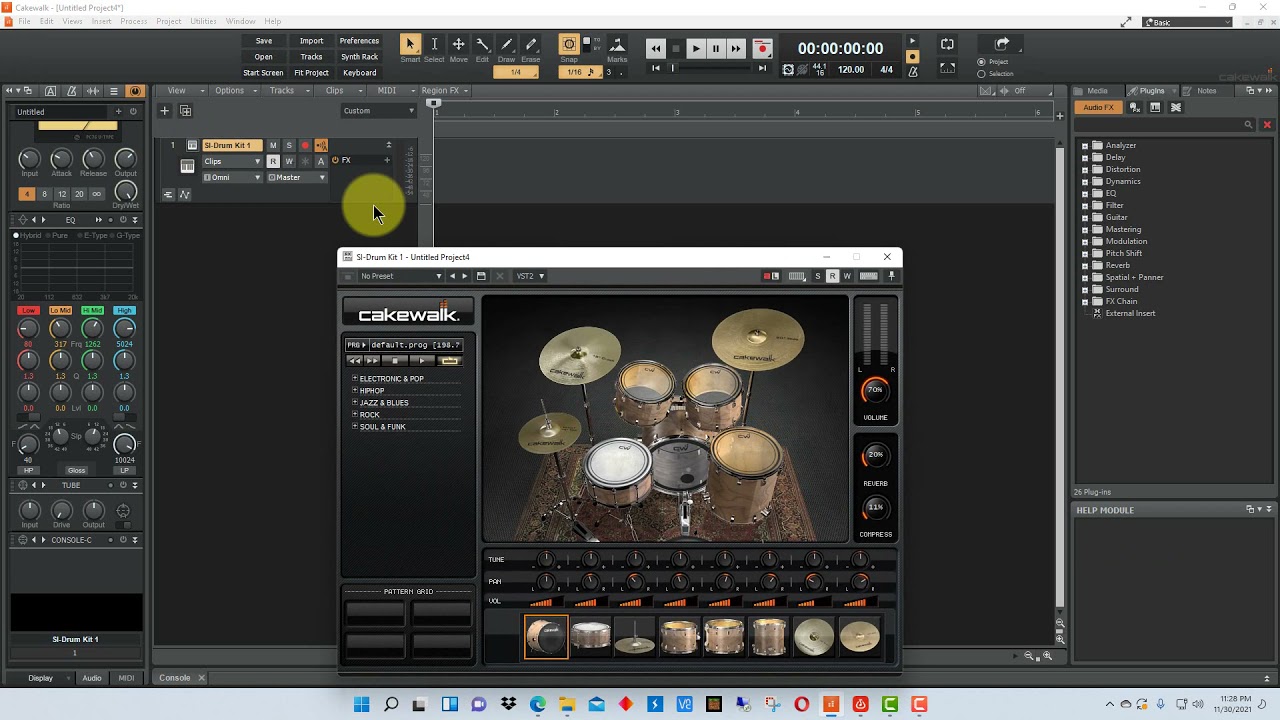
DAW Integration: Load the drum machine VST onto a new track within your DAW. Most DAWs allow you to add VST instruments as track inserts or send effects. Ensure that the VST is receiving MIDI input from your DAW and that audio output is routed correctly to your master channel or mixer.
Audio and MIDI Setup: Configure the audio and MIDI settings within your DAW to ensure that the drum machine VST is properly connected to your audio interface and MIDI controllers. This step is crucial for seamless communication between the VST and your hardware setup.
Library and Presets: Familiarize yourself with the drum machine VST’s library of drum kits, presets, and sound banks. Experiment with different kits to understand the range of sounds available and how they can complement your music style.
Mapping and Customization: If the drum machine VST allows for custom mapping of MIDI notes, take the time to map the drum sounds to your MIDI controller according to your preferences. This customization can enhance your performance and streamline the drum programming process.
By following these steps, you can effectively set up your chosen drum machine VST and prepare it for seamless integration into your music production workflow. A well-configured setup ensures that you can focus on creating captivating drum patterns and exploring the full potential of the VST without technical hindrances.
Understanding the Interface
Upon opening your chosen drum machine VST within your digital audio workstation (DAW), you’ll encounter an interface that serves as the control center for crafting dynamic drum patterns and shaping the sonic character of your beats. Understanding the various elements of the interface is essential for harnessing the full potential of the VST. Here’s a breakdown of the key components you’re likely to encounter:
Drum Kit Display: The interface typically features a visual representation of the drum kit, displaying each drum sound or instrument within the VST. This display allows you to see the arrangement of the drum components and select individual elements for editing.
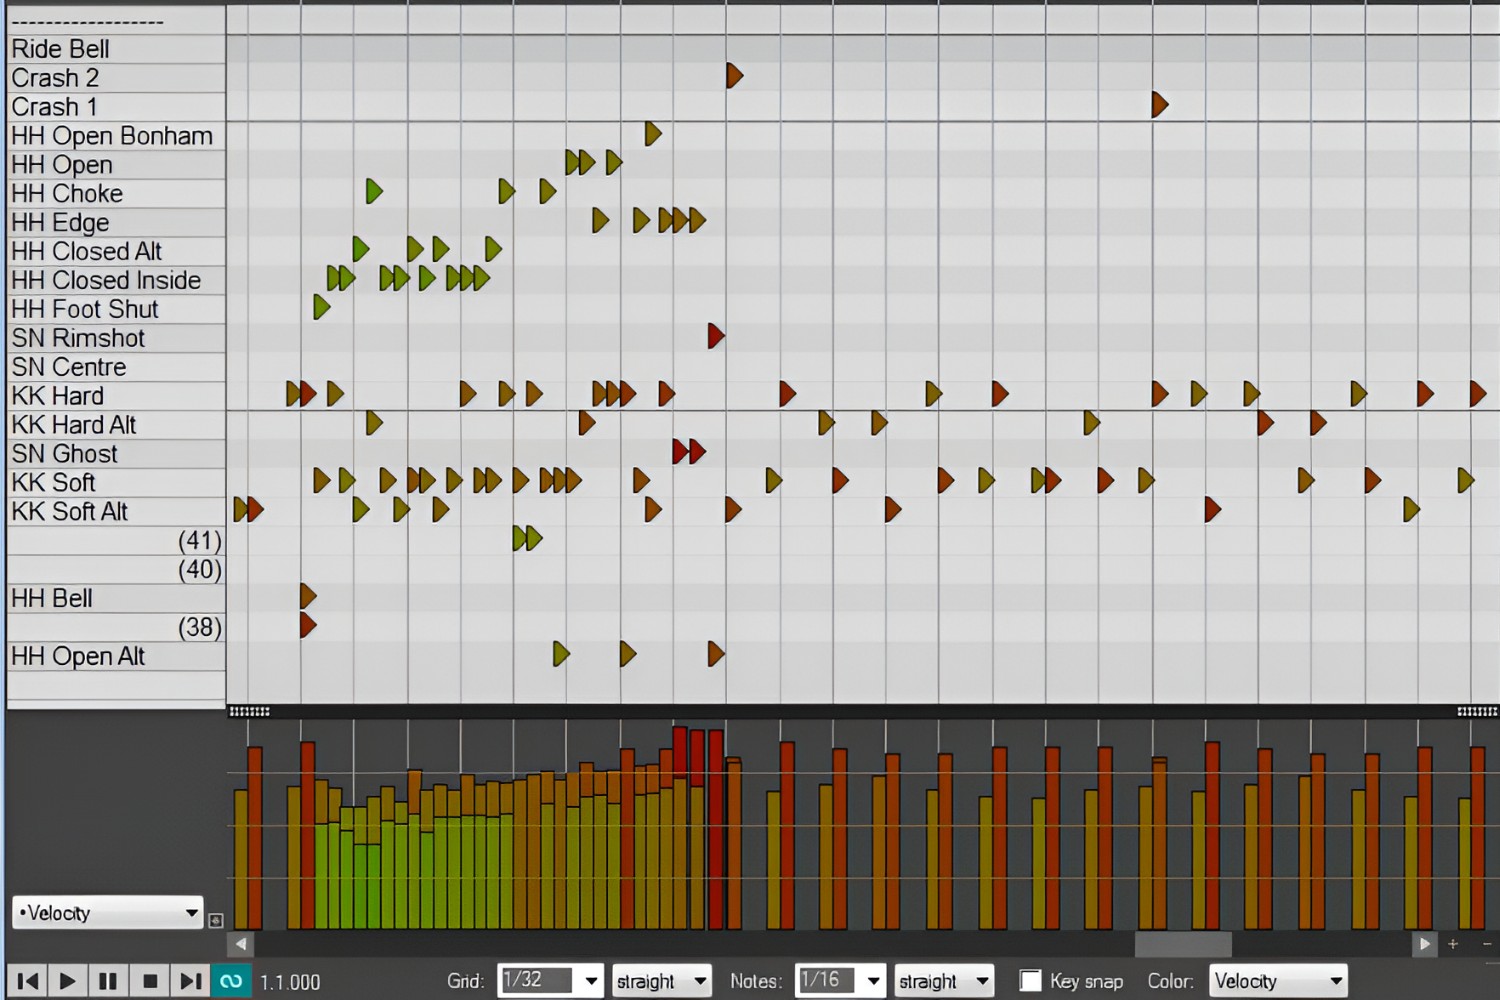
Pattern Sequencer: Many drum machine VSTs include a pattern sequencer, which enables you to arrange and sequence drum patterns in a grid-based layout. This intuitive interface allows for the creation of complex rhythm patterns, variations, and fills.
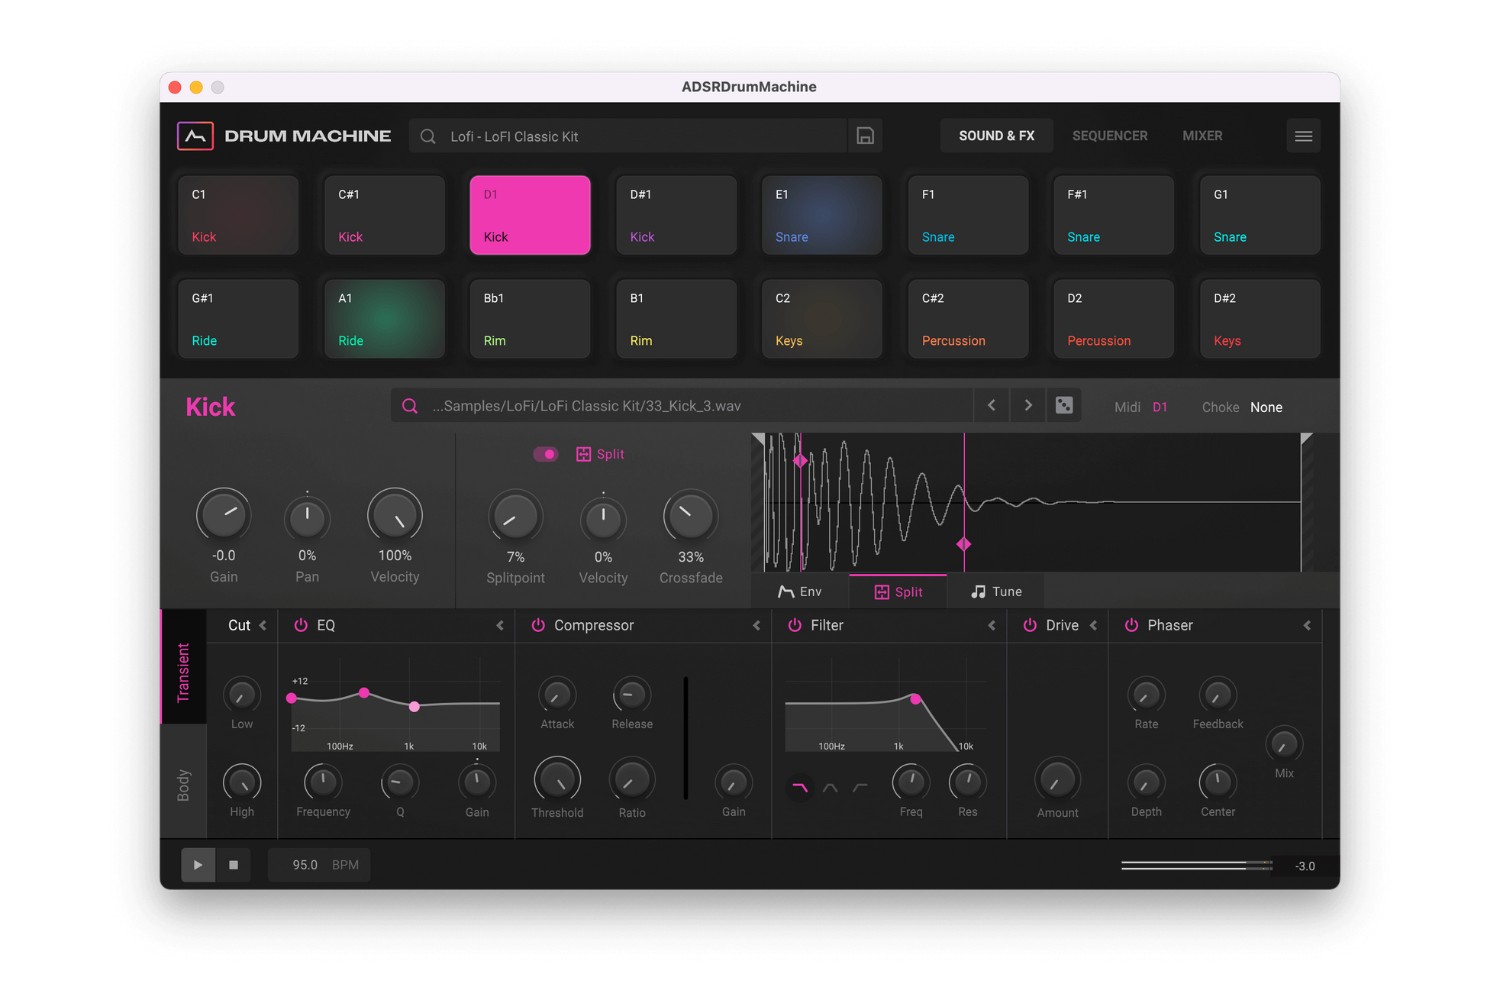
Sound Controls: Each drum sound within the VST is accompanied by a set of sound controls, including volume, pan, pitch, and individual effects parameters. These controls empower you to shape the sonic characteristics of each drum component to fit your production requirements.
Global Effects and Processing: The interface may incorporate global effects and processing modules, such as reverb, delay, compression, and EQ. These modules allow you to apply effects to the entire drum mix, adding depth and texture to your drum patterns.
Automation and Modulation: Some drum machine VSTs offer automation and modulation capabilities, allowing you to automate parameters, create dynamic changes in drum patterns, and introduce evolving textures and variations to your beats.
Performance Controls: In certain interfaces, performance controls such as roll, flam, and humanization settings are provided, enabling expressive and nuanced drum performances that emulate the feel of live drumming.
By familiarizing yourself with these interface elements, you can navigate the drum machine VST with confidence and precision, unlocking its potential to sculpt compelling drum patterns and elevate your music productions. The interface serves as your creative playground, offering a plethora of tools and controls to shape the rhythmic foundation of your compositions.
Creating Drum Patterns
Once you are acquainted with the interface of your drum machine VST, you can embark on the exciting journey of creating captivating drum patterns that form the rhythmic backbone of your music. Here’s a step-by-step guide to crafting compelling drum patterns using your chosen VST:
Pattern Selection: Begin by selecting a pattern or creating a new one within the pattern sequencer of the drum machine VST. This serves as the canvas for arranging your drum elements into cohesive rhythmic sequences.
Rhythmic Structure: Establish the rhythmic structure of your pattern by placing drum hits, kicks, snares, hi-hats, and percussion elements within the sequencer grid. Experiment with different rhythms, accents, and variations to create dynamic and engaging patterns.
Velocity and Dynamics: Utilize velocity controls to adjust the intensity and dynamics of individual drum hits. Varying the velocity adds a human touch to the patterns, creating a sense of groove and nuance in the drum performance.
Pattern Variations: Introduce variations and fills within the pattern to add interest and progression. Incorporate drum fills, rolls, and breaks to create transitions and build anticipation within the rhythm.
Swing and Groove: Explore the swing and groove settings within the drum machine VST to infuse your patterns with a sense of swing, shuffle, or syncopation. These settings can impart a distinct rhythmic feel to your drum patterns, enhancing their musicality.
Automation and Modulation: Experiment with automation and modulation to introduce evolving changes in the drum patterns. Use modulation sources to add movement and expression to the patterns, creating evolving textures and dynamics.
Layering and Textures: Consider layering drum sounds and textures to enrich the complexity of your patterns. Experiment with layering electronic and acoustic drum samples to create hybrid and unique drum textures.
By following these steps and embracing experimentation, you can craft intricate, expressive, and dynamic drum patterns that complement your musical compositions. The drum machine VST serves as a versatile tool for shaping rhythmic landscapes, allowing you to unleash your creativity and infuse your music with compelling beats and grooves.
Adding Effects and Processing
Enhancing your drum patterns with effects and processing is a pivotal stage in the music production process. A drum machine VST often provides a range of effects and processing tools that can elevate the sonic character of your beats. Here’s a guide to effectively integrating effects and processing into your drum tracks:
Dynamic Processing: Begin by applying dynamic processing to your drum tracks. Compression can even out the dynamic range of the drum patterns, adding punch and consistency to the overall sound. Adjust the threshold, ratio, and attack/release parameters to achieve the desired level of compression.
Equalization (EQ): Utilize EQ to sculpt the tonal balance of the drum elements. Adjust the EQ settings to enhance the clarity of the kick, emphasize the snap of the snare, and bring out the shimmer of the cymbals. Pay attention to the frequency ranges of each drum component and make precise adjustments to achieve cohesion and clarity.
Reverb and Ambience: Incorporate reverb and ambience to add spatial depth and dimension to your drum patterns. Experiment with different reverb settings to create a sense of space, from tight and intimate environments to expansive and atmospheric reverberations.
Delay and Modulation: Introduce delay and modulation effects to infuse movement and texture into your drum tracks. Delays can create rhythmic echoes and reflections, while modulation effects such as chorus and flanger can add a sense of movement and richness to the drum patterns.
Transient Shaping: Consider using transient shaping tools to refine the attack and sustain of individual drum hits. Adjusting the transient shaping parameters can accentuate the impact of the drums, tighten the overall feel, and shape the transients to cut through the mix effectively.
Specialized Effects: Explore specialized effects such as distortion, saturation, and filtering to impart character and grit to your drum patterns. These effects can add edge, warmth, and unique sonic qualities to the drum sounds, allowing you to craft distinctive and expressive rhythms.
Bus Processing: Grouping your drum tracks and applying bus processing can unify the sonic characteristics of the individual drum elements. Bus compression, EQ, and saturation can enhance the cohesion and impact of the drum mix, creating a polished and cohesive sonic palette.
By incorporating these effects and processing techniques, you can transform your drum patterns into dynamic, expressive, and sonically rich elements within your music productions. The judicious application of effects and processing empowers you to shape the sonic identity of your drum tracks, adding depth, movement, and character to your rhythmic compositions.
Exporting Your Drum Tracks
Once you’ve crafted and refined your drum patterns using the drum machine VST, the final step is to export the tracks for use in your music projects. Exporting your drum tracks effectively ensures that they can be seamlessly integrated into your digital audio workstation (DAW) and form the rhythmic foundation of your compositions. Here’s a guide to the process of exporting your drum tracks:
Consolidation and Organization: Before exporting, ensure that your drum patterns are well-organized and consolidated within your DAW. This includes naming the tracks appropriately, arranging the patterns in a coherent structure, and cleaning up any unused or redundant elements.
Export Settings: Access the export settings in your DAW and specify the parameters for the export process. This typically involves setting the desired file format (e.g., WAV, AIFF, or MP3), bit depth, sample rate, and any dithering options for maintaining audio quality.
Individual Stems: Consider exporting your drum tracks as individual stems to allow for greater flexibility during the mixing and arrangement stages. By exporting separate stems for kick, snare, hi-hats, percussion, and other elements, you provide the opportunity for precise control and processing in the mix.
Mastered Mix: If your drum patterns are part of a fully mixed and mastered composition, export the entire mix with the drum tracks included. Ensure that the levels and processing on the master bus are optimized to achieve a balanced and polished sound for the final export.
File Naming and Metadata: When exporting your drum tracks, use clear and descriptive file names that indicate the content and context of the tracks. Additionally, consider embedding metadata such as track titles, artist information, and production details to maintain organization and accessibility.
Backup and Archive: After exporting your drum tracks, create backups and archives of the exported files to prevent loss or corruption. Store the files in a secure location, such as a dedicated project folder or cloud storage, to ensure that they remain accessible for future use.
Quality Assurance: Before finalizing the export process, perform a quality assurance check by listening to the exported drum tracks and confirming that they retain the intended sonic characteristics and fidelity. Address any issues or discrepancies before proceeding.
By following these steps, you can effectively export your drum tracks from the drum machine VST, ensuring that they are ready for integration into your music projects. The exported tracks serve as the rhythmic heartbeat of your compositions, ready to drive the energy, groove, and emotion of your music productions.