Introduction
Are you ready to infuse your music productions with captivating drum patterns and beats? With the powerful digital audio workstation (DAW) software Reaper, you can seamlessly integrate a drum machine to enhance your musical creations. Whether you're a seasoned music producer or just starting your journey in music production, understanding how to open a drum machine in Reaper is a valuable skill that can elevate your compositions.
Reaper offers a versatile platform for integrating virtual instruments, including drum machines, enabling users to craft intricate and dynamic rhythms. By following the steps outlined in this guide, you'll gain the knowledge and confidence to harness the full potential of a drum machine within Reaper.
In this comprehensive tutorial, we'll walk through the process of setting up a drum machine VST (Virtual Studio Technology) within Reaper, creating a dedicated track for the drum machine, loading and configuring the drum machine plugin, programming compelling drum patterns, and recording and editing these patterns to perfection. Whether you're aiming to produce electronic dance music, hip-hop beats, or experimental soundscapes, mastering the art of integrating a drum machine in Reaper will undoubtedly expand your creative horizons.
Embark on this musical journey, and let's delve into the intricacies of opening a drum machine in Reaper. Get ready to unleash your rhythmic creativity and take your music production skills to new heights.
Step 1: Setting up the Drum Machine VST
Before diving into the world of rhythmic possibilities, the first crucial step is to set up a drum machine VST within Reaper. A VST, or Virtual Studio Technology, allows you to integrate virtual instruments and effects into your DAW, providing a vast array of sonic tools at your fingertips.
To begin, launch Reaper and ensure that your preferred drum machine VST plugin is installed on your system. Navigate to the “Options” menu and select “Preferences.” Within the Preferences window, click on the “Plugins” tab. Here, you can specify the location of your VST plugins by adding the corresponding directory to Reaper’s plugin search path. Once the directory is added, Reaper will scan and recognize the installed VST plugins, including your drum machine VST.
After successfully adding the plugin directory, click “OK” to close the Preferences window. Next, create a new track in Reaper by right-clicking in the track control panel and selecting “Insert Virtual Instrument on New Track.” Choose the drum machine VST from the list of available plugins. This action will create a new track with the drum machine VST loaded and ready for use.
It’s important to ensure that the audio and MIDI settings are properly configured to allow seamless integration of the drum machine VST. Navigate to the “Options” menu and select “Preferences.” Within the Preferences window, click on the “Audio” and “MIDI Devices” tabs to verify that the audio and MIDI settings are correctly configured to accommodate the drum machine VST.
With the drum machine VST successfully set up in Reaper, you’re now poised to explore its rhythmic potential and craft compelling drum patterns that will breathe life into your music productions. This initial setup lays the foundation for an immersive and dynamic music production experience within Reaper, empowering you to unleash your creative vision through the rhythmic canvas of the drum machine.
Step 2: Creating a New Track for the Drum Machine
Once the drum machine VST is set up within Reaper, the next pivotal step is to create a dedicated track that will serve as the canvas for your rhythmic explorations. This dedicated track will house the drum machine VST, providing a focused environment for crafting and shaping your drum patterns.
To create a new track for the drum machine in Reaper, begin by navigating to the main toolbar and selecting “Track” followed by “Insert New Track.” Alternatively, you can right-click in the track control panel and choose “Insert New Track.” This action will generate a new track within the Reaper interface.
With the new track created, it’s essential to assign the drum machine VST to this track. To achieve this, click on the “FX” button located on the newly created track. This will open the FX browser, where you can select the drum machine VST from the list of available plugins. Once the drum machine VST is added to the track, it becomes seamlessly integrated, ready to unleash its rhythmic prowess within your music production environment.
Furthermore, consider labeling the track to reflect the presence of the drum machine, enhancing the organization and clarity of your project. Right-click on the track control panel, select “Track Control Panel” and then “Track Description.” Here, you can input a descriptive name for the track, such as “Drum Machine,” “Rhythmic Engine,” or a specific name corresponding to the drum machine VST you’re using. This labeling practice fosters an intuitive and structured workflow, allowing for swift identification and manipulation of the drum machine track.
By creating a dedicated track for the drum machine within Reaper, you establish a focused environment where rhythmic creativity can flourish. This deliberate organization sets the stage for seamless integration of the drum machine VST, paving the way for immersive sonic explorations and rhythmic innovations within your music productions.
Step 3: Loading and Configuring the Drum Machine Plugin
With the dedicated track prepared, the next critical phase involves loading and configuring the drum machine plugin within Reaper. This pivotal step sets the stage for harnessing the rhythmic potential of the drum machine, allowing you to tailor its settings to suit your creative vision.
To load the drum machine plugin, navigate to the track where the drum machine VST is housed. Click on the “FX” button within the track control panel to access the FX browser. Here, you can select the drum machine VST from the list of available plugins and add it to the track. Once the drum machine plugin is loaded, its interface will be displayed, ready to be fine-tuned and customized to your preferences.
Upon loading the drum machine plugin, take the time to explore its interface and familiarize yourself with its controls and parameters. Depending on the specific drum machine VST you’re using, you’ll encounter a diverse array of options for shaping and sculpting your drum sounds. From individual drum kit elements to global effects and modulation controls, the plugin interface serves as a versatile playground for crafting and refining your rhythmic palette.
Configuring the drum machine plugin involves tailoring its settings to align with your creative vision. This may entail adjusting parameters such as tempo, swing, drum sound selection, envelope shaping, and effects application. Delve into the intricacies of the plugin’s settings, experimenting with different configurations to discover the sonic textures and rhythmic nuances that resonate with your musical direction.
Furthermore, consider leveraging Reaper’s powerful routing and signal processing capabilities to integrate the drum machine plugin seamlessly within your project. Explore the possibilities of parallel processing, bussing, and signal routing to infuse your drum patterns with depth, clarity, and character.
By loading and configuring the drum machine plugin within Reaper, you embark on a sonic journey where rhythmic expression and sonic manipulation converge. This process empowers you to sculpt and refine your drum sounds, infusing them with personality and vitality, as you prepare to delve into the art of programming compelling drum patterns.
Step 4: Programming Drum Patterns
As the drum machine plugin is loaded and configured, you are now poised to embark on the art of programming compelling drum patterns within Reaper. This pivotal step unleashes your rhythmic creativity, allowing you to craft intricate and dynamic rhythms that will form the rhythmic backbone of your music production.
To initiate the programming of drum patterns, consider the rhythmic structure and feel you aim to achieve. Whether it’s a pulsating four-on-the-floor beat for a dance track, a syncopated groove for a funk composition, or a complex polyrhythmic pattern for an experimental piece, the drum machine within Reaper provides the canvas for realizing your rhythmic vision.
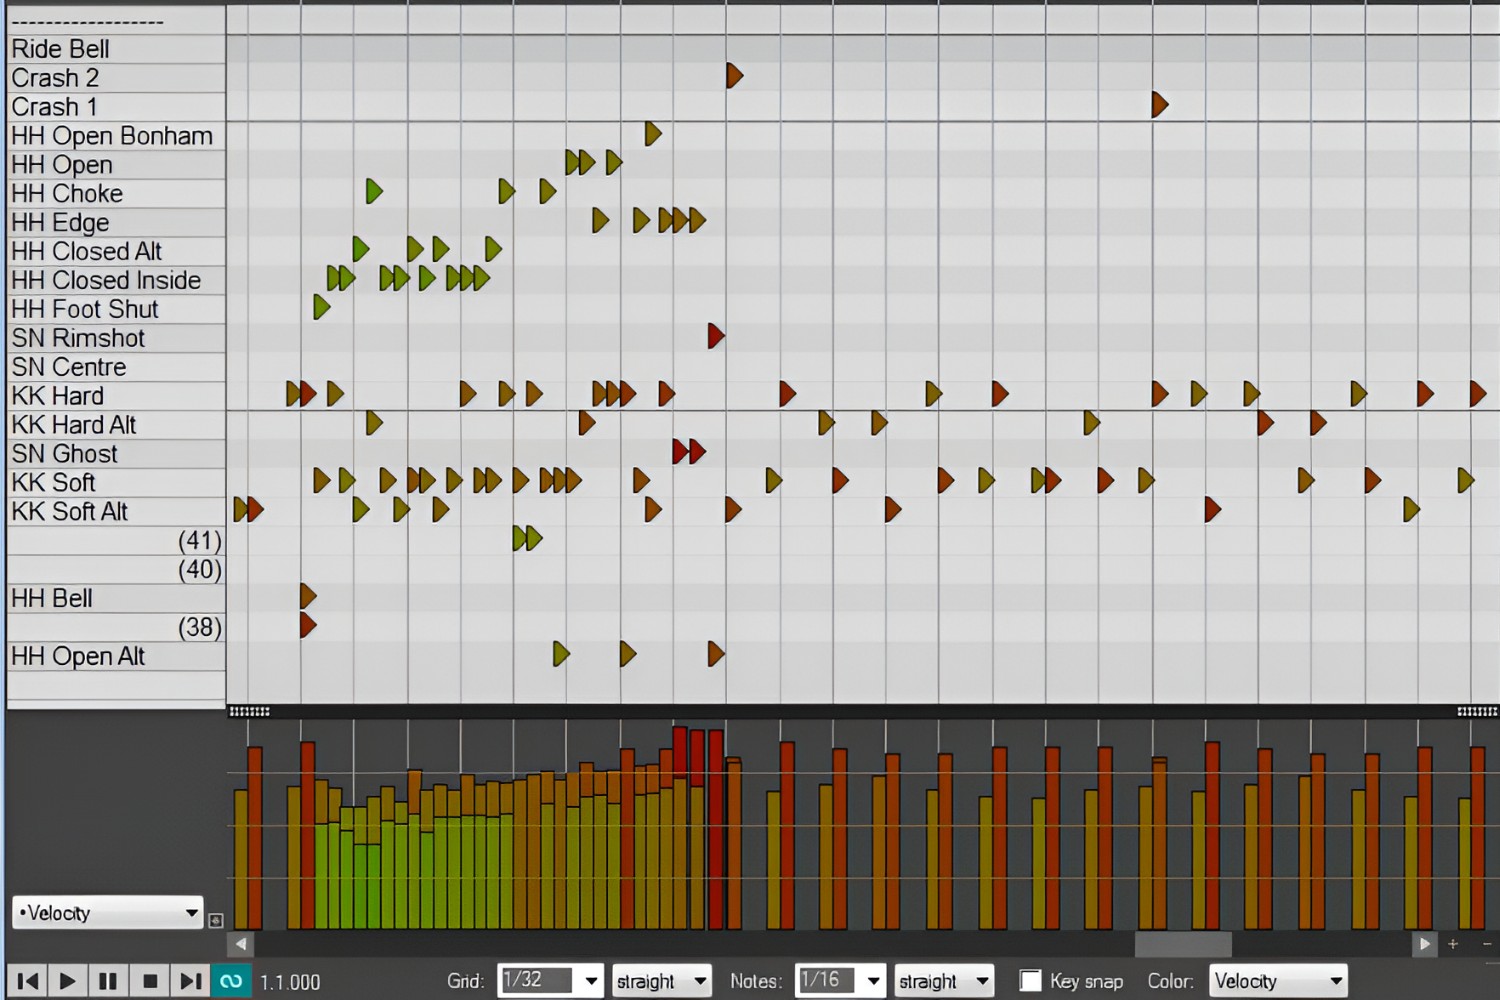
Begin by accessing the piano roll or MIDI editor within the drum machine track. Here, you can input and manipulate MIDI notes that correspond to various drum sounds and elements. Explore the grid-based interface, where each vertical position represents a specific drum sound, and each horizontal position denotes a moment in time.
Experiment with different drum sounds and their placement within the grid, crafting patterns that exhibit groove, dynamics, and syncopation. Utilize velocity controls to impart variations in the intensity of individual drum hits, infusing your patterns with human-like expressiveness and nuance.
Furthermore, consider incorporating drum machine features such as pattern sequencing, swing settings, and real-time performance recording to infuse your patterns with rhythmic vitality and spontaneity. Reaper’s intuitive interface and robust MIDI editing capabilities provide a fertile ground for realizing your rhythmic aspirations.
As you delve deeper into the programming process, explore the interplay between various drum elements, layering and arranging them to create cohesive and engaging rhythmic tapestries. Experiment with fills, variations, and transitions to introduce dynamism and evolution within your drum patterns.
Programming drum patterns within Reaper is a transformative process that empowers you to breathe life into your musical compositions. Through meticulous arrangement and manipulation of drum sounds, you sculpt rhythmic narratives that drive the emotional and kinetic core of your music, setting the stage for the final step of recording and editing these patterns to perfection.
Step 5: Recording and Editing Drum Patterns
With the drum patterns meticulously programmed, the final step in the process of integrating a drum machine in Reaper involves recording and editing these patterns to perfection. This phase allows you to capture the essence of your rhythmic creations and fine-tune them to align seamlessly with your musical vision.
To record the programmed drum patterns, engage Reaper’s recording functionality and ensure that the drum machine track is armed for recording. Trigger the playback within Reaper, allowing the sequenced drum patterns to be captured in real time. This recording process captures the nuances and dynamics of your programmed patterns, preserving the expressive intricacies within your music production.
Upon recording the drum patterns, delve into the realm of editing to refine and polish the rhythmic elements. Reaper’s robust editing capabilities empower you to manipulate MIDI notes, adjust timing and velocity, and fine-tune the intricacies of your drum patterns. Whether it’s quantizing to achieve precise rhythmic alignment or humanizing to introduce subtle variations, the editing phase serves as a canvas for perfecting your rhythmic tapestries.
Consider exploring Reaper’s array of MIDI editing tools, such as note length adjustment, velocity scaling, and groove quantization, to shape the rhythmic contours of your drum patterns. These tools provide the means to sculpt the rhythmic dynamics, ensuring that each drum hit resonates with the desired impact and expression.
Furthermore, leverage Reaper’s non-destructive editing paradigm, allowing you to experiment with different editing approaches while preserving the original integrity of your drum patterns. This flexibility fosters an iterative and exploratory editing process, enabling you to refine and enhance the rhythmic elements with precision and creativity.
As you navigate the editing phase, consider the broader context of your musical composition, ensuring that the drum patterns coalesce harmoniously with other musical elements. Balance the rhythmic interplay between the drum patterns and other instrumentation, fine-tuning the rhythmic relationships to achieve a cohesive and compelling sonic tapestry.
Recording and editing drum patterns within Reaper represents the culmination of your rhythmic journey, where meticulously crafted rhythms are captured, refined, and seamlessly integrated within your music production. This phase marks the realization of your rhythmic vision, setting the stage for the comprehensive integration of the drum machine within your musical compositions.