Introduction
When it comes to capturing the raw power and nuanced tonal qualities of an electric guitar, using a microphone to send the signal to an amplifier is an essential part of the process. Whether you are recording in a studio or playing live on stage, understanding how to mic an electric guitar and send the output to an amp is crucial for achieving the desired sound.
Capturing the essence of an electric guitar involves a combination of technical knowledge and artistic intuition. The right microphone, proper placement, and thoughtful signal routing are all pivotal in achieving the desired tone and sonic character. In this guide, we will explore the fundamental steps involved in miking an electric guitar and sending the output to an amplifier, providing insights that cater to both recording and live performance scenarios.
Miking an electric guitar is not merely a technical task; it is an art form that requires a deep understanding of the instrument and the sonic landscape it inhabits. By mastering the techniques outlined in this guide, you will be empowered to unleash the full potential of your electric guitar, whether in the studio or on stage. Let's delve into the intricacies of selecting the right microphone, optimal placement, and the crucial steps for routing the signal to an amplifier, unlocking the true sonic potential of the electric guitar.
Choosing the Right Microphone
When miking an electric guitar, selecting the right microphone is paramount to capturing the instrument’s unique tonal characteristics. Dynamic and condenser microphones are the two main types used for miking electric guitars, each offering distinct sonic qualities and applications.
Dynamic Microphones:
- Dynamic microphones, such as the legendary Shure SM57, are renowned for their durability and ability to handle high sound pressure levels, making them ideal for close-miking guitar amplifiers.
- They excel at capturing the punch and midrange presence of electric guitars, making them a popular choice for rock and blues genres.
- Dynamic mics are often favored for live performances due to their robust build and ability to withstand high-volume environments.
Condenser Microphones:
- Condenser microphones, such as the Neumann U87 or AKG C414, are known for their sensitivity and ability to capture a wide frequency range, making them versatile for various recording applications.
- They are well-suited for capturing the intricate harmonics and detailed nuances of electric guitar tones, making them a preferred choice for studio recordings and genres that demand sonic precision.
- Condenser mics require phantom power and are more sensitive to loud volumes, making them better suited for controlled studio environments.
When choosing a microphone for miking an electric guitar, it’s essential to consider the sonic characteristics you aim to capture and the intended application, whether it’s live performance or studio recording. Experimenting with different microphones and understanding their sonic signatures will enable you to make informed decisions based on the specific sonic qualities you seek to emphasize.
By selecting the right microphone tailored to your sonic vision, you lay a solid foundation for capturing the essence of the electric guitar, setting the stage for the next crucial step: microphone placement.
Placing the Microphone
Once you have selected the appropriate microphone for miking an electric guitar, the next critical step is determining the optimal placement to capture the desired tonal characteristics. The placement of the microphone in relation to the guitar amplifier significantly influences the resulting sound, making it essential to experiment and fine-tune the positioning to achieve the desired sonic impact.
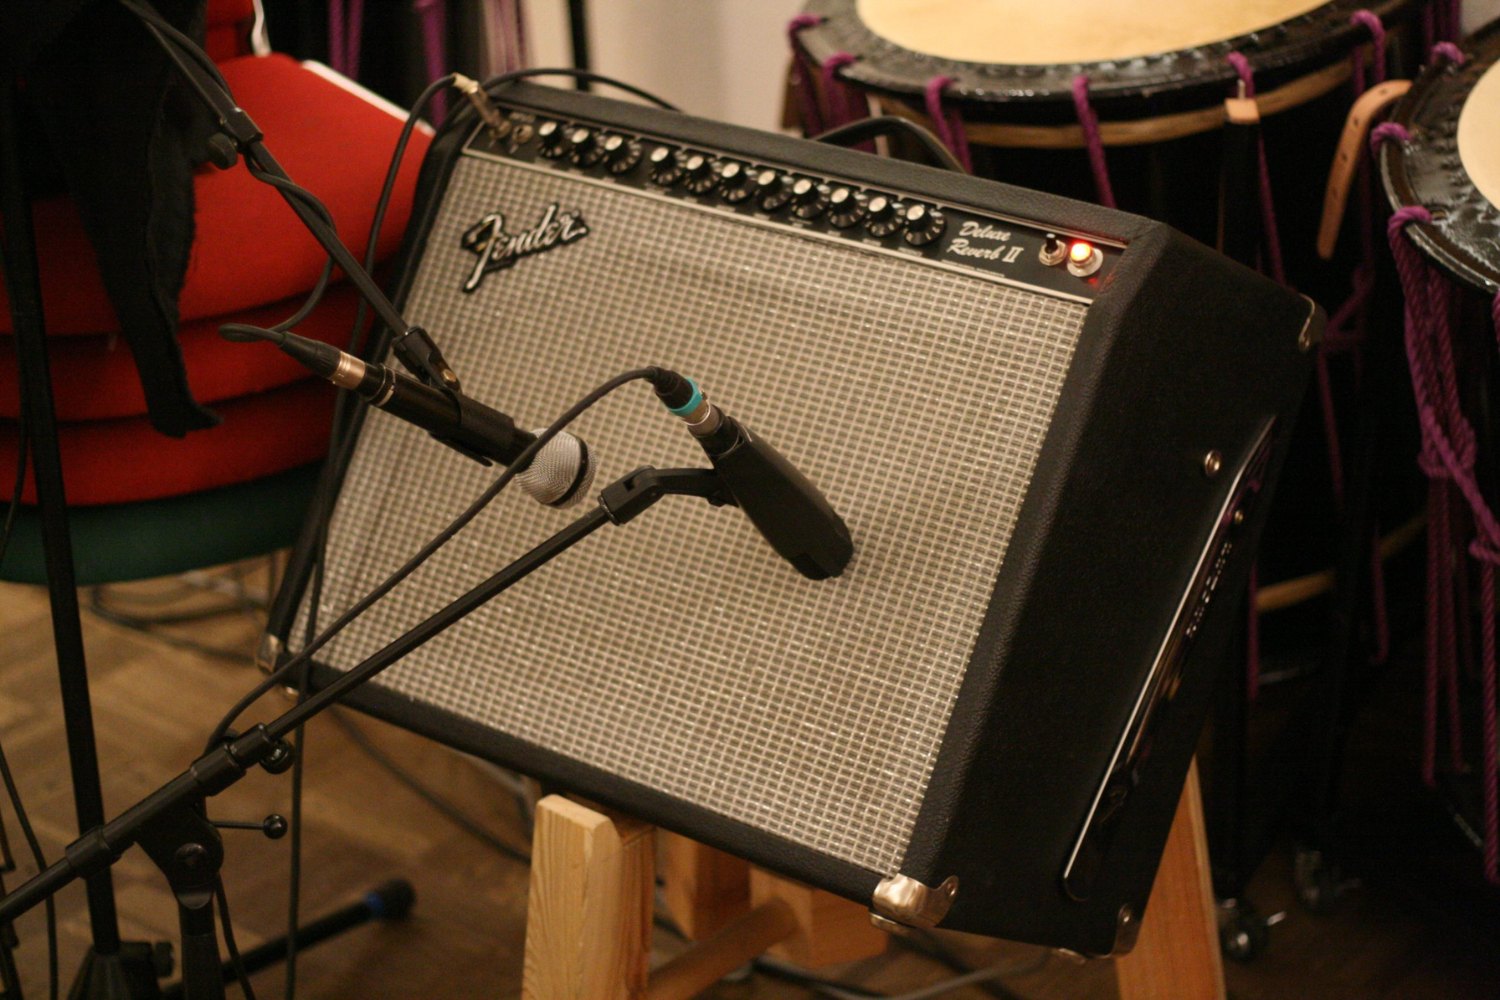
Close-Miking:
Placing the microphone close to the guitar amplifier’s speaker cone is a common technique employed to capture the direct, focused sound of the instrument. Positioning the microphone near the center of the speaker cone yields a more pronounced midrange and high-frequency response, ideal for emphasizing the guitar’s articulation and presence in the mix. This approach is often favored for genres that require a punchy and aggressive guitar tone, such as rock and metal.
Off-Axis Placement:
Experimenting with off-axis microphone placement, where the microphone is angled away from the speaker cone, can yield a smoother and more balanced tonal character. This technique can help mitigate harsh high frequencies and accentuate the warmth of the guitar’s sound, offering a more nuanced and rounded sonic profile. Off-axis placement is particularly effective for capturing the natural resonance and depth of the guitar’s tone, making it suitable for genres that demand a more organic and vintage sound, such as blues and jazz.
During the placement process, it’s crucial to listen attentively and make incremental adjustments to the microphone position, as subtle changes can have a significant impact on the captured sound. Additionally, considering the distance between the microphone and the amplifier can influence the balance of direct sound and room ambience, allowing for further sonic sculpting based on the desired spatial characteristics.
Ultimately, the goal of microphone placement is to faithfully capture the unique tonal qualities of the electric guitar while aligning with the sonic vision for the recording or live performance. By experimenting with different placement techniques and attentively listening to the resulting sound, you can harness the full sonic potential of the electric guitar, setting the stage for the next crucial steps in the miking process.
Connecting the Microphone to the Mixer
Once the microphone is properly placed to capture the desired tonal characteristics of the electric guitar, the next step is to connect the microphone to a mixer for signal processing and routing. Whether you are in a studio setting or preparing for a live performance, ensuring a secure and optimized connection between the microphone and the mixer is essential for maintaining signal integrity and facilitating further sonic shaping.
Using Balanced Cables:
When connecting the microphone to the mixer, it is crucial to use balanced cables, such as XLR cables, to preserve signal quality and minimize interference. Balanced cables are designed to reject external noise and electromagnetic interference, ensuring a clean and robust signal transmission from the microphone to the mixer. Additionally, utilizing high-quality cables with reliable connectors is paramount in maintaining signal integrity and preventing potential signal degradation.
Setting Gain Levels:
Upon connecting the microphone to the mixer, setting the appropriate gain levels is vital for optimizing the signal-to-noise ratio and preventing distortion. Gradually increasing the microphone preamp’s gain while monitoring the mixer’s level meters allows for precise control over the input signal, ensuring that the electric guitar’s sonic nuances are faithfully captured without introducing unwanted noise or clipping. Careful attention to gain staging is essential for achieving a clean and balanced signal that serves as the foundation for subsequent processing and amplification.
Engaging Phantom Power (if applicable):
If you are using a condenser microphone that requires phantom power, it is imperative to engage phantom power on the mixer or preamp to provide the necessary voltage for the microphone’s operation. However, it’s essential to exercise caution and ensure that the microphone is compatible with phantom power to avoid any potential damage. Additionally, being mindful of phantom power usage and adhering to manufacturer guidelines is crucial for safeguarding the microphone’s functionality and longevity.
By establishing a secure and optimized connection between the microphone and the mixer, you set the stage for further signal processing and routing, paving the way for shaping the electric guitar’s sonic imprint. The meticulous attention to detail in this crucial step ensures that the captured signal retains its integrity and fidelity, serving as the canvas for sonic exploration and refinement in the subsequent stages of the miking process.
Setting Levels and EQ
After connecting the microphone to the mixer, the next pivotal step in the miking process involves setting appropriate levels and applying equalization (EQ) to sculpt the electric guitar’s sonic character. This stage allows for fine-tuning the captured signal, addressing tonal imbalances, and shaping the guitar’s sound to align with the desired sonic vision, whether in a recording or live performance context.
Optimizing Input Levels:
Ensuring optimal input levels on the mixer is crucial for maintaining a healthy signal-to-noise ratio and preventing distortion. Carefully adjusting the input gain while monitoring the mixer’s level meters allows for precise control over the signal’s amplitude, ensuring that the electric guitar’s sonic nuances are faithfully represented without introducing unwanted noise or clipping. Attentive gain staging is fundamental for achieving a clean and balanced signal that serves as the foundation for subsequent processing and amplification.
Applying Equalization (EQ):
Utilizing EQ to shape the electric guitar’s tonal profile is a fundamental aspect of the miking process. Whether accentuating the guitar’s midrange presence, enhancing the clarity of the high frequencies, or sculpting the low-end response, EQ allows for targeted tonal adjustments to align the guitar’s sound with the overarching sonic vision. Careful consideration of the guitar’s sonic characteristics and the intended musical context guides the application of EQ, empowering you to emphasize the instrument’s defining qualities while addressing any sonic imbalances.
Addressing Frequency Build-Up and Notching:
During the EQ process, attentive listening and critical assessment are essential for identifying potential frequency build-up or resonant peaks that may impact the guitar’s sonic clarity. Notching out problematic frequencies and addressing potential masking issues through precise EQ adjustments contribute to a more articulate and balanced representation of the electric guitar’s tonal spectrum, ensuring that the instrument occupies its rightful sonic space within the mix.
By meticulously setting levels and applying EQ to the captured signal, you embark on a sonic refinement journey that elevates the electric guitar’s tonal identity, setting the stage for its seamless integration into the broader sonic landscape. The judicious application of these techniques empowers you to shape the guitar’s sonic imprint with precision and artistry, harnessing its full expressive potential in the recording or live performance environment.
Sending Output to the Amp
Once the electric guitar signal has been meticulously captured, shaped, and refined through the miking and mixing process, the final step involves sending the output to an amplifier to unleash the instrument’s sonic prowess in a live performance or studio setting. This crucial stage bridges the gap between the meticulously crafted guitar tone and its amplification, ensuring that the sonic vision is translated into a powerful and captivating auditory experience.
Utilizing Dedicated Guitar Cables:
When sending the output from the mixer to the amplifier, employing high-quality guitar cables designed for instrument-level signals is essential for preserving signal integrity and minimizing potential interference. Dedicated guitar cables, such as 1/4-inch TS (Tip-Sleeve) cables, provide a reliable and low-noise connection between the mixer and the amplifier, ensuring that the captured guitar tone is faithfully transmitted without compromise.
Optimizing Amplifier Input Levels:
Upon connecting the mixer’s output to the amplifier, meticulous attention to amplifier input levels is crucial for achieving the desired sonic impact while preventing signal distortion. Carefully adjusting the amplifier’s input gain or volume control ensures that the captured guitar tone is faithfully reproduced with the appropriate level of amplification, empowering the instrument to resonate with power and clarity through the amplifier’s speakers.
Embracing Amplifier Tone Shaping:
Modern guitar amplifiers often feature a range of tone-shaping controls, including EQ, presence, and gain adjustments, allowing for further sonic refinement and customization. By judiciously sculpting the amplifier’s tonal characteristics to complement the meticulously captured guitar tone, you can unleash a dynamic and expressive sonic palette that embodies the instrument’s full sonic potential, tailored to the specific musical context and performance requirements.
Harnessing Effects and Amplifier Features:
Exploring the diverse array of effects and features offered by guitar amplifiers, such as reverb, delay, modulation effects, and amplifier channel selection, presents opportunities for expanding the sonic palette and imbuing the guitar tone with depth, dimension, and expressive nuance. Thoughtful integration of effects and amplifier features enriches the sonic narrative, elevating the electric guitar’s voice to resonate with emotive power and sonic versatility.
By sending the meticulously crafted guitar tone to the amplifier, you complete the sonic journey, unleashing the instrument’s expressive potential with clarity, authority, and emotive resonance. This final stage in the miking process culminates in the realization of the sonic vision, empowering the electric guitar to captivate and inspire, whether in the studio or on the stage.