Introduction
Playing the acoustic guitar is a rewarding experience that brings joy to countless musicians around the world. However, for those who are just starting out or have smaller hands, navigating the fretboard and effectively fingering chords can be a daunting task. The good news is that there are ways to make an acoustic guitar easier to finger, allowing you to play with more ease and enjoyment.
In this article, we will explore various techniques and tips to improve your ability to fret chords on an acoustic guitar. Whether you’re a beginner or an intermediate player looking to enhance your skills, these methods will help you overcome the challenges associated with finger placement and pressure.
Before we dive into the specifics, it’s important to understand the basic anatomy of an acoustic guitar. Each part contributes to the overall playability of the instrument, and having a solid grasp of its components will help you make informed choices when it comes to improving ease of fingering.
Additionally, we’ll discuss how choosing the right guitar that suits your hand size and preference can make a world of difference. We’ll also touch on proper guitar maintenance techniques to ensure optimal playability.
Whether you dream of strumming your favorite songs around a campfire or performing on stage, the information in this article will set you on the path to making an acoustic guitar easier to finger. With practice, patience, and the right approach, you’ll be playing beautiful melodies and captivating chords in no time.
Understanding the Anatomy of an Acoustic Guitar
Before we delve into techniques for easy fingering on an acoustic guitar, it’s essential to have a good understanding of its anatomy. Familiarizing yourself with the various components will give you insight into how each part affects the instrument’s playability.
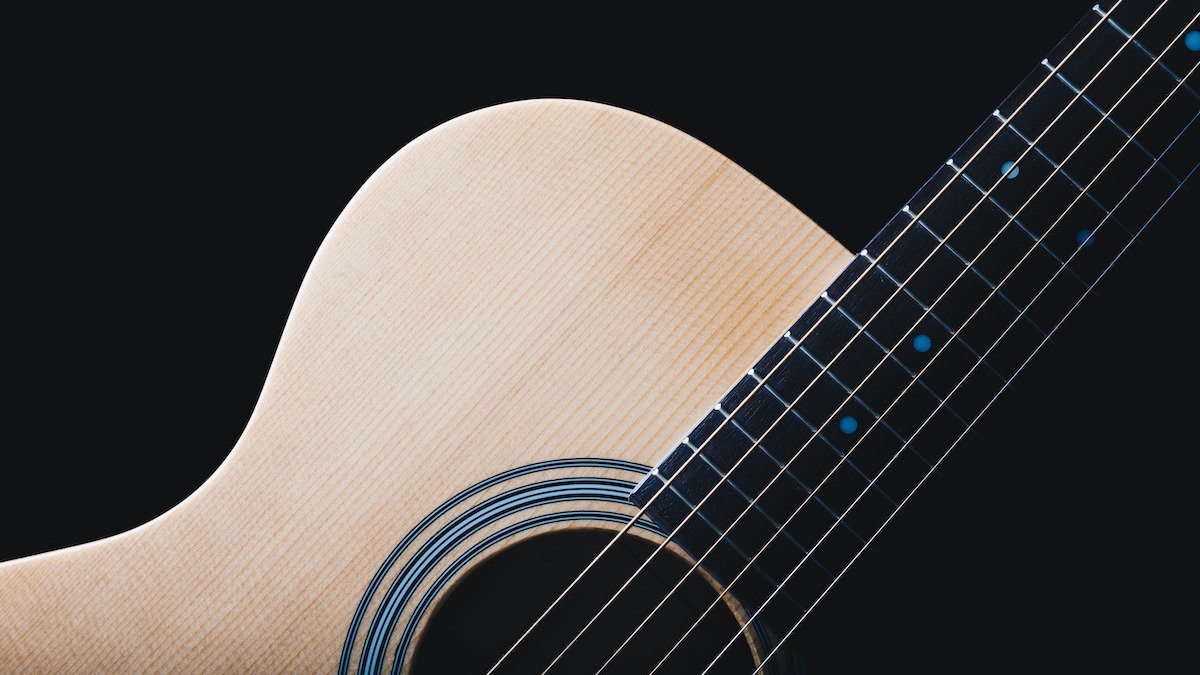
The body of an acoustic guitar consists of the top, back, and sides. The top, also known as the soundboard, is responsible for amplifying sound waves produced by the strings. A solid top guitar will typically produce a richer and more resonant tone compared to a guitar with a laminate top.
The neck of the guitar houses the fretboard, which is where you place your fingers to form chords and play notes. It’s crucial to pay attention to the neck’s width and thickness, as these factors can significantly impact the ease of fingering. A slimmer neck profile might be more comfortable for players with smaller hands, whereas players with larger hands may prefer a slightly wider neck for better leverage and control.
The fretboard is usually made of rosewood, ebony, or maple and is divided into frets, small metal bars that mark specific notes along the neck. Understanding how to properly position your fingers between the frets is vital for achieving clean and accurate chords.
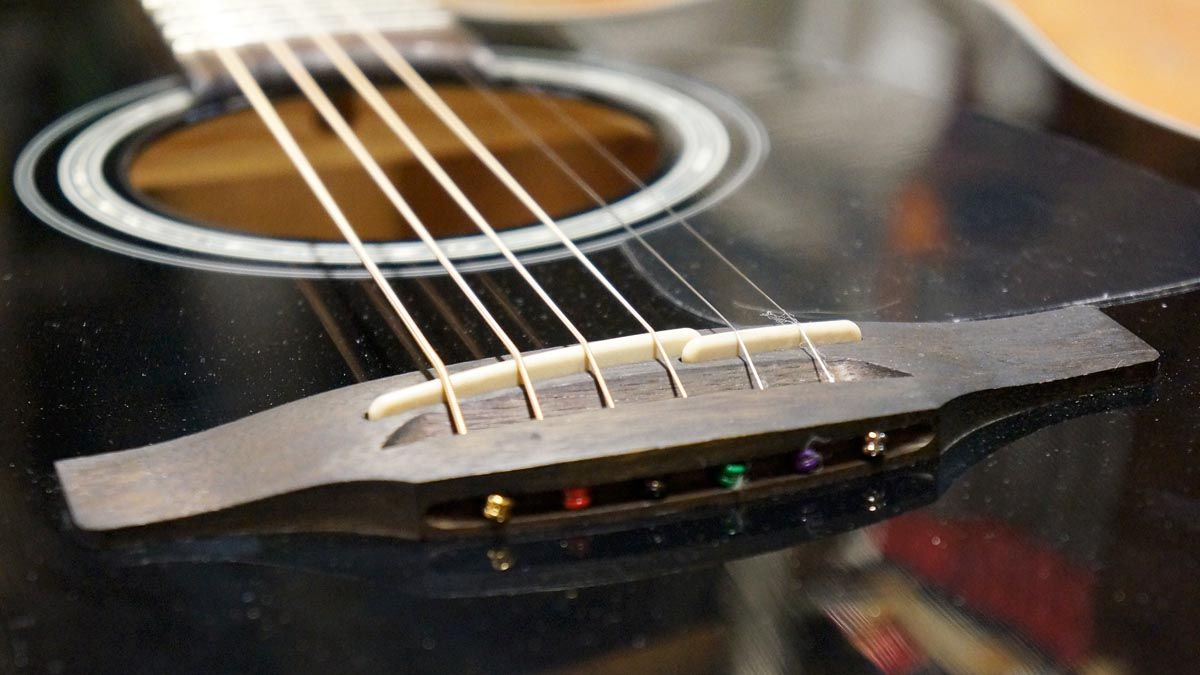
The guitar’s nut, located at the top of the neck, supports the strings and keeps them evenly spaced. The nut’s material and craftsmanship can affect the action (the distance between the strings and the fretboard), which, in turn, influences the ease of pressing down the strings.
At the end of the neck, near the body, you’ll find the guitar’s bridge. The bridge holds the strings in place and transfers the vibrations from the strings to the soundboard, contributing to the guitar’s overall resonance and volume.
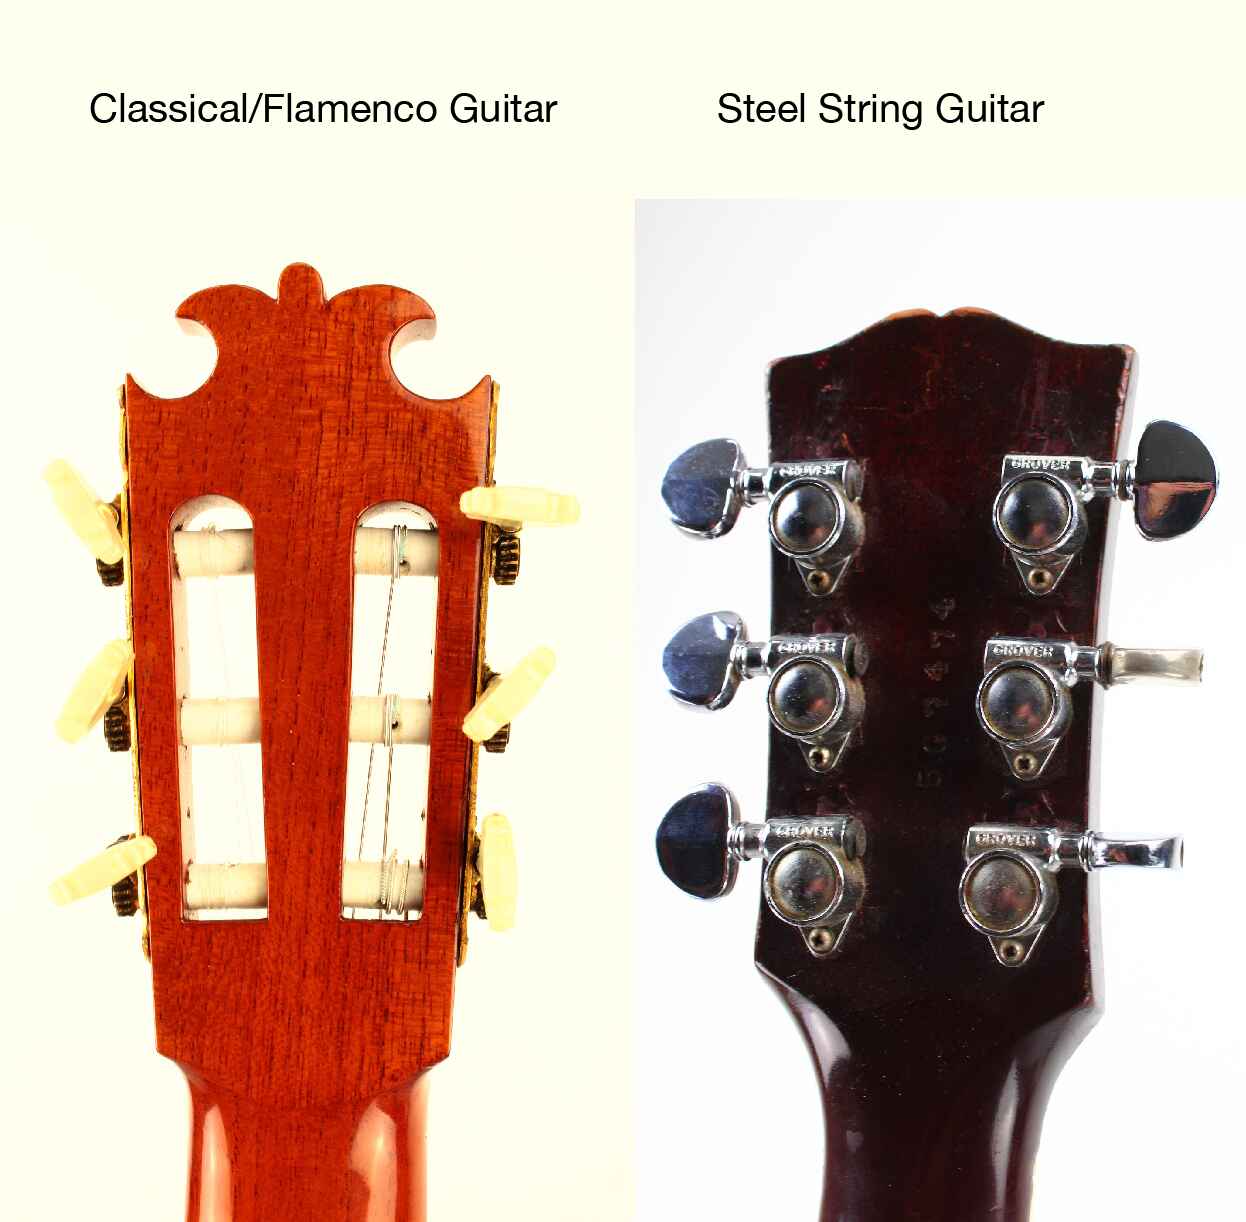
Finally, the tuning pegs, also known as machine heads or tuners, are used to adjust the pitch of each individual string. Accurate tuning is crucial for achieving the correct notes and maintaining good intonation across the fretboard.
By understanding how each component of an acoustic guitar contributes to its playability, you can make informed decisions when selecting a guitar that suits your hand size and playing style. Additionally, this knowledge will help you identify any potential adjustments or modifications that can be made to optimize the instrument for easy fingering.
Choosing the Right Guitar for Easy Fingering
When it comes to making an acoustic guitar easier to finger, selecting the right instrument for your needs and preferences is crucial. Here are some factors to consider when choosing a guitar that enhances ease of fingering.
1. Neck Profile: The shape and thickness of the neck play a significant role in how comfortable it feels in your hand. For easier fingering, consider guitars with slimmer neck profiles, as they can provide a more effortless grip, especially for players with smaller hands. Test out different neck sizes and choose the one that feels most comfortable to you.
2. Scale Length: The scale length is the distance between the nut and the saddle. Longer scale lengths can result in higher string tension, requiring more finger strength to press down on the frets. Consider guitars with shorter scale lengths if you have less hand strength or find it challenging to press down on strings comfortably.
3. Action: The action refers to the distance between the strings and the fretboard. Lower action guitars typically require less finger pressure to produce clear notes and chords. Look for guitars with adjustable action or consult a professional guitar technician to set up the instrument with optimal action for easy fingering.
4. Nut Width: The width of the nut affects the spacing of the strings. Guitars with narrower nut widths might be more suitable for players with smaller hands, as they provide shorter distances between the strings. This can make it easier for your fingers to reach across the fretboard without straining.
5. Body Size: Acoustic guitars come in various body sizes, including dreadnought, concert, and parlor. Smaller-bodied guitars, such as concerts or parlors, may be more comfortable to hold and fret for players with smaller hands. Experiment with different body sizes to find the one that suits your comfort and ease of fingering.
6. Playability: Ultimately, the most important factor when choosing a guitar for easy fingering is how it feels and plays in your hands. Try out different guitars, paying attention to the comfort and ease with which you can fret chords and navigate the fretboard. A guitar that feels natural and allows you to play with ease will enhance your overall playing experience.
Remember, choosing the right guitar is a personal decision that depends on your individual preferences and requirements. Take your time to explore different options, try out various guitars, and seek advice from professionals to find the perfect instrument that allows for effortless fingering and enjoyable playing.
Proper Guitar Maintenance for Easy Fingering
Maintaining your acoustic guitar in good condition is essential for optimal playability and easy fingering. By following proper maintenance practices, you can ensure that your instrument remains in top shape, allowing for smooth fretting and enjoyable playing experiences. Here are some essential maintenance tips to keep in mind:
1. Regular Cleaning: Dust, dirt, and sweat can build up on your guitar, affecting its playability. Use a clean, dry cloth to wipe down the body, neck, and strings after each playing session. Be sure to clean the fretboard regularly using a specialized fretboard cleaner or a mild solution of water and guitar cleaner. Remove any grime or residue gently to avoid damaging the wood or finish.
2. Proper Storage: When not in use, store your guitar in a suitable case or stand to protect it from humidity, temperature fluctuations, and accidental damage. Extreme conditions can cause the neck to warp or the strings to lose tension, affecting the ease of fingering. Invest in a humidifier to maintain the ideal humidity level for your guitar, especially if you live in a dry climate.
3. String Maintenance: Regularly inspect your guitar strings for signs of wear, such as discoloration, fraying, or flat spots. Worn-out strings can make fingering more difficult due to reduced tone and playability. Change your strings when necessary to ensure optimal sound and ease of playing. Additionally, keeping your strings clean by wiping them after each session can prolong their lifespan.
4. Truss Rod Adjustments: The truss rod is a metal rod inside the neck of the guitar that helps maintain its structural integrity. If you notice excessive bowing or backbow (an unnatural upward curve) in the neck, consult a professional guitar technician who can make proper adjustments. A well-adjusted truss rod ensures proper string height and eliminates any unnecessary difficulties when fretting chords.
5. Nut and Saddle Check: Inspect the nut and saddle of your guitar regularly to ensure they are properly fitted and in good condition. If you notice any cracks, unevenness, or signs of wear, consult a professional for necessary repairs or replacements. A well-maintained nut and saddle contribute to consistent string height and proper intonation, making fretting chords easier.
6. Regular Setups and Maintenance: Consider scheduling regular maintenance and setups with a professional guitar technician. They can adjust the action, intonation, and other critical aspects of your guitar to optimize playability. A well-setup instrument will make fretting chords easier and more comfortable, enhancing your overall playing experience.
By implementing these maintenance practices, you can ensure that your acoustic guitar remains in great condition, leading to easy fingering and improved playability. Regular care and attention to your instrument will allow you to focus on your playing without unnecessary difficulties. Remember, a well-maintained guitar is a joy to play and can help you reach new heights in your musical journey.
Correct Hand Placement and Technique
Developing proper hand placement and technique is crucial for easy and efficient fingering on the acoustic guitar. By focusing on correct hand positioning, you can minimize tension and strain, allowing for smoother chord transitions and improved playability. Here are some essential tips to achieve correct hand placement:
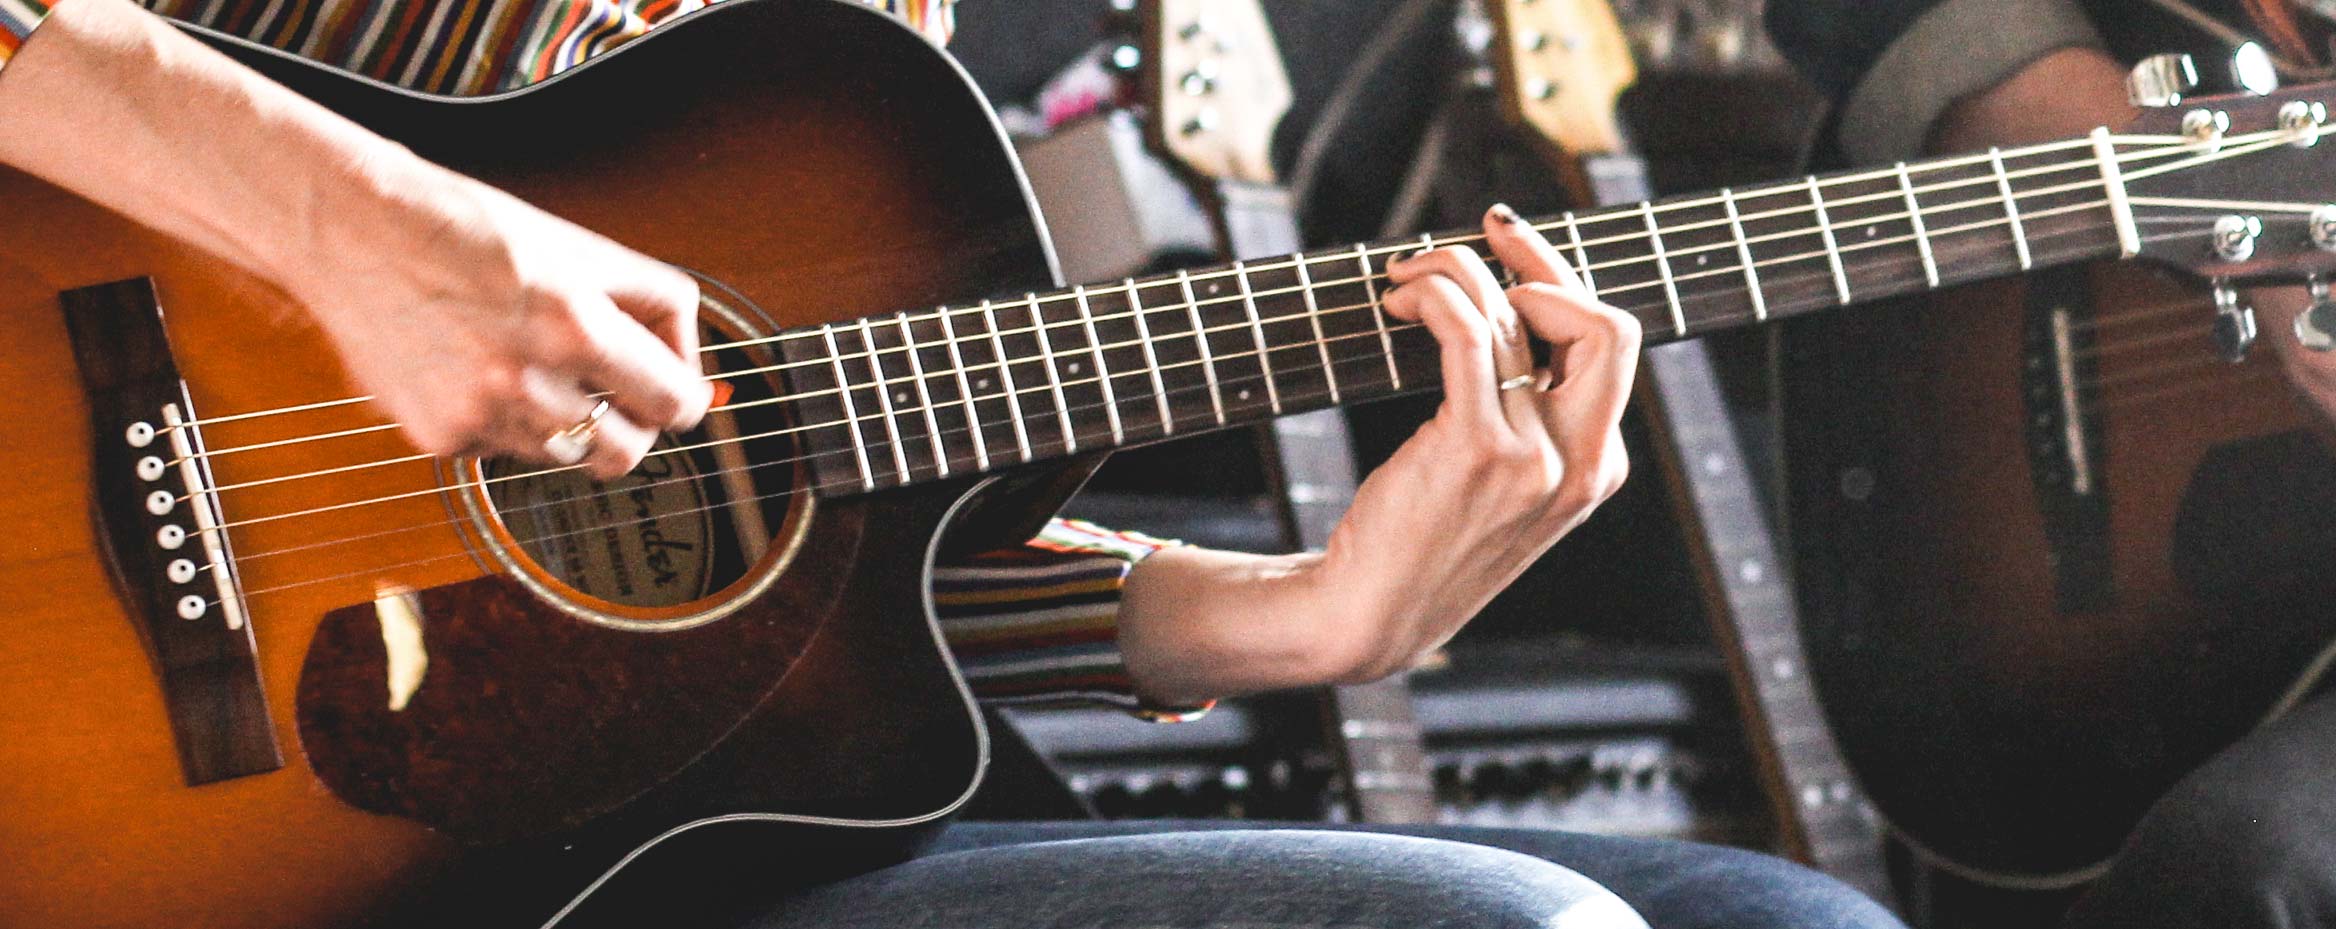
1. Hand Position: Place your thumb on the back of the guitar neck, approximately centered behind the fretboard. Your fingers should be positioned perpendicular to the fretboard, with the fingertips pressing down on the strings. Avoid excessive bending of the wrist or angling the fingers too drastically.
2. Finger Placement: Aim to press down on the strings with the tips of your fingers, just behind the fret wire. This ensures a clean and clear sound without any buzzing or muting. Be mindful of keeping your fingers arched and maintaining a light touch on the strings, as excessive finger pressure can make fretting more challenging.
3. Thumb Placement: While it’s natural for the thumb to shift slightly depending on the chord or note being played, the general position is behind the middle of the guitar neck. Avoid wrapping the thumb around the neck or gripping too tightly, as this can hinder finger mobility and impede easy fingering.
4. Fretting Technique: When fretting chords, focus on applying even pressure on the strings with your fingertips. Avoid pressing too hard or squeezing the strings excessively, as this can lead to stiffness and unnecessary tension. Practice lifting your fingers slightly off the fretboard during chord changes to enable smoother transitions.
5. Hand and Arm Movement: Keep your hand and arm relaxed while playing. Tension in the muscles can hinder speed, accuracy, and comfort. Allow your hand to move freely along the neck, using the minimum movement necessary to reach the desired chords and notes.
6. Finger Independence Exercises: Work on finger independence exercises to train your fingers to move independently of each other. This will improve dexterity and help you navigate the fretboard more easily. Practice exercises such as spider crawls, fretting individual notes, and playing scales to strengthen each finger’s control and coordination.
Remember, developing correct hand placement and technique requires practice and patience. Take the time to focus on these fundamentals, especially when learning new chords or songs. With consistent effort and attention to detail, you will notice a significant improvement in your ease of fingering and overall playing ability.
Reducing Finger Pressure on the Fretboard
When playing the acoustic guitar, it’s common for beginners to exert excessive finger pressure on the fretboard. While it may seem necessary to press down hard to produce clear notes and chords, it can actually hinder your playing by causing unnecessary tension and fatigue. By learning to reduce finger pressure, you can improve ease and fluidity in your fingering. Here are some helpful techniques:
1. Use Only the Necessary Force: Train yourself to use only the minimum amount of finger pressure needed to produce a clean sound. Experiment with applying gradual pressure until the notes ring clear, and avoid squeezing the fretboard too tightly. Remember, it’s about precision, not force.
2. Focus on Fingertip Contact: Instead of pressing down with the entire finger, concentrate on using the fingertips to apply pressure on the strings. This allows for more accurate placement and reduces the need for excessive finger pressure. Additionally, using the fingertips effectively minimizes the chance of muting adjacent strings.
3. Use Your Arm and Hand Weight: Utilize the weight of your arm and the natural strength of your hand to apply pressure on the fretboard. Rather than relying solely on finger muscles, allow the weight of your arm to assist in pressing down the strings. This technique reduces strain on your fingers and promotes a lighter touch.
4. Relax Your Hands and Fingers: Keep your hands and fingers relaxed while playing. Tension in the muscles can lead to increased finger pressure and decreased flexibility. Take regular breaks during practice sessions to shake out any tension and ensure that you are approaching the fretboard with a relaxed and loose grip.
5. Optimize Finger Placement: Pay attention to your finger placement on the fretboard. Make sure to position your fingers directly behind the fret wire, as this requires less pressure to produce clear notes. Practicing accurate finger placement will reduce the need for excessive pressure and enhance the ease of fingering.
6. Gradually Increase Finger Strength: Building finger strength through regular practice will allow you to fret chords with less effort. Gradually increase the time spent practicing chord shapes and finger exercises to develop the strength necessary for a lighter touch on the strings.
By implementing these techniques, you can reduce finger pressure on the fretboard, leading to improved playability and a more relaxed playing experience. Remember, it’s all about finding the right balance of pressure to produce clean, clear notes without unnecessary strain. Practice regularly and remain mindful of your finger pressure, and in time, you will notice a significant improvement in your ease of fingering on the acoustic guitar.
Stretching and Warming up Your Fingers
Before diving into playing the acoustic guitar, it’s essential to warm up and stretch your fingers. This prepares your hands for playing, increases flexibility, and helps prevent injuries. Incorporating finger warm-up exercises into your practice routine can significantly improve your ease of fingering. Here are some effective techniques:
1. Finger Stretches: Start by extending your hand in front of you, palm facing down. Gently pull each finger back with your other hand, holding the stretch for a few seconds before releasing. Repeat this process for each finger, ensuring you stretch both the front and back of your fingers.
2. Finger Tapping: Begin with your fingers curled into a loose fist. One at a time, tap each finger onto a flat surface, starting with your pinky finger and working your way to your index finger. This exercise improves finger independence, coordination, and dexterity.
3. Finger Rolling: Place your fingers on a flat surface and roll each finger from side to side. This exercise helps loosen up the joints and increases finger mobility.
4. Finger Press-and-Release: Press each finger onto a flat surface, starting with your pinky finger and moving to your index finger. Hold the press for a few seconds and release. Repeat this process for all fingers. This exercise helps improve finger strength and flexibility.
5. Hand and Wrist Rotation: Extend your arm in front of you with your palm facing down. Slowly rotate your wrist in a circular motion, both clockwise and counterclockwise. This movement helps loosen up the wrist and gently stretches the hand muscles.
6. Finger Tension Release: Shake your hands gently, allowing the fingers to loosen and relax. This exercise helps release any tension or stiffness in the fingers and prepares them for playing.
Perform these warm-up exercises for at least five to ten minutes before each practice session or performance. Additionally, take short breaks during extended playing sessions to stretch and relax your fingers further.
Remember, warming up and stretching your fingers is critical for maintaining healthy hands and improving your fingering ability on the acoustic guitar. By incorporating these exercises into your routine, you’ll notice increased agility and dexterity, allowing you to play more comfortably and with greater ease.
Using Capo and Open Tunings
To make an acoustic guitar easier to finger and play, you can utilize the techniques of using a capo and experimenting with open tunings. These techniques offer alternative ways to approach chord formations and can open up new possibilities for creativity and ease of playing.
1. Capo: A capo is a device that clamps onto the fretboard, raising the pitch of the strings. By placing a capo on a specific fret, you can effectively change the key of the guitar without having to learn new chord shapes. This can be particularly useful when playing songs with difficult chord formations or when needing to match a vocal range. By using a capo to transpose the key, you can play familiar open chord shapes in more comfortable positions, making the fingering easier and more enjoyable.
2. Open Tunings: Open tunings involve tuning the strings of the guitar to a specific chord, creating a unique and harmonious sound. Unlike standard tuning (EADGBe), open tunings allow you to play full-sounding chords effortlessly by simply strumming the open strings. Open tunings can simplify chord shapes and make finger placement more comfortable and intuitive. Common open tunings include Open D (DADF#AD) and Open G (DGDGBD), among others.
Both capos and open tunings offer valuable tools for enhancing playability on the acoustic guitar, especially for players who struggle with certain chord formations or find traditional tuning challenging. Here are a few tips for using capos and open tunings:
1. Experiment and Explore: Don’t be afraid to experiment with different capo positions and open tunings to discover new sounds and find the ones that work best for you. Every player has different preferences, so take the time to explore and find the combinations that suit your playing style and make fingering chords easier.
2. Learn the Corresponding Chord Shapes: When using a capo or open tunings, it’s essential to familiarize yourself with the chord shapes that correspond to the desired key or tuning. Spend time practicing and memorizing these new chord shapes to become comfortable with the finger placements and transitions.
3. Adapt Songs to Your Skill Level: Utilize capos and open tunings to adapt songs to your skill level. If a song’s original chord progression is challenging to finger, try using a capo to transpose the chords to a more comfortable position or experiment with open tunings to simplify the chord shapes.
4. Mix Capos and Open Tunings: Get creative by combining capos and open tunings. For example, you can use a capo on the second or third fret while playing in an open tuning to expand your tonal range and explore different chord voicings.
Capos and open tunings provide valuable tools to make the acoustic guitar easier to finger and play. Incorporating these techniques into your practice routine will not only enhance your playing ability but also inspire new musical ideas and expand your repertoire. Enjoy the freedom and creativity that capos and open tunings offer while making your playing experience more enjoyable and comfortable on the acoustic guitar.
Trying Lighter Gauge Strings
Another effective method for making an acoustic guitar easier to finger is to try using lighter gauge strings. The gauge of a string refers to its thickness, and lighter gauge strings require less tension to achieve proper pitch. Here are some reasons why experimenting with lighter gauge strings can improve your ease of fingering:
1. Reduced String Tension: Lighter gauge strings exert less tension on the guitar neck compared to heavier gauge strings. This means you’ll need to apply less finger pressure to fret notes and chords, resulting in a more comfortable and effortless playing experience. Reduced string tension can also reduce finger fatigue, allowing you to play for longer periods without discomfort.
2. Easier Bending and Vibrato: Lighter gauge strings are easier to bend, making it simpler to achieve expressive techniques like string bends and vibrato. The decreased tension allows the string to move more fluidly under your fingers, enhancing your ability to add dynamic and emotional nuances to your playing.
3. Increased Speed and Agility: Lighter gauge strings require less effort to push down, allowing your fingers to move more quickly and smoothly across the fretboard. This can be especially beneficial for intricate passages or fast-paced songs where rapid finger movements are required. Lighter gauge strings can improve your agility and precision, making complex passages easier to execute.
4. Enhanced Resonance and Tone: Lighter gauge strings can produce a brighter and more vibrant tone compared to heavier gauge strings. This can be particularly beneficial if you prefer a brighter sound or if you find that heavy strings make your guitar sound muffled or less resonant. Experimenting with lighter gauge strings may result in a tonal quality that suits your playing style and preferences.
5. Easier Chord Formations: Lighter gauge strings make it easier to form chords accurately. The reduced tension allows the strings to require less pressure to achieve proper finger placement, resulting in cleaner and clearer chord voicings. This can be especially advantageous for beginners or players with smaller hands who struggle with complex chord shapes.
6. Adaptability to Finger Strength: Lighter gauge strings are more forgiving on the fingers, making them suitable for players with less finger strength or those transitioning from other instruments. If your fingers are still developing calluses or if you find heavier gauge strings uncomfortable, lighter gauges can provide a gentler playing experience while you build strength and endurance.
When transitioning to lighter gauge strings, it’s important to note that they may have a slightly different feel and sound compared to heavier gauges. The change in tension may require adjustments to the guitar’s setup, such as adjusting the truss rod or bridge saddle height. Consulting a professional guitar technician can help ensure that your guitar is properly set up for the lighter gauge strings.
Experimenting with lighter gauge strings can transform your playing experience by making the acoustic guitar easier to finger while offering increased comfort, speed, and tonal options. Explore different gauge options and find the balance that works best for your playing style, hand strength, and musical preferences.
Practicing Regularly to Strengthen Your Fingers
One of the most effective ways to make an acoustic guitar easier to finger is to develop strength and dexterity in your fingers through regular practice. Just like any physical activity, consistent practice is key to building finger strength and improving your overall playing ability. Here are some tips for incorporating finger-strengthening exercises into your practice routine:
1. Finger Exercises: Dedicate some time each practice session to specific finger exercises that target the muscles used for fretting and fingerpicking. Focus on exercises that involve fretting individual notes, playing scales, or practicing chord transitions. Gradually increase the speed and complexity of these exercises as your finger strength improves.
2. Scales and Arpeggios: Practicing scales and arpeggios is an excellent way to strengthen your fingers while improving your fretting accuracy and speed. Start with basic scales, such as the major and minor scales, and gradually work your way to more advanced patterns. Remember to use alternate picking or fingerpicking techniques while practicing to involve all your fingers.
3. Chord Progressions: Spend time practicing various chord progressions to develop finger strength and coordination. Start with simple progressions and gradually progress to more complex chord shapes. Challenge yourself to play smoothly and cleanly without relying on excessive finger pressure.
4. Finger Gymnastics: Engage in finger gymnastics exercises that involve stretching, bending, and lifting your fingers. This helps improve finger independence and dexterity. One exercise involves extending your fingers as wide as possible and then curling them into a fist. Repeat this motion several times to loosen and strengthen your fingers.
5. Finger Tapping Exercises: Finger tapping exercises involve tapping the strings with your picking hand while maintaining a steady rhythm with your fretting hand. This technique builds finger strength and coordination between your fretting and picking hands. Start slowly and gradually increase the speed as you become more comfortable.
6. Repetition and Consistency: Practice regularly and consistently to build finger strength and endurance. Shorter, focused practice sessions every day are more effective than sporadic longer sessions. Make finger strengthening exercises a part of your daily routine to see significant improvements over time.
Remember to take breaks and rest your hands when you feel any discomfort or fatigue. Overworking your fingers can lead to injury or strain. Listen to your body and give it the rest it needs to recover.
By consistently practicing finger-strengthening exercises, you will gradually enhance your finger strength, increase your control over the fretboard, and make the acoustic guitar easier to finger. The more you practice, the more effortless it will become to form chords, play melodies, and explore the full potential of your instrument.
Conclusion
Learning to make an acoustic guitar easier to finger is a valuable skill that can enhance your playing experience and enable you to express yourself more freely. By understanding the anatomy of the guitar, choosing the right instrument, and practicing proper maintenance, you can optimize playability and ease of fingering. Additionally, techniques such as correct hand placement, reducing finger pressure, stretching, and warm-up exercises can help improve your finger dexterity and minimize tension.
Exploring tools like capos and open tunings allows for more comfortable chord formations and opens up new possibilities for creative expression. Trying lighter gauge strings and practicing regularly to strengthen your fingers can also contribute to making the guitar easier to play, enhancing your technique and control.
Remember, developing these skills and techniques takes time and dedication. Be patient with yourself and enjoy the process of improving your playing. Focus on maintaining a relaxed and comfortable playing posture, and don’t forget to have fun while experimenting and exploring new techniques.
Ultimately, by incorporating these strategies into your practice routine and adapting them to your individual needs and preferences, you’ll be well on your way to making the acoustic guitar easier to finger. Embrace the journey, embrace the challenges, and embrace the joy of playing the instrument you love.