Introduction
So, you've just picked up your brand-new electric guitar, and you're eager to plug in and let the music flow. But before you crank up the volume and let those sweet riffs fill the air, there's an essential aspect of guitar maintenance that often goes unnoticed: grounding your electric guitar. This crucial step ensures that your guitar's electrical components function properly, minimizes unwanted noise and interference, and most importantly, keeps you safe from electric shocks.
Grounding your electric guitar is a fundamental practice that every guitarist should be familiar with. Whether you're a seasoned player or just starting, understanding how to properly ground your instrument is key to maintaining its performance and longevity. In this guide, we'll walk you through the process of grounding your electric guitar, from the reasons why it's important to the tools and steps needed to get the job done. So, grab your guitar, roll up your sleeves, and let's dive into the world of grounding for a smoother, safer, and better sounding musical experience.
Why Grounding Your Electric Guitar is Important
Grounding your electric guitar serves several critical purposes that directly impact its performance and your safety. Here are a few reasons why grounding is essential:
- Electrical Safety: Proper grounding ensures that any excess electrical current is safely directed away from the guitar and into the ground, reducing the risk of electric shock for the player.
- Minimizing Interference: Grounding helps eliminate unwanted buzzing, humming, and other interference that can result from electromagnetic noise. This interference can be particularly noticeable when using distortion or high-gain settings.
- Shielding Against Noise: Grounding shields the electronic components of the guitar from external electromagnetic fields, which can otherwise induce noise in the signal path. This is especially important in environments with high electronic interference, such as recording studios or live performance venues.
- Protecting Components: Proper grounding protects the sensitive electronic components of the guitar, such as pickups and tone circuits, from damage caused by static electricity or electrical surges.
- Enhancing Signal Integrity: A well-grounded guitar ensures that the signal path remains clear and free from unwanted noise, resulting in a cleaner and more faithful reproduction of your playing.
By understanding the importance of grounding your electric guitar, you can ensure that your instrument not only sounds its best but also operates safely and reliably. With these benefits in mind, let’s move on to the tools and materials needed to ground your electric guitar effectively.
Tools and Materials Needed
Before you begin the process of grounding your electric guitar, it’s essential to gather the necessary tools and materials to ensure a smooth and effective procedure. Here’s a list of items you’ll need:
- Soldering Iron: A soldering iron is crucial for making secure electrical connections during the grounding process. Choose a soldering iron with a wattage suitable for guitar electronics work, typically between 15-30 watts.
- Solder: High-quality electrical solder is essential for creating reliable and durable connections between the wires and components.
- Wire Strippers: These tools are necessary for cleanly and safely removing insulation from the wires, allowing for proper soldering and connections.
- Multimeter: A multimeter is used to test the continuity of the ground connections and ensure that the guitar’s electronics are properly grounded.
- Wire and Shielding Material: You may need additional wire and shielding material to create new ground connections or shield the internal cavities of the guitar to minimize interference.
- Electrical Tape: Electrical tape can be used to insulate and protect connections from accidental contact and to secure wires in place.
- Work Area and Ventilation: Ensure you have a well-ventilated workspace with a suitable work surface to safely handle the soldering iron and other tools.
- Reference Material: It’s helpful to have access to wiring diagrams or reference materials specific to your guitar model to understand the existing grounding configuration and make any necessary modifications.
By having these tools and materials at your disposal, you’ll be well-prepared to embark on the grounding process with confidence. With the groundwork laid out, let’s move on to the step-by-step guide to grounding your electric guitar.
Step-by-Step Guide to Grounding Your Electric Guitar
Grounding your electric guitar involves a series of systematic steps to ensure that the electrical components are properly connected and shielded. Here’s a comprehensive guide to grounding your electric guitar:
- Prepare the Work Area: Set up a well-ventilated workspace with a suitable work surface. Ensure that you have easy access to your tools and materials.
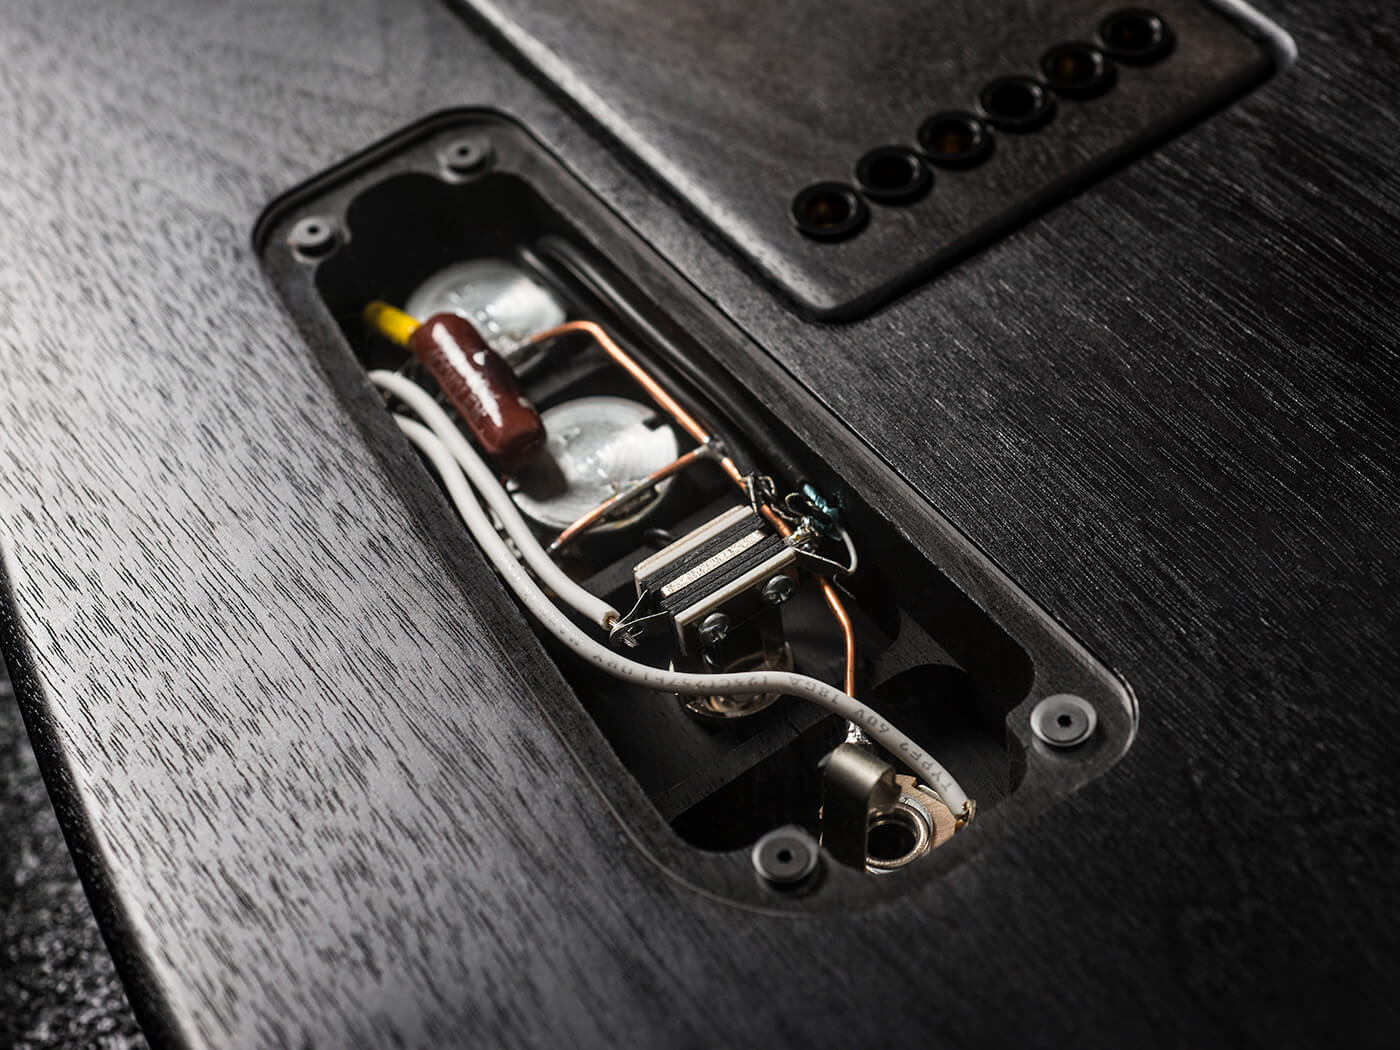
- Remove the Guitar’s Electronics Cavity Cover: Using the appropriate tools, carefully remove the cover from the electronics cavity to access the internal components.
- Identify Existing Ground Connections: Take note of the existing ground connections within the guitar, including the bridge ground wire and any additional shielding connections.
- Inspect and Clean Existing Grounding Points: Examine the grounding points for corrosion or poor connections. Clean the contact points using a suitable electronics cleaner to ensure good conductivity.
- Create New Ground Connections (if necessary): If your guitar lacks sufficient grounding or shielding, create new ground connections using additional wire and shielding material. Ensure that these new connections are securely soldered to the appropriate grounding points.
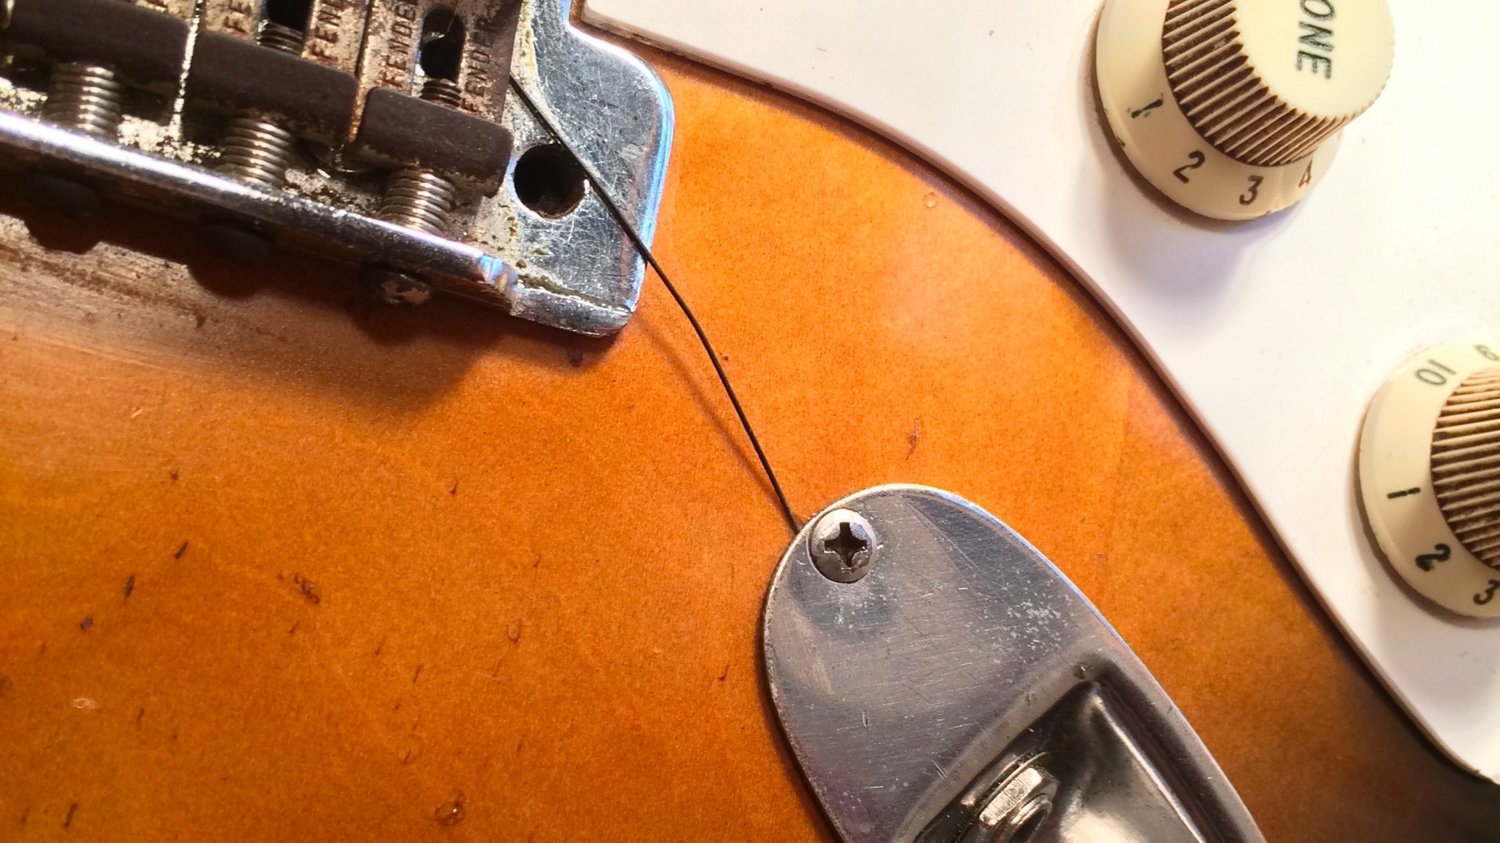
- Connect the Bridge Ground Wire: Reconnect the bridge ground wire to its designated grounding point, typically on the back of a tone or volume potentiometer.
- Shield the Electronics Cavity (if necessary): If your guitar experiences excessive interference, consider shielding the electronics cavity with conductive shielding material to minimize electromagnetic noise.
- Solder the Ground Connections: Using a soldering iron and high-quality electrical solder, carefully solder the ground connections to ensure reliable and secure electrical contact.
- Test the Ground Connections: Use a multimeter to test the continuity of the ground connections and verify that all components are effectively grounded.
- Reassemble the Guitar: Once the grounding process is complete and verified, reassemble the electronics cavity cover and ensure that all components are securely in place.
Following these step-by-step instructions will help you effectively ground your electric guitar, ensuring optimal performance and minimizing unwanted interference. With the grounding process completed, the next crucial step is to test your ground connection to validate its effectiveness.
Testing Your Ground Connection
After completing the grounding process, it’s crucial to verify the effectiveness of the ground connections to ensure that your electric guitar is properly grounded. Testing the ground connection involves a few simple steps to confirm that the electrical components are adequately grounded and shielded. Here’s how to test your ground connection:
- Set Up the Multimeter: Switch the multimeter to the continuity or resistance setting, depending on the available options on your device.
- Test the Bridge Ground: Place one probe of the multimeter on the bridge or tremolo system of the guitar and the other probe on a known ground point, such as the sleeve of the output jack or the back of a potentiometer. A successful ground connection will result in a reading of near zero ohms or indicate continuity.
- Check Additional Grounding Points: Test the continuity of other ground connections, including the back of potentiometers, the control cavity shielding, and any additional grounding points within the guitar’s electronics.
- Inspect for Interference: While playing the guitar, listen for any signs of unwanted buzzing, humming, or interference. If the grounding is effective, you should notice a significant reduction in such noise compared to before the grounding process.
If the multimeter readings indicate continuity and the guitar exhibits reduced interference, it’s a strong indication that the ground connections are successful. However, if you encounter any issues during testing, revisit the grounding process to identify and rectify any potential issues with the connections.
By thoroughly testing your ground connection, you can ensure that your electric guitar’s electronics are effectively grounded, minimizing interference and providing a safe and reliable playing experience. With the ground connection validated, it’s important to maintain good grounding practices to sustain the integrity of the electrical components.
Tips for Maintaining a Good Ground Connection
Ensuring a reliable ground connection is essential for the optimal performance and safety of your electric guitar. Here are some valuable tips to help you maintain a good ground connection:
- Regular Inspection: Periodically inspect the ground connections and wiring in your guitar to check for any signs of corrosion, loose connections, or wear. Address any issues promptly to maintain a solid ground connection.
- Use Quality Components: When making or replacing ground connections, use high-quality wire, solder, and shielding materials to ensure durable and reliable connections that resist corrosion and degradation over time.
- Secure Solder Joints: When soldering ground connections, ensure that the joints are securely and neatly soldered to prevent any potential breakage or intermittent connections that can compromise the ground path.
- Proper Shielding: If your guitar experiences excessive electromagnetic interference, consider adding or upgrading shielding material within the electronics cavity to minimize noise and maintain a clean ground reference.
- Grounding the Amplifier: Ensure that the amplifier or audio equipment you connect your guitar to is also properly grounded to prevent ground loops and minimize the risk of electrical shock.
- Grounding in Different Environments: Be mindful of the impact of different performance environments on grounding. In venues with complex electrical systems, such as stages with multiple interconnected devices, pay attention to potential grounding issues that may arise.
- Seek Professional Assistance: If you encounter persistent grounding issues or are unsure about the grounding process, seek assistance from a qualified guitar technician or luthier who can diagnose and resolve any complex grounding issues.
By following these tips, you can maintain a solid ground connection in your electric guitar, ensuring consistent performance, minimal interference, and a safe playing experience. With proper maintenance and attention to grounding practices, your electric guitar will continue to deliver the exceptional sound quality and reliability you expect.
Conclusion
Grounding your electric guitar is a foundational aspect of instrument maintenance that directly impacts its performance, safety, and sound quality. By understanding the importance of grounding and following the step-by-step process outlined in this guide, you can ensure that your guitar’s electrical components are effectively grounded and shielded, resulting in a cleaner signal path and minimizing unwanted interference.
From preparing the necessary tools and materials to testing the ground connection, each step plays a vital role in achieving a reliable ground connection. By maintaining good grounding practices and periodically inspecting the ground connections, you can sustain the integrity of your guitar’s electrical system and enjoy consistent performance over time.
Whether you’re a seasoned guitarist or a beginner, mastering the art of grounding your electric guitar empowers you to take control of your instrument’s electrical integrity and sound quality. By incorporating the tips for maintaining a good ground connection, you can mitigate potential issues and ensure that your guitar continues to deliver the exceptional sound and performance you desire.
So, as you embark on your musical journey, remember that proper grounding is not just a technical necessity but a crucial element in shaping the sonic character of your electric guitar. With a well-grounded instrument, you can unleash your creativity and let the music resonate with clarity, free from unwanted noise and interference.