Introduction
Welcome to our comprehensive guide on how to use a DI box for acoustic guitar. Whether you are a seasoned musician or just starting out, understanding the importance of a DI (Direct Injection) Box can greatly improve the quality of your sound when performing live or recording in a studio. In this article, we will explore what a DI Box is, why it is crucial for acoustic guitar players, and provide step-by-step instructions on how to set up and use a DI Box.
With the rise of live performances and the increasing demand for clarity and precision in sound reproduction, the role of a DI Box has become indispensable for acoustic guitarists. A DI Box converts the high-impedance signal produced by an acoustic guitar’s pickup into a low-impedance signal, making it compatible with professional audio equipment such as mixers, audio interfaces, and PA systems. This allows for a cleaner signal transmission, eliminating noise, distortion, and impedance mismatches that can adversely affect your sound quality.
Using a DI Box not only ensures optimal sound reproduction but also provides convenience and flexibility in various performance scenarios. Whether you are playing in a small venue with limited amplification options or connecting your acoustic guitar directly to a recording interface in a studio setting, a DI Box acts as a reliable intermediary, guaranteeing consistent tone and signal integrity.
In the following sections, we will delve deeper into the technical aspects of setting up a DI Box, including connecting your acoustic guitar, adjusting input gain levels, understanding the ground lift switch, and connecting to a mixer or PA system. We will also address common troubleshooting issues that may arise and provide solutions to overcome them.
By the end of this guide, you will have the knowledge and confidence to utilize a DI Box effectively, enhancing the overall sound quality of your acoustic guitar and elevating your performance capabilities. So, let’s dive in and explore the world of DI Boxes and their invaluable role in amplifying and capturing the essence of your acoustic guitar.
What is a DI Box?
A DI Box, short for Direct Injection Box, is an essential tool for musicians, especially acoustic guitarists, in the world of live performances and studio recordings. It serves as a vital link between your acoustic guitar and professional audio equipment, ensuring optimal signal quality and compatibility.
At its core, a DI Box is essentially a specialized audio transformer that converts the high-impedance signal output from your guitar’s pickup into a low-impedance signal that can be easily interpreted by mixers, audio interfaces, and PA systems. This transformation is crucial because high-impedance signals are prone to interference, noise, and signal degradation over long cable runs or when connected to equipment with low input impedance.
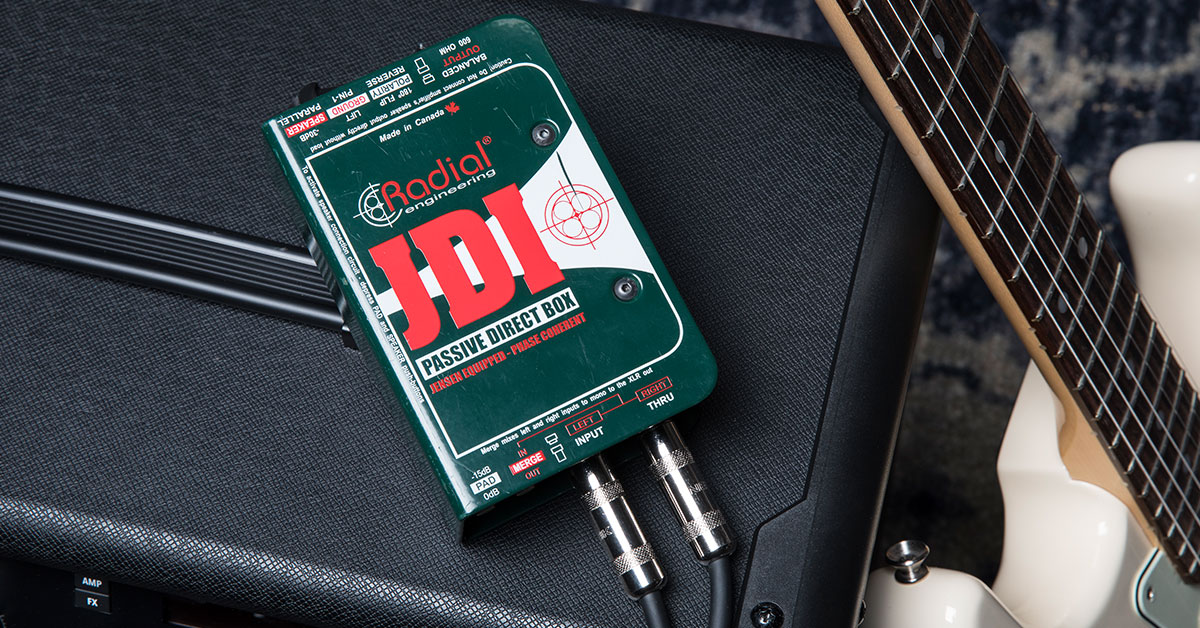
DI Boxes come in various shapes and sizes, ranging from compact portable units to larger, feature-rich models with additional controls and options. Some DI Boxes are passive, meaning they don’t require external power and rely solely on the audio transformer to do the signal conversion. Others are active, incorporating built-in preamps and requiring batteries or phantom power to operate.
One of the primary functions of a DI Box is to balance and match the impedance of your guitar’s pickup with the input impedance of the recording or amplification equipment. This ensures a clean and accurate signal transfer, minimizing noise and maximizing the fidelity of your acoustic guitar’s sound.
Additionally, DI Boxes often provide other useful features to further enhance your signal quality and offer connectivity options. These can include adjustable input gain controls, ground lift switches to eliminate ground loops and reduce electrical interference, and outputs that allow you to connect to a mixer, PA system, or recording interface, among other audio devices.
Overall, a DI Box is an essential tool for any acoustic guitarist seeking professional sound quality. It bridges the gap between your guitar’s pickup and audio equipment, providing a reliable and transparent connection that takes your sound to a new level. With a DI Box in your setup, you can experience improved signal fidelity, reduced noise and interference, and greater control over your acoustic guitar’s tone.
Why Use a DI Box for Acoustic Guitar?
Using a DI Box for your acoustic guitar offers several significant advantages that can greatly enhance your overall sound quality and performance experience. Let’s take a closer look at why utilizing a DI Box is highly recommended for acoustic guitarists:
1. Signal Integrity: A DI Box ensures that the signal from your acoustic guitar’s pickup remains clear and intact throughout the audio chain. By converting the high-impedance signal into a low-impedance signal, a DI Box reduces the risk of signal loss, distortion, and noise that may occur when connected directly to the amplifier or audio interface.
2. Impedance Matching: Impedance matching is crucial for maintaining the integrity of your guitar’s tone. A DI Box matches the high impedance output of your acoustic guitar’s pickup with the low impedance input of professional audio equipment, such as mixers and recording interfaces. This prevents signal degradation and ensures the accurate reproduction of your instrument’s sound.
3. Noise Reduction: An acoustic guitar pickup can be sensitive to external interference, resulting in unwanted noise. By using a DI Box, you can eliminate or effectively reduce electrical hums, ground loops, and electromagnetic interference that can plague your signal. This results in a cleaner sound and a more professional performance.
4. Flexibility in Sound Reinforcement: When performing in various venues, the available amplification systems may not always be ideal for an acoustic guitar. A DI Box allows you to connect your acoustic guitar directly to the PA system or mixer, giving you more control over the sound and ensuring consistency in tone across different performance spaces.
5. Versatile Connection Options: DI Boxes typically offer multiple output options, allowing you to connect to different audio devices simultaneously. This versatility enables you to route your guitar’s signal to various destinations, such as a mixer for front-of-house sound reinforcement and a recording interface for studio recording.
6. Improved Sound Reproduction: By utilizing a DI Box, you can achieve a balanced and professional sound, whether you are performing live or recording in a studio. The precision and consistency provided by a DI Box enhance the nuances and dynamics of your acoustic guitar, resulting in a more accurate and faithful representation of your instrument’s tone.
In summary, using a DI Box for your acoustic guitar is essential for maintaining signal integrity, reducing noise, achieving impedance matching, and gaining greater control over your sound. It opens up a world of possibilities for live performances and studio recordings, allowing you to showcase the true beauty and unique characteristics of your acoustic guitar with clarity and precision.
Setting up your DI Box
Setting up your DI Box correctly is crucial to ensure optimal sound quality and reliable performance. Here are the steps to follow when setting up your DI Box:
1. Choose the Right DI Box: Select a DI Box that suits your specific needs and preferences. Consider factors like input/output options, whether you need a passive or active DI Box, and any additional features that may be beneficial to your setup.
2. Connect the DI Box: Begin by connecting your acoustic guitar to the input of the DI Box. Most DI Boxes have a 1/4″ instrument input designed to accommodate the standard output jack of an acoustic guitar. Ensure a secure connection is made.
3. Adjust Input Gain: Many DI Boxes have an input gain control that allows you to adjust the level of the incoming signal. Start with the gain set to a nominal position and make any necessary adjustments to avoid distortion or signal clipping. Experiment with different gain settings to find the optimal balance between volume and clarity.
4. Ground Lift Switch: Some DI Boxes feature a ground lift switch, which can be useful in eliminating ground loop hum caused by electrical interference. If you experience a humming sound when your DI Box is connected, try toggling the ground lift switch to see if it eliminates or reduces the problem.
5. Connect to Mixer/PA System: Use an XLR cable to connect the output of the DI Box to a mixer or PA system. Locate the XLR output on your DI Box and connect it to an available input on the mixer or PA system. Ensure a secure connection is made, and verify that the input channel on the mixer or PA system is properly configured for the DI Box signal.
6. Set the Output Level: Adjust the output level of the DI Box to match the input requirements of the connected audio device. This helps maintain consistent volume levels and prevents overloading or distorting the inputs on the mixer or PA system. Consult the user manual of your DI Box for specific instructions on adjusting the output level.
7. Test and Fine-Tune: Before your performance or recording session, take the time to test your setup and make any necessary adjustments. Play your acoustic guitar and listen for any issues such as signal distortion, noise, or imbalances. Use the controls on your DI Box and audio equipment to fine-tune the sound to your liking.
Properly setting up your DI Box ensures that your acoustic guitar’s signal is accurately transmitted, reducing the risk of unwanted noise and signal degradation. Take the time to familiarize yourself with the specific controls and features of your DI Box, as each model may have slight variations in operation.
Remember, the goal is to achieve a transparent and balanced signal transfer, allowing the true tone and nuances of your acoustic guitar to shine through in your performances or recordings.
Connecting your Acoustic Guitar to the DI Box
Connecting your acoustic guitar to the DI Box correctly is essential for optimal signal transfer and sound quality. Follow these steps to ensure a proper connection:
1. Locate the Instrument Input: Identify the instrument input on your DI Box. It is typically labeled as “Input” or “Instrument In.” This input is designed to accommodate the standard 1/4″ output jack found on acoustic guitars.
2. Plug in the Guitar: Take your 1/4″ instrument cable and plug one end into the output jack of your acoustic guitar. Ensure that the connection is secure to avoid any signal dropouts or interference.
3. Connect the Cable: Take the other end of the instrument cable and plug it into the instrument input on the DI Box. Again, ensure a secure connection is made to maintain signal integrity.
4. Check for Signal: Once the guitar is connected to the DI Box, check for signal flow. If your DI Box has an LED indicator, it may light up to indicate that there is a signal passing through. You can strum your acoustic guitar to test and confirm that the signal is being detected by the DI Box.
5. Adjust Input Gain: Many DI Boxes have an input gain control that allows you to adjust the level of the incoming signal. Start with the gain set to a neutral position and then experiment with different settings to find the ideal balance. Aim for a clear and balanced signal without any distortion or clipping.
6. Use a High-Quality Cable: It is important to use a high-quality instrument cable to connect your guitar to the DI Box. This helps ensure optimal signal transmission and reduces the risk of signal degradation or interference.
7. Consider DI with Preamp: If you have a passive acoustic guitar with a low-output pickup, consider using a DI Box with a built-in preamp. This can provide additional gain and boost the signal before it enters the DI Box, ensuring a stronger and cleaner signal.
By following these steps, you can ensure a proper and secure connection between your acoustic guitar and the DI Box. This connection is crucial in achieving a clean, balanced, and noise-free signal from your guitar, allowing you to fully utilize the benefits of the DI Box in enhancing your acoustic guitar’s sound.
Adjusting the Input Gain
Adjusting the input gain on your DI Box is a critical step in achieving the optimal sound quality and level for your acoustic guitar signal. Follow these guidelines to adjust the input gain effectively:
1. Find the Input Gain Control: Locate the input gain control on your DI Box. It is often labeled as “Gain,” “Input Level,” or a similar term. This control allows you to adjust the level of the incoming signal from your acoustic guitar.
2. Start with a Neutral Position: Begin by setting the input gain to a neutral or default position. This ensures that you have a balanced starting point to work with. If your DI Box has a numbered scale, set it to the middle position or “0” as a starting point.
3. Strum Your Guitar: Play your acoustic guitar at a typical performance level while monitoring the signal through the DI Box. Listen for any distortion or clipping. If the signal is too low and lacks clarity, gradually increase the input gain. If the signal is too strong and distorts, reduce the input gain accordingly.
4. Aim for Clarity and Headroom: The goal is to achieve a clear and balanced signal without any audible distortion or clipping. Ensure that the acoustic guitar’s natural tone and dynamics are accurately represented. Pay attention to the loudest parts of your playing and ensure that there is enough headroom to prevent any clipping or unwanted distortion.
5. Avoid Extreme Settings: When adjusting the input gain, it’s important to avoid extreme settings. Excessive gain can introduce noise, distortion, and clipping, while too little gain can result in a weak or buried signal. Aim for a balanced setting that allows your acoustic guitar’s sound to shine through without any unwanted artifacts.
6. Consider Room Acoustics: Keep in mind that the acoustic characteristics of the performance space or recording environment may influence the input gain settings. If you’re in a highly reverberant room, you may need to lower the gain to prevent the signal from becoming too muddy or washed out. Conversely, in a dry or dead room, you may need to boost the gain slightly to compensate for the lack of natural ambience.
7. Monitor the Output Level: While adjusting the input gain, keep an eye on the output level of the DI Box. Ensure that the output level is appropriate for connecting to your mixer, recording interface, or PA system. If necessary, adjust the output level of the DI Box to match the input level requirements of your audio equipment.
Remember, the input gain setting on your DI Box plays a crucial role in capturing the true essence of your acoustic guitar’s sound. Take the time to fine-tune this setting to achieve a balanced and pristine signal that accurately represents your playing style and musical expression.
Understanding the Ground Lift Switch
The ground lift switch is a common feature found on many DI Boxes and serves a vital function in eliminating unwanted noise and interference in your audio signal. Let’s delve into the importance of the ground lift switch and how to use it effectively:
1. What is a Ground Lift Switch?
The ground lift switch is a small toggle or button typically located on the outer panel of a DI Box. Its purpose is to interrupt the electrical connection between the ground (earth) of the DI Box and the audio source it is connected to, such as your acoustic guitar. Ground loops, which can cause hums, buzzes, or other electrical noises, can be effectively addressed using the ground lift switch.
2. When to Use the Ground Lift Switch?
If you experience a humming sound or noticeable electrical interference when using your DI Box, it is typically due to a ground loop – a situation where multiple electrical devices share a common ground path, creating a loop of electrical current. In such cases, engaging the ground lift switch can help break the loop and eliminate the unwanted noise.
3. How to Use the Ground Lift Switch?
Engaging the ground lift switch is a simple process that involves flicking the switch to the “lift” position. This essentially creates an electrical break between the ground connection of the DI Box and the source device, interrupting the ground loop. It is important to note that the ground lift switch should only be used if ground loop noise is present and not as a standard practice.
4. Testing and Monitoring:
When using the ground lift switch, it’s crucial to monitor the audio signal for any changes in sound quality. In some cases, engaging the ground lift switch may successfully address ground loop noise. However, it is also possible that using the ground lift switch may result in a loss of shielding or introduce other unwanted side effects. Therefore, take the time to monitor the signal after engaging the ground lift switch and ensure that the sound remains clear and free from any new issues.
5. Understanding Limitations:
While the ground lift switch is an effective tool, it is important to recognize its limitations. If the ground loop issue persists even after using the ground lift switch, other troubleshooting measures may be necessary, such as rearranging power sources, utilizing high-quality cables, or using isolation transformers. If you are unsure how to address persistent ground loop noise, consulting with a sound engineer or technical expert can provide valuable guidance.
6. Ground Lift vs. Grounding:
It is important to distinguish between the ground lift switch and the need for proper grounding. While the ground lift switch can help in certain situations, adequate grounding is essential for safety reasons. Always ensure that your DI Box and audio equipment are properly grounded according to local electrical standards.
Understanding how to use the ground lift switch effectively can help you combat unwanted noise and interference, leading to a cleaner and more professional sound. By using this feature judiciously and in conjunction with other troubleshooting methods, you can ensure a noise-free signal for your acoustic guitar.
Connecting the DI Box to a Mixer or PA System
Connecting your DI Box to a mixer or PA system is a crucial step in ensuring that your acoustic guitar signal reaches the intended destination with clarity and fidelity. Here’s how to properly connect your DI Box:
1. Identify the Output Connections:
Locate the output options on your DI Box. Most DI Boxes have an XLR output, which is the standard connection for connecting to mixers and PA systems. Some DI Boxes may also have additional output options such as 1/4″ TRS or RCA connectors.
2. Prepare the Appropriate Cables:
Choose the appropriate cable to connect the output of your DI Box to the mixer or PA system. If your DI Box has an XLR output, use an XLR cable. If it has a 1/4″ TRS output, use a 1/4″ TRS cable. Ensure that the cables are of good quality to minimize signal loss or interference.
3. Connect the Output of the DI Box:
Take one end of the appropriate cable and plug it into the output of your DI Box. If your DI Box has multiple output options, select the one that is compatible with the input connectors on your mixer or PA system.
4. Connect to the Mixer or PA System:
Identify an available input channel on the mixer or PA system where you want to connect the DI Box. Use the other end of the cable and plug it into the corresponding input on the mixer or PA system. Make sure the connection is secure.
5. Verify Input Configuration:
On the mixer or PA system, ensure the input channel that corresponds to the DI Box connection is properly configured. This may involve adjusting the input gain or selecting the appropriate input type (e.g., line, mic) to match the signal coming from the DI Box. Consult the mixer or PA system’s user manual for specific instructions.
6. Test and Make Adjustments:
Before your performance or recording session, test the connection and listen for any issues such as improper grounding, signal distortion, or noise. Adjust the input gain and other settings on the mixer or PA system to achieve the desired sound quality and volume.
7. Multiple DI Boxes:
If you are using multiple DI Boxes for multiple instruments, ensure that each DI Box is connected to its respective input channel on the mixer or PA system. Assigning each instrument to its own input channel allows for independent control and mixing.
By following these steps, you can establish a proper and reliable connection between your DI Box and the mixer or PA system. This connection is crucial in ensuring that your acoustic guitar’s signal is amplified and reproduced accurately, allowing your performance to shine through in a live or recorded setting.
Setting the Output Level
Setting the output level of your DI Box is an important step in ensuring that your acoustic guitar signal is delivered at the appropriate level to the connected audio equipment. Here’s how to effectively set the output level:
1. Identify the Output Level Control:
Locate the output level control on your DI Box. This control may be labeled as “Output Level,” “Level,” or similar terminology. It allows you to adjust the strength of the signal being sent to the connected mixer, PA system, or recording interface.
2. Start with a Neutral Position:
Begin by setting the output level control to a neutral or default position, typically indicated as “Unity” or “0 dB.” This ensures that you have a balanced starting point to work with.
3. Monitor the Input of the Audio Equipment:
Connect your DI Box to the input of the connected audio equipment, such as a mixer or PA system. In the case of recording, connect to the recording interface. Take note of the input level meters or indicators on the receiving equipment.
4. Play and Observe the Signal:
Play your acoustic guitar and observe the input level meters on the connected equipment. Make adjustments to the output level control on the DI Box until the input level meters read within an optimal range. Aim for a healthy signal level without exceeding the maximum threshold or causing distortion.
5. Avoid Overloading the Inputs:
It is crucial to ensure that the output level from your DI Box does not overload the inputs of the connected audio equipment. Overloading the inputs can lead to distortion, clipping, and a compromised sound quality. Keep an eye on the input level meters and make adjustments to the DI Box’s output level control as needed.
6. Adjust for Different Audio Devices:
Keep in mind that different audio devices may have varying input sensitivity. This means that the optimal output level on your DI Box may differ when connecting to different mixers, PA systems, or recording interfaces. Adjust the output level accordingly to match the input requirements of the specific equipment you are connecting to.
7. Test and Make Fine-Tuning Adjustments:
After initially setting the output level, take the time to test your setup and make any necessary fine-tuning adjustments. Play your acoustic guitar across different dynamic ranges and listen for any distortions, inconsistencies, or imbalances. Make further adjustments to the output level as needed to achieve a balanced and clean sound.
Setting the output level correctly ensures that the signal from your DI Box is delivered at an appropriate level to the destination audio device, allowing for accurate and optimal amplification or recording of your acoustic guitar. Take the time to carefully monitor and adjust the output level to achieve the best possible sound quality for your performance or recording.
Troubleshooting Common Issues
While using a DI Box for your acoustic guitar can greatly enhance your sound quality, you may encounter some common issues along the way. Here are some troubleshooting tips to address these issues:
1. Noise or Hum:
If you experience unwanted noise or hum in your signal, it could be due to several factors. First, check your cables and connections to ensure they are secure. If the issue persists, try engaging the ground lift switch on your DI Box to eliminate any ground loop issues. Additionally, make sure your audio equipment is properly grounded, as inadequate grounding can contribute to noise problems.
2. Distortion or Clipping:
If your signal is distorted or clipped, first check that the input gain and output levels on your DI Box are properly adjusted. Lower the input gain if the signal is too hot, causing distortion. Similarly, reduce the output level if the signal is clipping the input of the connected audio equipment. Making these adjustments can help regain a clean and undistorted signal.
3. Weak or Low Volume:
If your signal is too weak or low in volume, check the input gain on your DI Box and ensure it is set appropriately. Increasing the input gain can boost the level of your signal. Additionally, check the output level of the DI Box and adjust it accordingly to match the input level requirements of the connected audio equipment. Make sure your guitar’s volume is sufficient as well.
4. Phase Issues:
In some cases, when combining the DI Box signal with other microphones or audio sources, you may encounter phase cancellation issues. This can result in a thin or hollow sound. Experiment with reversing the phase (polarity) switch on the DI Box or adjusting the phase of the other audio sources to resolve the issue. Listen carefully and make incremental adjustments until the sound is balanced and full.
5. Signal Dropouts:
If you experience intermittent signal dropouts or loss, check all of your connections to ensure they are secure. A loose or faulty cable connection can cause signal dropouts. Additionally, inspect your batteries (if using an active DI Box) or power supply to ensure they are functioning correctly. Replacing the batteries or using a reliable power source can help resolve signal dropout issues.
6. Excessive Feedback:
If you encounter feedback or a high-pitched squealing sound, it could be due to the interaction between your acoustic guitar’s amplified sound and the PA system. Reduce the volume or gain on the PA system and adjust the position of your guitar in relation to the speakers to minimize feedback. Utilizing a feedback suppressor or an EQ pedal can also help in managing feedback issues.
7. Signal Mismatch:
If the levels of your acoustic guitar signal seem unbalanced with other instruments or audio sources, check the input levels on the connected audio equipment. Adjust the input gain or volume on the mixer or other devices to achieve a balanced mix. Additionally, make sure all your equipment is set to the appropriate signal level (line, mic), as mismatched levels can result in imbalanced sound.
By troubleshooting these common issues, you can overcome technical challenges and ensure a smooth and optimal performance or recording experience with your acoustic guitar and DI Box setup. Keep in mind that each situation may require unique adjustments and experimentation to achieve the best results.
Conclusion
Using a DI Box for your acoustic guitar can significantly enhance your sound quality, whether you are performing live or recording in the studio. By converting your high-impedance guitar signal into a low-impedance signal, a DI Box ensures optimal signal integrity, reduces noise, and facilitates seamless connectivity with audio equipment.
In this comprehensive guide, we explored the various aspects of using a DI Box for acoustic guitar. We learned about the purpose and functionality of a DI Box, its importance in impedance matching, and the benefits it provides to acoustic guitarists.
We discussed the step-by-step process of properly setting up a DI Box, including connecting your acoustic guitar, adjusting the input gain, utilizing the ground lift switch, and connecting to a mixer or PA system. We also covered troubleshooting common issues that may arise during the setup and usage of a DI Box.
Remember, proper setup and understanding of your DI Box are key to achieving the best sound quality. Take the time to experiment with different settings and fine-tune the output level to suit your specific acoustic guitar and audio setup.
Finally, keep in mind that every acoustic guitar and audio system is unique, and the optimal settings may vary. It is essential to trust your ears and make adjustments based on the specific requirements of your instrument and performance space.
By incorporating a DI Box into your acoustic guitar setup, you can elevate your sound, reduce interference and noise, and ensure a professional and polished performance. Embrace the versatility and enhanced sound quality that a DI Box offers, and let your acoustic guitar’s true voice be heard.