Introduction
Introduction
Welcome to the world of immersive gaming audio! Setting up a gaming headset on Windows 10 is a straightforward process that can greatly enhance your gaming experience. Whether you're a seasoned gamer or just starting out, having the right audio setup can make a significant difference in your gameplay. With the right headset, you can hear every footstep, explosion, and dialogue with crystal-clear precision, allowing you to fully immerse yourself in the game.
In this guide, we will walk you through the step-by-step process of setting up your gaming headset on a Windows 10 PC. Whether you've just purchased a brand-new headset or are looking to optimize your existing setup, this guide will help you get the most out of your gaming audio experience.
From plugging in the headset to configuring the audio settings, we'll cover everything you need to know to ensure that your gaming headset is properly set up and ready to deliver top-notch audio performance. By the end of this guide, you'll be ready to dive into your favorite games with immersive, high-quality sound that truly brings the gaming world to life.
So, grab your gaming headset, fire up your Windows 10 PC, and let's get started on the journey to optimizing your gaming audio experience. Whether you're a competitive gamer, a casual player, or someone who simply enjoys getting lost in the virtual worlds of video games, setting up your gaming headset on Windows 10 is a crucial step in unlocking the full potential of your gaming setup. Let's dive in and make sure you're ready to hear every detail and nuance of your favorite games with unparalleled clarity and precision.
Step 1: Plug in the gaming headset
Before diving into the software configurations, the first step in setting up your gaming headset on Windows 10 is to physically connect the headset to your computer. Most gaming headsets use a standard 3.5mm audio jack or a USB connection, so the process is usually quite simple.
Here’s how to plug in your gaming headset:
- Locate the audio input/output ports on your computer. These are typically found on the front or back of the computer tower, or on the side of a laptop.
- If your gaming headset uses a 3.5mm audio jack, insert the headphone plug into the audio output (usually green) and the microphone plug into the audio input (usually pink) on your computer. Make sure the plugs are securely inserted to ensure a stable connection.
- If your gaming headset uses a USB connection, simply insert the USB plug into an available USB port on your computer.
- Once the headset is plugged in, you should see a notification on your computer indicating that a new audio device has been detected. Windows 10 will automatically attempt to install the necessary drivers for the headset, ensuring that it is recognized and ready for use.
After plugging in the gaming headset, it’s important to ensure that the connections are secure and that the headset is properly seated. This will prevent audio issues and ensure that the headset functions as intended.
With the physical connection established, you’re now ready to move on to the next step in the setup process, which involves configuring the gaming headset as the default audio device on your Windows 10 system.
Step 2: Set the gaming headset as the default audio device
Once your gaming headset is physically connected to your Windows 10 PC, the next crucial step is to set it as the default audio device. This ensures that all audio output and input is routed through the headset, providing you with the immersive audio experience that gaming headsets are designed to deliver.
Here’s how to set your gaming headset as the default audio device in Windows 10:
- Right-click on the speaker icon located in the system tray at the bottom right corner of the screen. This will open a menu with various audio options.
- Select “Open Sound settings” from the menu. This will open the Sound settings window where you can manage audio devices.
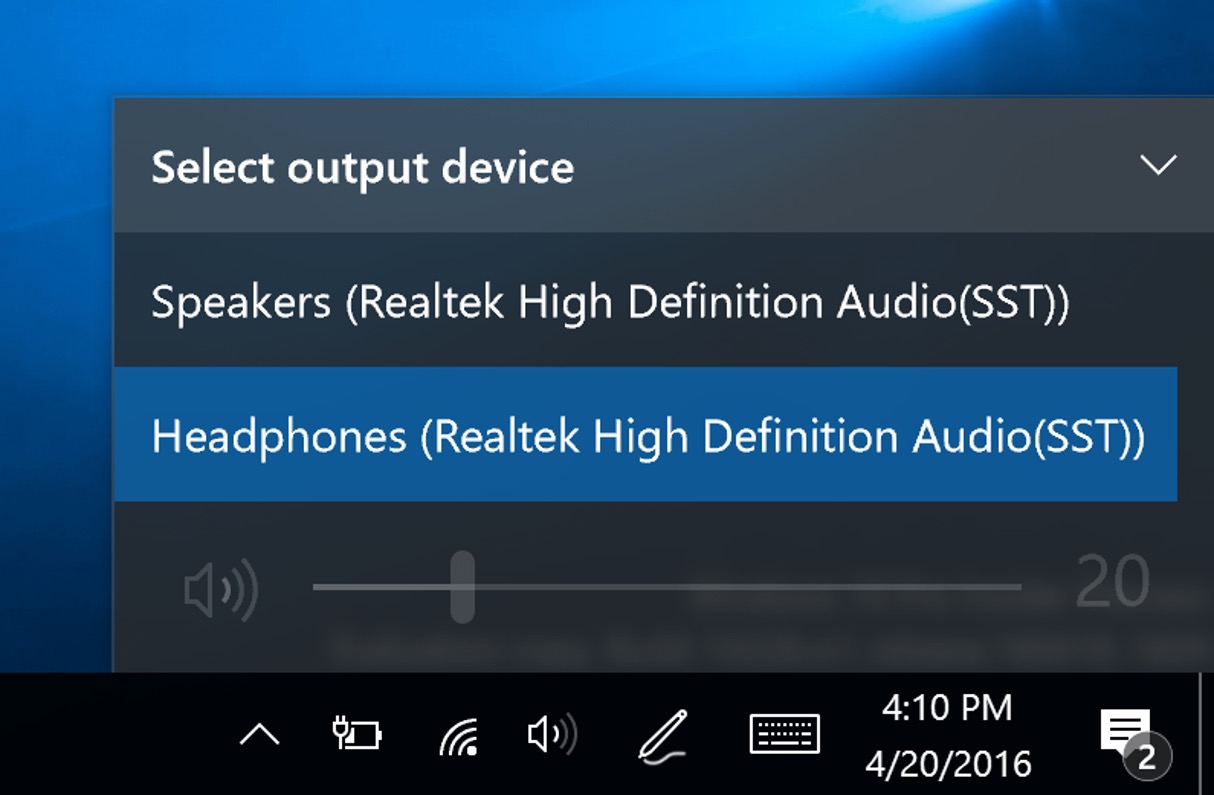
- In the Sound settings window, locate the “Output” section, which lists the available audio output devices. Your gaming headset should appear in this list.
- Click on your gaming headset in the list of output devices. Then, click the “Set as Default” button. This will designate your gaming headset as the default audio output device for your Windows 10 system.
- Next, navigate to the “Input” section within the Sound settings window. Here, you can select your gaming headset as the default input device for capturing microphone audio.
- Once you have set both the output and input options to your gaming headset, close the Sound settings window.
By setting your gaming headset as the default audio device, you ensure that all audio output, including game sound effects, music, and voice chat, is directed to the headset. Additionally, by designating the headset as the default input device, you can utilize its microphone for in-game communication and voice chat without any additional configuration.
With your gaming headset now established as the default audio device, you’re ready to move on to the next step, which involves adjusting the headset settings in Windows 10 to fine-tune the audio experience to your preferences.
Step 3: Adjust the headset settings in Windows 10
Now that your gaming headset is set as the default audio device, it’s time to fine-tune its settings to ensure optimal performance and customization. Windows 10 provides a range of audio settings that allow you to adjust the volume, microphone levels, and spatial sound features to suit your preferences and gaming needs.
Here’s how to adjust the headset settings in Windows 10:
- Right-click on the speaker icon in the system tray and select “Open Sound settings” to access the Sound settings window.
- In the Sound settings window, click on “Device properties” under the “Output” section to open the device properties for your gaming headset.
- Here, you can adjust the volume and spatial sound settings for your gaming headset. Windows 10 offers spatial sound enhancements such as Windows Sonic for Headphones and Dolby Atmos for Headphones, which can provide immersive 3D audio experiences in supported games.
- Next, click on “Device properties” under the “Input” section to access the microphone properties for your gaming headset. Here, you can adjust the microphone levels, enable noise suppression, and configure other advanced microphone settings to ensure clear and crisp voice capture during gaming sessions.
- Additionally, Windows 10 provides a range of app-specific audio settings that allow you to customize the audio output for individual games and applications. You can access these settings by right-clicking on the speaker icon, selecting “Open Volume mixer,” and adjusting the volume levels for each application as needed.
By adjusting the headset settings in Windows 10, you can tailor the audio experience to your liking, whether you prefer immersive spatial sound for single-player adventures or crystal-clear voice communication for multiplayer gaming.
With the headset settings optimized, you’re now ready to proceed to the final step, which involves testing the gaming headset to ensure that everything is functioning as intended.
Step 4: Test the gaming headset
After setting up and configuring your gaming headset on Windows 10, it’s essential to perform a thorough test to verify that the headset is functioning correctly and delivering the desired audio and microphone performance. Testing the headset allows you to identify and address any potential issues before diving into your gaming sessions.
Here’s how to test your gaming headset on Windows 10:
- Launch a game or open a multimedia application that supports audio output, such as a music player or video streaming service.
- Ensure that the audio output is directed to your gaming headset by checking the application’s audio settings. Most games and multimedia applications allow you to select the desired audio output device within their settings.
- Play audio or video content through the application and listen for the audio output through your gaming headset. Verify that the sound is clear, balanced, and immersive, allowing you to fully experience the audio elements of the content.
- If your gaming headset features a microphone, test the microphone by using the built-in Windows 10 voice recorder or a communication application that supports voice chat. Speak into the microphone and ensure that your voice is captured clearly without any distortion or background noise.
- Adjust the volume and microphone levels as needed using the headset’s physical controls or the Windows 10 audio settings to achieve the desired audio balance and microphone sensitivity.
By thoroughly testing the gaming headset, you can confirm that both the audio output and microphone input are functioning as intended, providing you with the best possible audio experience during gaming and other multimedia activities.
If you encounter any issues during the testing phase, such as distorted audio, microphone malfunctions, or connectivity problems, refer to the headset’s user manual for troubleshooting guidance or explore Windows 10’s device troubleshooting options to diagnose and resolve the issues.
With the gaming headset successfully tested and verified, you’re now ready to embark on your gaming adventures with immersive audio and clear communication, fully leveraging the capabilities of your gaming headset on Windows 10.
Conclusion
Congratulations! You’ve successfully set up and optimized your gaming headset on Windows 10, paving the way for an enhanced and immersive gaming audio experience. By following the step-by-step process outlined in this guide, you’ve ensured that your gaming headset is seamlessly integrated with your Windows 10 system, ready to deliver high-quality audio output and clear microphone input for your gaming and multimedia activities.
With the physical connection established and the headset configured as the default audio device, you’ve taken the crucial first steps toward unlocking the full potential of your gaming headset. By adjusting the headset settings in Windows 10, you’ve personalized the audio experience to suit your preferences, whether it’s immersive spatial sound enhancements or optimized microphone performance for in-game communication.
Thoroughly testing the gaming headset has allowed you to verify its functionality, ensuring that both the audio output and microphone input meet your expectations. Any potential issues have been addressed, and you’re now equipped with a fully operational gaming headset that’s ready to elevate your gaming sessions to new heights.
As you delve into your favorite games, whether it’s exploring vast open worlds, engaging in intense multiplayer battles, or immersing yourself in captivating narratives, your gaming headset will serve as a vital tool, delivering every audio detail with precision and clarity. From the subtle ambient sounds to the thunderous explosions, the immersive audio provided by your gaming headset will enrich your gaming experiences like never before.
Remember, the steps outlined in this guide serve as a foundation for maximizing the potential of your gaming headset on Windows 10. As you continue to explore new games and multimedia content, don’t hesitate to revisit the headset settings to fine-tune the audio experience according to the specific requirements of each experience.
With your gaming headset seamlessly integrated into your gaming setup, you’re now poised to embark on thrilling adventures, engage in intense multiplayer battles, and immerse yourself in captivating narratives, all while enjoying the immersive audio delivered by your optimized gaming headset on Windows 10.