Introduction
Are you an avid gamer who relies on a trusty headset to immerse yourself in virtual worlds and communicate with teammates? If so, you've likely encountered the frustrating issue of a faulty headset wire. Whether it's due to wear and tear from countless gaming sessions or accidental damage, a damaged headset wire can disrupt your gaming experience and communication with fellow players.
Fortunately, fixing a gaming headset wire is a manageable task that doesn't require advanced technical skills. In this guide, we'll walk you through the step-by-step process of repairing your gaming headset wire, allowing you to restore seamless audio and communication functionality to your favorite gaming accessory.
By following this comprehensive tutorial, you'll gain the confidence and know-how to address common headset wire issues, such as intermittent audio, one-sided audio, or complete audio loss. Before you know it, you'll be back in the game, fully immersed in the rich soundscape and connected with your gaming community.
So, grab your tools and let's dive into the process of reviving your gaming headset by repairing its wire. Whether you're a seasoned DIY enthusiast or a newcomer to the world of electronics repair, this guide will equip you with the knowledge and skills to tackle this common issue with ease. Let's get started on the path to restoring your headset to its full functionality!
Step 1: Identifying the Issue
Before embarking on the repair process, it’s crucial to accurately identify the specific issue affecting your gaming headset wire. Common symptoms of a faulty headset wire include intermittent audio, one-sided audio, or complete audio loss. Begin by examining the entire length of the wire, paying close attention to any visible damage such as fraying, cuts, or exposed wires.
Next, test the headset on multiple devices to determine if the issue persists across different platforms. If the problem is consistent across various devices, it’s likely that the wire itself is damaged. Additionally, gently manipulate the wire while listening for changes in audio quality or connectivity. This can help pinpoint the location of the damage, whether it’s near the connector, inline remote, or ear cups.
Furthermore, consider testing a different headset with the same device to rule out any potential issues with the audio source. If the alternate headset functions properly, it reinforces the likelihood of a wire-related problem with your original headset.
By carefully assessing the symptoms and conducting these tests, you’ll gain valuable insights into the nature and location of the wire issue, setting the stage for a targeted and effective repair process. With a clear understanding of the problem at hand, you can proceed to gather the necessary tools and prepare for the repair procedure.
Step 2: Gathering the Necessary Tools
Before delving into the repair process, it’s essential to assemble the required tools to ensure a smooth and efficient repair experience. Here’s a list of the essential tools and materials you’ll need:
- Wire Strippers: These specialized tools are designed to precisely strip the insulation from the wire, allowing you to access the conductive metal underneath.
- Soldering Iron and Solder: A soldering iron is used to join the wires securely, and solder is the conductive metal alloy that fuses the wires together.
- Heat-Shrink Tubing: This insulating material shrinks when heated, providing protection and insulation for the soldered wires.
- Multi-meter: This device is invaluable for testing the continuity and integrity of the repaired wire, ensuring a reliable connection.
- Electrical Tape: A versatile and essential tool for insulating and securing the repaired wire.
- Replacement Connector (if necessary): If the damage is near the connector, having a replacement connector on hand can facilitate a comprehensive repair.
- Craft Knife or Wire Cutters: These tools are used for precise cutting and trimming of the wire and insulation.
By gathering these tools and materials in advance, you’ll be well-prepared to tackle the repair process with confidence and precision. Having the right tools at your disposal is the first step towards a successful headset wire repair, ensuring that you can address the issue effectively and restore your headset to optimal functionality.
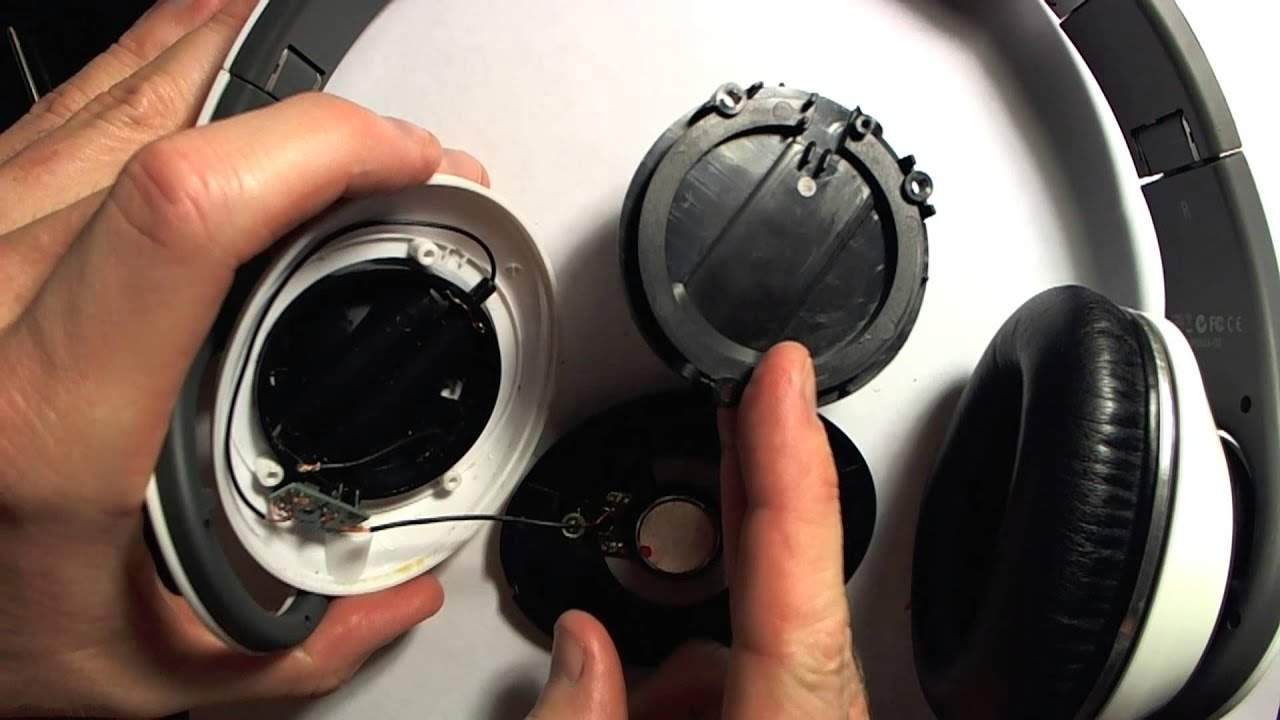
Step 3: Stripping the Wire
With the necessary tools at hand, it’s time to proceed with the critical step of stripping the damaged sections of the wire to prepare them for repair. Begin by carefully examining the wire to identify the areas of damage, such as fraying, cuts, or exposed conductive metal. Use wire strippers to gently remove the insulation from the damaged sections, exposing the conductive metal underneath.
Exercise caution to avoid damaging the conductive metal while stripping the wire. It’s essential to maintain the integrity of the metal strands to ensure a reliable and secure connection during the repair process. Once the damaged sections have been stripped, trim any frayed or irregular edges to create clean and uniform surfaces for the subsequent steps.
After stripping the wire, it’s crucial to verify that the conductive metal is free from any debris or oxidation that may impede the soldering process. Use a clean, dry cloth or a gentle solvent to remove any contaminants and ensure that the metal surfaces are clean and ready for soldering.
By meticulously stripping the damaged sections of the wire and preparing the conductive metal for the next phase of the repair, you’re laying the foundation for a successful and durable repair. This meticulous approach will contribute to the overall integrity and reliability of the repaired wire, setting the stage for seamless audio transmission and long-term functionality.
Step 4: Soldering the Wires
Once the damaged sections of the wire have been stripped and prepared, the next crucial step is soldering the wires to establish secure and reliable connections. Begin by carefully aligning the stripped sections of the wires, ensuring that the conductive metal strands are properly aligned and in close contact with each other. This alignment is essential for creating a robust and conductive joint between the wires.
Heat the soldering iron to the appropriate temperature and apply it to the aligned wires, allowing the solder to melt and flow evenly across the exposed metal surfaces. It’s important to use the right amount of solder to create a strong bond without excessive buildup. The solder should form a smooth and uniform connection, securely joining the wires and promoting efficient electrical conductivity.
During the soldering process, it’s crucial to maintain a steady hand and apply consistent heat to ensure that the solder adheres to the wires effectively. Avoid excessive movement or disturbance of the wires while the solder cools, as this can compromise the integrity of the soldered joint.
After soldering the wires, allow the soldered joint to cool completely before proceeding to the next step. This cooling period is essential for solidifying the solder and establishing a durable connection between the wires. Once the solder has solidified, gently tug on the wires to verify that the joint is secure and resilient.
By skillfully soldering the wires and creating robust connections, you’re enhancing the overall durability and functionality of the repaired wire. This meticulous approach to soldering ensures that the wires are securely bonded, facilitating reliable audio transmission and withstanding the rigors of regular use.
Step 5: Insulating the Wires
With the wires securely soldered and the electrical connections established, the next critical step is insulating the repaired sections to safeguard the wires and prevent potential short circuits or signal interference. This insulation process is essential for maintaining the integrity and reliability of the repaired wire, ensuring long-term functionality and durability.
Begin by carefully applying heat-shrink tubing over the soldered sections of the wires. The heat-shrink tubing should fully cover the soldered joints and extend slightly beyond the repaired areas to provide comprehensive insulation. Once positioned, use a heat source, such as a heat gun or a lighter, to shrink the tubing evenly around the soldered sections. This process creates a tight and protective seal, effectively insulating the soldered joints from external elements.
After applying the heat-shrink tubing, inspect the insulated sections to ensure that the tubing is securely in place and free from any gaps or exposed areas. This thorough inspection is crucial for verifying the effectiveness of the insulation and addressing any potential vulnerabilities that may compromise the repair.
In addition to heat-shrink tubing, you can further reinforce the insulation by applying electrical tape over the repaired sections. The electrical tape provides an additional layer of protection, enhancing the overall resilience of the repaired wire and shielding it from mechanical stress and environmental factors.
By meticulously insulating the repaired sections of the wire, you’re fortifying the integrity and functionality of the headset wire, safeguarding it against potential damage and ensuring consistent audio transmission. This comprehensive insulation process contributes to the overall reliability and longevity of the repair, allowing you to enjoy uninterrupted gaming experiences with restored audio connectivity.
Step 6: Testing the Headset
After completing the repair process, it’s essential to thoroughly test the headset to ensure that the wire repair has successfully restored its audio functionality. Testing the headset allows you to verify the effectiveness of the repair and identify any potential issues that may require further attention.
Begin by connecting the repaired headset to a compatible audio source, such as a gaming console, computer, or mobile device. Carefully inspect the audio output from the headset, listening for clear and consistent sound from both ear cups. Test various audio sources, including music, game audio, and voice communication, to assess the headset’s performance across different audio formats.
During the testing phase, pay close attention to the previously experienced symptoms, such as intermittent audio, one-sided audio, or complete audio loss. Verify that the repaired wire effectively addresses these issues, ensuring that the headset delivers reliable and immersive audio experiences without any disruptions.
Additionally, perform physical maneuvers with the headset, such as gently bending and flexing the wire near the repaired sections. This stress testing helps evaluate the resilience of the repair, ensuring that the wire can withstand typical usage scenarios without compromising audio connectivity.
If the testing reveals any lingering issues or irregularities in audio performance, revisit the repaired sections of the wire to identify and address potential shortcomings. Conduct further inspections and, if necessary, repeat the repair process to achieve optimal functionality and reliability.
By meticulously testing the repaired headset, you can confidently assess the effectiveness of the wire repair and make any necessary adjustments to ensure seamless audio transmission. This thorough testing phase is essential for validating the success of the repair and ensuring that the headset is fully restored to its original functionality, allowing you to immerse yourself in captivating audio experiences during your gaming sessions.