Introduction
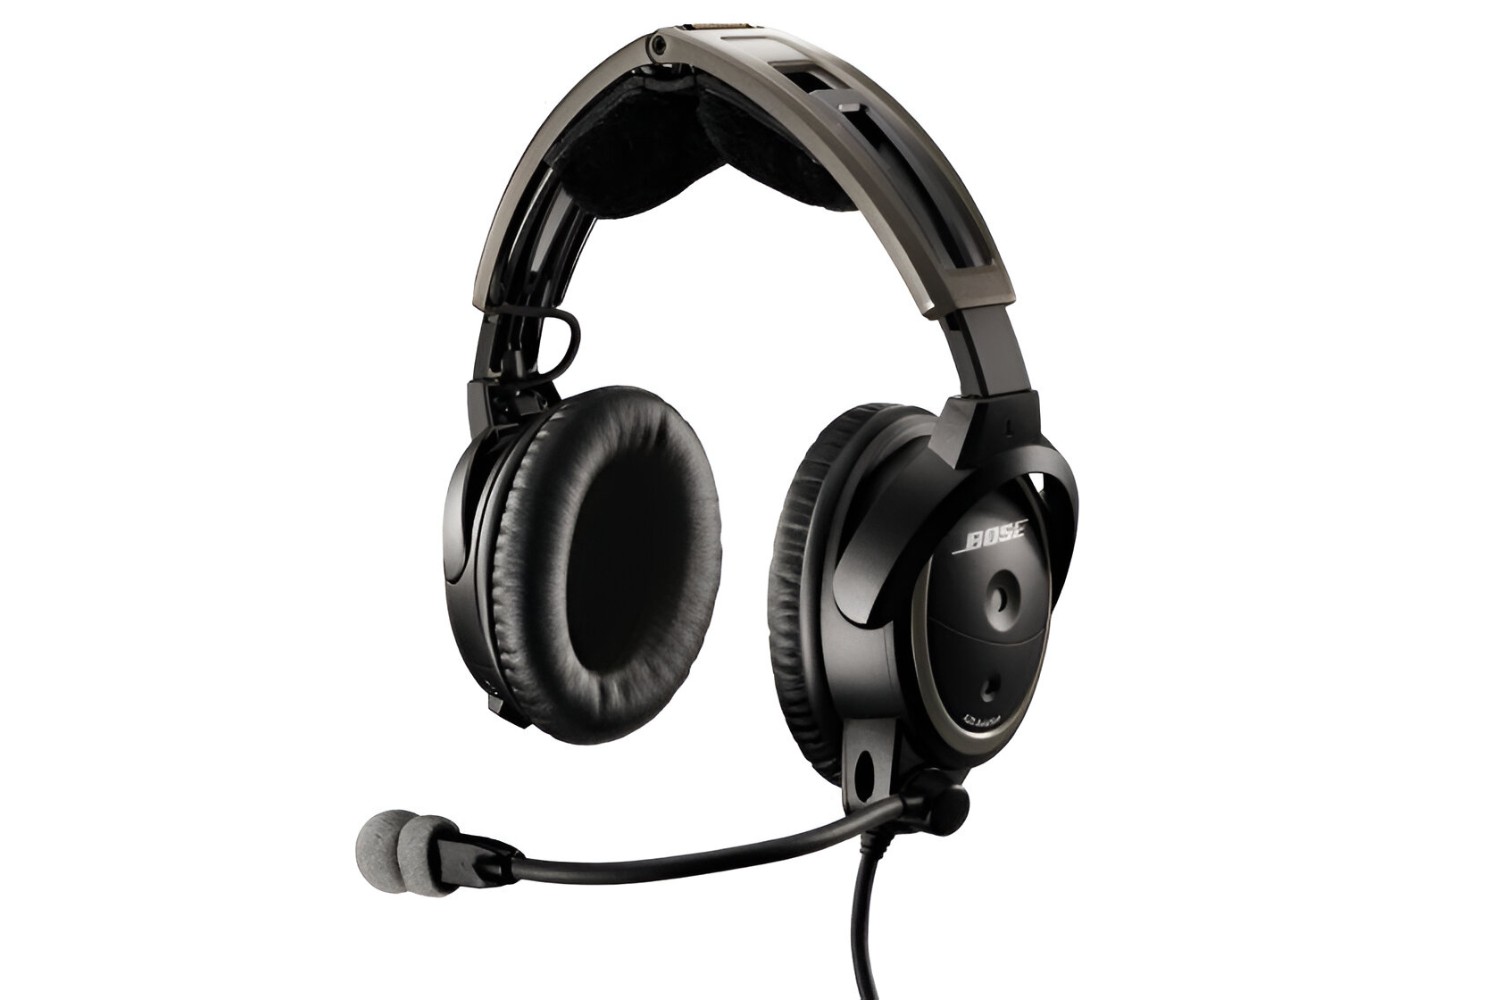
Are you a gaming enthusiast looking to repurpose your Bose Army CVC-style headset into a high-quality gaming headset? With a few simple modifications, you can elevate your gaming experience without breaking the bank. Converting a military-grade headset into a gaming accessory allows you to enjoy immersive sound and clear communication with fellow gamers. Whether you're engaging in intense multiplayer battles or immersing yourself in the rich narratives of single-player adventures, a customized gaming headset can significantly enhance your overall gaming experience.
In this guide, we will walk you through the step-by-step process of transforming your Bose Army CVC-style headset into a gaming headset. By following these instructions, you can unlock the full potential of your headset and seamlessly integrate it into your gaming setup. From disassembling the headset to modifying the microphone and speaker connections, each stage of this conversion process is designed to be accessible and straightforward, even for those with limited technical expertise.
By repurposing your Bose Army CVC-style headset, you can not only save money but also contribute to sustainability by giving new life to an existing device. This DIY approach empowers you to customize your gaming accessories according to your preferences, ensuring that you have a headset perfectly tailored to your needs. So, let's dive in and unlock the potential of your Bose Army CVC-style headset as we embark on this exciting journey to create a personalized gaming headset that will take your gaming adventures to the next level.
Step 1: Gather the necessary tools and materials
Before embarking on the conversion process, it’s essential to gather the tools and materials required to modify your Bose Army CVC-style headset into a gaming headset. By assembling these items, you can ensure a smooth and efficient transformation while minimizing interruptions during the process.
Here’s what you’ll need:
- Bose Army CVC-style headset: The foundation of your gaming headset conversion project is the Bose Army CVC-style headset. Ensure that it is in good working condition before proceeding with the modifications.
- Microphone and speaker connectors: Depending on the gaming device you plan to connect your headset to, you may need specific connectors to facilitate seamless integration. Research the compatibility of your gaming device to determine the appropriate connectors.
- Wire strippers and cutters: These tools are essential for modifying the wiring within the headset to accommodate the gaming device’s connections. Ensure that the wire strippers and cutters are suitable for the gauge of the headset’s wiring.
- Soldering iron and solder: To securely connect the modified wiring and connectors, a soldering iron and solder are necessary. Familiarize yourself with basic soldering techniques if you are not already proficient in this skill.
- Electrical tape or heat shrink tubing: Once the connections are made, electrical tape or heat shrink tubing can be used to insulate and protect the soldered joints, preventing any potential short circuits.
- Testing device: Have your gaming device or a suitable testing device on hand to verify the functionality of the modified headset before engaging in extensive gaming sessions.
By gathering these tools and materials, you’ll be well-prepared to embark on the transformation of your Bose Army CVC-style headset into a fully functional gaming headset. With the necessary components at your disposal, you can proceed to the next step with confidence, knowing that you have everything you need to complete the conversion successfully.
Step 2: Disassemble the Bose Army CVC headset
Before you can begin the process of converting your Bose Army CVC-style headset into a gaming headset, it’s essential to carefully disassemble the headset to access its internal components. This step requires patience and precision to avoid damaging any vital elements of the headset.
Follow these steps to disassemble the headset:
- Remove the ear cushions: Gently detach the ear cushions from the headset to expose the speakers and the internal wiring. Take care not to exert excessive force to prevent any damage to the cushions or the underlying components.
- Unscrew the casing: Using the appropriate screwdriver, carefully remove the screws that secure the casing of the headset. Place the screws in a safe location to prevent loss and ensure that they are easily accessible when reassembling the headset.
- Separate the casing: Once the screws are removed, gently separate the casing to reveal the internal circuitry and wiring. Take note of the arrangement of components and the routing of wires to facilitate reassembly later in the process.
- Identify the microphone and speaker connections: Locate the microphone and speaker connections within the headset. Take note of their positions and the existing wiring configuration, as these will be modified to accommodate the gaming device connections.
As you disassemble the Bose Army CVC-style headset, maintain a methodical approach and keep track of the components and their respective positions. This careful disassembly process sets the stage for the subsequent modifications that will transform the headset into a gaming-ready accessory.
With the headset disassembled, you are now ready to proceed to the next step, where you will modify the microphone and speaker connections to enable seamless integration with your gaming device.
Step 3: Modify the microphone and speaker connections
With the Bose Army CVC-style headset disassembled, the next crucial step in the conversion process involves modifying the microphone and speaker connections to ensure compatibility with gaming devices. This step requires precision and attention to detail to achieve seamless integration and optimal functionality.
Follow these guidelines to modify the connections:
- Identify the existing connections: Locate the microphone and speaker connections within the headset. Carefully examine the wiring and the points of attachment to understand the current configuration.
- Prepare the connectors: Depending on the specifications of your gaming device, you may need to prepare the microphone and speaker connectors for integration. If specific connectors are required, ensure that they are compatible with the gaming device’s input/output ports.
- Modify the wiring: Using wire strippers and cutters, carefully modify the wiring within the headset to accommodate the new connectors. Take precise measurements and exercise caution to avoid damaging the delicate wiring during this process.
- Solder the connections: With the wiring modified, use a soldering iron and solder to securely attach the new connectors to the headset’s wiring. Employ proper soldering techniques to create durable and reliable connections that will withstand regular use.
- Insulate the connections: After soldering the connections, insulate the joints using electrical tape or heat shrink tubing to protect them from potential damage and ensure electrical safety. Proper insulation is essential to prevent short circuits and maintain the integrity of the modified connections.
By meticulously modifying the microphone and speaker connections, you can tailor the Bose Army CVC-style headset to seamlessly interface with gaming devices, delivering exceptional audio quality and clear communication during gaming sessions. This critical modification paves the way for the final step of connecting the headset to the gaming device and testing its functionality.
With the connections successfully modified, you are now prepared to proceed to the next step, where you will connect the headset to the gaming device and verify its performance as a fully functional gaming headset.
Step 4: Connect the headset to the gaming device
Having successfully modified the microphone and speaker connections of your Bose Army CVC-style headset, the next pivotal step is to connect the headset to your gaming device. This process involves establishing the necessary links to ensure seamless audio input and output, as well as clear communication during gaming sessions.
Follow these steps to connect the headset to the gaming device:
- Identify the input/output ports: Familiarize yourself with the input/output ports of your gaming device, such as the audio output for speakers and the microphone input. Ensure that you are aware of the specific ports required for connecting the headset.
- Plug in the connectors: Carefully insert the modified microphone and speaker connectors into the corresponding ports on the gaming device. Exercise caution to align the connectors properly and avoid applying excessive force during the insertion process.
- Secure the connections: Once the connectors are in place, ensure that they are securely fastened to the gaming device’s ports. A snug and secure connection is essential to prevent audio disruptions and maintain clear communication throughout gaming sessions.
- Adjust the settings: Access the audio settings on your gaming device to configure the input and output sources. Verify that the headset is recognized and selected as the primary audio input and output device for an immersive gaming experience.
By connecting the modified Bose Army CVC-style headset to your gaming device, you are effectively integrating it into your gaming setup, ready to deliver exceptional audio performance and reliable communication capabilities. This pivotal step bridges the gap between the modified headset and the gaming environment, setting the stage for testing its functionality in the next phase.
With the headset successfully connected to the gaming device, you are now poised to proceed to the final step, where you will test the functionality of the customized gaming headset to ensure that it meets your expectations and enhances your gaming experience.
Step 5: Test the gaming headset
Now that you have completed the essential steps of modifying and connecting your Bose Army CVC-style headset to transform it into a gaming headset, it’s time to put your customized creation to the test. Testing the functionality of the headset is a crucial phase that allows you to verify its audio performance, microphone clarity, and overall compatibility with your gaming device.
Follow these guidelines to test the gaming headset:
- Audio playback test: Play a variety of audio content, including music, game sound effects, and dialogue, to assess the headset’s audio quality. Pay attention to the clarity, depth, and immersive nature of the sound produced by the modified headset.
- Microphone test: Utilize the headset’s microphone to record your voice and engage in voice communication with fellow gamers. Assess the microphone’s clarity and the absence of distortions or background noise during communication.
- Gaming session test: Engage in a gaming session that encompasses diverse audio elements and interactive communication with other players. Evaluate the headset’s performance in delivering an immersive gaming experience and facilitating clear, uninterrupted communication.
- Adjustments and fine-tuning: If necessary, make adjustments to the audio settings and microphone sensitivity to optimize the headset’s performance based on your preferences and the specific requirements of the games you play.
By subjecting the modified headset to comprehensive testing, you can ensure that it meets the standards of audio quality and communication clarity expected from a dedicated gaming headset. This phase allows you to fine-tune the settings and make any necessary refinements to maximize the headset’s performance in various gaming scenarios.
With the gaming headset successfully tested and validated for optimal functionality, you have completed the transformation of your Bose Army CVC-style headset into a fully capable gaming accessory. Your customized headset is now ready to elevate your gaming experiences with immersive audio and seamless communication, enhancing your overall enjoyment of gaming adventures.
Conclusion
Congratulations on successfully converting your Bose Army CVC-style headset into a fully functional gaming headset. Through the meticulous process of disassembling, modifying connections, and testing its performance, you have unlocked the potential of your headset to enhance your gaming experiences. This transformation not only allows you to repurpose an existing device but also empowers you to customize your gaming accessories to suit your preferences and gaming setup.
By embarking on this DIY project, you have demonstrated resourcefulness and creativity in optimizing your gaming equipment without the need for significant financial investment. The repurposed gaming headset now stands as a testament to your technical skills and ingenuity, providing an immersive audio experience and reliable communication capabilities during gaming sessions.
Furthermore, by repurposing and customizing your Bose Army CVC-style headset, you have contributed to sustainability by extending the lifespan of the device and minimizing electronic waste. This eco-conscious approach aligns with the principles of responsible consumption and environmental stewardship, reflecting a commitment to maximizing the utility of existing resources.
As you integrate your newly transformed gaming headset into your gaming setup, you can look forward to immersive audio, clear communication, and a heightened sense of engagement during your gaming adventures. The customized headset is a testament to your dedication to optimizing your gaming experiences and personalizing your gaming accessories to align with your preferences.
With the knowledge and skills gained from this transformation process, you are well-equipped to explore further DIY projects and customization endeavors, expanding your capabilities in tailoring gaming equipment to meet your specific needs. Whether it’s enhancing audiovisual elements, optimizing control interfaces, or refining communication devices, your experience in converting the Bose Army CVC-style headset into a gaming headset serves as a foundation for future creative undertakings.
Embrace the enhanced gaming experiences made possible by your customized headset, and continue to explore opportunities for personalizing and optimizing your gaming environment. Your journey in repurposing and customizing your gaming accessories signifies a commitment to innovation and a dedication to maximizing the enjoyment derived from gaming pursuits.


