Introduction
With the advancement of technology, managing and controlling your home’s temperature has become easier and more convenient than ever before. The Alarm.com Smart Thermostat is a cutting-edge device that allows you to regulate the temperature of your home with just a few taps on your smartphone or tablet. Whether you’re at home or on the go, the Alarm.com Smart Thermostat puts you in control of your comfort.
Designed with the latest smart home technology, this thermostat offers a wide range of features that not only make your life easier but also help you save energy and money. From setting customized schedules to monitoring energy usage, the Alarm.com Smart Thermostat provides a seamless and intuitive user experience.
In this guide, we will explore how to get started with the Alarm.com Smart Thermostat, including the installation process and connecting it to your home’s Wi-Fi. We will also delve into the various features and functionalities offered by this smart device, such as adjusting temperature settings, creating and managing schedules, and utilizing geofencing to automatically adjust the temperature based on your location.
You will learn how to program energy-saving modes to optimize efficiency and reduce your energy consumption. Additionally, we will discuss how to integrate your Alarm.com Smart Thermostat with other smart home devices for a more connected and cohesive smart home environment.
If you encounter any issues or have questions along the way, we’ve got you covered. We will provide troubleshooting tips for common problems that may arise during the setup or usage of your Alarm.com Smart Thermostat.
By the end of this guide, you will have a thorough understanding of how to make the most out of your Alarm.com Smart Thermostat and enjoy the comfort and convenience it brings to your home.
Getting Started with Alarm.com Smart Thermostat
Welcome to the world of smart home automation with the Alarm.com Smart Thermostat! Before you can start enjoying the benefits of this innovative device, there are a few steps you need to follow to get started.
The first step is to ensure that you have all the necessary equipment. You will need the Alarm.com Smart Thermostat itself, a compatible smartphone or tablet, and a stable internet connection. Make sure your smartphone or tablet meets the system requirements for the Alarm.com app, which can be found on the app store or Alarm.com’s website.
Next, it’s time to install the Smart Thermostat. Choose a convenient location on your wall where you want to install the device. Ensure that it is within range of your Wi-Fi network and away from direct sunlight or cold drafts that may affect its performance. Follow the step-by-step installation instructions provided in the user manual or the manufacturer’s website to attach the thermostat securely to the wall.
Once the physical installation is complete, it’s time to power up the Smart Thermostat. Usually, the device will turn on automatically when connected to the wiring. If it doesn’t, consult the user manual for troubleshooting tips.
After the device is powered up, it’s time to connect it to your home’s Wi-Fi network. This step is crucial as it allows the Smart Thermostat to communicate with your smartphone or tablet through the Alarm.com app. Launch the app on your device and follow the instructions to connect the thermostat to your Wi-Fi network. Make sure you enter the correct Wi-Fi password to establish a stable connection.
Once the Smart Thermostat is successfully connected to your Wi-Fi network, it’s time to set up your account on the Alarm.com app. If you don’t already have an account, you will need to create one. Follow the on-screen instructions to enter your details and create a unique username and password. Once the account setup is complete, you will be able to access and control your Smart Thermostat remotely through the app.
With the physical installation, Wi-Fi connection, and account setup complete, you are now ready to start using your Alarm.com Smart Thermostat. In the next sections, we will explore the various features and functionalities offered by this smart device and learn how to make the most out of them.
Installing the Smart Thermostat
The installation process for the Alarm.com Smart Thermostat is straightforward and can be completed with just a few simple steps. Before you begin, make sure you have read the user manual and gathered all the necessary tools.
To start the installation, ensure that your heating and cooling systems are turned off. This will prevent any accidental damage during the installation process. Next, remove the existing thermostat from the wall by unscrewing the mounting plate and disconnecting the wires.
Once the old thermostat is removed, you can begin installing the Alarm.com Smart Thermostat. Start by mounting the new thermostat’s base plate onto the wall, making sure the screw holes align properly. Use a level to ensure that the plate is straight. Once it’s in position, secure it to the wall using the provided screws.
After the base plate is securely fastened, it’s time to connect the wiring. Refer to the user manual or installation guide for the correct wiring instructions for your specific heating and cooling systems. Carefully connect each wire to the corresponding terminal on the base plate, ensuring they are secure and properly inserted.
Once the wiring is complete, attach the Smart Thermostat to the base plate by aligning the pins on the back of the device with the slots on the base plate. Press down until you hear a click, indicating that the thermostat is securely attached.
With the Smart Thermostat now installed, it’s time to power it up. Restore power to your heating and cooling systems and verify that the device turns on. It should display the current temperature and other relevant information on the screen.
Lastly, it’s important to perform a test run to ensure that the Smart Thermostat is functioning correctly. Adjust the temperature settings using the controls on the device or through the Alarm.com app. Listen for the sound of your heating or cooling system turning on and off as the thermostat regulates the temperature.
If you encounter any issues during the installation process or if the device doesn’t power up or function as expected, refer to the troubleshooting section in the user manual or contact the Alarm.com customer support for assistance.
By following these simple steps, you’ll have your Alarm.com Smart Thermostat successfully installed and ready to improve your home’s comfort and energy efficiency.
Connecting the Smart Thermostat to Wi-Fi
The Alarm.com Smart Thermostat offers seamless connectivity to your home’s Wi-Fi network, allowing you to control and monitor your thermostat settings from anywhere using the Alarm.com app on your smartphone or tablet. Connecting your Smart Thermostat to Wi-Fi is a straightforward process that can be completed in a few simple steps.
Before you begin, ensure that your home’s Wi-Fi network is active and working properly. Locate the Wi-Fi network name (SSID) and password, as you will need these during the setup process.
To connect your Smart Thermostat to Wi-Fi, start by accessing the device’s menu. Depending on the model, this can usually be done by touching the screen or pressing a specific button combination. Once you’re in the menu, navigate to the Wi-Fi settings section.
From the Wi-Fi settings section, the Smart Thermostat will scan for available Wi-Fi networks in the vicinity. Select your home’s Wi-Fi network from the list of displayed networks. If your network is not displayed, try manually entering the network name (SSID).
Once you have selected your Wi-Fi network, you will be prompted to enter the Wi-Fi password. Use the on-screen keyboard to enter the password accurately. Take care to ensure that uppercase and lowercase letters, as well as any special characters, are entered correctly, as Wi-Fi passwords are case-sensitive.
After entering the Wi-Fi password, the Smart Thermostat will attempt to establish a connection to your home’s Wi-Fi network. This process may take a few seconds, and the device will indicate that it is connecting.
If the connection is successful, the Smart Thermostat will display a confirmation message or an indicator light to indicate that it is now connected to Wi-Fi. It may also display the signal strength to let you know the quality of the Wi-Fi connection.
Once the Smart Thermostat is connected to Wi-Fi, you can verify the connection by launching the Alarm.com app on your smartphone or tablet. Log in to your Alarm.com account and navigate to the thermostat section. You should see the current temperature and be able to control the thermostat settings remotely.
If you encounter any issues during the Wi-Fi setup process, ensure that the Wi-Fi network name and password are correct. You may also try restarting your Wi-Fi router and the Smart Thermostat to refresh the connection. If the problem persists, refer to the troubleshooting section in the user manual or contact Alarm.com customer support for further assistance.
By following these simple steps, you can connect your Alarm.com Smart Thermostat to your home’s Wi-Fi network, enabling you to enjoy the convenience and control of managing your thermostat settings from anywhere at any time.
Setting up Your Account on the Alarm.com App
To take full advantage of the features and functionalities of your Alarm.com Smart Thermostat, you’ll need to set up an account on the Alarm.com app. This will allow you to control and monitor your thermostat settings remotely from your smartphone or tablet.
Before you begin, make sure you have downloaded and installed the Alarm.com app from the app store on your device. Once the app is installed, follow these steps to set up your account:
1. Launch the Alarm.com app on your smartphone or tablet. You’ll be greeted with a welcome screen. Tap on the “Sign Up” or “Create Account” button to start creating your account.
2. Provide the required information, including your name, email address, and a unique username and password. Make sure to choose a strong password to ensure the security of your account.
3. Once you’ve entered the necessary details, tap on the “Next” or “Create Account” button to proceed.
4. The next step is to verify your email address. Check the inbox of the email address you provided during registration for a verification email from Alarm.com. Open the email and click on the verification link to confirm your email address.
5. After verifying your email address, return to the Alarm.com app and log in using your username and password. You may be prompted to grant certain permissions to the app, such as access to your location or notifications. Follow the on-screen prompts to allow these permissions if desired.
6. Once you are logged in, navigate to the thermostat section of the app. Here, you can add and manage your Alarm.com Smart Thermostat. Tap on the “Add Thermostat” or similar option to begin the process of connecting your Smart Thermostat to the app.
7. Follow the on-screen instructions to connect your Smart Thermostat to the app. This may involve scanning a QR code or entering a unique code provided by the thermostat.
8. Once the connection is established, you will see the current temperature and be able to control the thermostat settings through the Alarm.com app.
That’s it! You have successfully set up your account on the Alarm.com app and connected your Smart Thermostat. From now on, you can enjoy the convenience of managing your thermostat settings remotely, accessing energy-saving features, and creating customized schedules to suit your lifestyle.
If you encounter any issues during the account setup process or need assistance with any app-related tasks, refer to the app’s user guide or contact the Alarm.com customer support for further guidance.
Exploring the Smart Thermostat Interface
Once you have successfully set up your Alarm.com Smart Thermostat, it’s time to get familiar with its interface. Understanding the various features and controls will enable you to effectively control and monitor your home’s temperature. Let’s explore the Smart Thermostat interface in more detail:
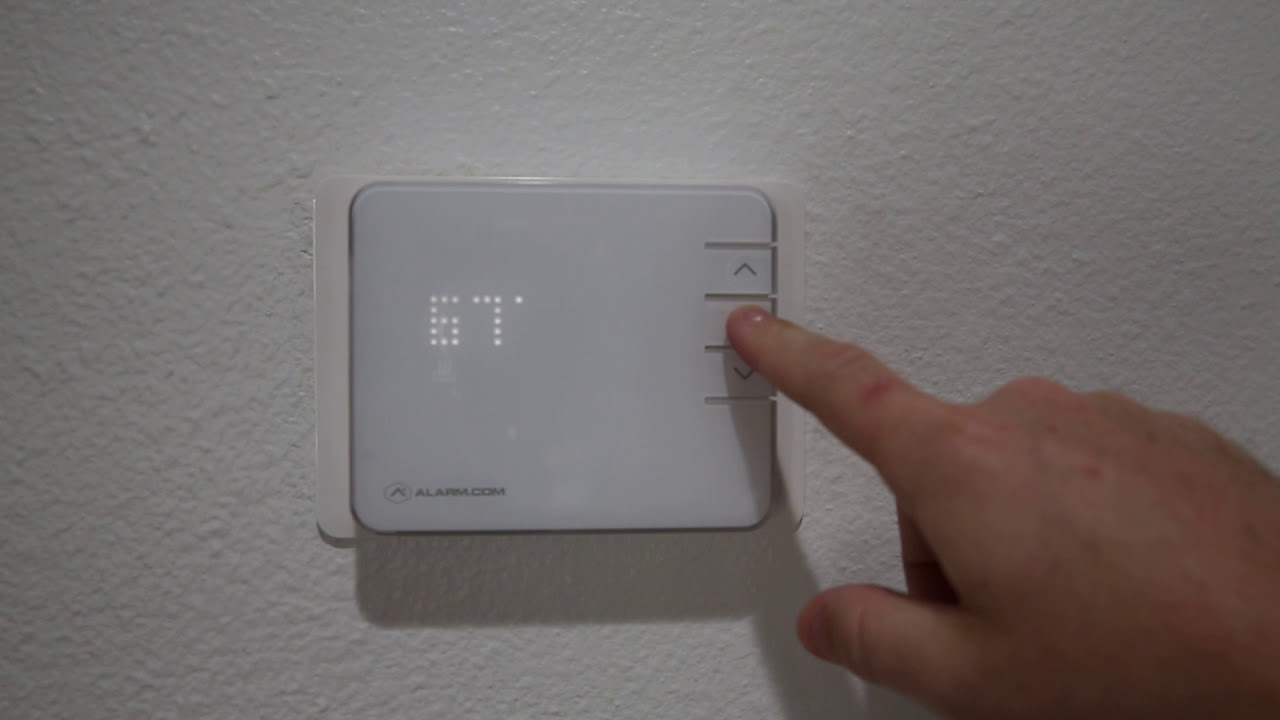
The main screen of the Smart Thermostat displays the current temperature and other relevant information, such as the set temperature, humidity level, and whether the heating or cooling system is running. Use this screen as a quick reference to check the status of your home’s temperature at a glance.
To adjust the temperature, you can use the up and down arrows or swipe gestures on the touchscreen. Alternatively, you can use the temperature adjust buttons on the side of the device, if available. Some thermostats also offer voice control capabilities, allowing you to adjust the temperature using voice commands.
Many Smart Thermostats offer additional features beyond basic temperature adjustments. These features may include:
- Schedule Management: The Smart Thermostat allows you to create and manage schedules to automatically adjust the temperature throughout the day. This feature is particularly useful if you have regular daily routines or want to save energy by reducing heating or cooling during certain periods.
- Energy-saving Modes: Smart Thermostats often come with pre-programmed energy-saving modes, such as “Away” or “Sleep,” that optimize energy consumption without sacrificing comfort. You can select these modes manually or set them to activate automatically based on your preferences or occupancy.
- Geofencing: Geofencing utilizes your smartphone’s GPS to track your location and adjust the thermostat settings accordingly. You can set up geofencing to automatically adjust the temperature when you leave or return home, ensuring optimal comfort while minimizing energy waste.
- Energy Usage Monitoring: Some Smart Thermostats provide insights into your energy usage, allowing you to track and analyze your home’s heating and cooling patterns over time. This information can help you make informed decisions about energy-saving adjustments and potentially reduce your utility bills.
- Integration with Smart Home Devices: Smart Thermostats often offer integration with other smart home devices, such as smart speakers or home automation systems. This enables you to control your thermostat using voice commands or create automation scenarios that optimize comfort and energy efficiency.
Exploring and familiarizing yourself with these additional features will help you make the most out of your Smart Thermostat and customize it according to your preferences and lifestyle.
Remember, the interface and menu options may vary slightly depending on the specific model and brand of your Smart Thermostat. Refer to the user manual or manufacturer’s website for detailed instructions and information on your specific device.
Now that you have an understanding of the Smart Thermostat interface, you’re ready to start utilizing its various features and functionalities to create a comfortable and energy-efficient home environment.
Adjusting Temperature Settings
One of the primary functions of the Alarm.com Smart Thermostat is to give you precise control over the temperature in your home. Whether you want to warm up on a cold winter day or cool down during a hot summer afternoon, adjusting the temperature settings is a breeze with this smart device.
To adjust the temperature on your Smart Thermostat, you have a few different options:
- Using the Touchscreen: If your Smart Thermostat has a touchscreen display, you can directly touch the up and down arrows on the screen to adjust the temperature to your desired level. The touchscreen interface provides a tactile and intuitive way to make quick temperature changes.
- Using the Buttons: Some Smart Thermostats have physical buttons on the device itself that allow you to adjust the temperature. Buttons may include an up and down arrow or dedicated temperature adjustment buttons. Refer to the user manual or device instructions to understand how the buttons work on your specific model.
- Using the Alarm.com App: The Alarm.com app is a powerful tool that enables you to control your Smart Thermostat remotely. Open the app on your smartphone or tablet, log in to your account, and navigate to the thermostat section. From there, you can adjust the temperature by simply using the on-screen controls or sliders.
- Using Voice Control: If your Smart Thermostat is compatible with voice assistants like Amazon Alexa or Google Assistant, you can use voice commands to adjust the temperature. Set up the voice assistant and connect it to your Smart Thermostat, then simply ask it to increase or decrease the temperature according to your preference.
When adjusting the temperature, keep in mind that small adjustments can make a significant difference in energy consumption and comfort. With the Alarm.com Smart Thermostat, you have precise control over the temperature settings, allowing you to find the perfect balance.
Additionally, the Smart Thermostat may offer advanced features that allow you to customize temperature settings based on time of day, day of the week, or even your occupancy patterns. Creating and managing schedules ensures that your home is always at the desired temperature when you need it, saving energy when you don’t.
Remember to consider energy-saving practices as you make adjustments to the temperature settings. Lowering the temperature slightly in the winter or raising it in the summer can result in substantial energy savings without compromising comfort.
By understanding the various methods available for adjusting the temperature settings and utilizing the additional features of your Smart Thermostat, you can create a comfortable environment that aligns with your energy-saving goals and preferences.
Creating and Managing Schedules
One of the key features of the Alarm.com Smart Thermostat is the ability to create and manage schedules. By setting up schedules, you can automatically adjust the temperature in your home based on your daily routines and preferences. This not only adds convenience but also helps you save energy and reduce utility costs.
To create a schedule on your Smart Thermostat, follow these steps:
- Access the Schedule Settings: Open the Alarm.com app on your smartphone or tablet and navigate to the thermostat section. Look for the scheduling options in the menu. Depending on the specific model and brand, you may also be able to access schedule settings directly on the device itself.
- Define Time Slots: Determine the time slots during which you want to adjust the temperature. You can create different time slots for weekdays, weekends, or specific days of the week. For example, you might want to set a lower temperature during working hours on weekdays and a higher temperature for evenings and weekends.
- Set Desired Temperatures: For each time slot, specify the desired temperature. You can adjust the temperature setting for heating and cooling separately. Be mindful of energy-saving practices and set temperatures that are comfortable yet efficient for each time slot.
- Apply and Save: Once you have defined your schedule, apply the settings and save them on your Smart Thermostat. The device will now automatically adjust the temperature based on the schedule you have created.
- Make Adjustments as Needed: Schedules are not set in stone. If your routine changes or you want to make adjustments to the temperature settings, you can easily modify the existing schedule or create new ones. This flexibility allows you to tailor your thermostat settings to your evolving lifestyle.
When creating and managing schedules, consider factors such as your occupancy patterns, work schedule, and preferences for comfort. By aligning the thermostat settings with your daily routines, you can ensure that your home is always at the desired temperature without wasting energy on unnecessary heating or cooling.
Additionally, with the convenience of the Alarm.com app, you can make on-the-go adjustments to your schedule or override the set temperature when needed. This means that if your plans change or you return home earlier than expected, you can easily adjust the temperature setting to suit your immediate needs.
It’s important to regularly review and tweak your schedules to optimize energy efficiency. With time and experimentation, you can find the ideal temperature settings and schedule configurations that keep you comfortable while saving energy.
By utilizing the scheduling feature of your Alarm.com Smart Thermostat, you can enjoy automatic temperature adjustments that align with your daily routines, enhancing both comfort and energy efficiency in your home.
Using Geofencing to Automatically Adjust the Temperature
Geofencing is a powerful feature of the Alarm.com Smart Thermostat that allows you to automatically adjust the temperature in your home based on your location. By utilizing your smartphone’s GPS, the Smart Thermostat can detect when you leave or return home, triggering temperature adjustments accordingly. This not only adds convenience but also helps optimize energy consumption.
To use geofencing with your Smart Thermostat, follow these steps:
- Set up Geofencing: Open the Alarm.com app on your smartphone or tablet and navigate to the thermostat settings. Look for the geofencing options and enable the feature. You may need to grant permission to the app to access your location.
- Define Geofence Boundary: Determine the distance from your home within which the geofencing feature should activate. This is typically referred to as the geofence boundary. You can set this range based on your personal preferences and the time it takes for your heating or cooling system to adjust to the desired temperature.
- Choose Temperature Adjustments: Specify the temperature adjustments you want to apply when you leave or enter the geofence boundary. For example, you may want to lower the temperature when you leave the boundary to conserve energy and raise it when you enter the boundary for increased comfort.
- Test and Fine-tune: After setting up geofencing, test the feature by leaving or entering the geofence boundary. Monitor your Smart Thermostat to ensure that the temperature adjustments are triggered accurately. If needed, adjust the geofence boundary or temperature settings to fine-tune the feature.
Geofencing provides the convenience of automatically adjusting the temperature in your home based on your daily movements. When you leave, the Smart Thermostat can switch to energy-saving temperature settings, and when you return, it can adjust to your desired comfort level.
Geofencing is particularly useful for individuals or families with varying schedules or those who often forget to adjust the thermostat before leaving the house. It ensures that you come back to a comfortable temperature without wasting energy on heating or cooling an empty home.
Keep in mind that geofencing relies on your smartphone’s GPS location. Ensure that your smartphone has location services enabled and that the Alarm.com app has the necessary permissions to access your location. Also, note that the accuracy of geofencing can vary based on GPS signal quality and other factors.
By using geofencing with your Alarm.com Smart Thermostat, you can enjoy automatic temperature adjustments that align with your comings and goings, enhancing both convenience and energy efficiency in your home.
Programming Energy-saving Modes
Programming energy-saving modes on your Alarm.com Smart Thermostat is an effective way to optimize energy consumption and reduce utility costs. These modes allow you to set specific temperature adjustments for periods when you are away or when you are asleep, ensuring that energy is not wasted on unnecessary heating or cooling.
To program energy-saving modes on your Smart Thermostat, follow these steps:
- Access the Energy-saving Modes: Open the Alarm.com app on your smartphone or tablet and navigate to the thermostat settings. Locate the energy-saving modes feature, which may be labeled as “Away Mode” or “Sleep Mode.”
- Select the Mode: Choose the energy-saving mode you want to program. Typically, thermostats offer preset modes such as “Away” and “Sleep,” but you may also have the option to create custom modes. Select the mode you want to customize.
- Adjust the Temperature Settings: Specify the desired temperature adjustments for the selected mode. For example, you may want to lower the temperature by a few degrees during the Away mode or raise it slightly during the Sleep mode to ensure energy efficiency and comfort.
- Set the Duration: Determine the duration during which the energy-saving mode should be active. You can choose specific hours of the day or set a timer for a certain number of hours. This flexibility allows you to tailor the energy-saving modes to your specific schedule.
- Apply and Save: Once you have adjusted the temperature settings and set the duration, save the energy-saving mode settings on your Smart Thermostat. The device will now automatically activate the selected mode according to the specified time and apply the temperature adjustments you have set.
Energy-saving modes are particularly useful when you are away from home for extended periods, such as during vacations or work trips. They ensure that energy is not wasted on heating or cooling an unoccupied space, helping you reduce energy consumption and lower your utility bills.
In addition to preset energy-saving modes, some Smart Thermostats allow you to create custom modes to suit your specific needs. This flexibility enables you to fine-tune your thermostat settings and energy-saving preferences based on various scenarios and occupancy patterns.
Remember to review and adjust the energy-saving modes periodically to accommodate any changes in your schedule or lifestyle. For example, you may want to make adjustments to the energy-saving modes during different seasons or when your routine shifts.
By programming energy-saving modes on your Alarm.com Smart Thermostat, you can take control of your energy consumption and contribute to a more sustainable and cost-effective home environment.
Monitoring Energy Usage
The Alarm.com Smart Thermostat offers the ability to monitor your energy usage, providing valuable insights into your home’s heating and cooling patterns. By tracking your energy usage, you can gain a better understanding of how your HVAC system operates and make informed decisions to enhance energy efficiency and reduce your carbon footprint.
To monitor energy usage with your Smart Thermostat, follow these steps:
- Access Energy Usage Data: Open the Alarm.com app on your smartphone or tablet and navigate to the thermostat settings. Look for the energy usage section, which may be labeled as “Energy Monitoring” or similar.
- View Energy Usage Metrics: In the energy usage section, you will find various metrics that provide insights into your heating and cooling patterns. These may include average energy consumption, usage over time, and comparisons to previous periods.
- Analyze Usage Patterns: Examine your energy usage data to identify any trends or patterns. Look for periods of higher energy consumption and consider the reasons behind them. For example, you may notice increased energy usage during extreme weather conditions or when certain appliances or devices are in use.
- Make Adjustments: Based on the analysis of your energy usage data, consider making adjustments to your thermostat settings or behavior to optimize energy efficiency. This may include modifying your temperature settings during specific times of the day or creating customized schedules to align with your occupancy patterns.
- Track Progress: Regularly monitor your energy usage data to track your progress in reducing energy consumption. Look for improvements over time and celebrate the positive impact you are making on both the environment and your utility bills.
Monitoring your energy usage provides you with actionable information to help you make smarter decisions on how to manage heating and cooling in your home. By identifying areas of inefficiency, you can take steps to reduce waste and achieve optimal energy consumption without sacrificing comfort.
Some models of Smart Thermostats may also offer tips or suggestions based on your energy usage data, assisting you in identifying energy-saving opportunities. These insights can help you fine-tune your thermostat settings and behavior to maximize energy efficiency.
Remember that energy usage can vary based on factors such as weather conditions, occupancy, and lifestyle. Regularly reviewing your energy usage data and making adjustments as necessary will ensure that you are continuously optimizing your HVAC system’s performance.
By monitoring energy usage with your Alarm.com Smart Thermostat, you can become more conscious of your energy consumption and actively work towards a more energy-efficient and sustainable home environment.
Integrating with Other Smart Home Devices
The Alarm.com Smart Thermostat is designed to seamlessly integrate with other smart home devices, enabling you to create a connected and cohesive smart home ecosystem. By integrating your Smart Thermostat with other devices, you can unlock a range of automation possibilities and enhance the overall convenience and efficiency of your smart home system.
Integrating your Smart Thermostat with other smart home devices typically involves using a central hub or platform that can communicate and control multiple devices simultaneously. Here are a few examples of how your Smart Thermostat can integrate with other smart home devices:
- Voice Assistants: Connect your Smart Thermostat to popular voice assistants like Amazon Alexa or Google Assistant. This enables you to control the thermostat using voice commands, such as adjusting the temperature or changing the mode. Voice control adds an extra layer of convenience and makes it even easier to manage your home’s temperature.
- Home Automation Systems: If you have a home automation system, you can integrate your Smart Thermostat into the system’s ecosystem. This allows you to create automation scenarios based on various triggers and conditions. For example, you could have the thermostat automatically adjust the temperature when the security system is armed or disarmed.
- Smart Lighting: By integrating your Smart Thermostat with smart lighting devices, you can synchronize the lighting with the thermostat’s settings. For example, the lights could dim or turn off when the thermostat enters an energy-saving mode or gradually brighten when the thermostat detects that you are waking up.
- Smart Window Shades: Integrate your Smart Thermostat with motorized window shades or blinds to optimize energy efficiency. When the thermostat detects that the temperature is increasing, it can automatically close the shades to block out excessive sunlight and minimize cooling needs.
- Weather Stations: Connect your Smart Thermostat with a weather station to receive real-time weather updates. By incorporating weather data into your thermostat’s algorithms, it can make more informed temperature adjustments based on factors like outdoor temperature, humidity, and weather conditions.
Integration with other smart home devices and platforms expands the capabilities of your Smart Thermostat, allowing it to communicate and collaborate with other devices to create a truly intelligent and efficient home environment.
Before attempting to integrate your Smart Thermostat with other devices, ensure compatibility and follow the specific instructions provided by both the thermostat manufacturer and the device or platform you want to integrate with. This ensures a smooth setup process and maximizes the benefits of integration.
By integrating your Alarm.com Smart Thermostat with other smart home devices, you can elevate your home automation experience and enjoy a more streamlined and interconnected smart home ecosystem.
Troubleshooting Common Issues
While the Alarm.com Smart Thermostat is designed to be user-friendly and reliable, occasionally you may encounter certain issues that require troubleshooting. Identifying and resolving these issues promptly will ensure that your thermostat remains in optimal working condition. Here are some common issues you might encounter and possible troubleshooting solutions:
1. No Power: If your Smart Thermostat is not turning on or displaying any information, check the power source. Verify that the thermostat is securely connected to the wiring and that power is reaching the device. If there is no power, confirm that the circuit breaker or fuse connected to the thermostat is not tripped or blown.
2. Connectivity Issues: If your Smart Thermostat is not connecting to your Wi-Fi network, ensure that the device is within range of the network and that you have entered the correct Wi-Fi password. Check that your Wi-Fi network is functioning properly and try restarting your router. If the issue persists, consult the user manual or contact customer support for further assistance.
3. Incorrect Temperature Reading: If you notice that the temperature reading on your Smart Thermostat is consistently inaccurate, you may need to recalibrate the device. Refer to the user manual for instructions on how to calibrate or adjust the temperature reading. Keep in mind that the thermostat’s location and exposure to direct sunlight or drafts can affect temperature accuracy.
4. Inconsistent Heating or Cooling: If your Smart Thermostat is not effectively maintaining the desired temperature, check the thermostat settings and schedule to ensure they are properly programmed. Verify that the heating and cooling systems are functioning correctly and that the thermostat is wired correctly. If the problem persists, consider contacting an HVAC technician for further inspection.
5. App Connectivity Issues: If you are experiencing difficulties connecting to your Smart Thermostat through the Alarm.com app, ensure that you have the latest version of the app installed and that your smartphone or tablet is updated to the latest software version. If the issue persists, try force-closing the app and reopening it. You may also need to check your internet connection or contact customer support for app-related assistance.
These are just a few examples of common issues that you may encounter with your Alarm.com Smart Thermostat. It’s essential to consult the user manual and troubleshooting guide provided by the manufacturer for specific instructions and solutions tailored to your device’s model.
If you have followed the troubleshooting steps and the issue persists, it may be necessary to contact the manufacturer’s customer support or request assistance from a qualified technician to diagnose and resolve the problem.
Remember, proper maintenance and regular updates of firmware and software can prevent many issues from arising. Periodically check for software updates on both the Smart Thermostat and the associated app to ensure that you have the latest features and bug fixes.
By addressing and resolving common issues promptly, you can continue to enjoy the benefits of your Alarm.com Smart Thermostat and maintain a comfortable and energy-efficient home environment.
Conclusion
The Alarm.com Smart Thermostat is a powerful and versatile device that brings convenience, control, and energy efficiency to your home. With its user-friendly interface, seamless integration with other smart home devices, and advanced features like scheduling, geofencing, and energy-saving modes, the Smart Thermostat offers a wide range of benefits.
In this guide, we explored how to get started with the Alarm.com Smart Thermostat, from the installation process to connecting it to your Wi-Fi network and setting up your account on the Alarm.com app. We discussed the various features of the Smart Thermostat, including adjusting temperature settings, creating and managing schedules, using geofencing to automatically adjust the temperature based on your location, programming energy-saving modes, monitoring energy usage, and integrating with other smart home devices.
It’s important to remember that every home and user experience may be different, and the specific features and functionalities of your Smart Thermostat may vary based on the model and brand. Always refer to the user manual, manufacturer’s website, or customer support for detailed information and instructions specific to your device.
By utilizing the capabilities of your Alarm.com Smart Thermostat, you can achieve a more comfortable and energy-efficient home environment. Whether you’re adjusting the temperature with a simple tap on the touchscreen, creating personalized schedules, or automating temperature adjustments with geofencing, your Smart Thermostat puts you in control.
Regularly monitoring your energy usage and troubleshooting common issues will ensure that your Smart Thermostat continues to operate effectively. Always follow the recommended maintenance practices and keep your device and associated app up to date to ensure optimal performance.
With the Alarm.com Smart Thermostat, you can experience the convenience of controlling your home’s temperature from anywhere, the energy efficiency of automated temperature adjustments, and the peace of mind that comes with a more connected and efficient smart home ecosystem.