Introduction
Welcome to our comprehensive guide on how to remove the Arlo Video Doorbell. Whether you’re looking to upgrade to a new model or simply need to uninstall your current doorbell for maintenance purposes, we’ve got you covered. The Arlo Video Doorbell is a popular and feature-rich device that provides advanced security and convenience for your home. Before diving into the removal process, it’s essential to gather the necessary tools and prepare yourself for a smooth and hassle-free experience.
Removing a doorbell may seem daunting, but fear not! With the right instructions and a bit of patience, you’ll have it removed in no time. In this step-by-step guide, we will walk you through the process of disconnecting the power supply, removing the existing doorbell, disconnecting the wiring, and installing the new doorbell.
However, before we proceed, it’s crucial to ensure your safety by turning off the power supply to the doorbell. This precautionary measure will prevent any accidental shocks or damage to the electrical system. Once you’ve taken the necessary precautions, you can proceed with the removal process confidently.
So, without further ado, let’s dive into the step-by-step instructions to successfully remove your Arlo Video Doorbell. Make sure to follow each step carefully to avoid any potential issues and ensure a smooth transition.
Step 1: Gather the necessary tools
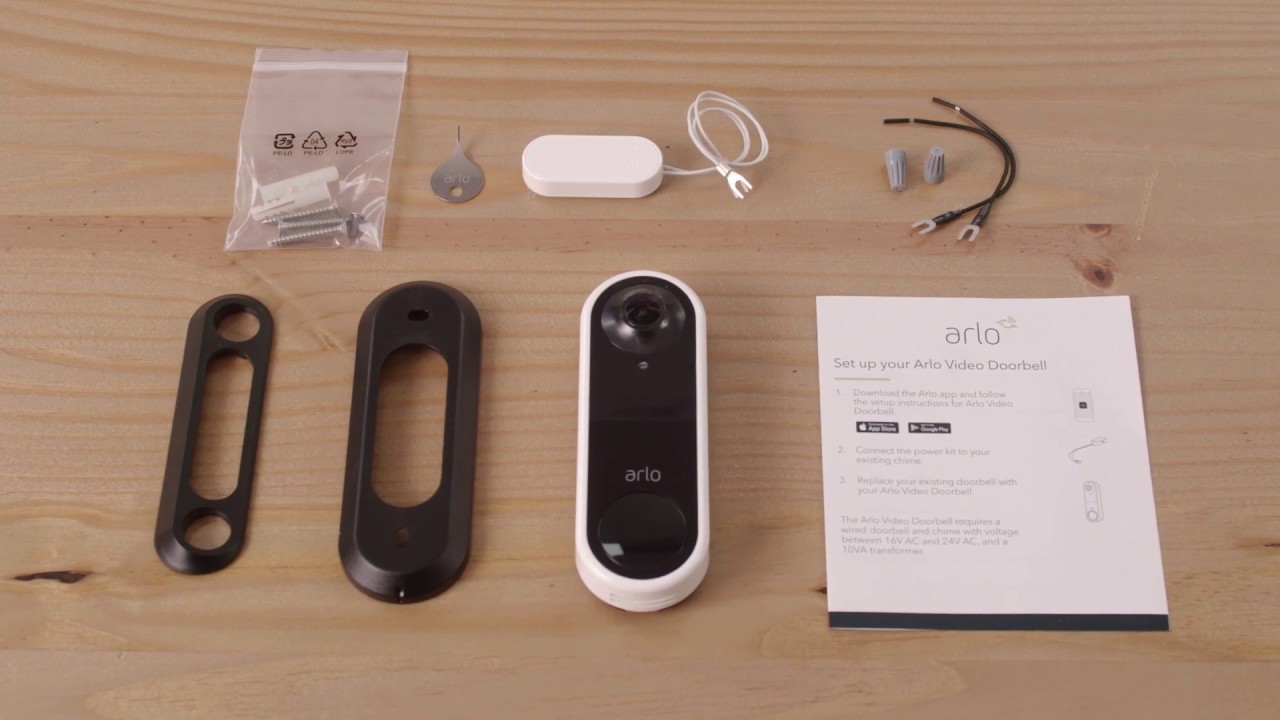
Before you begin the process of removing the Arlo Video Doorbell, it’s important to gather the necessary tools. Having the right tools will make the process easier and more efficient. Here are the essential tools you’ll need:
- Screwdriver: You’ll need a Phillips-head screwdriver or a suitable screwdriver to remove the screws holding the existing doorbell and mounting bracket.
- Wire strippers: Wire strippers will be required to properly disconnect the wiring from the doorbell.
- Electrical tape: Having electrical tape on hand will come in handy for securing the wiring and preventing any exposed wires from causing a short circuit.
- Work gloves: It’s always a good idea to wear work gloves to protect your hands during the removal process.
- Safety glasses: While not necessary, safety glasses can provide an extra layer of protection against any debris or particles that may fly around during the removal.
Make sure to have all these tools readily available before you proceed with the removal process. This will help ensure a smooth and efficient experience, allowing you to safely remove the Arlo Video Doorbell without any unnecessary delays or complications.
Step 2: Disconnect the power supply
Before you begin removing the Arlo Video Doorbell, it’s crucial to disconnect the power supply to ensure your safety. Follow these steps to disconnect the power:
- Locate the circuit breaker: Identify the circuit breaker in your home’s electrical panel that controls the power supply to the doorbell. It is usually labeled or identified as “Doorbell” or “Front Door.”
- Flip the breaker switch: Once you’ve located the circuit breaker, use caution and flip the switch to the “Off” or “Down” position. This will cut off the power supply to the doorbell, ensuring there is no electrical current flowing through the system.
- Verify the power supply is disconnected: Double-check that the power supply is indeed disconnected by attempting to ring the doorbell. If there is no sound or response, it means the power supply has been successfully disconnected.
It’s important to take these steps to ensure your safety before proceeding with the removal process. Cutting off the power supply will prevent any accidental electrical shocks or damage to the doorbell and electrical system.
Also, keep in mind that different homes may have varying electrical setups, so if you’re unsure about the location of the circuit breaker or how to cut off the power supply, consult a professional electrician. Safety should always be your top priority when working with electrical systems.
Step 3: Remove the existing doorbell
Now that you have disconnected the power supply, it’s time to remove the existing doorbell. Follow these steps to successfully remove the Arlo Video Doorbell:
- Inspect the doorbell: Take a close look at the existing doorbell. Most doorbells are held in place by a few screws or a mounting bracket. Identify the specific method of attachment used for your doorbell.
- Remove the screws: Use a screwdriver that matches the type of screws used to secure the doorbell. Typically, the screws will be located at the top and bottom of the device. Carefully unscrew and remove them.
- Detach the mounting bracket: If your doorbell uses a mounting bracket, you’ll need to detach it from the wall. Gently pull the doorbell away from the wall to reveal the mounting bracket. Then, unscrew any screws holding the bracket in place and remove it.
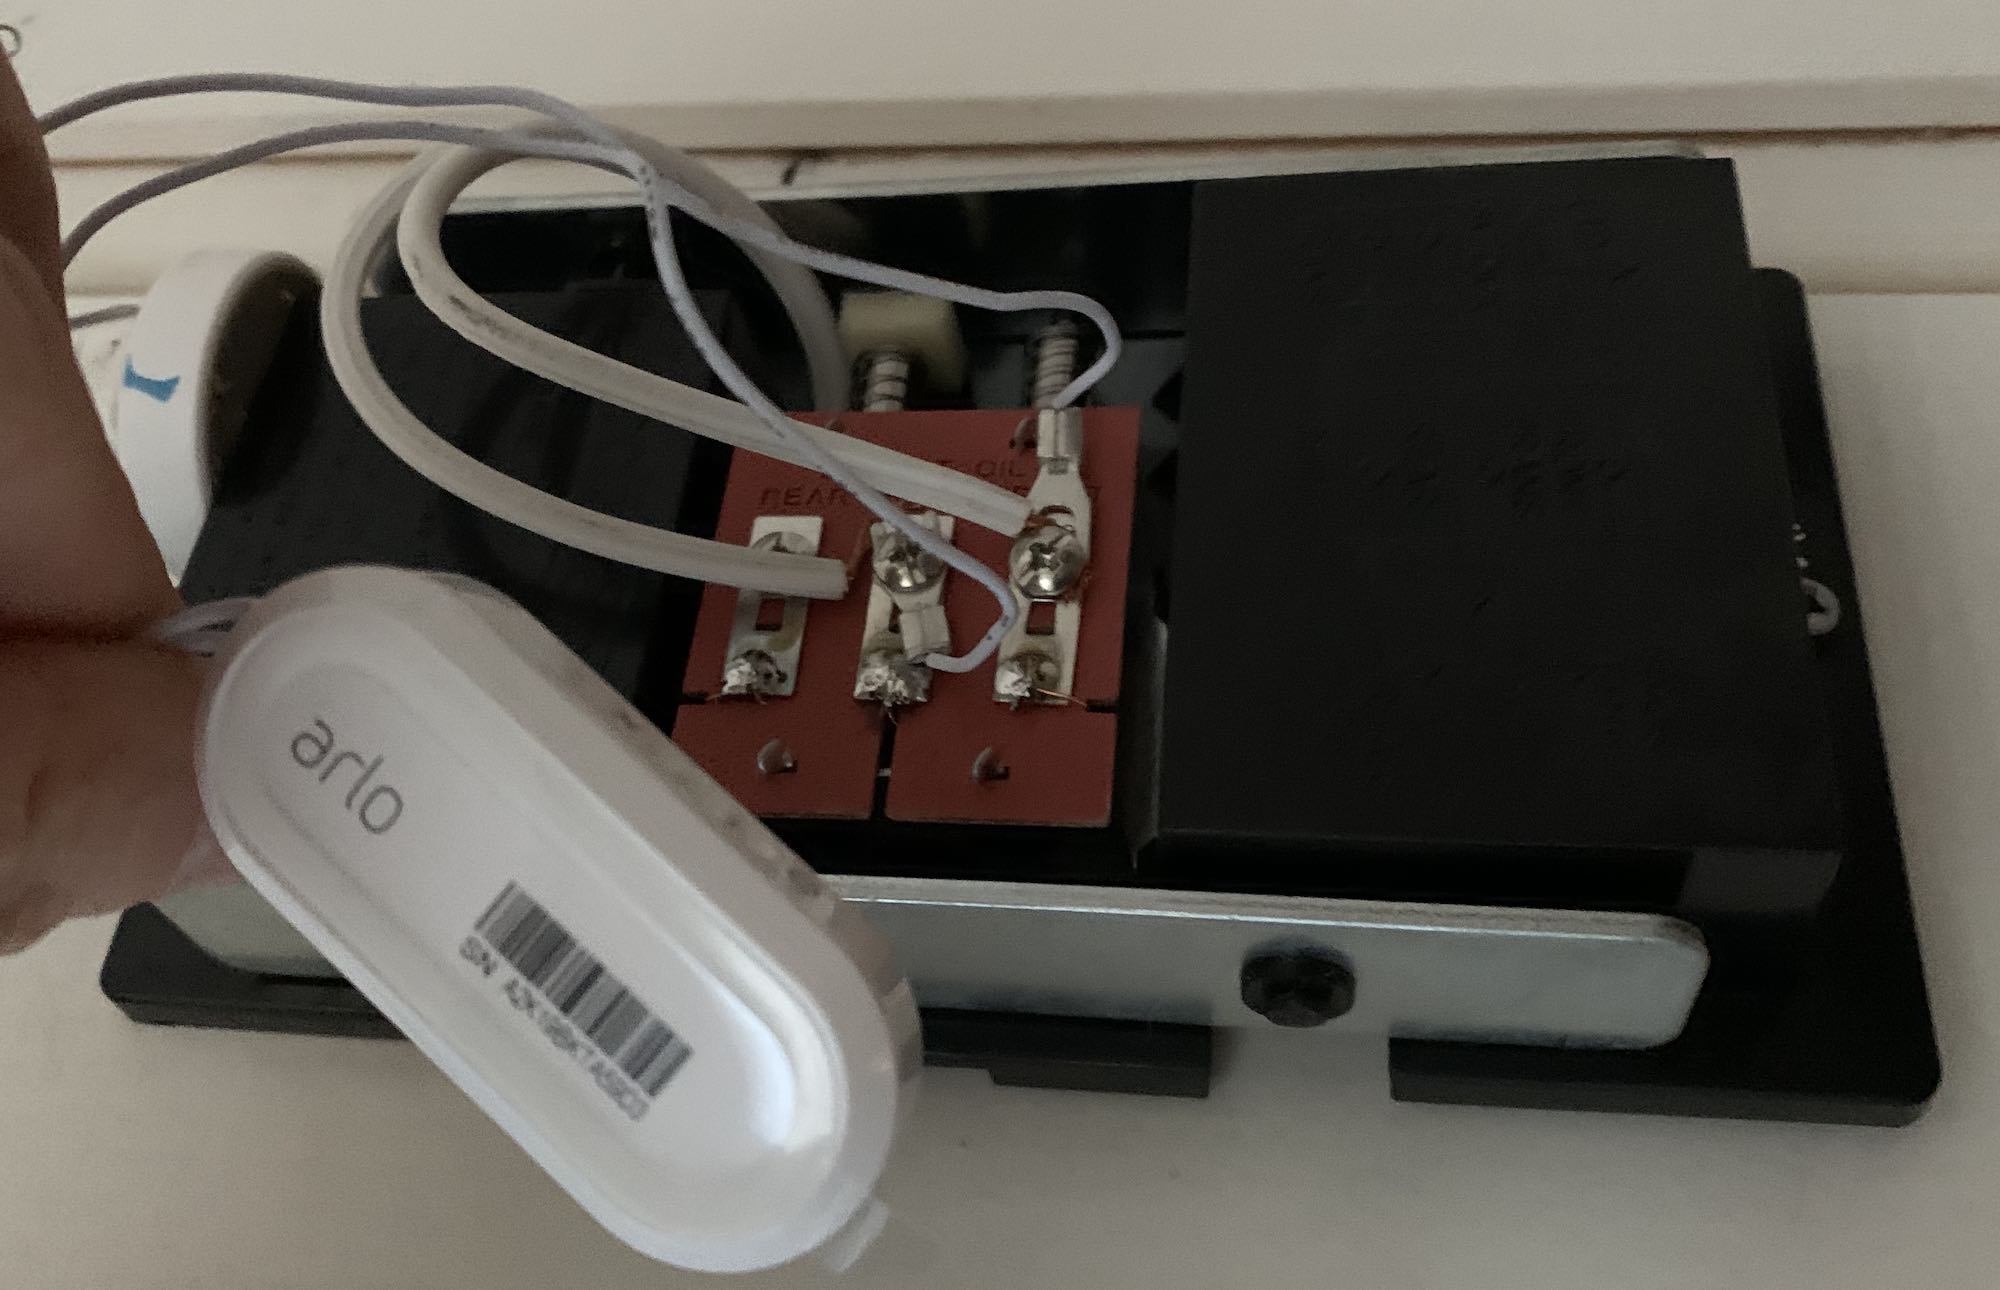
- Disconnect any wiring: With the doorbell and mounting bracket removed, you’ll see the wiring behind it. Carefully disconnect the wiring by unscrewing the terminal screws or detaching the wire connectors. Take note of the wire colors and their corresponding terminals.
Once you have removed the screws, detached the mounting bracket, and disconnected the wiring, you have successfully removed the existing Arlo Video Doorbell. Set it aside in a safe place if you plan to reuse it or dispose of it properly according to local regulations.
Keep in mind that some doorbells may have additional components, such as a chime box or transformer, that may need to be disconnected as well. If you come across any additional components, refer to the manufacturer’s instructions or consult a professional for guidance.
Step 4: Disconnect the wiring
With the existing doorbell removed, it’s time to disconnect the wiring in preparation for the installation of the new doorbell. Follow these steps to safely disconnect the wiring:
- Identify the wiring: Take a close look at the wiring behind the removed doorbell. You will typically find two or three wires connected to the terminal screws or wire connectors. The wires are usually color-coded, with the most common colors being red, white, and green.
- Loosen the terminal screws: Using a screwdriver, gently loosen the terminal screws that secure the wires. Turn them counterclockwise to loosen the grip on the wires without completely removing the screws.
- Remove the wires: Once the terminal screws are loosened, carefully remove the wires from their respective terminals. If the wires are connected using wire connectors, gently pull them apart to separate the wiring.
- Secure the loose wires: To prevent them from accidentally touching and causing a short circuit, use electrical tape to secure and cover the exposed ends of the wires. This step is crucial for safety.
By following these steps, you have successfully disconnected the wiring from the previous doorbell. Take a moment to ensure that all wires are securely taped and separated to avoid any potential electrical hazards.
Remember, when working with electrical wiring, always exercise caution and adhere to safety precautions. If you’re unfamiliar or uncomfortable working with electrical systems, it’s highly recommended to seek assistance from a qualified professional.
Step 5: Remove the mounting bracket
Now that the wiring is disconnected, it’s time to remove the mounting bracket that held the previous doorbell in place. Follow these steps to remove the mounting bracket:
- Inspect the mounting bracket: Take a close look at the mounting bracket. It is usually secured to the wall or door frame with screws. Assess how it is attached and determine which screws need to be removed.
- Remove the screws: Using a screwdriver, carefully remove the screws that are holding the mounting bracket in place. Make sure to keep track of the screws to prevent them from getting misplaced.
- Gently detach the mounting bracket: Once the screws are removed, gently pull the mounting bracket away from the wall or door frame. If necessary, use slight pressure to separate it from any adhesive or caulking that may be securing it.
By following these steps, you have successfully removed the mounting bracket. Set it aside in a safe place in case it can be reused in the future or dispose of it properly according to local regulations.
It’s important to remove the mounting bracket carefully to avoid damaging the wall or door frame. Inspect the area where the bracket was attached, and if there are any holes or damage, take the necessary steps to repair or patch them appropriately.
With the mounting bracket now removed, you’re one step closer to installing the new Arlo Video Doorbell and enhancing the security of your home.
Step 6: Install the new doorbell
Now that you’ve removed the old doorbell and prepared the mounting area, it’s time to install the new Arlo Video Doorbell. Follow these steps for a successful installation:
- Position the mounting bracket: Take the new doorbell and align it with the mounting area. Ensure that the screw holes on the mounting bracket match the holes on the wall or door frame. Adjust the position as needed.
- Secure the mounting bracket: Once the doorbell is positioned correctly, use screws and a screwdriver to secure the mounting bracket in place. Make sure the bracket is firmly attached and level.
- Connect the wiring: Take the wires you disconnected earlier and identify their corresponding terminals on the new doorbell. Match the wire colors to their respective terminals and connect them securely. Tighten the terminal screws to ensure a solid connection. If your new doorbell uses wire connectors, follow the manufacturer’s instructions for proper wiring.
- Attach the doorbell: With the wiring connected, carefully align the doorbell with the mounting bracket. Gently slide the doorbell onto the bracket until it snaps into place or is held securely.
- Test the doorbell: At this point, you can restore power to the doorbell by flipping the circuit breaker switch back to the “On” or “Up” position. Test the functionality of the doorbell by pressing the button or using the Arlo app. Make sure it rings and functions properly.
Congratulations! You have successfully installed the new Arlo Video Doorbell. Take a moment to admire your work and ensure the doorbell is securely attached and functioning as expected.
If you encounter any issues during the installation or the doorbell fails to work correctly, refer to the manufacturer’s instructions or seek professional assistance for troubleshooting and support.
Step 7: Connect the wiring
With the new Arlo Video Doorbell securely installed, it’s time to connect the wiring for proper functionality. Follow these steps to connect the wiring:
- Identify the terminals: Take a close look at the terminals on the new doorbell. They are usually labeled or color-coded for easy identification. Refer to the manufacturer’s instructions to ensure proper terminal identification.
- Match the wire colors: Take the wires you disconnected from the previous doorbell and match their colors to the corresponding terminals. For example, connect the red wire to the terminal labeled “R” or “Red” and the white wire to the terminal labeled “W” or “White.”
- Secure the wiring: Once the wires are in position, tighten the terminal screws or follow the manufacturer’s instructions for securing the wiring using wire connectors. Ensure a tight and secure connection to prevent any loose or exposed wires.
- Tuck away the wiring: Once the wiring is connected, carefully tuck it into the mounting area or follow any cable management guidelines provided by the manufacturer. Ensure that the wiring is out of the way and does not interfere with the doorbell’s functionality or aesthetics.
By following these steps, you have successfully connected the wiring for the new Arlo Video Doorbell. Take a moment to double-check that all connections are secure and the wiring is neatly tucked away.
If you are unsure about the wiring or need additional assistance, consider consulting a professional electrician to ensure a safe and proper connection.
Step 8: Mount the new doorbell
Once the wiring is connected, it’s time to mount the new Arlo Video Doorbell securely. Follow these steps to mount the doorbell:
- Align the doorbell: Place the new doorbell in position, aligning it with the mounting bracket. Ensure that the screw holes on the doorbell align with the holes on the bracket.
- Secure the doorbell: Once aligned, use the provided screws and a screwdriver to secure the doorbell to the mounting bracket. Gently tighten the screws, ensuring a snug fit without overtightening.
- Double-check alignment: Verify that the doorbell is level and properly aligned. Adjust if necessary by loosening the screws slightly and repositioning the doorbell.
- Test the doorbell: After mounting the doorbell, test its functionality by pressing the doorbell button or using the Arlo app. Ensure that it rings or activates as expected.
By following these steps, you have successfully mounted the new Arlo Video Doorbell. Take a moment to inspect the doorbell, ensuring it is securely attached and level.
If the doorbell is not functioning correctly or if you encounter any issues during the mounting process, refer to the manufacturer’s instructions or contact their customer support for assistance and guidance.
Now that the new doorbell is securely mounted, you can move on to the final steps of restoring the power supply and testing the doorbell’s functionality.
Step 9: Restore power supply
With the new doorbell mounted and connected, it’s time to restore the power supply. Follow these steps to safely restore power:
- Locate the circuit breaker: Identify the circuit breaker that controls the power supply to the doorbell. Refer to the labels or markings on the breaker panel to find the correct one.
- Flip the breaker switch: Carefully flip the breaker switch that corresponds to the doorbell back to the “On” or “Up” position. This will restore the power supply to the doorbell.
- Verify power restoration: Once the breaker switch is flipped, test the doorbell by pressing the button or using the Arlo app. If the doorbell rings or activates as expected, it means that the power has been successfully restored.
By following these steps, you have successfully restored the power supply to your new Arlo Video Doorbell. It’s important to ensure that the doorbell functions correctly and is powered up before proceeding to the final step.
If, after restoring the power, the doorbell does not respond or function properly, double-check the wiring connections and ensure that the circuit breaker switch is in the correct position. If issues persist, refer to the manufacturer’s instructions or seek professional assistance for troubleshooting and support.
Now that the power supply is restored, you’re ready for the final step of testing the doorbell’s functionality.
Step 10: Test the doorbell functionality
With the power supply restored, it’s time to test the functionality of your new Arlo Video Doorbell. Follow these steps to ensure everything is working as expected:
- Press the doorbell button: Stand in front of the doorbell and press the button to test if it rings or activates. Listen for the doorbell chime or check for notifications on your smartphone using the Arlo app.
- Check for video and audio: If your Arlo Video Doorbell has a camera and microphone, check if you’re receiving a clear video feed and if the audio is functioning properly.
- Adjust settings if needed: Using the Arlo app or any other accompanying software, adjust the doorbell settings to your preferences. This may include adjusting motion detection sensitivity, customizing alert notifications, or setting up any special features.
- Perform additional tests: Walk around your property near the doorbell and observe if motion detection is working accurately. Test various scenarios, such as different lighting conditions or approaching the door from different angles, to ensure the doorbell captures events reliably.
By following these steps, you can verify that your new Arlo Video Doorbell is functioning properly. If everything is working as expected, you can now enjoy the enhanced security and convenience it brings to your home.
If you encounter any issues during the testing phase, refer to the manufacturer’s instructions or contact their customer support for further assistance. They will be able to provide specific troubleshooting steps or offer guidance to resolve any potential problems.
With the doorbell successfully tested, you have completed the installation process and can now fully enjoy the benefits of your new Arlo Video Doorbell!
Conclusion
Congratulations! You’ve successfully learned how to remove the Arlo Video Doorbell and install a new one. By following the step-by-step guide, you’ve taken the necessary actions to ensure a smooth and safe process.
Throughout this guide, we covered important steps, from gathering the necessary tools to disconnecting the power supply, removing the existing doorbell, connecting the wiring, mounting the new doorbell, restoring the power supply, and testing the doorbell’s functionality. Each step plays a crucial role in completing the installation successfully.
Remember, safety should always be your top priority. Take precautions when working with electrical systems, and if you’re unsure or uncomfortable, don’t hesitate to seek professional assistance. It’s better to be safe than sorry.
Now that you’ve installed your new Arlo Video Doorbell, you can enjoy its advanced security features, convenience, and peace of mind. Whether it’s monitoring your front door, receiving alerts on your smartphone, or having two-way communication with visitors, your doorbell will provide an enhanced level of security for your home.
Should you need further assistance or encounter any issues, refer to the manufacturer’s instructions or reach out to their customer support for additional guidance. They will be able to provide specific troubleshooting steps and answer any questions you may have.
Thank you for using this guide, and we hope your new Arlo Video Doorbell brings you satisfaction and improved home security!