Introduction
Are you looking to enhance your audio experience while watching movies or listening to music? Look no further than the Sony soundbar. This sleek and stylish audio device offers immersive sound and a wide range of features to elevate your entertainment setup. Whether you’re a tech enthusiast or a casual user, pairing a Sony soundbar with your TV and mobile devices can be a game-changer.
In this article, we will guide you through the process of pairing a Sony soundbar with your TV and mobile devices. We will cover everything from the initial setup to adjusting the soundbar settings to maximize your audio experience. So let’s get started and transform your living room into a personal movie theater or concert hall!
Before we delve into the step-by-step instructions, let’s take a moment to understand the benefits of using a Sony soundbar. Firstly, a soundbar provides a significant improvement in audio quality compared to built-in TV speakers. With advanced sound technologies and multiple audio channels, a soundbar can deliver crisp dialogue, powerful bass, and immersive surround sound.
Additionally, Sony soundbars often come with built-in Bluetooth functionality, allowing you to connect and stream music wirelessly from your smartphone or tablet. This wireless connectivity makes it easy to enjoy your favorite playlists and podcasts without the hassle of cables. Furthermore, many Sony soundbars support virtual surround sound technology, creating a surround sound experience without the need for additional speakers.
Now that we’ve established the advantages of having a Sony soundbar, let’s proceed to the next section and begin the setup process. Get ready to take your audio experience to the next level!
Step 1: Unpack and set up your Sony soundbar
Before you can start enjoying the immersive audio experience of your Sony soundbar, you’ll need to unpack and set it up properly. Let’s walk through the essential steps:
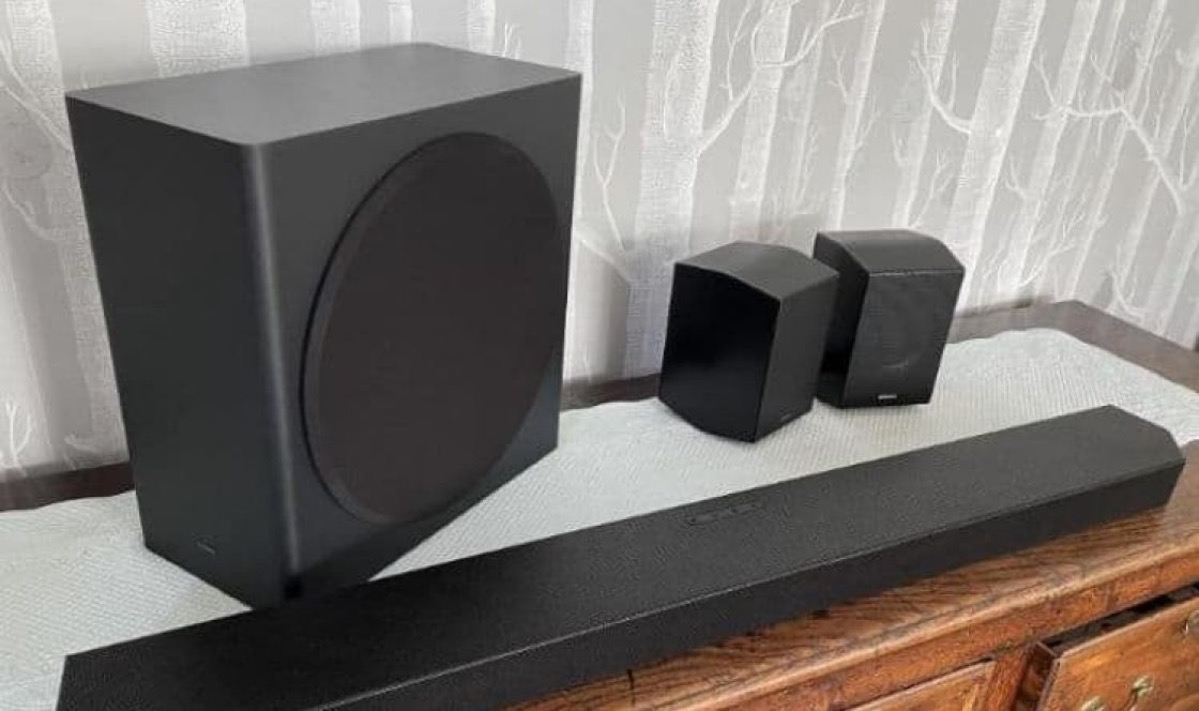
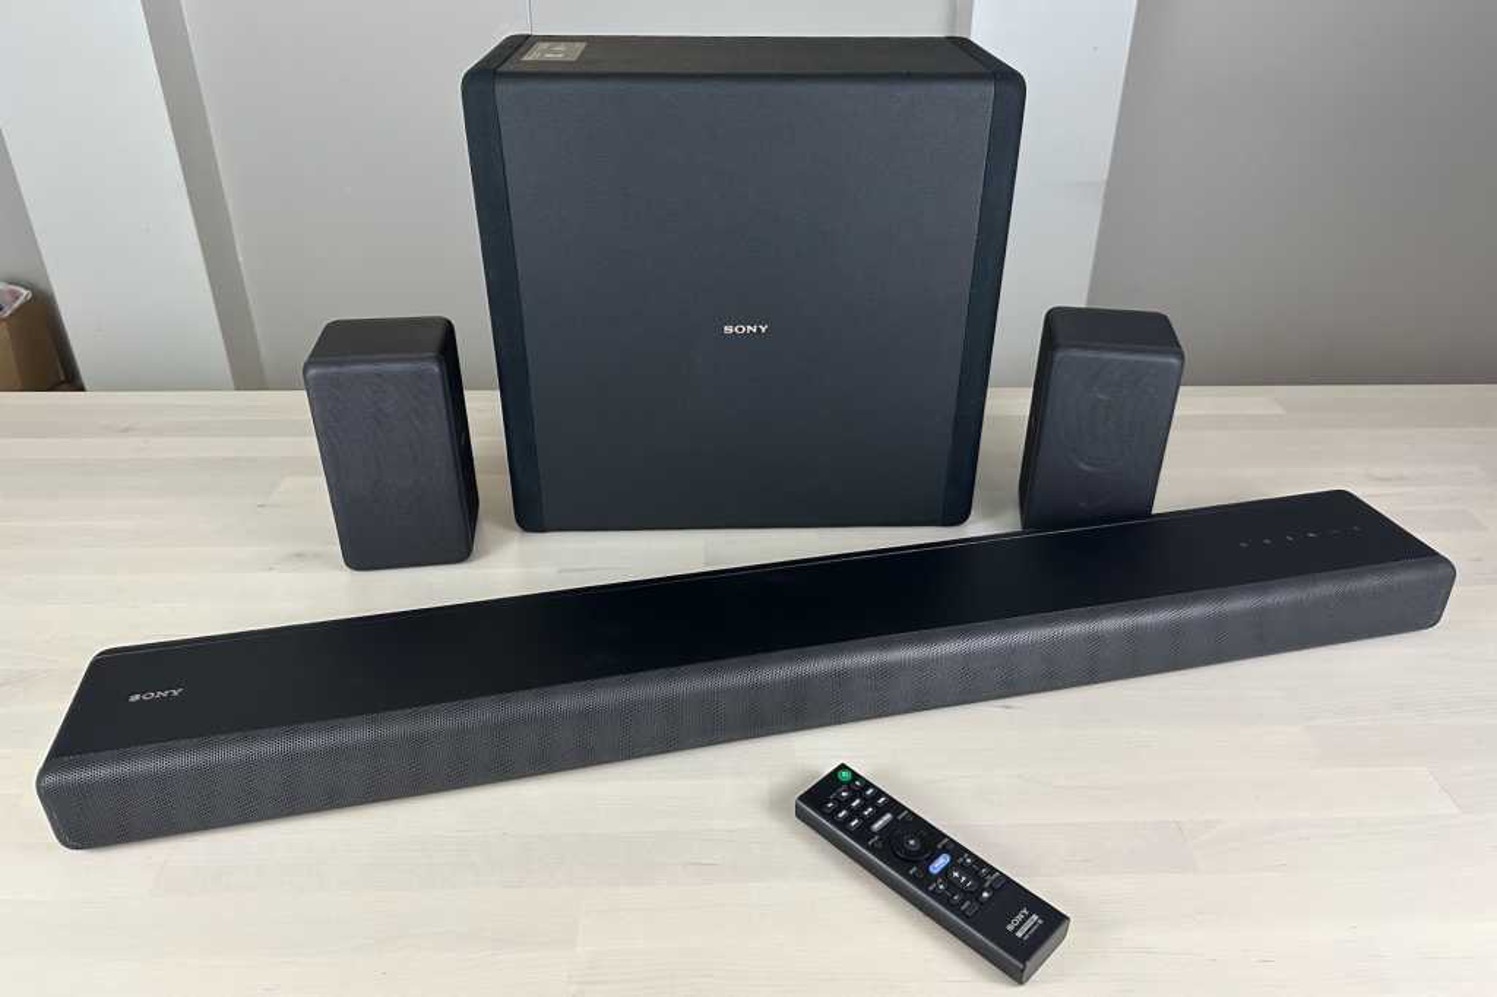
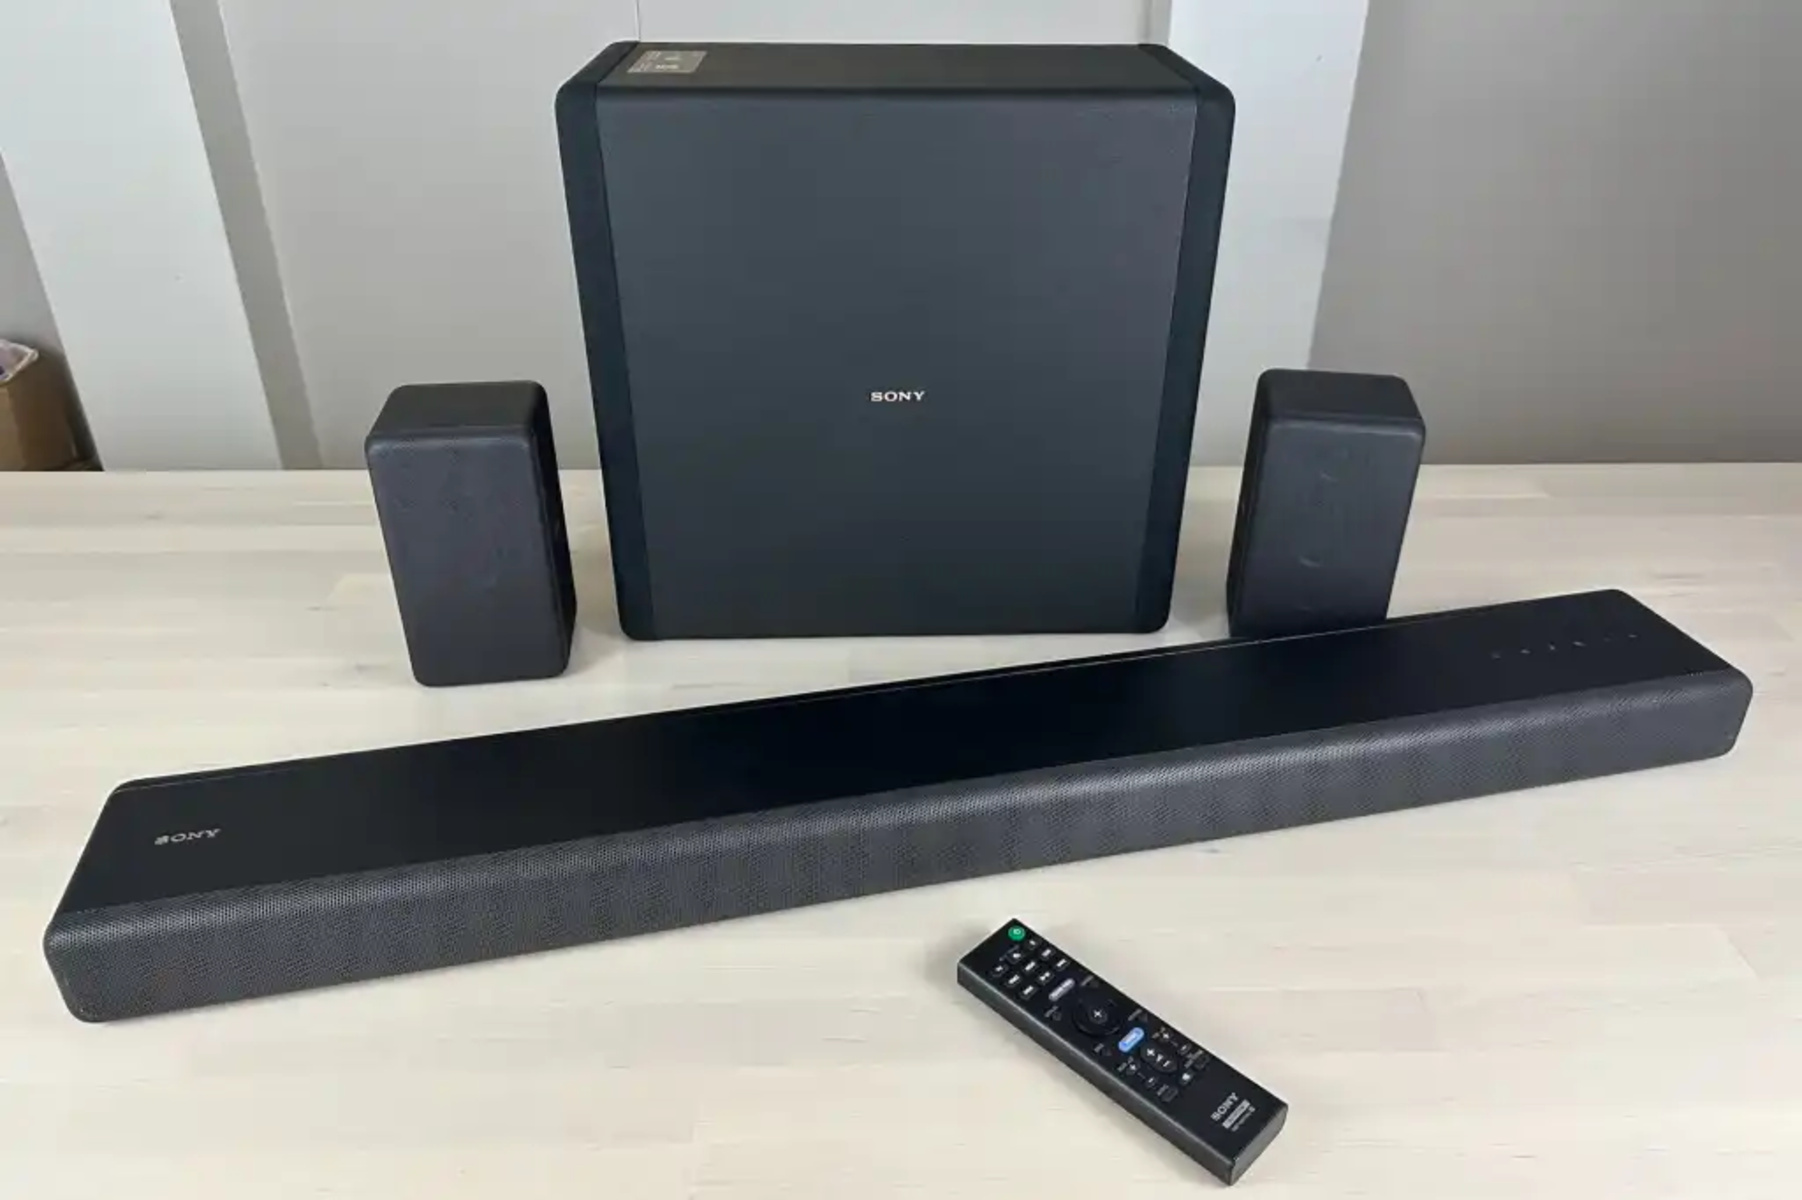
1. Unboxing: Carefully unpack your Sony soundbar and ensure that you have all the necessary components. This usually includes the soundbar itself, a power adapter, a remote control, and any accompanying cables.
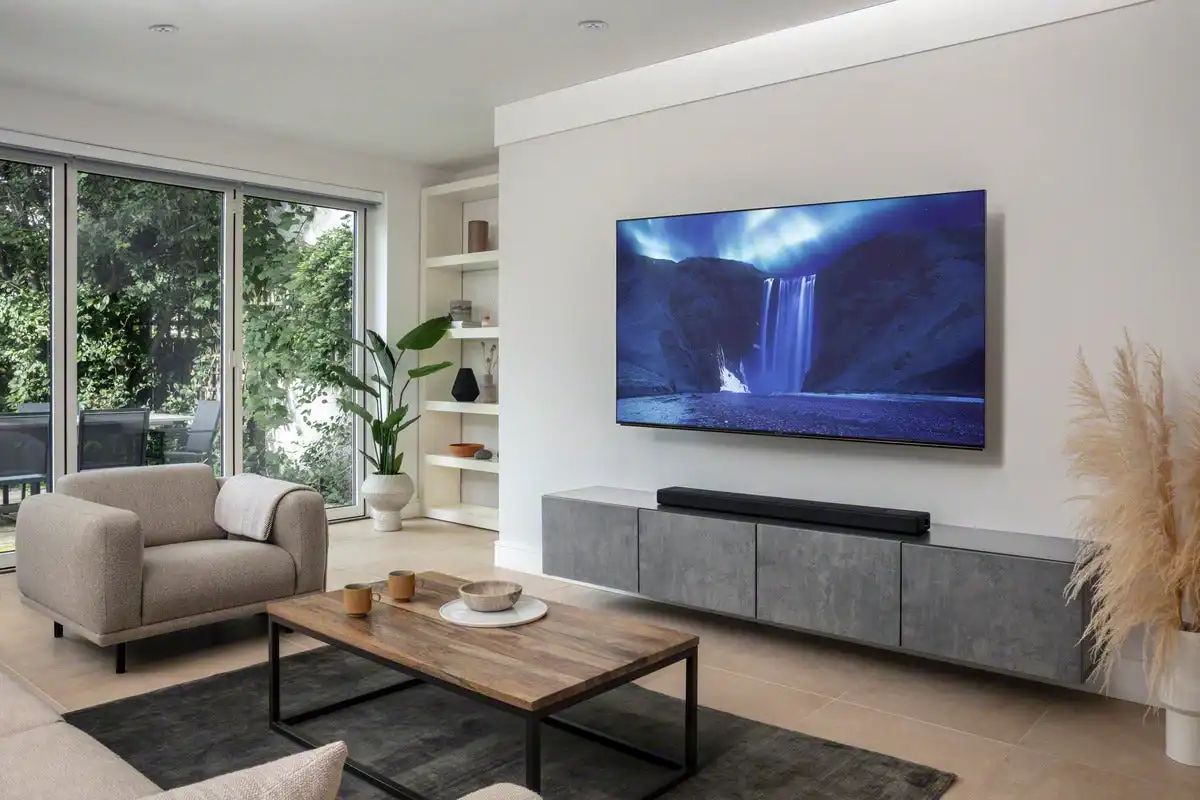
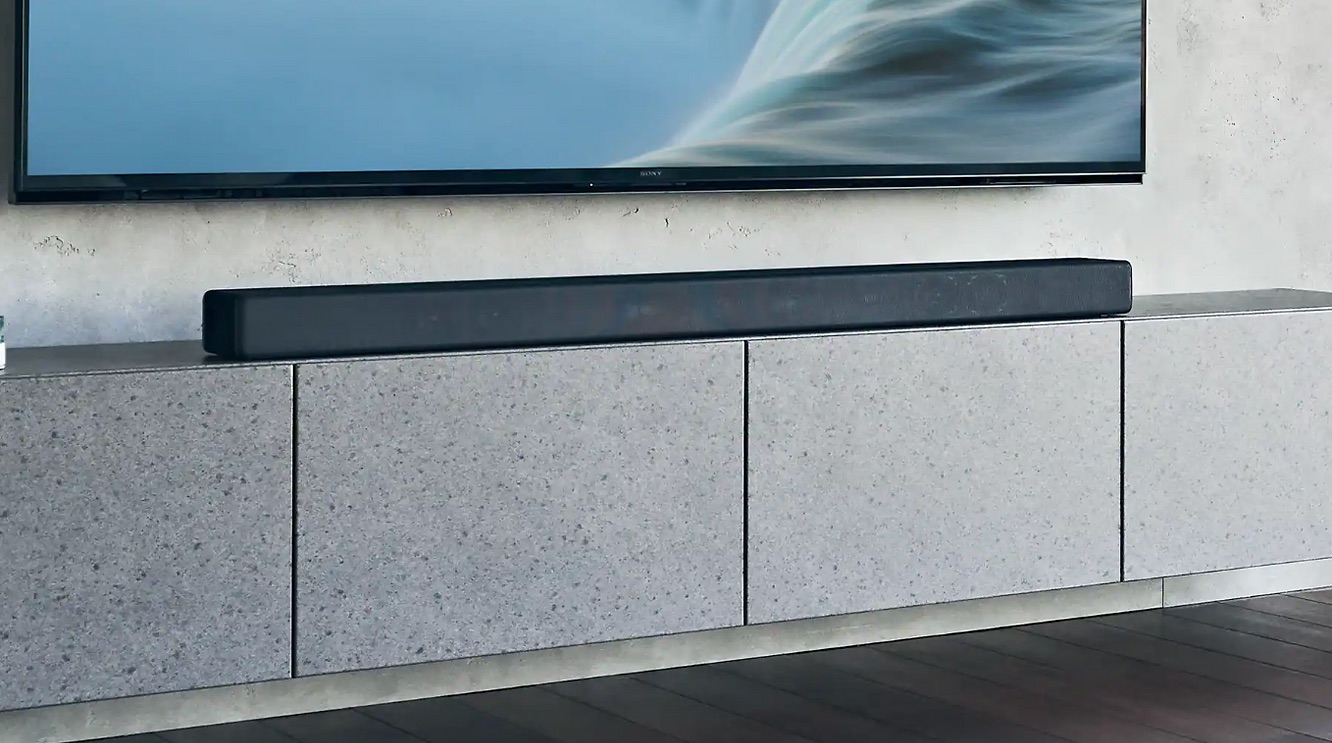
2. Placement: Decide on the ideal location for your soundbar. Typically, it should be placed directly below or above your TV, centered with the screen for optimal sound projection. You can either mount it on the wall using the provided brackets or position it on a TV stand.
3. Power Connection: Connect the power adapter to your soundbar and plug it into a nearby power outlet. Ensure that the power cable is securely connected and free from any obstructions.
4. Set Up the Remote Control: Insert the batteries into the remote control and make sure they are installed correctly. This will allow you to conveniently control the soundbar’s settings and volume without having to use the buttons on the device itself.
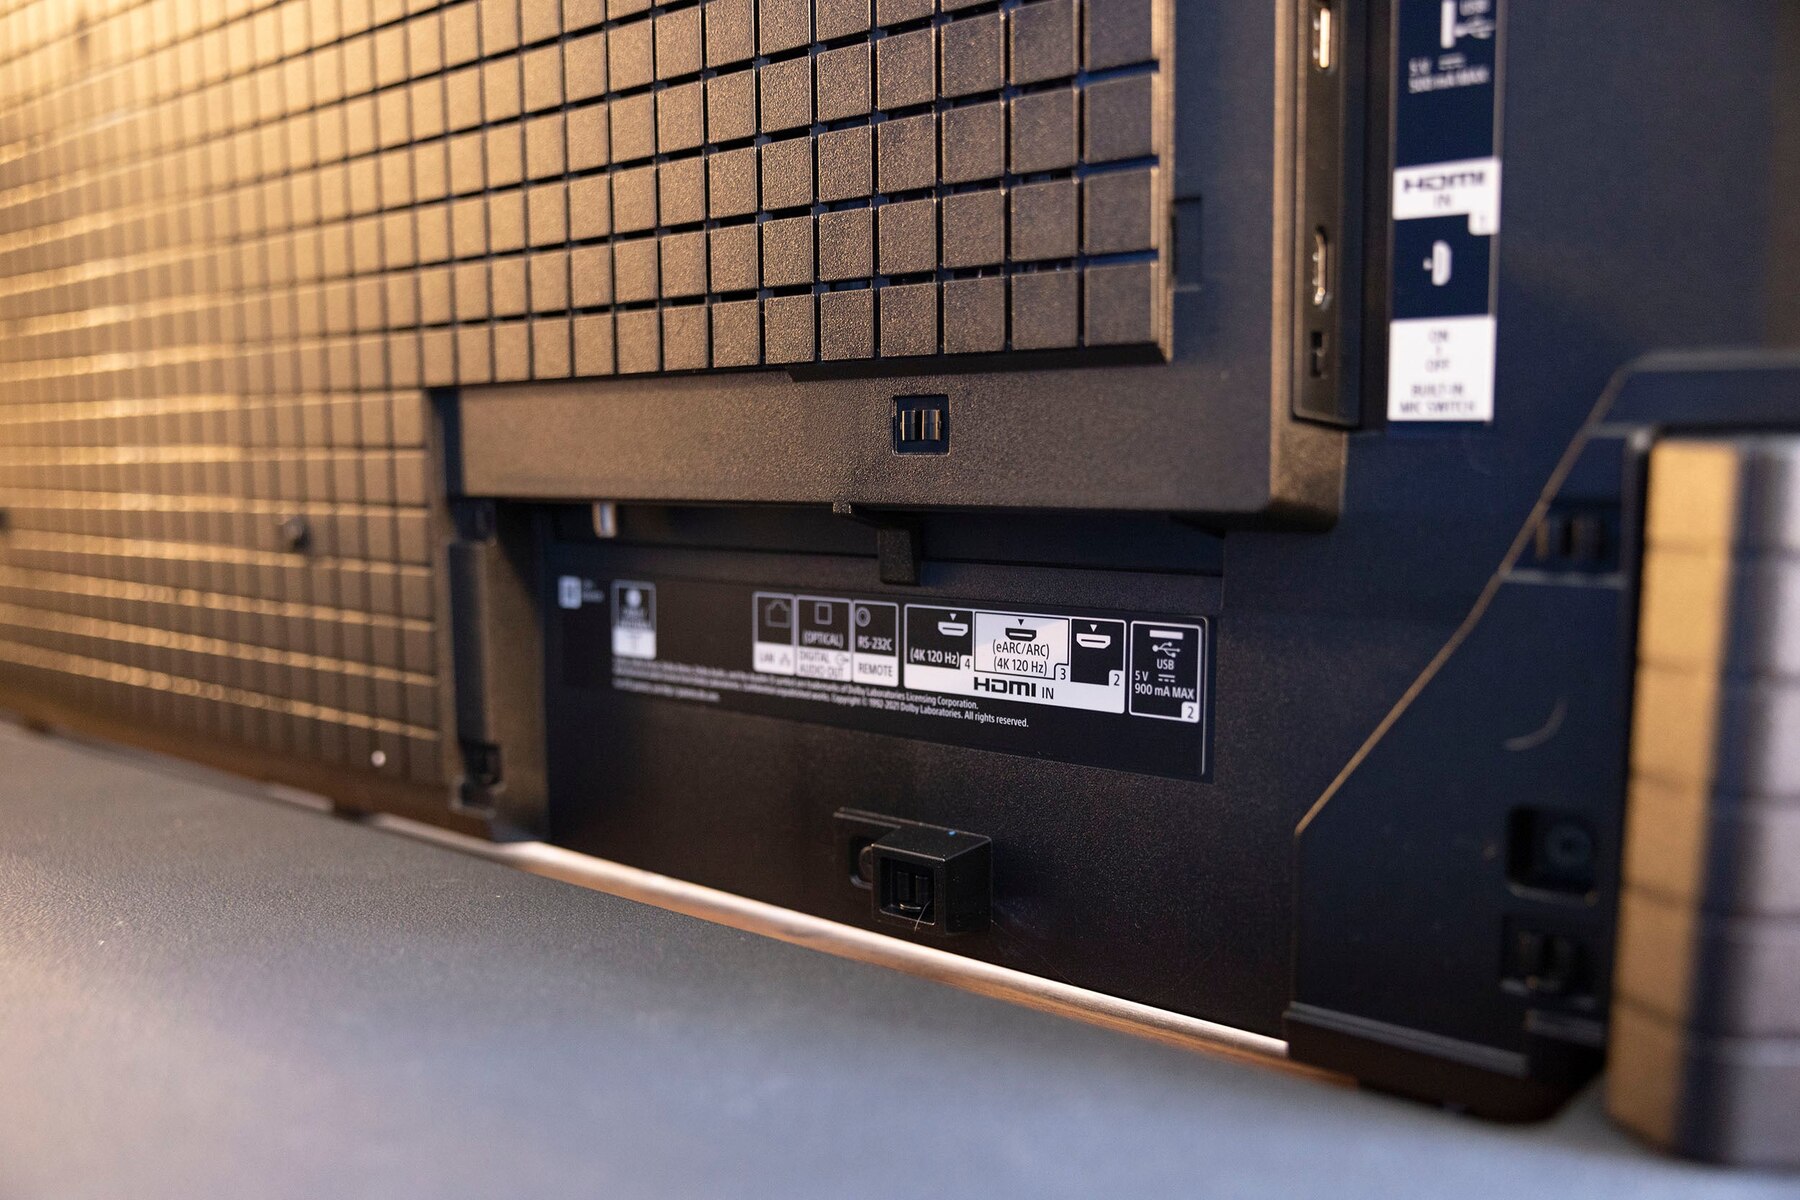
5. Connect to the TV: Depending on your TV’s available ports, you can connect the soundbar using either optical, HDMI, or RCA cables. Optical cables provide a reliable and high-quality audio connection, while HDMI cables support additional features like ARC (Audio Return Channel) for simplified control.
6. Cable Management: To maintain a clean and organized setup, consider using cable management solutions to hide and secure your cables. This will not only make your entertainment area tidier but also prevent any accidental trips or damage to the cables.
7. Power On: Once the connections are made, turn on both your soundbar and the TV. Make sure the soundbar is receiving power and set it to the appropriate input source. You may need to consult your soundbar’s user manual to determine the correct input setting for your specific TV model.
With these simple steps, you’ve successfully unpacked and set up your Sony soundbar. Next, we’ll move on to the process of connecting the soundbar to your TV for optimal audio performance.
Step 2: Connect your soundbar to your TV
Now that your Sony soundbar is set up, it’s time to connect it to your TV to ensure a seamless audio experience. The following steps will guide you through the process:
1. Check the available ports: Examine the back of your TV and the soundbar to determine the available ports. Most modern TVs and soundbars support HDMI, optical, and RCA connections. Choose the appropriate connection method based on the ports available on both devices.
2. HDMI Connection: If your TV and soundbar have HDMI ports, this is the recommended method for optimal performance. Connect one end of the HDMI cable to the HDMI output port on your soundbar and the other end to an HDMI input port on your TV. Make sure to use HDMI cables that support the needed audio formats, such as HDMI ARC.
3. Optical Connection: If HDMI is not an option, you can use an optical cable. Connect one end of the optical cable to the optical output port on your TV and the other end to the optical input port on your soundbar. This method provides a reliable digital audio signal transfer.
4. RCA Connection: Older TVs and soundbars may have RCA ports. Using a set of RCA cables, connect the corresponding red and white audio outputs on your TV to the matching input on your soundbar. This analog connection method is less common but still viable if other options are unavailable.
5. Set TV Sound Output: Once the physical connections are established, access your TV’s settings menu. Navigate to the audio or sound settings and select the sound output option. Choose the audio output to be sent to the external speakers, which is typically labeled as the soundbar or external speaker option.
6. Test the Connection: After configuring the sound output, play audio or video content on your TV to verify that the sound is coming from the soundbar. If the sound is still playing through the TV’s built-in speakers, ensure that the input source on the soundbar is correctly set to the connection you made (HDMI, optical, or RCA).
By following these steps, you have successfully connected your Sony soundbar to your TV. Now, let’s move on to the next step to power on and configure your soundbar for optimal performance.
Step 3: Power on and configure your soundbar
With your Sony soundbar successfully connected to your TV, it’s time to power it on and configure the settings to ensure the best audio performance. Follow these steps to get started:
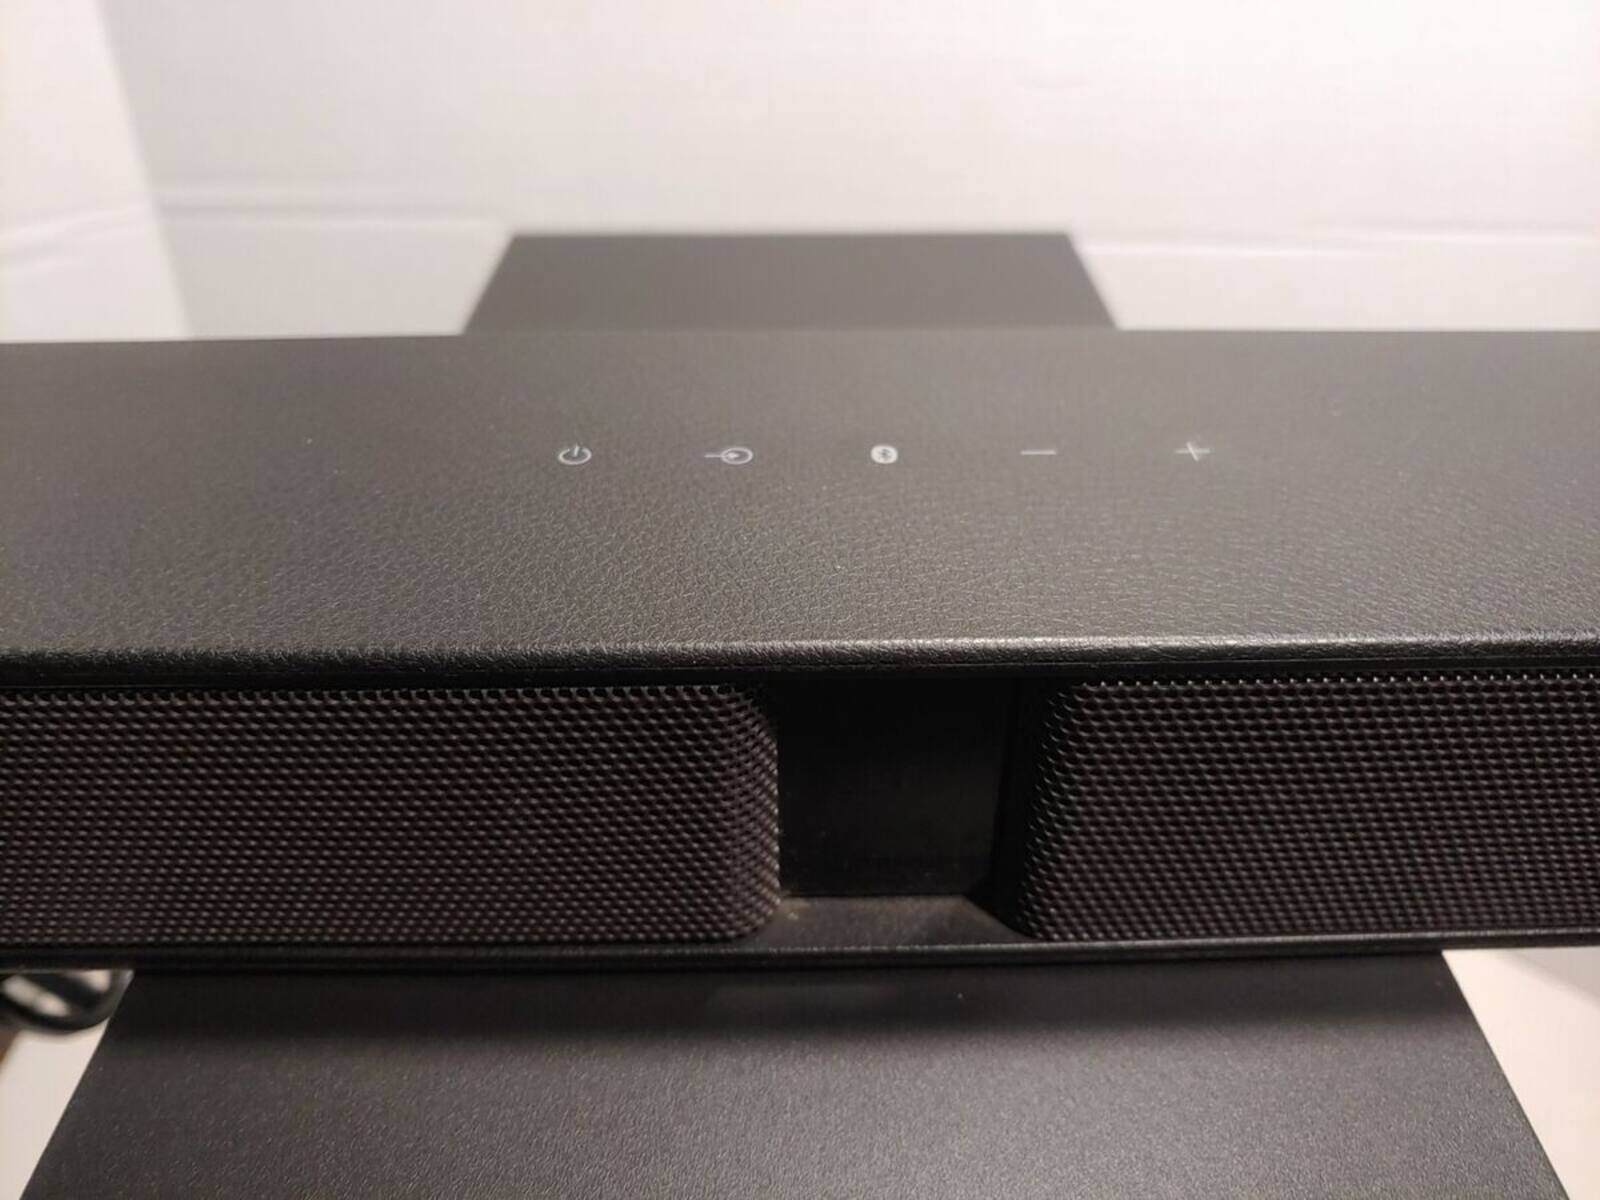
1. Power On: Press the power button on your soundbar or use the remote control to turn it on. You should see indicator lights or a display on the soundbar indicating that it has powered on.
2. Source Selection: Use the source or input button on your soundbar or remote control to select the appropriate input source. For example, if you connected your soundbar to the TV via HDMI, choose the HDMI input associated with the soundbar.
3. Adjust Volume: Test the audio by playing content on your TV and adjusting the volume using either the soundbar’s built-in volume control or the remote control. Make sure the sound is balanced and at a comfortable level. This will vary based on personal preference and the content being played.
4. Sound Modes: Explore the sound modes available on your Sony soundbar. These modes are designed to enhance specific types of audio, such as movies, music, or dialogue. Experiment with different modes and select the one that best suits your preferences or the content you are watching.
5. Equalizer Settings: Some Sony soundbars offer built-in equalizer settings that allow you to further customize the sound output. These settings can help to adjust the bass, treble, and other audio frequencies to your liking. Explore the equalizer options and make adjustments as desired.
6. Surround Sound Settings: If your soundbar supports virtual surround sound technology, access the settings menu to enable and customize this feature. Virtual surround sound creates a wider and more immersive audio experience, simulating the effect of multiple speakers placed around the room.
7. Additional Features: Sony soundbars may come with additional features such as voice control, wireless connectivity, or integration with smart home systems. Familiarize yourself with these features and configure them according to your preferences.
By following these steps, you have successfully powered on and configured your Sony soundbar. The settings you choose may vary depending on your personal preference and the specific model of your soundbar. Now, let’s move on to the next step to adjust the soundbar settings to fine-tune your audio experience.
Step 4: Adjust the soundbar settings
Now that your Sony soundbar is powered on and configured, it’s time to fine-tune the settings to optimize your audio experience. Follow these steps to adjust the soundbar settings:
1. Audio Levels: Use the soundbar’s volume control or the remote control to adjust the overall volume level. Find the right balance between clear audio and a comfortable listening level.
2. Subwoofer Settings: If your soundbar comes with a separate subwoofer, make sure it is properly connected and adjust its settings to achieve the desired level of bass. Some soundbars allow you to control the subwoofer volume independently, while others may have preset bass levels to choose from.
3. Dialogue Enhancement: Many Sony soundbars offer dialogue enhancement features to make voices clearer and more prominent. Enable this setting if you have difficulty hearing dialogue in movies or TV shows.
4. Sound Direction: Some soundbars have adjustable sound direction settings that allow you to focus the audio toward the listener or disperse it more evenly throughout the room. Experiment with these settings to find the optimal sound direction for your listening area.
5. Audio Delay: If you experience audio lag or synchronization issues between the soundbar and the video on your TV, you can adjust the audio delay settings. This will help to align the audio with the visuals for a seamless viewing experience.
6. Firmware Updates: It is essential to keep your Sony soundbar up to date with the latest firmware. Check for any available firmware updates through the soundbar’s settings menu or by visiting the Sony support website. Firmware updates can improve performance, add new features, and fix any bugs or issues.
7. Test and Fine-Tune: Once you have made adjustments to the various settings, test different types of content, such as movies, music, or TV shows, to ensure that the audio is optimized for each. Listen for any distortions or imbalances and make further adjustments if necessary.
Remember to refer to your soundbar’s user manual for specific instructions and settings available on your particular model. By adjusting the soundbar settings, you can tailor the audio to your preferences and create a more immersive and enjoyable entertainment experience.
Step 5: Pair your soundbar with a mobile device
Besides connecting your Sony soundbar to your TV, you can also pair it with your mobile devices to enjoy wireless audio streaming. Follow these steps to pair your soundbar with a mobile device:
1. Enable Bluetooth: On your mobile device, navigate to the settings menu and turn on the Bluetooth functionality. This will allow your device to discover and connect to nearby Bluetooth devices.
2. Enter Pairing Mode: Put your Sony soundbar into Bluetooth pairing mode. This can usually be done by pressing and holding the Bluetooth button on the soundbar or accessing the Bluetooth settings in the soundbar’s menu. Refer to your soundbar’s manual for specific instructions.
3. Pairing Process: Once your soundbar is in pairing mode, your mobile device will scan for nearby devices. Select your soundbar from the list of available devices to initiate the pairing process.
4. Authentication: In some cases, you may be prompted to enter a passcode to complete the pairing. Check your soundbar’s manual for the default passcode or any specific instructions on how to set it up.
5. Successful Pairing: Once the pairing is successful, your mobile device will indicate that it is connected to the soundbar via Bluetooth. You will now be able to stream audio from your device wirelessly through the soundbar.
6. Audio Playback: Play music or any audio content on your mobile device and enjoy the wireless streaming through your Sony soundbar. Adjust the volume using your mobile device’s volume controls or the soundbar’s remote control.
7. Additional Functionality: Some Sony soundbars offer additional features when connected to a mobile device, such as specialized apps, equalizer settings, or voice control. Explore these options to enhance your audio experience further.
Remember that the range of Bluetooth connectivity may vary depending on the environment and obstacles between your mobile device and the soundbar. To maintain a stable connection, it is advisable to keep the devices in close proximity.
By following these steps, you can conveniently pair your Sony soundbar with your mobile device and enjoy wireless audio streaming from various apps and media on your device.
Conclusion
Congratulations! You have successfully completed the process of pairing your Sony soundbar with your TV and mobile devices. By following the step-by-step instructions in this guide, you have optimized your audio setup and can now enjoy an immersive and enhanced audio experience in your home.
We began by unboxing and setting up your soundbar, ensuring that all the necessary components were connected properly. We then moved on to connecting the soundbar to your TV using HDMI, optical, or RCA cables, depending on the available ports.
After establishing the physical connections, we powered on the soundbar, configured the settings, and adjusted the sound levels, subwoofer settings, sound direction, and other audio parameters to fine-tune the audio output to your preference.
Lastly, we explored the exciting option of pairing your soundbar with a mobile device via Bluetooth. This allows you to stream music and other audio content wirelessly, giving you the freedom to enjoy your favorite tunes from anywhere in the room.
To ensure that you continue to enjoy the best performance from your soundbar, remember to update the firmware regularly and explore any additional features or settings specific to your Sony soundbar model.
With your Sony soundbar properly set up and optimized, you can now sit back, relax, and immerse yourself in the rich and immersive sound that enhances your movie-watching, gaming, and music-listening experiences. Upgrade your home entertainment setup and enjoy audio like never before with a Sony soundbar.
Thank you for following this guide, and we hope that you enjoy your new Sony soundbar to the fullest!