Introduction
Welcome to this guide on how to change your Venmo name. Venmo is a popular mobile payment service that allows you to send and receive money from friends and family with ease. Your Venmo name is the name that is displayed to others when they search for or interact with you on the platform. It’s important to keep your Venmo name accurate and up-to-date, as it helps people identify and connect with you.
Whether you’ve recently changed your name or simply want to update it for personal reasons, changing your Venmo name is a straightforward process. In this article, we will take you through a step-by-step guide on how to change your Venmo name, ensuring that your profile reflects the right information.
Please note that once you change your Venmo name, it will be updated for all your friends and contacts on the platform. This change will also be reflected in any transactions or interactions you have within the app. So, if you’re ready to update your Venmo name, let’s dive right into the steps!
Step 1: Open the Venmo app
To begin changing your Venmo name, the first step is to open the Venmo app on your mobile device. Make sure you have the latest version of the app installed to access all the features and updates.
If you don’t already have the Venmo app, you can download it from the App Store for iOS devices or the Google Play Store for Android devices. Once installed, locate the Venmo app on your home screen or app drawer and tap on it to open.
Upon opening the app, you will be prompted to log in to your Venmo account. If you haven’t created an account yet, you will need to sign up before proceeding. Existing users can enter their login credentials, including their email or phone number and password, to access their account.
It’s important to note that Venmo is a secure platform, and your personal and financial information is protected. We recommend using a strong and unique password for your Venmo account to ensure optimal security.
Once you have successfully logged in, you will be taken to the Venmo home screen, where you can see your recent transactions, payment requests, and other activity. From here, we can move on to the next step of changing your Venmo name.
Step 2: Login to your Venmo account
After opening the Venmo app, the next step is to login to your Venmo account. If you have already created an account, this process will be quick and straightforward.
On the login page, you will be prompted to enter either your email address or phone number, followed by your password. Ensure that you enter the correct information to access your Venmo account successfully.
If you have forgotten your password, don’t worry! Venmo provides an option to reset your password by clicking on the “Forgot Password?” link on the login page. Follow the instructions provided to reset your password and regain access to your account.
For added security, Venmo also offers the option to enable two-factor authentication (2FA) on your account. This additional layer of protection requires you to provide a verification code, either via SMS or through an authentication app, in addition to your password when logging in. Consider enabling 2FA for an added level of security on your Venmo account.
Once you have successfully logged in to your Venmo account, you will gain access to your personal profile, transaction history, and additional settings. This brings us to the next step in the process of changing your Venmo name.
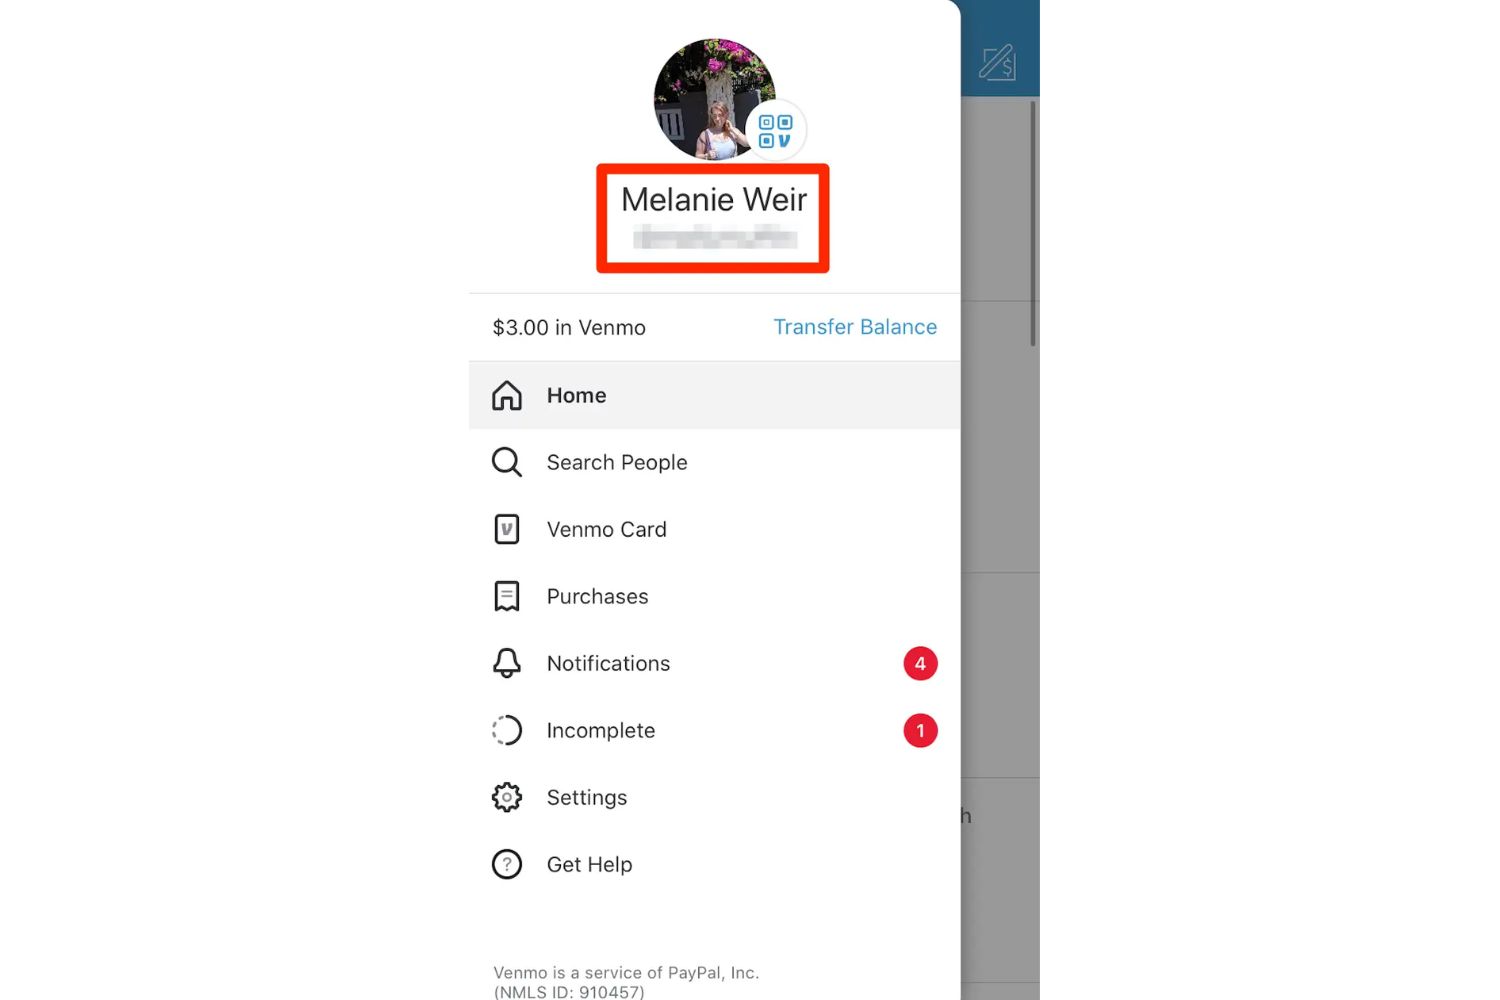
Step 3: Access your profile settings
Once you have logged in to your Venmo account, it’s time to access your profile settings. This is where you can make changes to various aspects of your Venmo account, including your name.
To access your profile settings, look for the “☰” icon in the top-left corner of the app. Tap on this icon, and a menu will appear on the screen, displaying different options and settings.
From the menu, scroll down and locate the “Settings” option. Tap on it to proceed to the next screen.
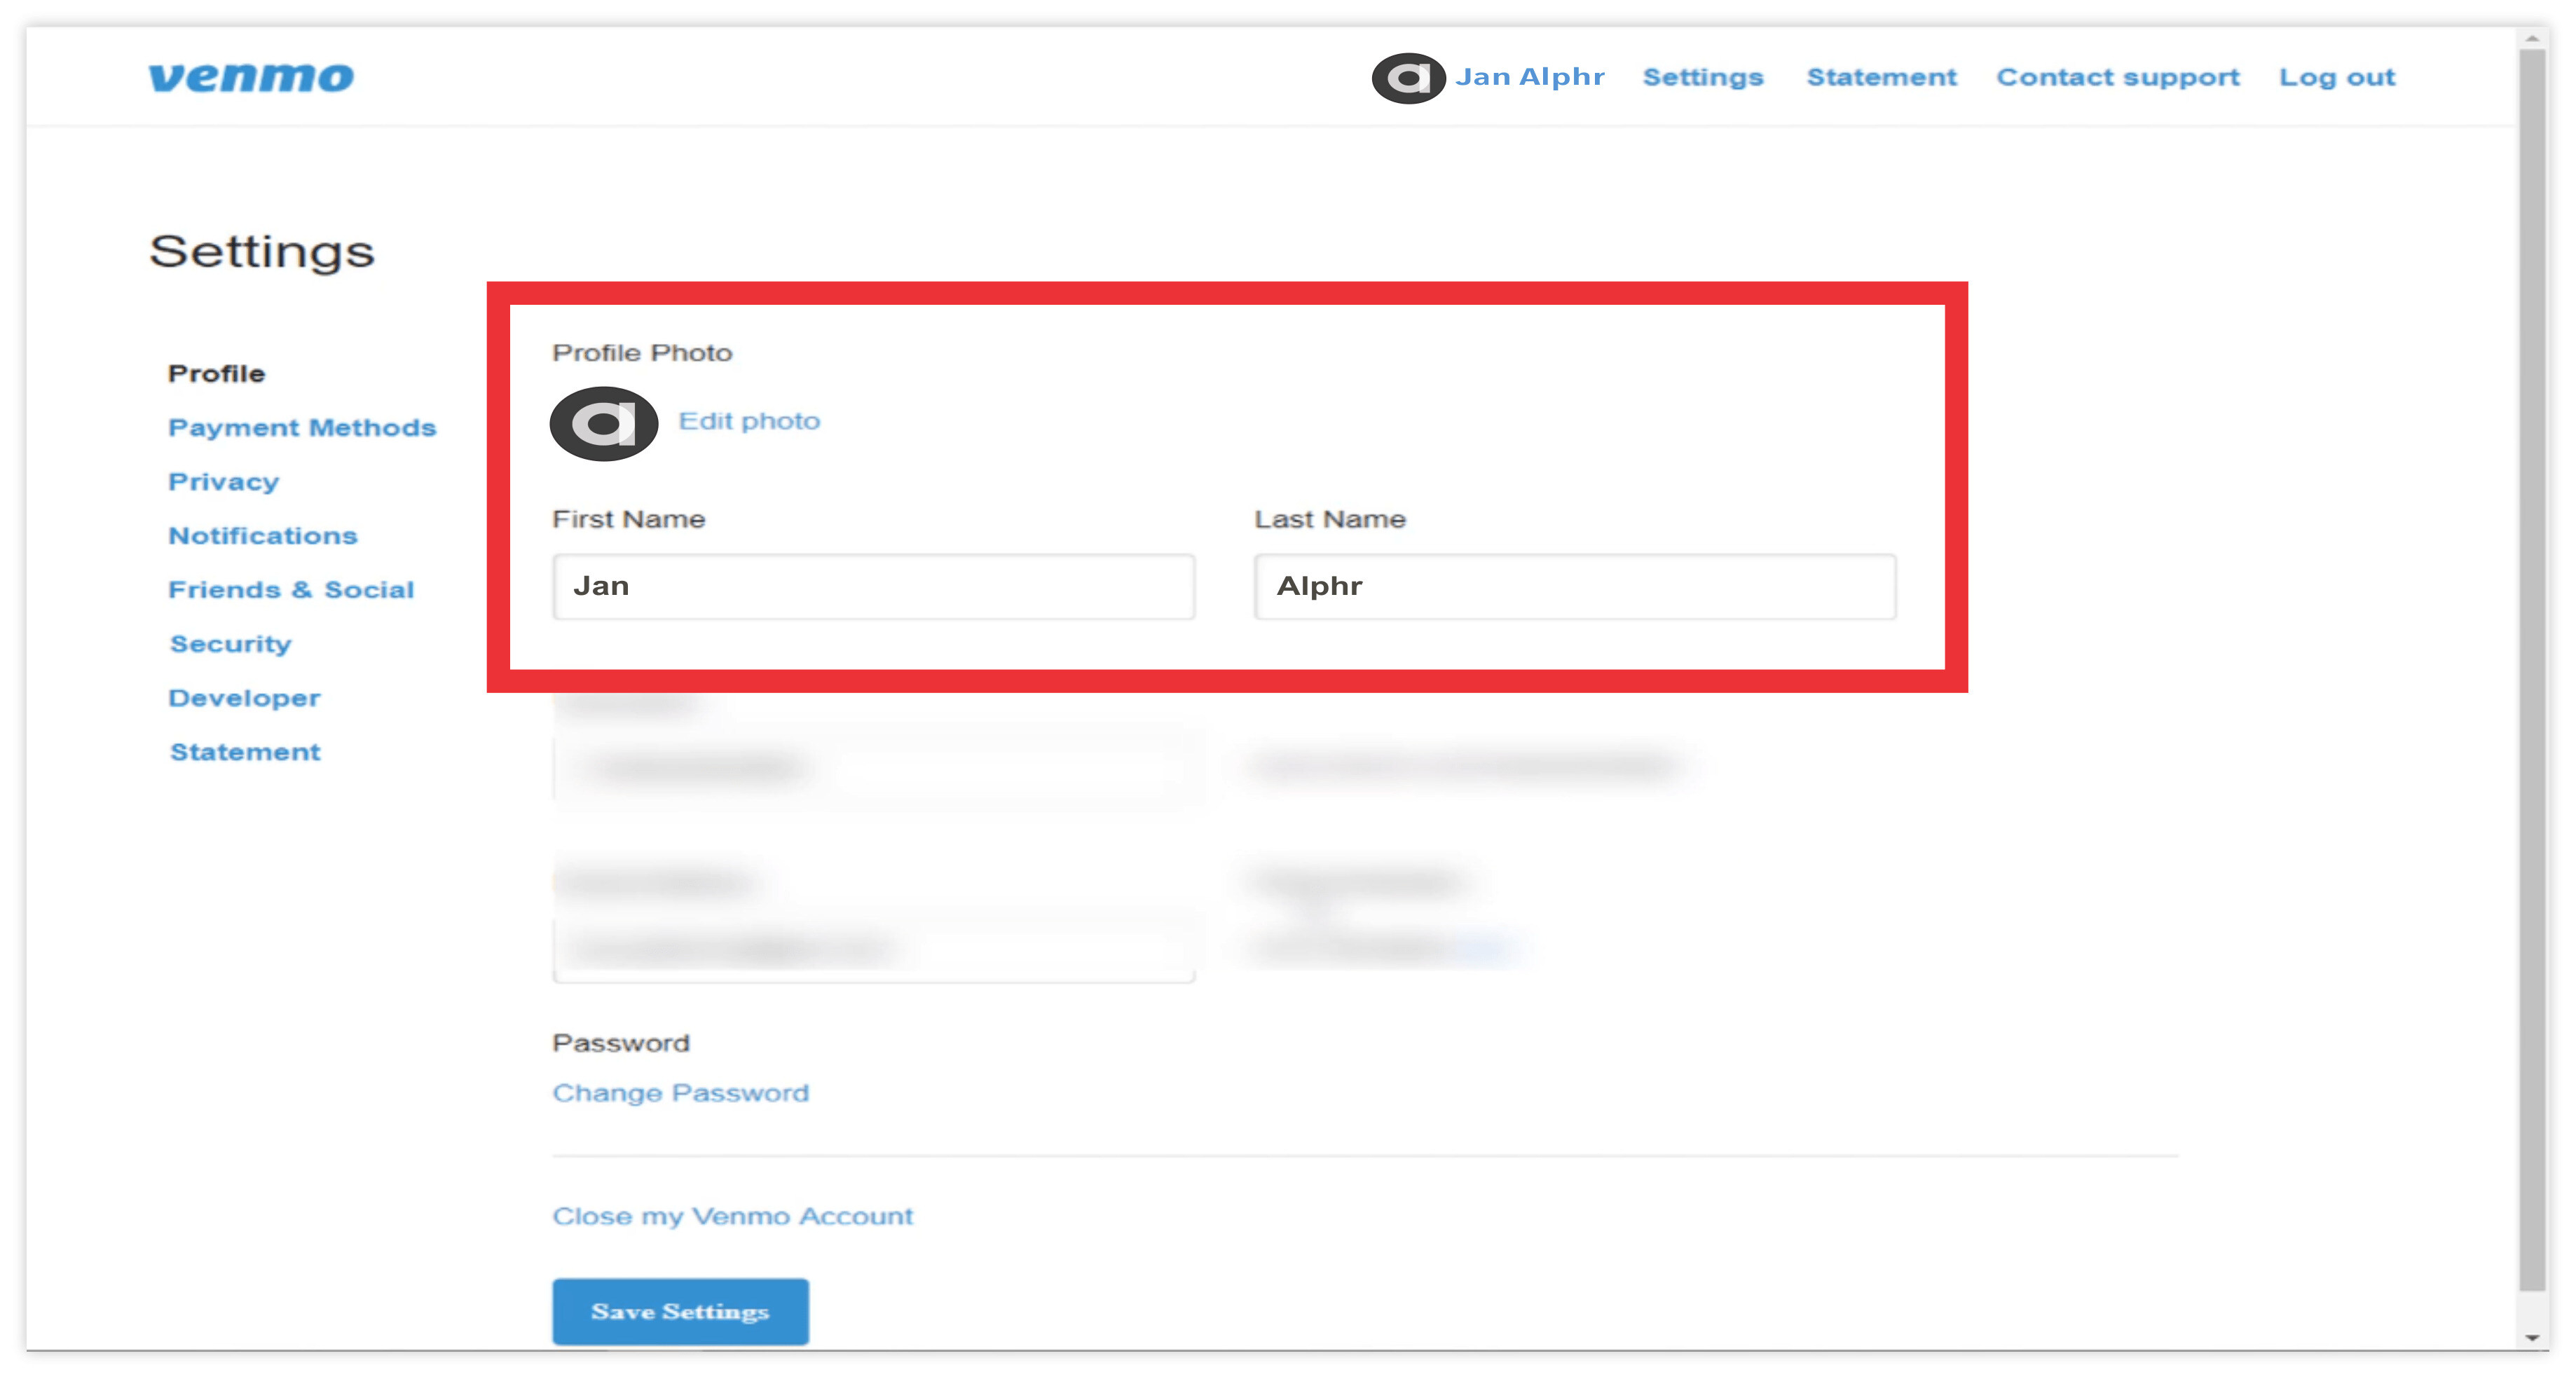
Within the settings menu, you will see several categories and options. Look for and select the option labeled “Edit Profile” or similar wording. This will bring up your profile information, including your name, profile picture, and other details.
At this point, you are just a few steps away from changing your Venmo name. Let’s move on to the next step to make the necessary adjustments.
Step 4: Edit your Venmo name
With your profile settings open, the next step is to edit your Venmo name. This will allow you to change the name that is displayed to others on the platform.
Within the profile editing screen, locate the field that contains your current Venmo name. It may be labeled as “Name,” “Display Name,” or something similar.
Tap on the name field to activate the editing mode. The keyboard will appear on your screen, allowing you to type and make changes to your Venmo name.
Enter your desired Venmo name in the text field. You can choose to use your real name or a nickname, depending on your preference. Take care to ensure that the name you choose complies with Venmo’s naming policy and guidelines.
It’s worth noting that Venmo does not allow the use of emojis, special characters, profanity, or any misleading information in your name. Keep it simple, authentic, and in line with Venmo’s guidelines to avoid any issues with your account.
If you want to add a middle name or any additional details to your Venmo name, include them in the same text field. Just make sure the entire name is within the allowed character limit.
Once you have entered your new Venmo name, take a moment to review it and ensure that it is spelled correctly. Once you are satisfied, it’s time to move on to the final step.
Step 5: Save your changes
After editing your Venmo name, it’s important to save your changes to ensure that your updated name is applied to your profile. Saving your changes is a simple and quick process in the Venmo app.
Once you have entered your desired Venmo name in the text field, look for the “Save” or “Done” button. This button is usually located near the top or bottom of the screen, depending on your device.
Tap on the “Save” or “Done” button to save your changes. The app will automatically update your Venmo name and take you back to your profile screen.
It’s important to note that once you save your new Venmo name, it will be displayed to others on the platform. They will see your updated name when searching for you, sending you payment requests, or making payments to you.
Take a moment to review your profile and confirm that your new Venmo name is accurately displayed. If everything looks good, you’re almost done!
Remember, you can always go back and change your Venmo name in the future if needed. Simply follow the same steps outlined in this guide to update your name as desired.
Now that you have saved your changes, let’s move on to the next step to ensure that your new Venmo name has been successfully updated.
Step 6: Verify the name change
After saving your new Venmo name, it’s important to verify that the change has been successfully applied to your profile. This will ensure that your friends, contacts, and other Venmo users see your updated name when interacting with you on the platform.
To verify the name change, navigate back to the home screen of the Venmo app. You can do this by tapping on the “☰” icon in the top-left corner of the screen.
Once on the home screen, take a moment to ensure that your new Venmo name is displayed correctly. Look for your name in any recent transactions, payment requests, or other activities listed on the screen.
If you don’t see your updated name immediately, don’t worry. It may take a few minutes for the changes to propagate throughout the system. Give it some time, and then check again to verify that your new Venmo name is now appearing as intended.
You can also ask a friend or contact on Venmo to search for your name and confirm if they see the updated name. This external verification can provide additional reassurance that your changes have taken effect.
If, for any reason, you discover that your new Venmo name is not displaying correctly or you’re experiencing any issues, don’t hesitate to reach out to Venmo support. They can assist you in troubleshooting and resolving any problems you may encounter.
Congratulations! You have successfully changed your Venmo name and verified the name change. Your updated name will now be visible to others on the Venmo platform, allowing for smoother interactions and transactions.
Remember, maintaining accurate and up-to-date information on your Venmo profile helps ensure a better user experience for yourself and others. Should you ever need to make changes to your Venmo name in the future, you can refer back to this guide to help you through the process.
Conclusion
Changing your Venmo name is a simple process that allows you to keep your profile information accurate and up-to-date. Whether you’ve recently changed your name or want to update it for personal reasons, following these steps will help you navigate the process with ease.
Remember, the steps to change your Venmo name include opening the app, logging into your account, accessing your profile settings, editing your name, saving your changes, and verifying the name change. By following these steps, you can ensure that your updated Venmo name is reflected correctly throughout the platform.
Having an accurate Venmo name is essential for smooth interactions with friends, family, and other Venmo users. It helps them easily identify and connect with you when making payments or sending requests. Additionally, keeping your Venmo name up-to-date ensures that your profile remains professional and trustworthy.
Always remember to adhere to Venmo’s naming policy and guidelines when choosing a new name. Avoid using emojis, special characters, profanity, or any misleading information in your Venmo name. Keep it simple, authentic, and in compliance with Venmo’s rules.
If you encounter any issues or have further questions regarding changing your Venmo name, do not hesitate to contact Venmo support. They are available to assist you and resolve any concerns you may have.
Now that you have learned how to change your Venmo name, you can confidently update your profile information whenever necessary. Enjoy the convenience and ease of using Venmo with your accurate and personalized Venmo name!