Connecting Your Bank Account to Venmo
One of the first steps to getting your money from Venmo is to connect your bank account to your Venmo account. This allows you to easily transfer funds between the two and access your money whenever you need it. Here’s how to do it:
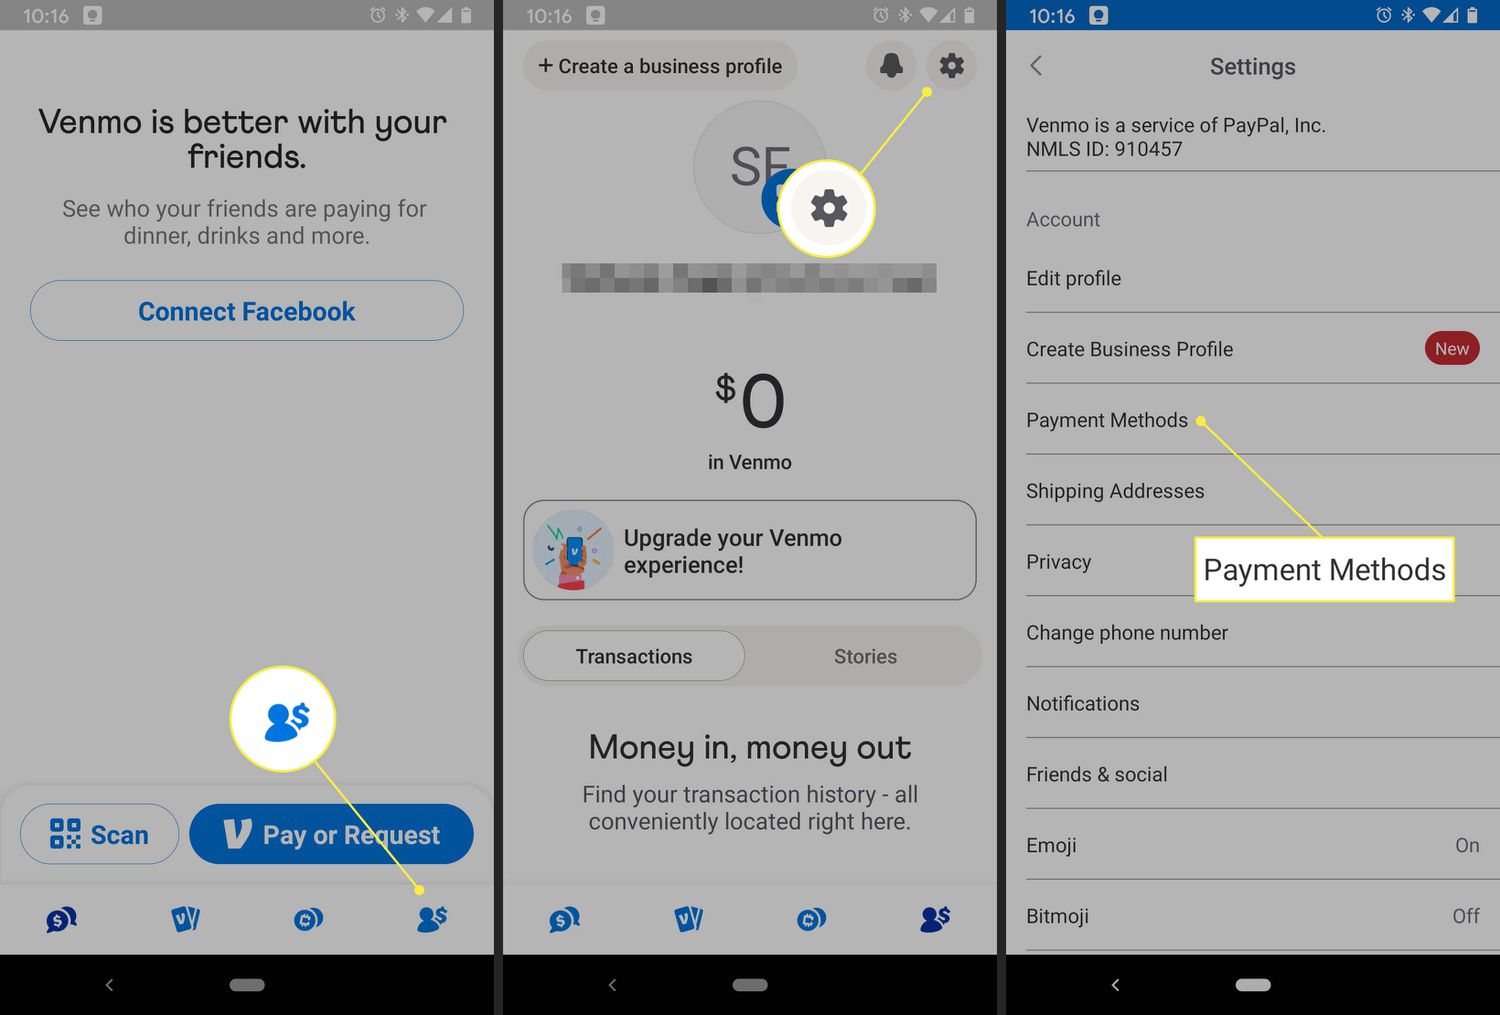
- Open the Venmo app on your smartphone and login to your account.
- Tap on the menu icon (typically three horizontal lines) at the top left corner of the screen.
- Select “Settings” from the menu options.
- Scroll down and tap on “Payment Methods.”
- Tap on “Add a Bank or Card.”
- Choose the “Bank” option and select your bank from the list or search for it manually.
- Follow the prompts to securely connect your bank account by providing the necessary details like your account number and routing number. Venmo will verify the information to ensure it is correct.
- Once your bank account is successfully connected, Venmo will send two small deposits to your bank account for verification purposes.
- Check your bank statement or online banking to find the amounts of the deposits. This usually takes 1-3 business days.
- Return to the Venmo app and navigate to the “Payment Methods” section again.
- Select your bank account and enter the amounts of the verification deposits.
- Once you’ve entered the correct amounts, your bank account will be verified, and you can start transferring money between Venmo and your bank account.
Having your bank account connected to Venmo ensures a seamless transfer of funds, making it easy to access and manage your money. Remember to keep your account information secure and update it if there are any changes to your banking details.
Withdrawing Funds from Venmo to Your Bank Account
Once you have connected your bank account to Venmo, you can easily withdraw your funds to your bank account. Here’s how to do it:
- Launch the Venmo app on your smartphone and sign in to your account.
- Tap on the menu icon at the top left corner of the screen to access the menu.
- Select “Transfer to Bank” from the available options.
- Choose the bank account you want to transfer the funds to from the list of connected accounts.
- Enter the amount you wish to withdraw and tap on “Next” to proceed.
- Review the details of the transfer and confirm that everything is correct.
- Tap on “Transfer” to initiate the withdrawal.
- Wait for the transfer to be processed. This usually takes 1-3 business days, but it can take longer depending on your bank’s processing time.
- Check your bank account balance to ensure that the funds have been successfully deposited.
It is important to note that Venmo may charge a small fee for instant transfers, which allows you to receive the funds in your bank account almost immediately. If you choose the standard transfer option, there are no additional fees.
Keep in mind that there may be withdrawal limits imposed by Venmo. These limits are put in place to protect against fraud and ensure the security of your funds. If you reach your withdrawal limit, you may need to wait until it resets or contact Venmo support for further assistance.
Now that you know how to withdraw funds from Venmo to your bank account, you can easily access your money whenever you need it.
Understanding Venmo’s Withdrawal Limits
When it comes to withdrawing funds from your Venmo account, it’s important to be aware of the withdrawal limits imposed by Venmo. These limits are in place to ensure the security of your funds and prevent fraudulent activities. Here’s what you need to know:
Venmo’s withdrawal limits vary depending on several factors, including your account status, transaction history, and verification level. By default, new Venmo accounts have a withdrawal limit of $999.99 within a rolling seven-day period.
However, Venmo offers an increased withdrawal limit for verified accounts. To verify your account, you’ll need to provide additional personal information and confirm your identity. Once your account is verified, the withdrawal limit can be increased up to $19,999.99 within a rolling seven-day period.
It’s important to note that these limits apply to the total amount you can withdraw from Venmo to your bank account, including both instant transfers and standard transfers. If you reach your withdrawal limit, you won’t be able to initiate any more transfers until the limit resets or you contact Venmo support for further assistance.
If you need to increase your withdrawal limit, you can contact Venmo customer support and provide them with any additional information they may require. They will review your request and determine if they can increase your withdrawal limit based on their internal policies and guidelines.
It’s also worth mentioning that Venmo may impose additional limits or restrictions based on security or fraud prevention measures. These limits can vary from case to case and are put in place to safeguard your funds and prevent unauthorized access to your account.
By understanding Venmo’s withdrawal limits and keeping track of your account activity, you can ensure a smooth and secure withdrawal process.
Troubleshooting Withdrawal Issues
While withdrawing funds from Venmo to your bank account is usually a seamless process, there may be instances where you encounter issues or face challenges. Here are some common withdrawal issues and troubleshooting steps you can take:
1. Insufficient funds: If you receive an error message stating that you have insufficient funds to complete the withdrawal, double-check your Venmo account balance. Ensure that you have enough available funds to cover the withdrawal amount and any associated fees.
2. Bank account verification: If you’re unable to initiate a withdrawal, it is possible that your bank account is not verified or connected correctly. Review the account details in the Venmo app and verify that your bank information is accurate. If needed, follow the verification process outlined earlier to ensure a successful connection.
3. Transfer delays: If your withdrawal is taking longer than expected, be aware that transfer times can vary depending on factors such as banking system processing times and weekends/holidays. Wait for a few business days for the transfer to complete before contacting Venmo support.
4. Account suspension: In rare cases, Venmo may suspend or limit your account due to security concerns or violation of their terms of service. If you’re unable to withdraw funds or access your account, reach out to Venmo support for assistance in resolving the issue.
5. Communication with Venmo support: If you encounter any withdrawal issues that you’re unable to resolve on your own, it’s recommended to contact Venmo customer support. Provide them with a detailed description of the problem and any error messages received. They will be able to investigate and assist you in resolving the issue.
Remember to keep your account information and personal details updated to ensure a smooth withdrawal process. Regularly check your Venmo account and associated email for any communications or updates from Venmo regarding your withdrawal requests.
By troubleshooting withdrawal issues promptly and seeking assistance when needed, you can overcome any challenges and successfully transfer your funds from Venmo to your bank account.
Using Venmo Card for Cash Withdrawals
In addition to transferring funds from your Venmo account to your bank account, you can also use the Venmo Card to withdraw cash directly. The Venmo Card is a physical debit card linked to your Venmo account, allowing you to access your funds conveniently. Here’s how you can use the Venmo Card for cash withdrawals:
1. Activate your Venmo Card: If you haven’t already, make sure to activate your Venmo Card. You can do this through the Venmo app by following the instructions provided when you received the card.
2. Locate an ATM: Use the Venmo app or visit the Venmo website to find ATMs near you that accept Venmo Card withdrawals. Look for ATMs displaying the Plus, MoneyPass, or Allpoint network logos, as these are the networks that support Venmo Card withdrawals.
3. Insert your Venmo Card: Once you locate a compatible ATM, insert your Venmo Card into the card slot. Wait for the machine to read the card and follow any prompts on the screen.
4. Enter your PIN: When prompted, enter the four-digit PIN associated with your Venmo Card. Make sure to choose a PIN that is easy for you to remember but difficult for others to guess.
5. Select “Withdraw Cash”: Most ATMs will offer several options on the main screen. Choose the option to “Withdraw Cash” or something similar that allows you to access the cash withdrawal functionality.
6. Enter the withdrawal amount: On the ATM screen, enter the amount of cash you wish to withdraw. Keep in mind that some ATMs may have withdrawal limits, so make sure your desired amount falls within the specified limit.
7. Confirm the transaction: Review the details of the withdrawal on the ATM screen and confirm that everything is correct. If necessary, ensure that the correct bank account is linked to your Venmo Card for the withdrawal.
8. Collect your cash and receipt: Once the transaction is processed, the ATM will dispense the requested cash amount. Remember to collect your cash and any receipt provided for your records.
Using the Venmo Card for cash withdrawals offers you the flexibility to access your funds in a convenient and efficient manner. However, it’s important to keep your Venmo Card and PIN secure to prevent unauthorized access to your funds. Report any lost or stolen cards to Venmo immediately to protect your account and funds.
Cashing Out from Venmo to a Debit Card
In addition to withdrawing funds from Venmo to your bank account, you also have the option to cash out directly to a debit card. This allows for quick access to your Venmo funds and can be a convenient alternative to traditional bank transfers. Here’s how you can cash out from Venmo to a debit card:
1. Open the Venmo app: Launch the Venmo app on your smartphone and sign in to your account.
2. Tap on the menu icon: Located at the top left corner of the screen, the menu icon resembles three horizontal lines.
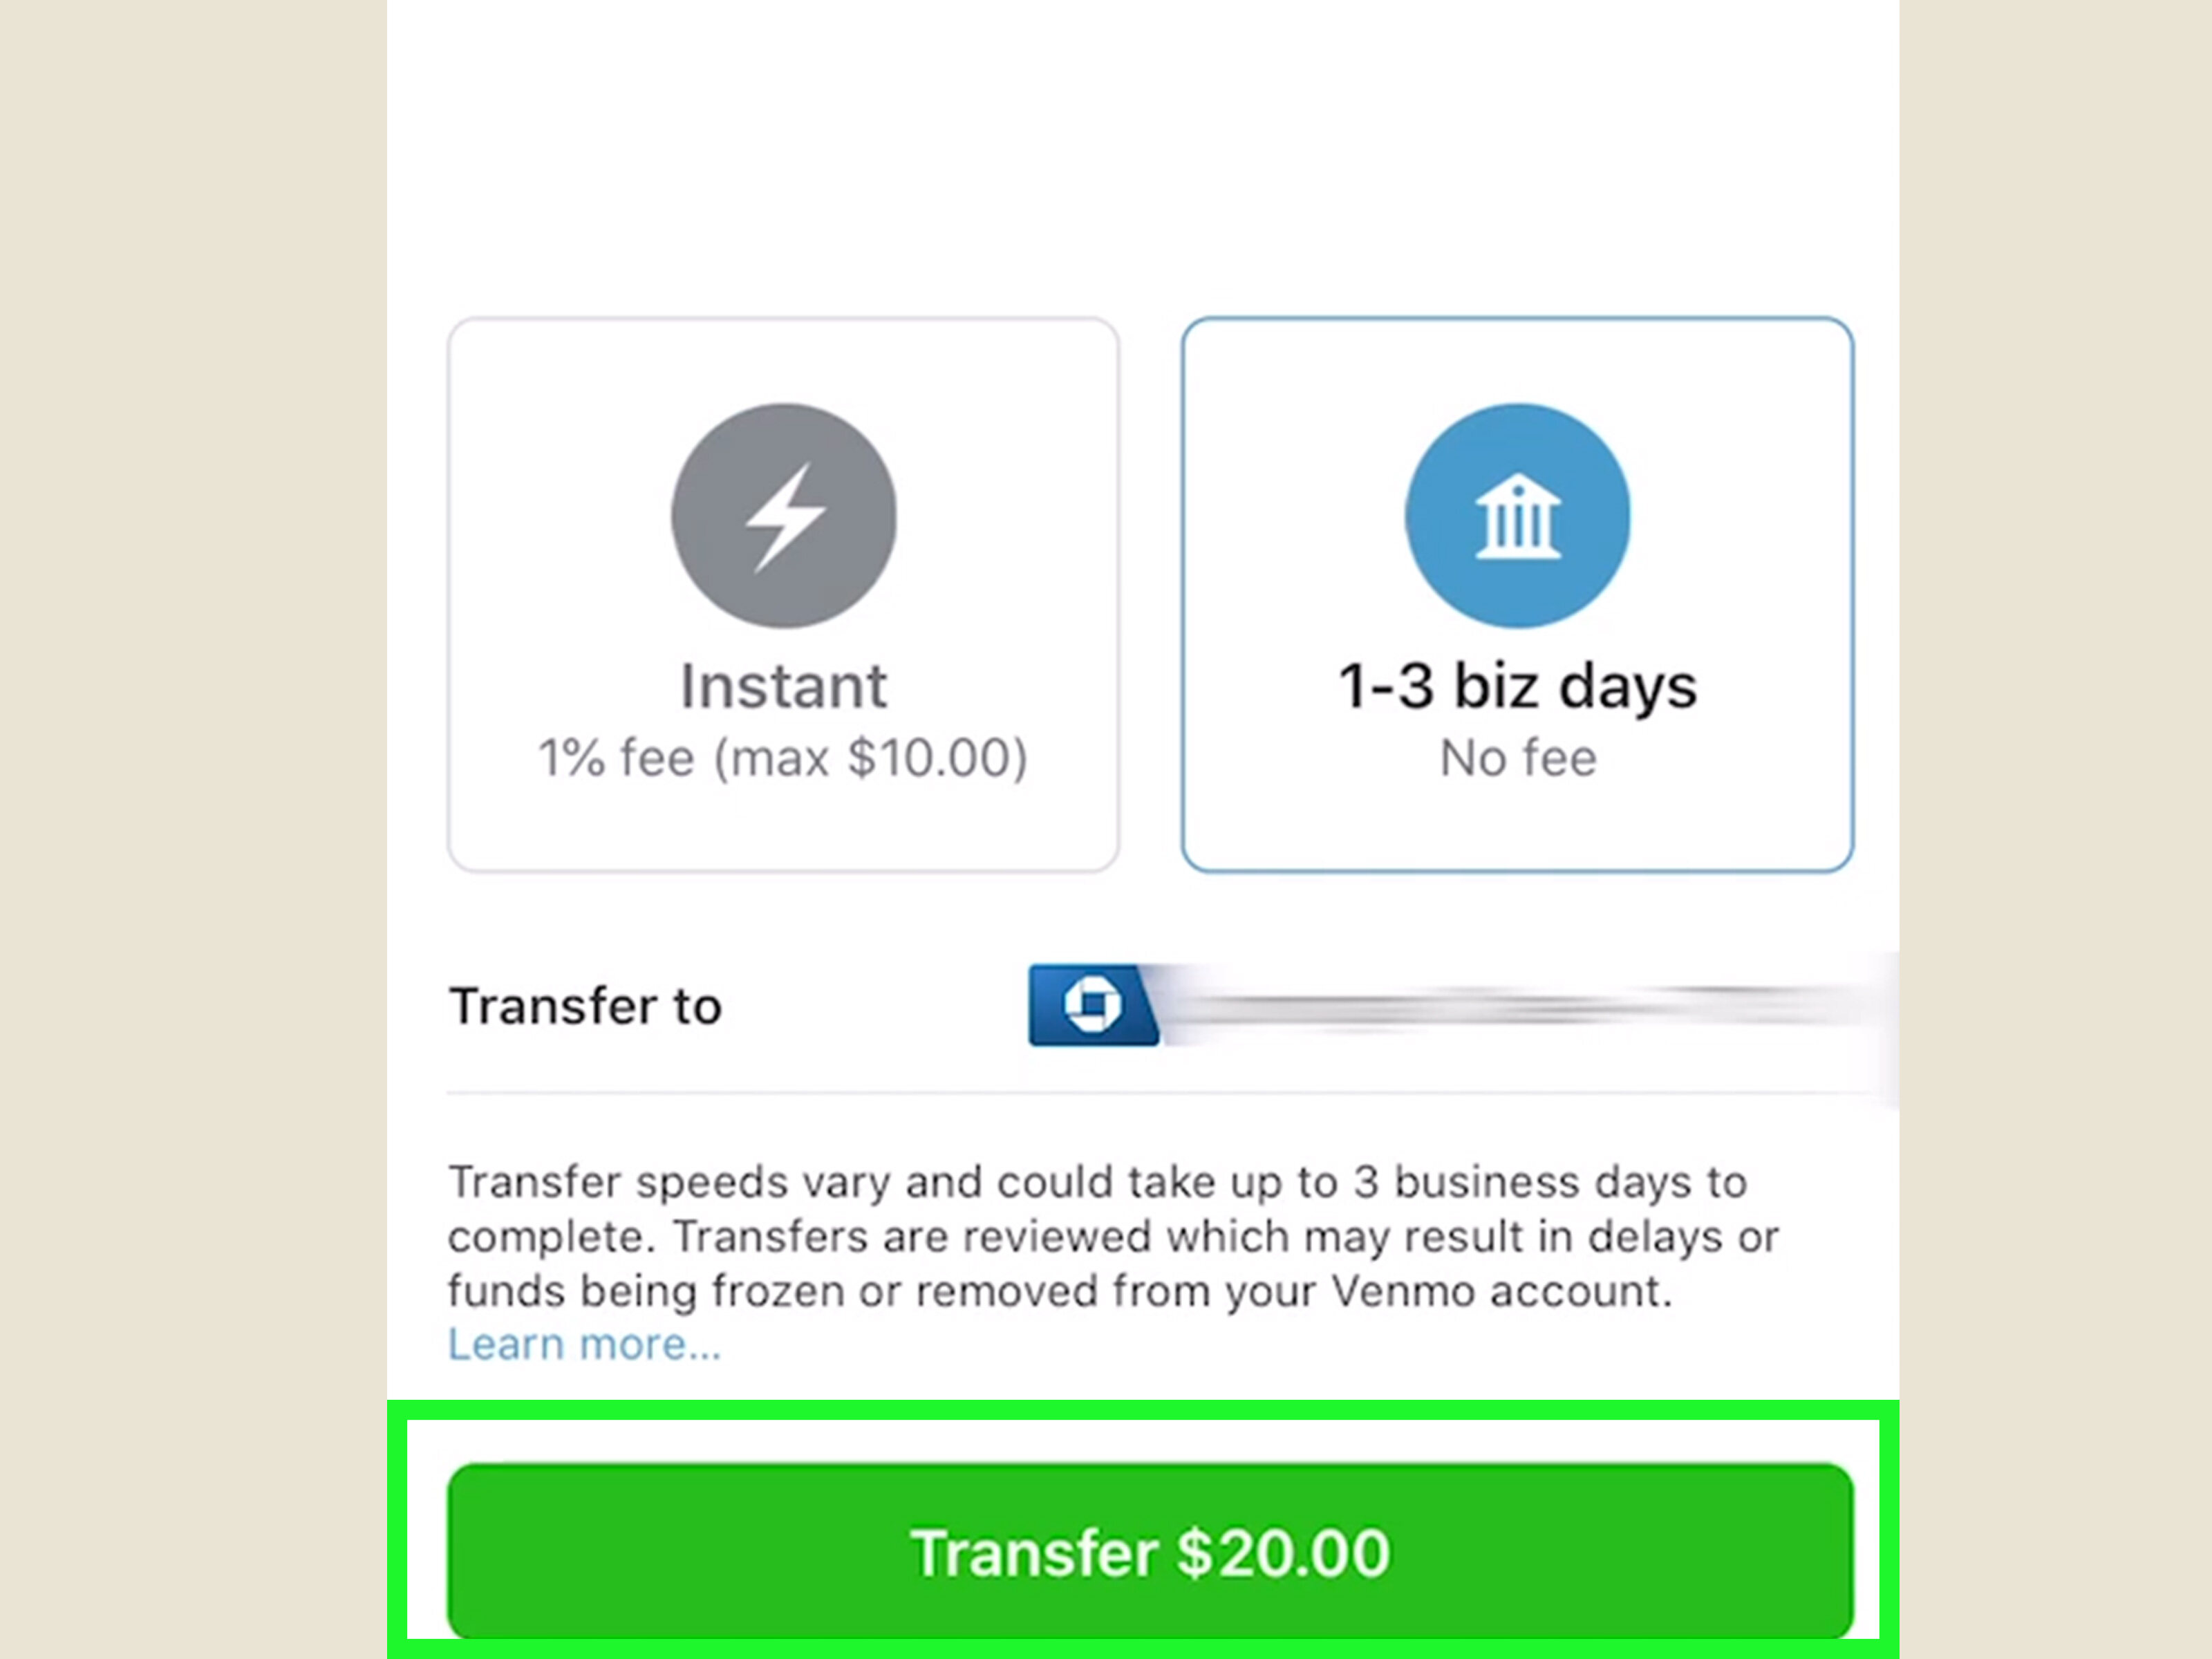
3. Select “Transfer to Bank”: From the menu options, choose “Transfer to Bank” to initiate the cash-out process.
4. Tap on “Instant” or “1-3 Business Days”: Venmo offers two options for cashing out to a debit card. “Instant” allows for immediate access to the funds, but it comes with a small fee. “1-3 Business Days” is a fee-free option that takes slightly longer for the funds to be available in your debit card account.
5. Choose the debit card: If you have multiple debit cards linked to your Venmo account, select the card you wish to cash out to from the available options.
6. Enter the cash-out amount: Specify the amount you want to cash out from your Venmo balance to your debit card. Ensure that the amount does not exceed your available balance.
7. Review and confirm: Double-check the details of the transaction on the review screen. Make sure the selected debit card and cash-out amount are accurate before proceeding.
8. Tap on “Transfer”: Once you have reviewed and confirmed the details, tap on the “Transfer” button to initiate the cash-out to your debit card.
9. Wait for the transfer: The cash-out process may take a few minutes or up to 1-3 business days, depending on the option you selected. You’ll receive a notification once the funds have been successfully transferred to your debit card account.
By cashing out from Venmo to your debit card, you can quickly access your funds and use them for purchases or withdrawals as needed. Be mindful of any transaction fees associated with instant transfers and ensure that you have sufficient funds in your Venmo balance to complete the cash-out.
Requesting a Check from Venmo
If you prefer to receive your Venmo funds in the form of a physical check, you have the option to request a check from Venmo. This can be useful if you prefer to have a paper record of the transaction or if you need to deposit the funds into an account that does not accept electronic transfers. Here’s how you can request a check from Venmo:
1. Open the Venmo app: Launch the Venmo app on your smartphone and log in to your account.
2. Tap on the menu icon: In the top left corner of the screen, you will find the menu icon, typically represented by three horizontal lines.
3. Select “Transfer to Bank”: From the menu options, choose “Transfer to Bank” to access the withdrawal options.
4. Tap on “Standard”: Venmo offers two options for withdrawal: “Instant” and “1-3 Business Days.” In this case, select the “1-3 Business Days” option to proceed with the check request.
5. Choose the bank account: If you have multiple bank accounts linked to Venmo, select the account you want the check to be issued from.
6. Enter the withdrawal amount: Specify the amount you wish to withdraw from your Venmo account as a check. Ensure that the amount does not exceed your available Venmo balance.
7. Review and confirm: Carefully review the details of the check request on the screen. Make sure the selected bank account and withdrawal amount are correct before proceeding.
8. Tap on “Request Check”: Once you have reviewed and confirmed the details, tap on the “Request Check” button to initiate the process.
9. Wait for processing: The check request will be processed by Venmo and sent to the mailing address associated with your Venmo account. The processing time may vary, but it typically takes about 3-5 business days for the check to be generated and mailed.
It’s important to ensure that your mailing address is accurate and up to date in order to receive the check at the correct location. If you need to update your address, you can do so by accessing the settings menu within the Venmo app. Be aware that Venmo may charge a fee for check requests, so take that into consideration when deciding on the withdrawal method.
Once you receive the check, you can deposit it into your bank account or cash it at a financial institution that accepts Venmo checks. Keep in mind that check deposits may be subject to your bank’s processing times and any applicable fees associated with check handling.
Exploring Alternative Options for Withdrawing Venmo Funds
In addition to transferring funds to your bank account or requesting a check, there are alternative options available for withdrawing your Venmo funds. These options can provide flexibility and convenience depending on your personal preferences and needs. Here are a few alternative methods to consider:
1. Peer-to-peer transfers: If you have friends or family members with Venmo accounts, you can transfer funds directly to them. This can be useful for splitting expenses or reimbursing someone for a payment. Simply open the Venmo app, select the person you want to transfer funds to, enter the amount, and complete the transaction.
2. Venmo card purchases: You can use your Venmo Card for everyday purchases, just like any other debit card. This allows you to spend your Venmo funds directly without the need for transferring them to your bank account. Keep in mind that there may be transaction limits and fees associated with using the Venmo Card for purchases.
3. Venmo Instant Transfers: If you need immediate access to your funds, Venmo offers an “Instant Transfers” feature for a small fee. With Instant Transfers, you can transfer your Venmo funds to an eligible debit card within minutes. This option can be convenient when you need to make a time-sensitive payment or need cash quickly.
4. Venmo Mobile Wallet: In addition to transferring funds to your bank account, you can use your Venmo balance directly for online purchases through the Venmo Mobile Wallet. Many online retailers and services accept Venmo as a payment method, allowing you to use your Venmo funds without the need for a bank transfer.
5. Peer-to-peer payment apps: Consider exploring other peer-to-peer payment apps similar to Venmo, such as PayPal or Cash App. These apps offer their own withdrawal options, including bank transfers and debit card withdrawals. Research and compare the features and fees associated with these apps to determine which one aligns best with your needs.
When exploring alternative options for withdrawing your Venmo funds, be sure to consider any associated fees, transfer limits, and security measures. Choose the method that best suits your preferences and provides the most convenient and efficient way to access your funds.
Ensuring Security and Protection for Your Venmo Money
As you manage and withdraw money from your Venmo account, it is important to prioritize the security and protection of your funds. By following a few key practices, you can minimize the risk of unauthorized access and ensure the safety of your Venmo money. Here’s what you can do:
1. Protect your login credentials: Keep your Venmo username, password, and any additional security measures (such as two-factor authentication) secure and confidential. Avoid using easily guessable passwords and consider changing them regularly to minimize the risk of unauthorized access.
2. Enable security features: Take advantage of Venmo’s security features, such as a passcode or biometric authentication (e.g., fingerprint or facial recognition) for the Venmo app on your device. These additional layers of security can help prevent unauthorized access if your device falls into the wrong hands.
3. Be cautious with personal information: Avoid sharing sensitive personal information, such as your full name, address, or Social Security number, publicly or with individuals you do not trust. Scammers or fraudsters may attempt to gain access to your Venmo account using this information.
4. Monitor your account activity: Regularly review your Venmo transaction history and associated email notifications for any suspicious activity. Report any unauthorized transactions or unusual account behavior to Venmo immediately.
5. Keep your devices updated: Ensure that your smartphone, tablet, or computer has the latest security updates and patches installed. This helps protect against known vulnerabilities that hackers may exploit to gain access to your device and Venmo account.
6. Use secure networks: When accessing your Venmo account, use secure and trusted Wi-Fi networks. Avoid using public or unsecured Wi-Fi networks, as they may be more susceptible to unauthorized access or interception of your login credentials.
7. Educate yourself about scams: Stay informed about common scams related to peer-to-peer payment apps like Venmo. Be cautious of unsolicited requests for money, suspicious links or attachments in messages, and unfamiliar individuals requesting your Venmo information.
8. Contact Venmo support: If you suspect any unauthorized activity or have security concerns about your Venmo account, contact Venmo support. They can provide guidance, assist with investigating suspicious activity, and help ensure the security of your funds.
By following these best practices and being proactive about account security, you can enjoy peace of mind while managing and withdrawing your Venmo money.