Common Wi-Fi Connectivity Issues
When you’re trying to connect your tablet to Wi-Fi and encountering difficulties, it can be frustrating and inconvenient. However, you’re not alone. Many people face common Wi-Fi connectivity issues, but with a few troubleshooting steps, you can often resolve the problem on your own. Here are some of the most common issues you may encounter and how to fix them:
1. Weak or No Signal: One of the most common Wi-Fi connectivity issues is a weak or no signal. This can happen if you’re too far away from the router or if there are physical obstructions between your tablet and the router. To resolve this, try moving closer to the router or eliminating any obstructions.
2. Incorrect Password: Another common issue is entering an incorrect Wi-Fi password. Double-check that you’re entering the correct password by typing it carefully. If you’re unsure, try connecting another device to the Wi-Fi network to verify the password’s accuracy.
3. Outdated Software: Outdated software on your tablet can also cause Wi-Fi connectivity problems. Make sure your tablet’s software is up to date by checking for any available updates. Updating the software can often resolve connectivity issues.
4. Router Issues: Sometimes the problem lies with the router rather than your tablet. Restart both your tablet and the router to refresh the connection. If the problem persists, you may need to contact your internet service provider or consider resetting your router.
5. Network Settings: Incorrect network settings on your tablet can also affect Wi-Fi connectivity. Resetting the network settings on your tablet can often resolve these issues. However, keep in mind that doing so will remove saved Wi-Fi networks, so you’ll need to reconnect to them manually.
6. Hidden Wi-Fi Network: If the Wi-Fi network you’re trying to connect to is hidden (i.e., not broadcasting its SSID), you may need to manually enter the network name in your tablet’s Wi-Fi settings. Contact your network administrator or refer to the router’s manual for the correct SSID.
7. Interference from Other Devices: Other devices such as cordless phones, baby monitors, or even neighboring Wi-Fi networks can interfere with your tablet’s Wi-Fi signal. Try moving away from these devices or changing the channel on your router to minimize interference.
8. Wi-Fi Network Compatibility: Some older tablets may have compatibility issues with newer Wi-Fi networks. If possible, try connecting to a different Wi-Fi network to see if the problem is specific to your tablet or if it extends to other networks as well.
9. Factory Reset: As a last resort, you can perform a factory reset on your tablet. Keep in mind that this will erase all data and settings on your device, so make sure to back up any important information before proceeding.
By following these troubleshooting steps, you can often resolve common Wi-Fi connectivity issues with tablets. If the problem persists, consider seeking further assistance from the tablet manufacturer or your internet service provider to ensure a seamless and stable connection.
Update Your Tablet’s Software
Keeping your tablet’s software up to date is crucial for optimal performance and compatibility with various apps and services. It can also help resolve Wi-Fi connectivity issues. Here’s how you can update your tablet’s software:
1. Check for Updates: Go to your tablet’s settings and look for the “Software Update” or “System Update” option. Tap on it to check for any available updates. If an update is available, follow the prompts to download and install it.
2. Wi-Fi Connection: Make sure your tablet is connected to Wi-Fi before checking for updates. It’s best to connect your tablet to a stable and reliable Wi-Fi network to ensure a smooth update process.
3. Automatic Updates: Some tablets have the option to enable automatic updates. If this setting is available, turn it on so that your tablet can automatically download and install updates as they become available. This ensures that your device stays up to date without manual intervention.
4. Scheduled Updates: If automatic updates are not available, you can manually check for updates regularly or schedule a specific time for your tablet to search for updates. This way, you can ensure that your tablet stays updated without constantly checking for updates.
5. Charge Your Tablet: Ensure that your tablet is charged or connected to a power source before starting the software update process. It’s important to have adequate battery power to avoid any interruptions during the update.
6. Be Patient: Software updates can take some time, depending on the size of the update and your internet connection speed. It’s essential to be patient and avoid interrupting the update process. Avoid turning off your tablet or disconnecting from Wi-Fi until the update is complete.
7. Clear Cache: After updating your tablet’s software, it’s a good practice to clear the cache. This can be done by going to the settings and finding the “Storage” or “Internal Storage” option. Look for the cache section and clear the cache to optimize the tablet’s performance.
8. Check for App Updates: After updating your tablet’s software, check for app updates as well. Outdated apps can also cause compatibility issues and impact Wi-Fi connectivity. Open the app store on your tablet and go to the “Updates” section to see if any apps need updating.
By regularly updating your tablet’s software, you can ensure that it runs smoothly and efficiently. Software updates often include bug fixes, security patches, and performance improvements, which can help resolve Wi-Fi connectivity issues and enhance your overall tablet experience.
Restart Your Tablet and Modem/Router
When experiencing Wi-Fi connectivity issues, a simple restart of your tablet and modem/router can often resolve the problem. Here’s how you can do it:
1. Restart Your Tablet: Begin by restarting your tablet. Press and hold the power button until a menu appears, then select the option to restart. Alternatively, you can also go into your tablet’s settings, choose the “System” or “General” tab, and then tap on “Restart” or “Reboot.”
2. Power Cycle Your Modem/Router: Next, turn off your modem and router. Locate the power cables from both devices and unplug them. Leave them unplugged for about 30 seconds to fully power down. Afterward, plug the power cables back in and wait for the modem/router to fully restart.
3. Verify Connection: Once your tablet and modem/router have restarted, ensure that they are both properly connected. Check that your tablet is connected to Wi-Fi and that the modem/router’s lights indicate a stable internet connection.
4. Test the Connection: Open a web browser on your tablet and try to access a website. If the Wi-Fi connection is working correctly, you should be able to load the webpage without any issues. If not, move on to the next troubleshooting step.
5. Reset Your Network Settings: If restarting your tablet and modem/router didn’t resolve the issue, you can try resetting your network settings. Note that this will remove any saved Wi-Fi networks on your tablet, so you will need to reconnect to them manually.
6. Forget Wi-Fi Network: To reset your network settings, go to your tablet’s settings and look for the Wi-Fi or Network option. Find the Wi-Fi network you are trying to connect to and select “Forget” or “Forget network.” Then, reconnect to the Wi-Fi network by entering the password.
7. Contact Your Internet Service Provider: If the issues persist even after restarting your tablet and modem/router, it’s advisable to contact your internet service provider (ISP). They can help troubleshoot any issues with your modem/router and ensure a stable internet connection.
Restarting your tablet and modem/router is a simple yet effective troubleshooting step to resolve Wi-Fi connectivity issues. By doing so, you can refresh the connection, clear any temporary glitches, and establish a stable connection between your tablet and the Wi-Fi network.
Check Your Wi-Fi Network Password
One of the most common reasons for Wi-Fi connectivity issues on your tablet is an incorrect Wi-Fi network password. If you’re unable to connect your tablet to your Wi-Fi network, here are some steps to check your Wi-Fi network password:
1. Double-Check the Password: The first step is to ensure that you’re entering the correct Wi-Fi network password. Wi-Fi passwords are case sensitive, so check that you haven’t accidentally toggled the caps lock key and ensure that you’re entering all the characters correctly.
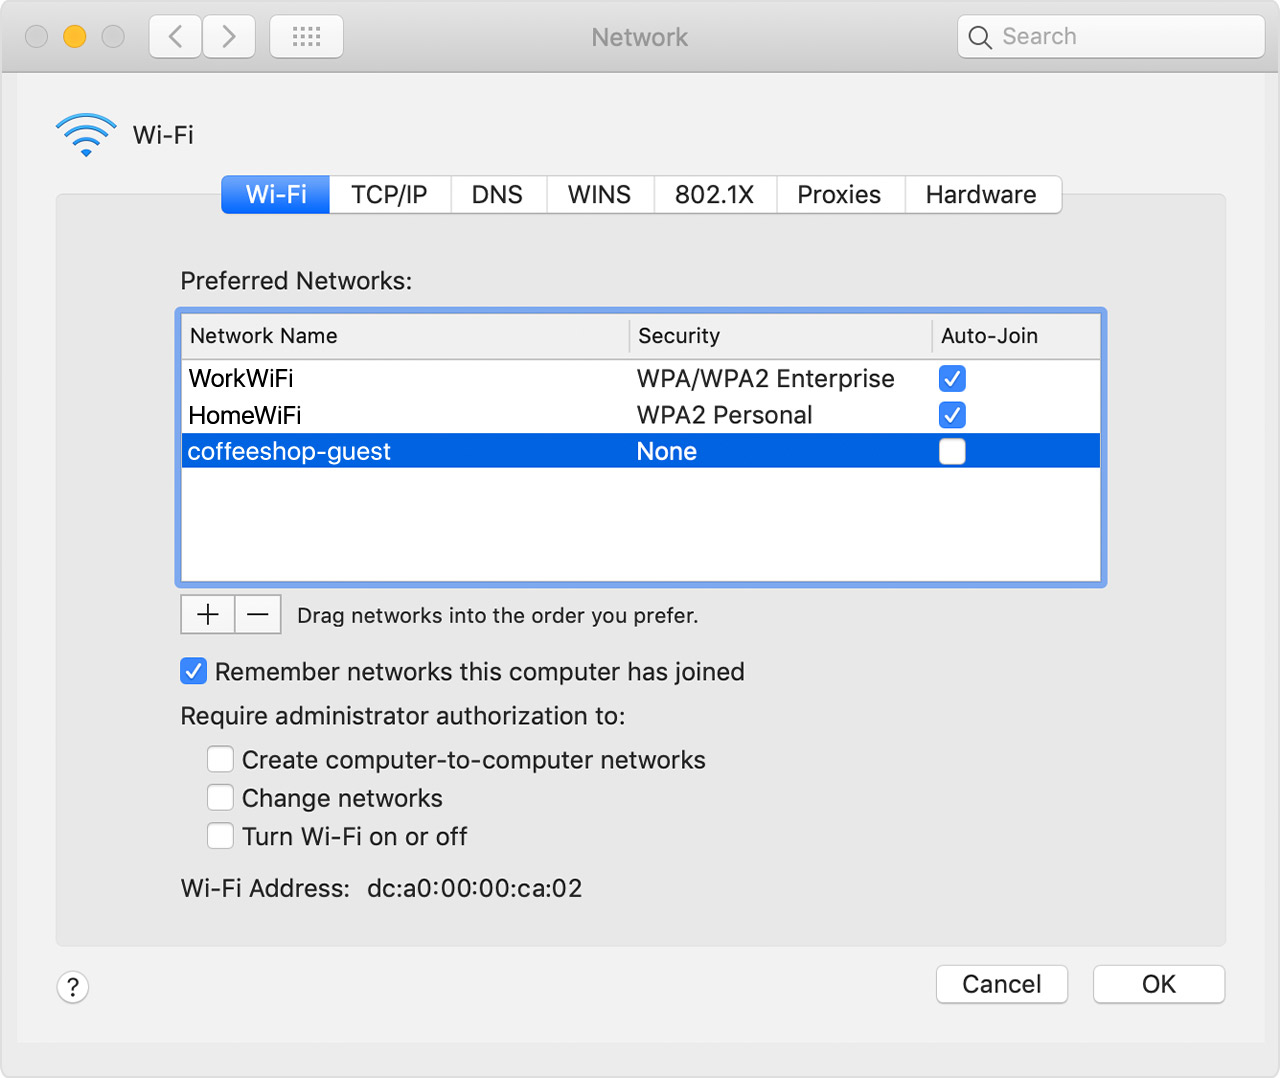
2. Verify the Wi-Fi Network Name: Make sure that you’re connecting to the correct Wi-Fi network. Sometimes, multiple Wi-Fi networks may be available, especially if you’re in an area with multiple routers. Check the network name (often referred to as SSID) listed in your tablet’s Wi-Fi settings matches the desired network.
3. Retrieve the Wi-Fi Password from the Router: If you’ve forgotten the Wi-Fi network password, you can retrieve it from the router’s settings. Pick up your router’s user manual or search online for instructions specific to your router model. Most routers have a web-based interface that you can access through a browser by typing in the router’s IP address.
4. Use a Device Already Connected to the Wi-Fi: If you have another device connected to the Wi-Fi network, such as a laptop or smartphone, you can retrieve the Wi-Fi password from that device. Go to the Wi-Fi settings on the connected device, locate the network name, and view the password.
5. Reset the Router’s Password: If you’re unable to retrieve the Wi-Fi network password, you can reset the router’s password. Locate the reset button on the router and press it for about 10-15 seconds using a paperclip or a similar tool. Keep in mind that this will reset all router settings, including the Wi-Fi password, so you’ll need to set it up again.
6. Update the Wi-Fi Password on Your Tablet: If you’ve confirmed the correct Wi-Fi network password, try updating the Wi-Fi password on your tablet. Go to the Wi-Fi settings, select the network you’re having trouble with, and choose the option to “Forget” or “Forget network.” Then, reconnect to the Wi-Fi network and enter the correct password.
7. Consider Changing the Wi-Fi Network Password: If you’re unable to retrieve or update the Wi-Fi password, you may need to consider changing the password on your Wi-Fi network. You can do this through the router’s settings by accessing the web-based interface. Remember to reconnect all connected devices to the Wi-Fi network with the new password.
By checking your Wi-Fi network password and ensuring its accuracy, you can eliminate one possible cause for the Wi-Fi connectivity issues on your tablet. Double-checking the password and, if needed, retrieving or updating it can help establish a successful connection to your Wi-Fi network.
Check if MAC Address Filtering is Enabled
Another reason why your tablet may not be connecting to your Wi-Fi network is if MAC address filtering is enabled. MAC address filtering is a security feature that only allows devices with specified MAC addresses to connect to the network. Here’s how you can check if MAC address filtering is enabled:
1. Access Your Router’s Settings: Open a web browser on a device connected to the Wi-Fi network and enter your router’s IP address in the address bar. This will take you to the router’s web-based interface.
2. Log in to the Router: Enter the administrator username and password for your router. If you haven’t changed them, check the router’s manual or the manufacturer’s website for the default login credentials.
3. Locate MAC Address Filtering: Look for the “MAC Address Filtering” or “MAC Access Control” option in the router’s settings. It may be found under the “Wireless Settings” or “Security” section.
4. Check the MAC Addresses: In the MAC address filtering settings, you will see a list of allowed or blocked MAC addresses. Compare the MAC address of your tablet to the list to determine if it is allowed or blocked.
5. Add Your Tablet’s MAC Address: If your tablet’s MAC address is not listed among the allowed addresses, you will need to add it to the list. Locate the option to add a new MAC address and enter your tablet’s MAC address. You can typically find the MAC address in the Wi-Fi settings on your tablet or on the device itself.
6. Disable MAC Address Filtering: If MAC address filtering is enabled and you are unable to add your tablet’s MAC address or if you don’t want to use this feature, you can choose to disable it. Look for the option to disable MAC address filtering or turn it off. Keep in mind that disabling this feature may compromise your network’s security.
7. Save and Apply Changes: After making any changes to the MAC address filtering settings, remember to save and apply the changes. This will update the router’s configuration and potentially allow your tablet to connect to the Wi-Fi network.
By checking if MAC address filtering is enabled and ensuring that your tablet’s MAC address is allowed, you can troubleshoot Wi-Fi connectivity issues related to this security feature. Adding your tablet’s MAC address or disabling MAC address filtering can help establish a successful connection to your Wi-Fi network.
Ensure Your Tablet is within Range of the Wi-Fi Network
If your tablet is not connecting to your Wi-Fi network, it’s essential to check if your tablet is within range of the Wi-Fi network. Wireless signals have limitations in terms of coverage distance, and being too far from the router can result in a weak or nonexistent connection. Here are some steps to ensure your tablet is within range of the Wi-Fi network:
1. Check Signal Strength: On your tablet, look for the Wi-Fi signal strength indicator. This can typically be found in the status bar or the Wi-Fi settings. If the signal strength is low or nonexistent, it indicates that you are too far from the Wi-Fi router.
2. Move Closer to the Router: If the signal strength is weak, try moving closer to your Wi-Fi router. Ideally, move to a location where you have a clear line of sight with the router and minimal physical obstructions that can interfere with the signal, such as walls or furniture.
3. Avoid Interference: Wireless signals can be affected by interference from other electronic devices such as cordless phones, microwave ovens, or Bluetooth devices. Move away from these devices or place them away from the Wi-Fi router to minimize potential interference.
4. Use Wi-Fi Range Extenders: If you have a large home or multiple floors, consider using Wi-Fi range extenders or repeaters to amplify the Wi-Fi signal. These devices can help extend the coverage area and improve signal strength in areas that are far from the main router.
5. Try Different Channels: Wi-Fi routers operate on different channels, and sometimes neighboring routers can interfere with each other. Access your router’s settings and experiment with changing the Wi-Fi channel to see if it improves the signal strength on your tablet.
6. Update Router Firmware: Outdated router firmware can sometimes cause connectivity issues. Check the manufacturer’s website for any firmware updates available for your router model. Updating the firmware can provide performance improvements and potentially enhance Wi-Fi signal coverage.
7. Consider Wi-Fi Signal Boosters: If all else fails, you may want to invest in Wi-Fi signal boosters or mesh Wi-Fi systems. These devices work by extending the wireless signal throughout your home or office, helping improve the coverage and ensure that your tablet can connect from any location.
By ensuring that your tablet is within range of the Wi-Fi network, you can improve the chances of establishing a stable connection. Moving closer to the router, minimizing interference, and using signal boosters or extenders can help you achieve a stronger and more reliable Wi-Fi signal for your tablet.
Reset Your Tablet’s Network Settings
If you’re experiencing persistent Wi-Fi connectivity issues on your tablet, resetting the network settings can often help resolve the problem. Resetting the network settings will clear any saved Wi-Fi networks and restore the network settings to their default configurations. Here’s how you can reset your tablet’s network settings:
1. Navigate to Network Settings: Open the Settings app on your tablet and look for the “Network” or “Connections” option. It may be located under the “Wi-Fi” or “Internet” section.
2. Find the Reset Network Settings Option: In the network settings, scroll down to locate the “Reset” or “Reset Network Settings” option. Tap on it to proceed with the reset.
3. Confirm the Reset: Your tablet will likely display a warning message informing you about the consequences of resetting the network settings. Read the message carefully and tap on the “Reset” or “Confirm” button to proceed.
4. Enter Device Passcode (if applicable): Some tablets may require you to enter your device passcode to confirm the reset. This is an additional security measure to prevent unauthorized access to your network settings. Enter your passcode when prompted.
5. Wait for the Reset: Once you’ve confirmed the reset, the tablet will begin resetting the network settings. This process may take a few moments, so be patient and avoid interrupting it.
6. Reconnect to Wi-Fi: After the network settings reset is complete, your tablet will reboot. Once it powers back on, go to the Wi-Fi settings and reconnect to your Wi-Fi network. Enter the password if prompted.
7. Reconfigure Other Network Settings (if necessary): After reconnecting to the Wi-Fi network, you may need to reconfigure other network-related settings, such as VPN or proxy settings. Check your specific needs and make the necessary adjustments.
Resetting your tablet’s network settings can help resolve various Wi-Fi connectivity issues that may be related to network configuration conflicts or incorrect settings. Keep in mind that this process will remove any saved Wi-Fi networks on your tablet, so you’ll need to reconnect to them manually. However, it can provide a fresh start and often resolves network-related problems on your tablet.
Verify if Wi-Fi Network is Broadcasting SSID
If your tablet is unable to detect or connect to your Wi-Fi network, it’s essential to verify if the network is broadcasting its SSID (Service Set Identifier). SSID is the name of your Wi-Fi network that identifies it among other networks in your vicinity. Here’s how you can check if your Wi-Fi network is broadcasting its SSID:
1. Access Wi-Fi Settings: Open the Settings app on your tablet and go to the “Wi-Fi” or “Network” section. This is where you can view and manage the available Wi-Fi networks.
2. Scan for Wi-Fi Networks: Tap on the option to scan for available Wi-Fi networks. Your tablet will search for nearby networks and display a list of networks it can detect.
3. Look for Your Wi-Fi Network: Check the list of available Wi-Fi networks and look for the name of your Wi-Fi network. It should be listed along with other networks in the vicinity.
4. Hidden Network: If you cannot find your Wi-Fi network in the list, it’s possible that the network is hidden, meaning it is not broadcasting its SSID. Hidden networks enhance security by making it less visible to potential unauthorized users.
5. Manually Connect to Hidden Network: If your Wi-Fi network is hidden, you can try manually connecting to it. Look for an option like “Add Network” or “Join Hidden Network” in the Wi-Fi settings. Enter the exact SSID of your Wi-Fi network, along with the security type and password if required.
6. Configure Visibility Settings on the Router: If you want to make your Wi-Fi network visible, access your router’s settings through a web browser by typing the router’s IP address. Locate the visibility or SSID broadcasting settings and make sure it’s enabled.
7. Save and Apply Changes: After making any changes to the visibility settings on your router, save and apply the changes. Restart your router to ensure the new settings take effect.
Verifying if your Wi-Fi network is broadcasting its SSID is crucial because if the network is hidden, your tablet may not be able to automatically detect it. By manually connecting to the hidden network or enabling SSID broadcasting on the router, you can ensure that your tablet can detect and connect to your Wi-Fi network seamlessly.
Check for Interference from Other Devices
If you’re experiencing Wi-Fi connectivity issues on your tablet, it’s possible that other devices or appliances in your vicinity are causing interference. Interference can weaken or disrupt your Wi-Fi signal, resulting in a poor connection. Here are some steps to check for interference from other devices:
1. Evaluate Nearby Devices: Identify any electronic devices or appliances in close proximity to your tablet and Wi-Fi router. Common sources of interference include cordless phones, baby monitors, microwave ovens, Bluetooth devices, and even neighboring Wi-Fi networks.
2. Relocate Electronic Devices: If possible, move your tablet and Wi-Fi router away from devices that may be causing interference. Physical separation can help minimize the impact on your Wi-Fi signal. For example, keep your tablet and router away from microwave ovens or cordless phones.
3. Change Wi-Fi Channel: Wi-Fi routers can operate on different channels, and neighboring routers may be using the same channel, causing interference. Access your router’s settings and try changing the Wi-Fi channel to a less congested one. Experiment with different channels to find the one with minimal interference.
4. Disable or Adjust Interfering Devices: Check the settings of devices that may be causing interference. For example, adjust the frequency or channel of cordless phones or baby monitors to minimize conflict with your Wi-Fi signal. Turn off or disconnect unnecessary Bluetooth devices that may be interfering with your Wi-Fi connection.
5. Use 5 GHz Wi-Fi: If your router supports it, switch to a 5 GHz Wi-Fi frequency band. The 5 GHz band has more channels and is less congested than the 2.4 GHz band, which can result in better signal quality and reduced interference.
6. Wi-Fi Signal Analyzer Apps: Install a Wi-Fi signal analyzer app on your tablet to help identify sources of interference. These apps can show you the strength and quality of Wi-Fi signals in your vicinity, allowing you to make informed decisions on mitigating interference.
7. Upgrade to a Dual-Band Router: Consider upgrading to a dual-band router that supports both 2.4 GHz and 5 GHz frequencies. Dual-band routers provide more flexibility and can help reduce interference by enabling you to connect devices to the less congested 5 GHz band.
By checking for interference from other devices and making necessary adjustments, you can minimize the impact on your Wi-Fi signal and improve connectivity on your tablet. Relocating devices, changing Wi-Fi channels, and upgrading to dual-band routers are effective strategies to reduce interference and enhance your Wi-Fi experience.
Try Connecting to a Different Wi-Fi Network
If you’re having persistent Wi-Fi connectivity issues on your tablet, it’s worth trying to connect to a different Wi-Fi network. This step can help determine whether the problem lies with your tablet or the specific Wi-Fi network you’re trying to connect to. Here’s how you can go about trying to connect to a different Wi-Fi network:
1. Search for Available Wi-Fi Networks: Open the Wi-Fi settings on your tablet and look for the list of available Wi-Fi networks in your vicinity. Your tablet will scan and display the networks it can detect.
2. Choose a Different Network: Look for an open network or one that you have access to, such as a friend’s or family member’s Wi-Fi. Select the network you want to connect to by tapping on its name.
3. Enter the Network Password (if required): If the Wi-Fi network you’re connecting to is secured, you’ll need to enter the correct password. Make sure to type the password accurately to ensure a successful connection.
4. Test the Connection: After connecting to the different Wi-Fi network, open a web browser or try accessing any internet-dependent app on your tablet to see if the connection is stable. If you can browse the web or use apps without any issues, it suggests that the problem may lie with your original Wi-Fi network.
5. Compare Performance with Original Network: Assess the performance of your tablet on the new Wi-Fi network and compare it to the original network you were experiencing issues with. If your tablet functions properly and has a reliable connection on the new network, it indicates that the issue may be specific to the original network.
6. Consult the Network Administrator (if needed): If you’re unable to connect to any Wi-Fi network or if the problem persists on multiple networks, it’s advisable to seek assistance from the network administrator. They can provide further guidance and support in troubleshooting the connectivity issue.
7. Consider Network Settings or Hardware Issues: If your tablet connects successfully to the different network, it’s possible that the issue lies within your original network’s settings or hardware. You may need to check the router configuration, contact your internet service provider, or consider upgrading your router if it’s outdated or experiencing issues.
Trying to connect to a different Wi-Fi network is a valuable step in troubleshooting Wi-Fi connectivity issues on your tablet. It helps identify whether the problem is specific to a particular network or if it’s related to your tablet’s settings or hardware. By comparing the performance on different networks, you can gather information to further diagnose and resolve the connectivity issue.
Consider a Factory Reset as a Last Resort
If you’ve exhausted all other troubleshooting steps and are still experiencing persistent Wi-Fi connectivity issues on your tablet, you may need to consider a factory reset as a last resort. A factory reset will restore your tablet to its original settings, erasing all data and personalization. Here are some considerations and steps to take if you decide to proceed with a factory reset:
1. Backup Important Data: Before performing a factory reset, it’s crucial to backup any important data, such as photos, documents, and contacts. You can use cloud storage services, external storage devices, or computer backup software to securely save your data.
2. Remove External Storage: If your tablet has an external SD card or other storage media, remove them before initiating the factory reset. This will prevent unintentional data loss or deletion of the external storage content.
3. Navigate to Factory Reset: Open the Settings app on your tablet and look for the “System” or “General” section. Within this section, you’ll likely find the “Reset” or “Backup & Reset” option. Tap on it to access the factory reset settings.
4. Confirm the Factory Reset: Your tablet will display a warning message about the consequences of a factory reset. Read the message carefully and be aware that this action will erase all data on the tablet. If you still wish to proceed, tap on the “Factory Reset” or “Reset Device” button to confirm and initiate the process.
5. Enter Device Passcode: You may be prompted to enter your device passcode or pattern to authorize the factory reset. This is an additional security measure to prevent unauthorized access to your device.
6. Wait for the Reset: The tablet will begin the factory reset process, which may take some time depending on your device’s model and specifications. It’s crucial to be patient and avoid interrupting the process to prevent any potential complications.
7. Set up Your Tablet Again: After the factory reset, your tablet will reboot and return to its original state. Follow the guided setup process to configure your tablet again, including connecting to a Wi-Fi network.
It’s important to emphasize that a factory reset should only be considered as a last resort when all other troubleshooting steps have been exhausted. It will remove all customization, apps, and settings from your tablet, making it necessary to start from scratch. If you’re unsure about performing a factory reset or if you have any concerns, it’s advisable to consult the tablet manufacturer’s support or seek assistance from a professional technician.