Introduction
When it comes to maintaining a cool and properly functioning computer, case fans play a crucial role. These small but powerful devices are responsible for keeping the internal components of your computer cool by circulating air throughout the case. However, have you noticed that your case fan is running slower than usual? This can be a cause of concern as it may lead to increased temperatures and potentially damage your computer’s hardware.
In this article, we will explore the importance of case fans, the reasons behind slow fan operation, and provide troubleshooting tips to resolve the issue. By understanding these factors, you can ensure that your computer is running efficiently and effectively.
Case fans are an integral part of any computer system, as they help dissipate the heat generated by the CPU, GPU, and other components. High temperatures can significantly affect the performance and lifespan of your system, leading to potential hardware failures or thermal throttling. A properly functioning case fan helps maintain an optimal temperature, allowing your computer to operate smoothly even during demanding tasks such as gaming or video editing.
Now, let’s delve into the reasons why your case fan may be running slower than usual.
Importance of Case Fans
Case fans are essential components of any computer system, serving a vital role in maintaining optimal performance and longevity. Understanding the importance of case fans can help you appreciate their role in keeping your computer running smoothly.
One of the main functions of case fans is to circulate air throughout the computer case. As electronic components generate heat during operation, case fans help dissipate this heat, preventing excessive temperatures that could damage sensitive hardware. By ensuring proper airflow, case fans contribute to the overall stability and reliability of your computer.
Efficient cooling is especially critical for high-performance systems used for gaming, video editing, or other resource-intensive tasks. These tasks generate a significant amount of heat, and without adequate cooling, the components can be pushed beyond their operational limits, leading to performance degradation or even system failure.
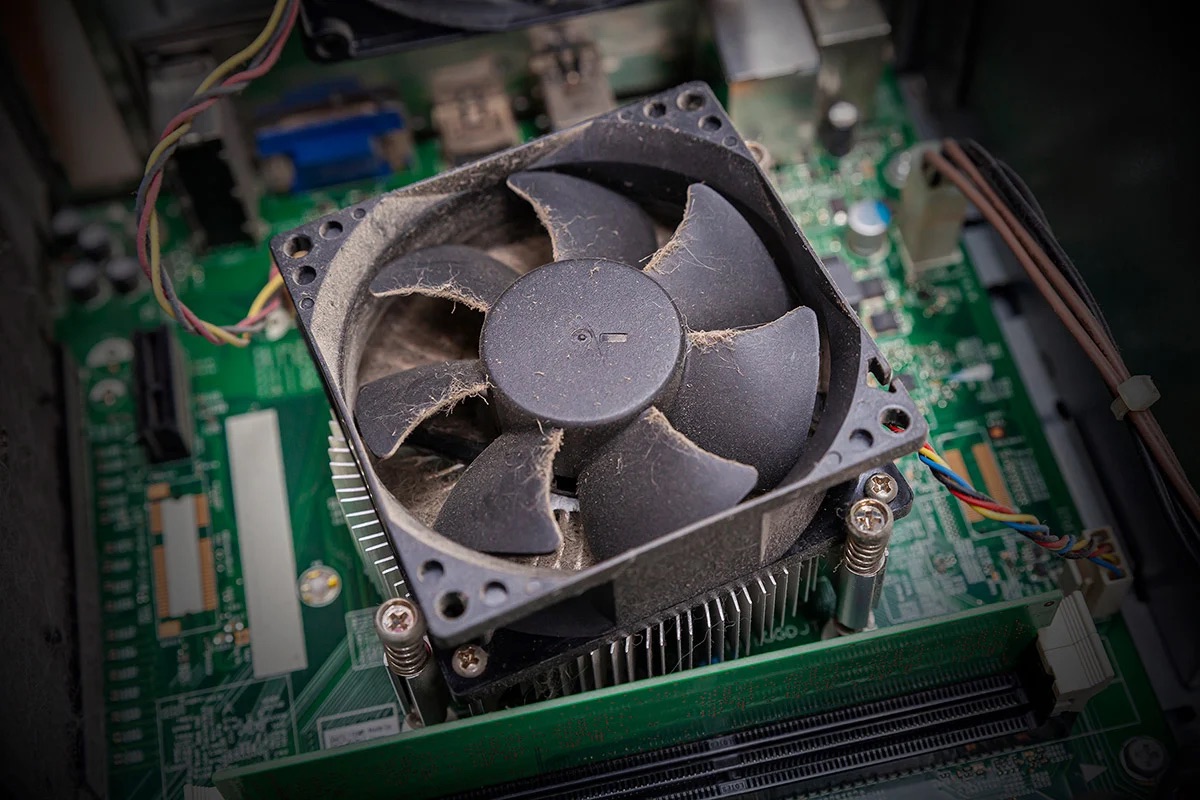
Moreover, case fans also assist in reducing the accumulation of dust and other particles inside the computer case. Dust build-up can obstruct airflow pathways, impeding the cooling process and increasing the risk of overheating. By continuously circulating air, case fans help minimize the accumulation of dust, ultimately prolonging the life of your system and reducing the need for frequent manual cleaning.
In addition to temperature regulation and dust prevention, case fans can contribute to a quieter computing experience. Many modern case fans are designed with noise reduction features and operate at lower decibel levels. By efficiently dissipating heat and maintaining lower operating temperatures, case fans can reduce the speed or workload of other cooling components, such as CPU or GPU fans, resulting in quieter overall system operation.
Overall, case fans are vital for the optimal functioning of your computer. They ensure that your system remains cool, reliable, and efficient, thus maximizing its performance and lifespan. Now, let’s explore the potential reasons why your case fan might be running slower than usual.
Reasons for Slow Case Fan Operation
If you’ve noticed that your case fan is running slower than usual, there could be several factors contributing to this issue. Identifying these reasons can help you troubleshoot the problem and restore optimal fan performance. Let’s explore some common causes of slow case fan operation:
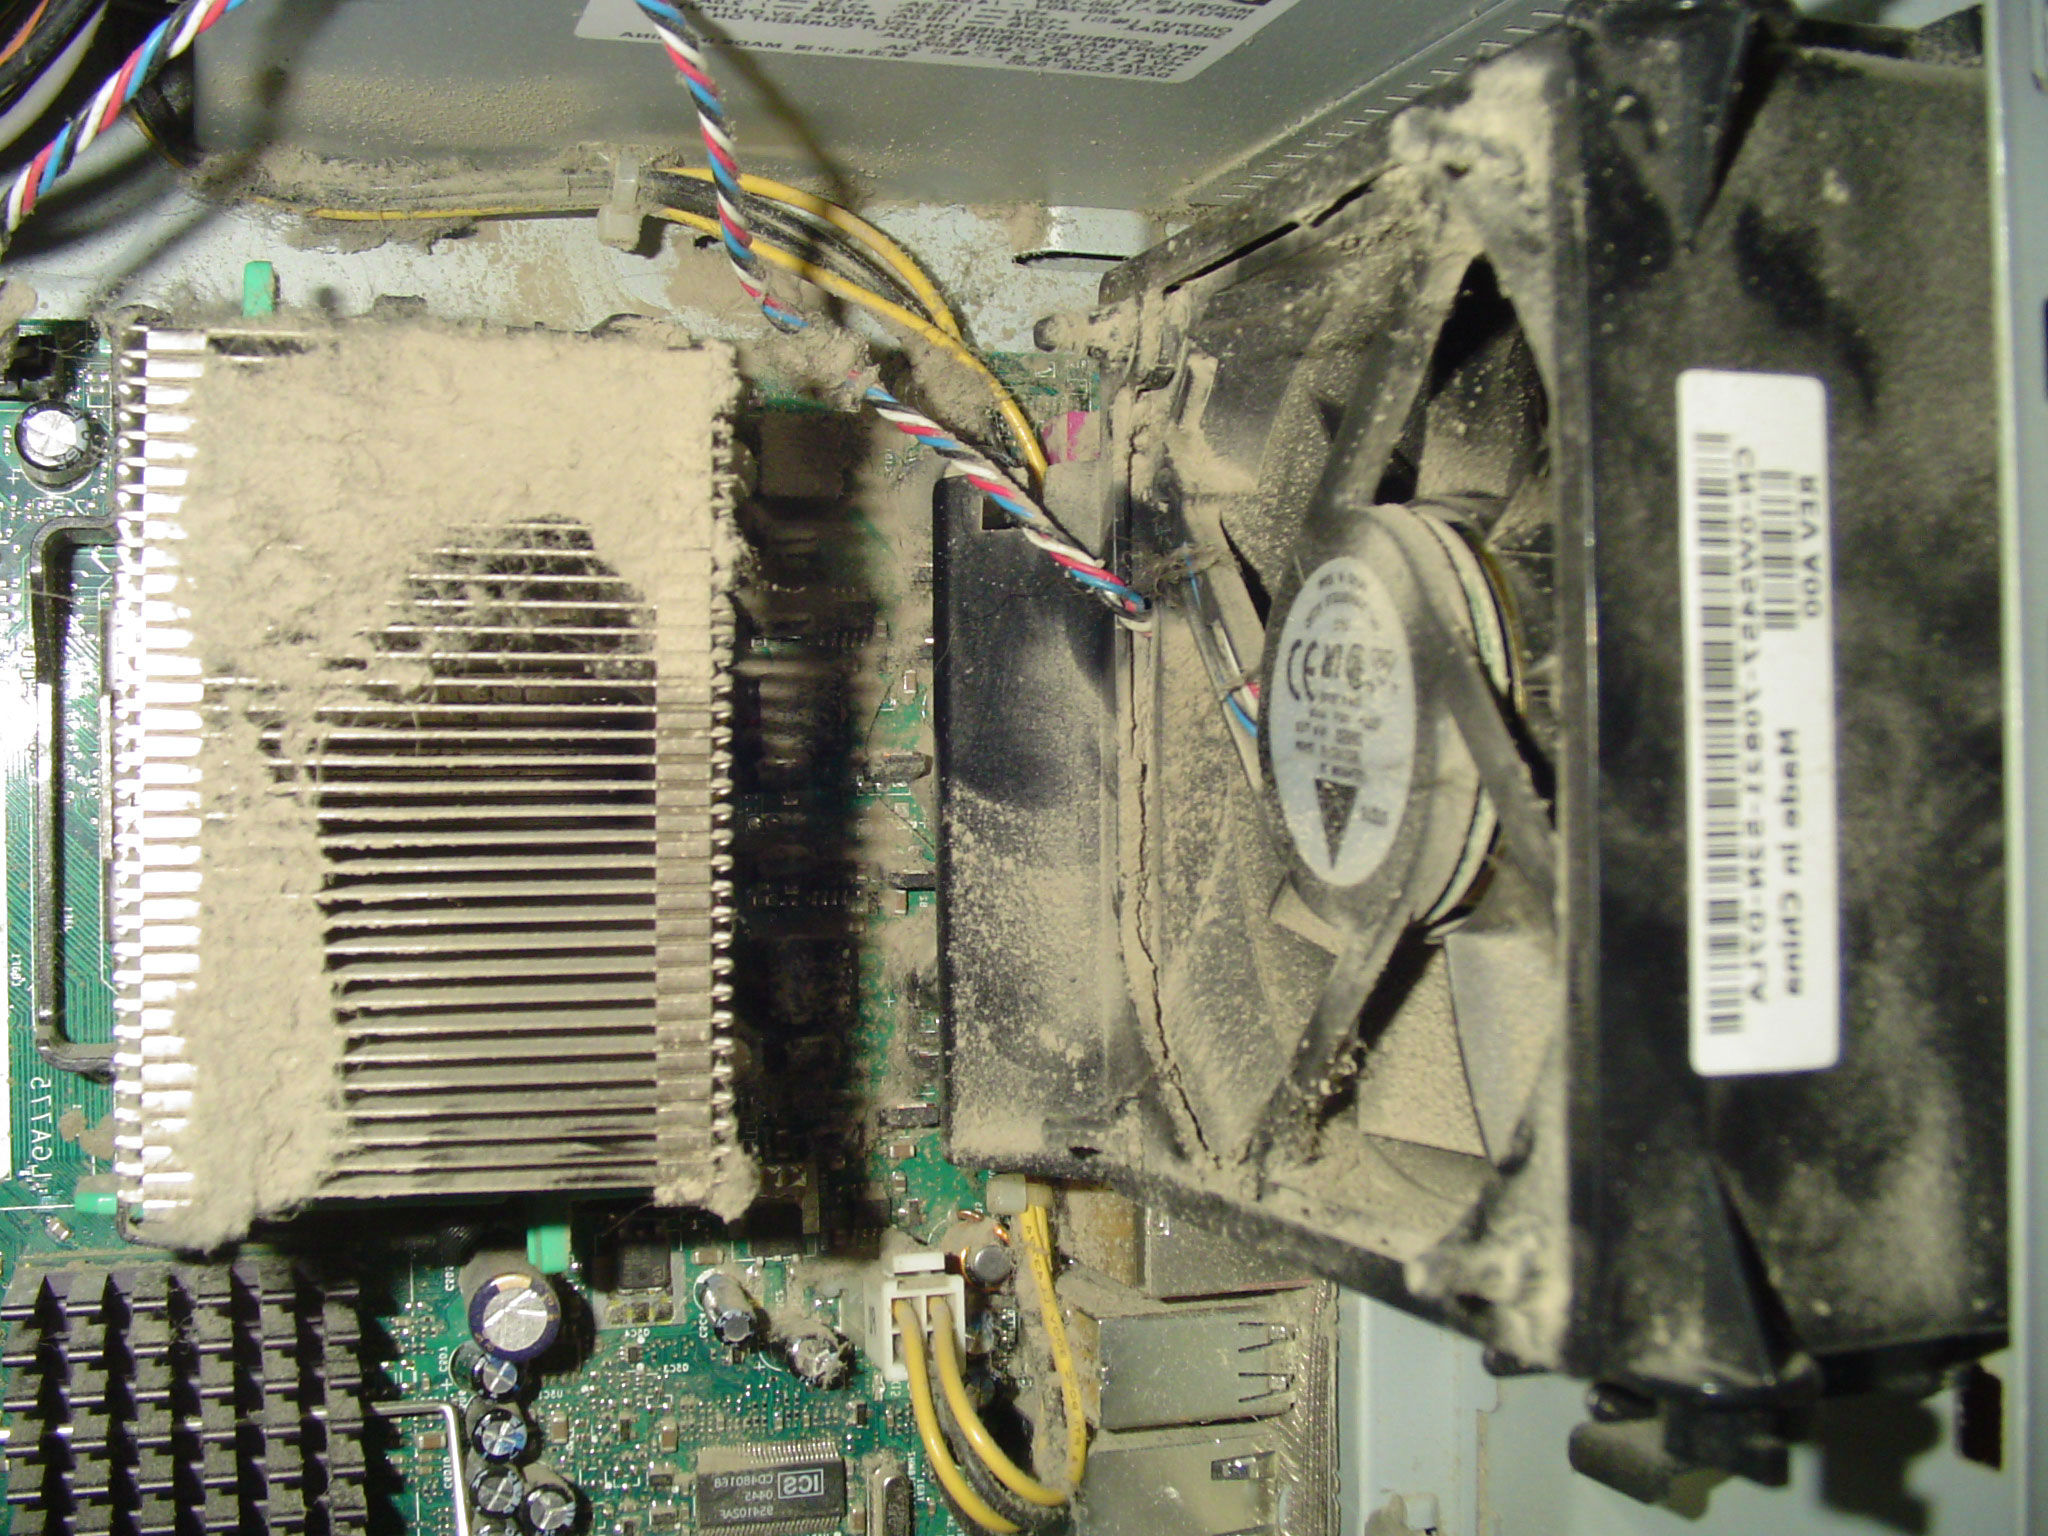
- Dust Build-Up: Over time, dust and debris can accumulate on the fan blades and restrict their movement. This build-up can impede the airflow, causing the fan to slow down. Regular cleaning of the fan blades and the surrounding area can help resolve this issue.
- Fan Speed Settings: Some case fans have adjustable speed settings that allow you to control their RPM (Revolutions Per Minute). If the fan speed setting is set to a lower value, the fan will naturally run slower. Check the fan speed settings in your computer’s BIOS or fan control software and adjust them accordingly.
- Fan Connection Issues: A loose or faulty connection between the fan and the motherboard can cause the fan to operate at a lower speed. Ensure that the fan is securely connected to the correct fan header on the motherboard. If necessary, try reconnecting the fan or using a different fan header.
- Faulty Fan Controller: If you have a case fan controller installed, it is possible that it is malfunctioning or set to a lower speed. Inspect the fan controller settings or consider replacing it if necessary.
- Insufficient Power Supply: Inadequate power supply to the case fan can result in slower operation. Make sure that the fan is connected to a suitable power source, such as a fan header on the motherboard or a dedicated fan controller. Additionally, check the power supply rating to ensure it can handle the power requirements of your case fans.
By assessing these potential causes of slow case fan operation, you can pinpoint the issue and take appropriate steps to resolve it. Let’s move on to the next section, where we will explore troubleshooting tips to address this problem.
Dust Build-Up
Over time, dust and debris can accumulate on the blades and inside the housing of your case fan, restricting airflow and causing it to run slower than usual. This build-up can significantly impact the cooling efficiency of your computer system and may lead to increased temperatures and potential hardware damage.
To address the issue of dust build-up, regular cleaning of the case fan is essential. Here’s a step-by-step guide:
- Power Off: Before starting any cleaning procedures, ensure that your computer is powered off and disconnected from any power source. This is important to prevent any accidents or damage to the system.
- Open the Case: Use a screwdriver to open the computer case. Refer to the manufacturer’s instructions or consult online resources for specific guidance on how to open your particular case model.
- Locate the Case Fans: Identify the location of the case fan(s) inside your computer. They are usually located at the front, rear, or top of the case. Refer to your computer’s documentation for precise fan locations.
- Remove the Fan: Disconnect the case fan from its power source and carefully remove it from its position. This may involve unscrewing the fan from the case or releasing any clips or brackets holding it in place.
- Clean the Fan: Gently clean the fan blades and the surrounding areas using a small brush, compressed air, or a soft cloth. Be careful not to apply excessive force to avoid damaging the fan blades. You can also use a vacuum cleaner with a brush attachment to remove any loose dust particles.
- Clean the Housing: Clean the fan housing and the area where the fan was installed. Remove any dust or debris using a cloth or compressed air.
- Reinstall the Fan: Once the fan and surrounding areas are clean and free from dust, reattach the fan securely to its position. Ensure that all connections are properly made.
- Close the Case: Finally, close the computer case and secure it with the screws or clips.
Regularly performing this cleaning routine can help prevent dust build-up and maintain the optimal performance of your case fan. Aim to clean your case fans every 3 to 6 months, depending on your environment and the level of dust accumulation.
In the next section, we will dive into fan speed settings and how they can affect the performance of your case fan.
Fan Speed Settings
The speed at which your case fan operates can have a significant impact on its performance and cooling capability. Most modern case fans allow you to adjust their speed settings to fit your specific needs. However, if the fan speed is set too low, it may result in slower operation and inadequate airflow.
To check and adjust the fan speed settings, you can use either your computer’s BIOS (Basic Input/Output System) or third-party software, depending on your motherboard and fan controller options. Here’s a step-by-step guide:
- Access the BIOS: Restart your computer and enter the BIOS setup by pressing the designated key during the boot process. The specific key can vary depending on your computer manufacturer (common keys include F2, Del, or Esc). Refer to your motherboard’s manual or the manufacturer’s website for exact instructions.
- Navigate to Fan Settings: Once inside the BIOS, navigate to the hardware or monitoring section, where you’ll find options related to fan control. Look for a sub-menu or settings that refer to fan speed control, fan curves, or PWM (Pulse Width Modulation) settings.
- Adjust Fan Speeds: Depending on your BIOS, you may have options to set the fan speeds manually or customize them through predefined fan curves. Select the appropriate fan control mode, and adjust the speed settings to increase the fan’s RPM. Note that increasing the fan speed will result in higher noise levels, so find a balance between cooling performance and noise level that suits your preferences.
- Save Settings and Exit: After adjusting the fan speed settings to your desired values, save the changes in the BIOS and exit the setup. Your case fans should now operate at the newly configured speeds.
If adjusting the fan speed settings through the BIOS is not an option, you can explore third-party software solutions. Many motherboard manufacturers provide dedicated software utilities that allow you to control fan speeds from within the operating system. Alternatively, there are also third-party software applications available that provide advanced fan control capabilities.
By ensuring that your case fan is running at an appropriate speed, you can optimize cooling performance and maintain ideal operating temperatures for your computer. In the next section, we will discuss fan connection issues and how they can impact fan operation.
Fan Connection Issues
One of the common causes of slow case fan operation is a loose or faulty connection between the fan and the motherboard. A poor connection can limit the power and control signals reaching the fan, resulting in reduced speed and inadequate airflow. Checking and ensuring proper fan connections can help resolve this issue.
Here are some steps to troubleshoot fan connection issues:
- Power Off: Before checking the fan connections, make sure your computer is powered off and unplugged from any power source. This ensures your safety and prevents any potential damage to the system.
- Locate the Fan Connectors: Open the computer case and locate the fan connectors on the motherboard. These connectors are typically labeled “SYS_FAN” or “CHA_FAN” and are designed to power and control the case fans.
- Check the Connections: Ensure that the fan’s power connector is securely connected to the appropriate fan header on the motherboard. Make sure the connection is firm and all pins are properly inserted. If the connection appears loose, disconnect the fan and reconnect it, ensuring a snug fit.
- Inspect for Damaged Wires: Examine the fan’s cable for any visible signs of damage or frayed wires. If you notice any issues, such as exposed wires or cuts in the cable, it may be necessary to replace the fan or repair the cable to restore proper functionality.
- Test with a Different Header: If you suspect a faulty fan header on the motherboard, try connecting the fan to a different header, if available. This can help determine if the issue lies with the fan header or the fan itself.
- Consider Using a Fan Controller: If you have multiple case fans or encounter persistent connection issues, you can invest in a fan controller. A fan controller provides additional fan headers and independent control over fan speeds, offering more flexibility and reducing the reliance on the motherboard’s fan headers.
By ensuring proper fan connections, you can eliminate potential issues causing your case fan to run slower than normal. This will help restore adequate airflow and maintain optimal cooling performance for your computer system. In the next section, we will explore the possibility of a faulty fan controller as a reason for slow case fan operation.
Faulty Fan Controller
If you have a fan controller installed in your computer system, a malfunctioning or faulty controller could be the reason why your case fan is running slower than normal. Fan controllers allow you to manually adjust the speed of your case fans or provide automatic control based on temperature sensors. If the fan controller is not functioning correctly, it can result in reduced fan speeds and inadequate cooling. Here are some steps to troubleshoot a faulty fan controller:
- Check Fan Controller Settings: Start by examining the settings on your fan controller. Ensure that the speed control is not set to a lower value than desired. Adjust the settings, if necessary, to increase the fan speed.
- Reset the Fan Controller: Some fan controllers have a reset button or a reset option in the settings. Try resetting the controller to its default settings and see if this resolves the issue.
- Test with Different Fans: To determine if the issue lies with the controller itself, try connecting different fans to the controller and observe their speed. If the new fans also run slower than expected, it indicates a problem with the fan controller.
- Consider Replacing or Repairing the Fan Controller: If your troubleshooting efforts confirm that the fan controller is indeed faulty, you may need to replace or repair it. Check if the controller is still under warranty, and contact the manufacturer for assistance or consider replacing it with a new one.
- Alternate Fan Control Options: If you do not wish to repair or replace the fan controller, you can explore alternative methods of controlling your case fans. For example, you can connect the fans directly to the motherboard’s fan headers or use software-based fan control utilities to adjust the fan speeds.
By troubleshooting and addressing any issues with the fan controller, you can ensure that your case fan operates at the desired speed, providing optimal cooling performance for your computer. In the next section, we will explore the possibility of insufficient power supply as a reason for slow case fan operation.
Insufficient Power Supply
Inadequate power supply to your case fan can result in slower operation and reduced airflow. Case fans require a sufficient and stable power source to run at their optimal speed. If the power supply is insufficient, it may not provide enough power to drive the fan, causing it to operate at a slower speed. Here are some factors to consider when addressing insufficient power supply:
- Check Power Connections: Ensure that the case fan is connected to a suitable power source. Most case fans are powered through fan headers on the motherboard or a separate fan controller. Verify that the connection is secure and the wiring is intact.
- Check Power Supply Rating: Check the power supply rating of your computer system. Verify if it has enough capacity to support all the components, including the case fans. Insufficient wattage from the power supply unit can result in insufficient power for the fans to operate at their full speed.
- Consider Upgrading the Power Supply: If you determine that the power supply is insufficient to handle the power requirements of your computer system, consider upgrading to a higher wattage power supply. Choose a power supply unit that can handle the total power consumption of your system, including the case fans.
- Distribute Power Load: If you have multiple case fans, distribute the power load among different fan headers or use a fan splitter to connect them to multiple headers. This can help ensure that each fan receives sufficient power for optimal operation.
- Monitor Power Draw: Utilize software tools or integrated hardware monitoring features to keep an eye on the power draw of your case fans. Excessive power draw or fluctuating voltages may indicate a power supply issue that needs to be addressed.
By addressing any potential power supply issues, you can ensure that your case fan receives the necessary power to operate at its full speed, maximizing cooling performance. Maintaining sufficient power supply is crucial not only for the case fan but also for the overall stability and performance of your computer system.
In the next section, we will delve into troubleshooting tips to help you diagnose and resolve slow case fan issues.
Troubleshooting Slow Case Fan Issues
If you have noticed that your case fan is running slower than usual, it’s important to troubleshoot and address the issue promptly. Here are some troubleshooting tips to help you diagnose and resolve slow case fan issues:
- Clean the Fan: Start by cleaning the case fan and surrounding area to remove any dust or debris that may be restricting airflow. Use a brush, compressed air, or a soft cloth for effective cleaning.
- Check Fan Speed Settings: Verify the fan speed settings in your computer’s BIOS or fan control software. Increase the fan speed if it is set too low, ensuring that it provides adequate airflow.
- Inspect Fan Connections: Ensure that the case fan is properly connected to the appropriate fan headers on the motherboard. Check for loose connections and reseat the fan if necessary.
- Test with Different Headers: If possible, connect the case fan to a different fan header to rule out any issues with the current fan header. This can help identify if the problem lies with the fan header or the fan itself.
- Examine the Fan Controller: If you have a fan controller installed, make sure it is functioning correctly. Reset the controller settings, check for any faults, and consider replacing or repairing it if necessary.
- Assess Power Supply: Verify that your computer’s power supply is adequate for the power requirements of the case fans. Upgrade the power supply if needed to provide sufficient power for optimal fan operation.
- Monitor Temperatures: Keep an eye on the temperatures of your computer components using software monitoring tools. If temperatures are higher than normal, it may indicate that the case fan is not providing adequate cooling.
- Consult Manufacturer Support: If the issue persists and you have exhausted all troubleshooting options, consider contacting the fan manufacturer or seeking assistance from professional computer technicians for further guidance and support.
By following these troubleshooting steps, you can identify and resolve the underlying causes of slow case fan operation. Remember that maintaining optimal fan speed and airflow is crucial for the overall performance and longevity of your computer system.
Now that you have a better understanding of the possible reasons behind slow case fan operation and how to troubleshoot them, you can take the necessary steps to ensure that your case fan operates at its full potential, providing efficient cooling for your computer components.
Conclusion
Ensuring that your case fan is running at an optimal speed is essential for maintaining a cool and properly functioning computer system. Slow case fan operation can result in increased temperatures, reduced performance, and potential hardware damage. By understanding the importance of case fans and troubleshooting the causes of slow fan operation, you can address the issue effectively.
In this article, we explored the significance of case fans in maintaining optimal temperatures and preventing hardware failures. We discussed common reasons for slow case fan operation, including dust build-up, fan speed settings, fan connection issues, faulty fan controllers, and insufficient power supply. By addressing these factors and implementing the appropriate solutions, you can restore your case fan’s performance and ensure efficient cooling for your computer.
We provided troubleshooting steps to help you diagnose and resolve slow case fan issues. This included cleaning the fan, adjusting fan speed settings, checking fan connections, examining the fan controller, assessing power supply, and monitoring temperatures. By following these steps, you can identify the underlying causes and take the necessary actions to resolve the problem.
Remember, regular maintenance and cleaning of your case fans are essential to prevent dust build-up and ensure optimal performance. Additionally, monitoring the temperatures of your computer components can help you detect any potential cooling issues and address them in a timely manner.
By addressing slow case fan operation, you not only safeguard your computer system from overheating but also enhance its overall performance and lifespan. So, take the time to troubleshoot and resolve any issues with your case fans, and enjoy a cool and reliable computing experience.