Introduction
Welcome to the world of 3D printing! If you’re a 3D printing enthusiast, you’re probably familiar with different printing modes and techniques. One such technique that has gained popularity is “Vase Mode.”
So, what exactly is vase mode and why is it worth exploring? Vase mode, also known as spiral mode or single-wall mode, is a unique printing setting that allows you to create 3D prints with a beautiful, single-walled, seamless appearance.
In this article, we will delve into the ins and outs of vase mode and explore its benefits, limitations, and practical applications. Whether you’re a seasoned 3D printing professional or a beginner looking to experiment with new printing techniques, understanding vase mode can add versatility to your printing capabilities.
Imagine being able to print intricate vase designs, decorative objects, or even functional prototypes with an elegant, continuous spiral wall. That’s exactly what vase mode offers. By utilizing vase mode, you can achieve a visually impressive result with minimal post-processing.
Throughout the article, we will address important aspects of vase mode such as its inner workings, advantages, limitations, and tips for successful prints. By the end, you’ll have a comprehensive understanding of vase mode and the confidence to incorporate it into your own 3D printing projects.
What is Vase Mode?
Vase mode is a special printing setting in 3D printing that allows you to create hollow objects with a single continuous wall. Unlike traditional printing modes that create solid objects by printing multiple layers, vase mode uses a single continuous extrusion path to build the object.
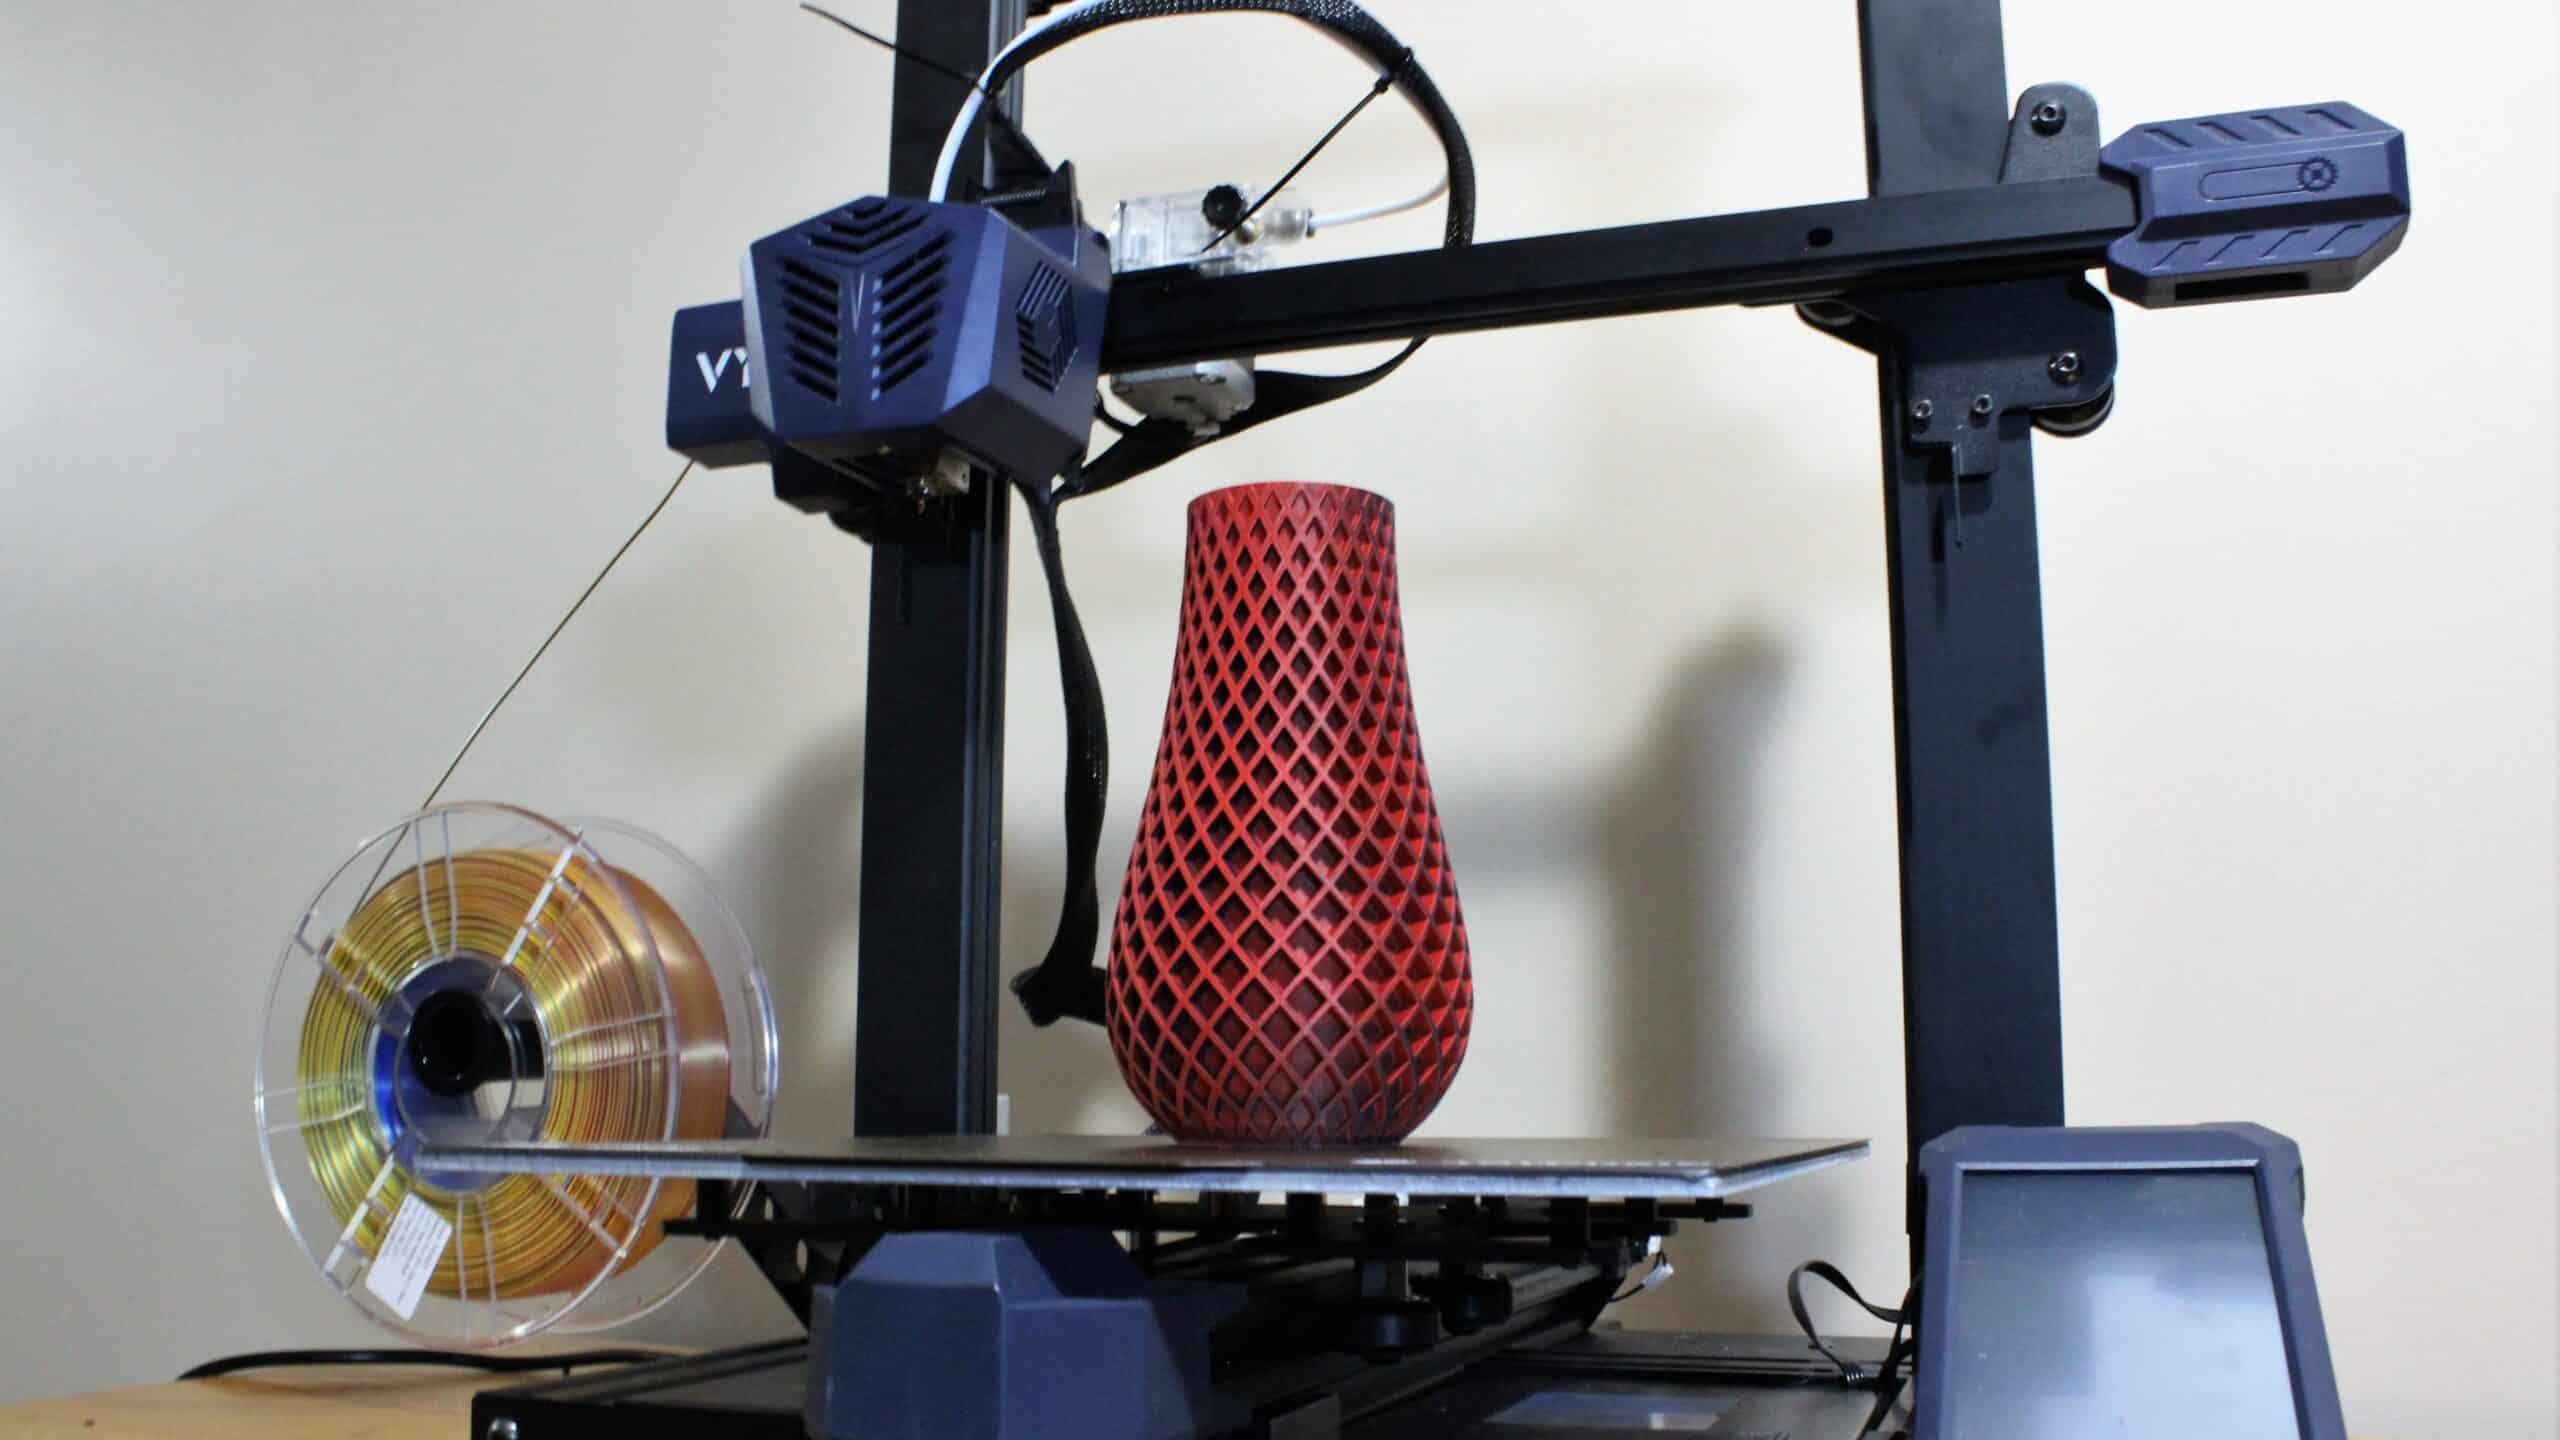
In vase mode, the printer gradually increases the height of the object while simultaneously reducing the extrusion width. This creates a seamless, spiral-like structure, resembling a vase, hence the name “vase mode.” The result is a visually appealing object with a lightweight and elegant aesthetic.
One of the key features of vase mode is its single-wall thickness. Instead of printing multiple perimeter walls, vase mode only prints a single layer, which contributes to its unique appearance. The absence of internal infill and top/bottom layers also saves printing time and reduces material usage.
Vase mode is suitable for creating objects with cylindrical or conical shapes, such as vases, cups, bottles, and decorative items. It is particularly effective for designs that emphasize the external appearance rather than structural integrity or functionality.
It’s important to note that not all 3D printers support vase mode. This feature is dependent on the printer’s firmware and slicer software. If your printer supports vase mode, you can typically find it as an option in your slicer’s settings.
The popularity of vase mode lies in its ability to create visually stunning objects with minimal effort. By understanding the mechanics behind vase mode and its advantages, you can unleash your creativity and bring your unique designs to life.
How Does Vase Mode Work?
To understand how vase mode works, let’s take a closer look at the printing process. When using vase mode, the printer follows a specific pattern to create the desired object.
The first step in using vase mode is to design or select a 3D model that is suitable for this mode. The model should have a hollow interior and a single continuous outer wall. You can either create your own design or choose from the vast library of pre-made vase mode designs available online.
Once you have your model, it needs to be sliced into layers so that the printer knows how to produce the object. In vase mode, the slicing software generates a single continuous spiral toolpath that starts from the bottom and moves upwards. This spiral path ensures that the printer creates a single-walled structure as it extrudes the filament.
As the printer starts to print, it gradually increases the height of the object layer by layer, allowing the singular wall to form. The extrusion width decreases proportionally with the increasing height, giving the object its unique spiral appearance.
In vase mode, there is typically no infill, meaning the interior of the object remains empty. This reduces the print time and material usage, as only the outer wall needs to be printed.
It’s important to note that successful printing in vase mode relies on proper settings and calibration. The printer’s temperature, filament flow rate, and layer height should be set optimally to ensure smooth extrusion and a consistent wall thickness.
Overall, vase mode works by leveraging a continuous spiral toolpath to create a single-walled, hollow object. By understanding the printing process and optimizing the settings, you can achieve high-quality prints with an elegant and seamless appearance.
Benefits of Using Vase Mode
Vase mode offers a range of benefits that make it a valuable tool for 3D printing enthusiasts. Here are some advantages of using vase mode:
- Visually Stunning Prints: One of the main advantages of vase mode is the ability to create visually impressive prints. The seamless, spiral-like structure of vase mode objects adds an elegant touch to decorative items like vases, cups, and figurines.
- Reduced Printing Time: Vase mode eliminates the need for infill and top/bottom layers, resulting in faster print times. With only a single wall to print, the layer-by-layer process is streamlined, allowing you to create complex and intricate designs in less time.
- Reduced Material Usage: Since vase mode requires no infill, it significantly reduces material consumption. This not only saves costs but also contributes to a more sustainable and eco-friendly printing process.
- Easier Post-processing: With its single-wall structure, vase mode prints require minimal post-processing. There are no interior supports or complex geometries to remove, resulting in a smoother and cleaner finish. This saves time and effort compared to traditional printing modes.
- Design Flexibility: Vase mode opens up a world of design possibilities. You can create intricate patterns, textures, or gradients on the outer surface of the object, adding a unique touch to your prints. The ability to print in a single continuous spiral also allows for more organic and fluid shapes.
- Economical for Large Prints: In situations where you need to print large objects, vase mode can be more cost-effective compared to traditional modes. Since it doesn’t require solid infill, the material usage is significantly reduced, resulting in considerable cost savings.
Vase mode provides a range of advantages that make it a valuable tool for both functional and aesthetic 3D prints. By leveraging its unique features, you can create stunning designs while optimizing printing time, material usage, and post-processing efforts.
Limitations of Vase Mode
While vase mode offers many benefits, it also comes with some limitations that are important to consider. Here are a few limitations of using vase mode:
- Lack of Structural Integrity: Vase mode prints are primarily focused on aesthetics rather than structural strength. With only a single wall, the prints may not have the necessary rigidity for functional or load-bearing purposes.
- No Internal Supports: Since vase mode prints have no infill, the lack of internal support structures can be a limitation. Certain designs may require internal supports to maintain their shape or prevent sagging during printing. Without these supports, intricate or complex designs may be challenging to print successfully.
- Difficulty with Overhangs: Due to the nature of vase mode printing, overhangs can be a challenge. Without the support of infill or top/bottom layers, severe overhangs may result in drooping or deformation. Designing objects with gentle slopes or incorporating manual support structures can help mitigate this limitation.
- Print Size Limitations: Vase mode may not be suitable for printing very large objects. As the height increases, the extrusion width decreases, resulting in slower print speeds and higher chances of print failures. It is important to consider the limitations of your printer and adjust settings accordingly when working with larger objects.
- Limited Design Options: Vase mode is best suited for objects with cylindrical or conical shapes. It may not be well-suited for complex geometries or objects with sharp corners. Designs requiring internal cavities or complex features are better suited for other printing modes.
- Increased Filament Usage for Thick Walls: When printing with thicker wall widths in vase mode, more filament is consumed compared to traditional print modes. This can impact material usage and increase costs, especially for larger or bulkier prints.
Understanding these limitations can help you make informed decisions when choosing to use vase mode for specific applications. By recognizing the constraints, you can mitigate potential issues and optimize your prints for the desired outcome.
Tips for Successful Printing in Vase Mode
To ensure successful prints in vase mode, here are some valuable tips to consider:
- Choose the Right Model: Select or design a model specifically tailored for vase mode. The model should have a hollow interior and a single continuous wall. This will ensure optimal print results without compromising the structural integrity of the object.
- Optimize Layer Height: Experiment with different layer heights to find the sweet spot for your printer and filament combination. In general, smaller layer heights result in finer details but longer print times.
- Calibrate Extrusion Settings: Properly calibrate your printer’s extrusion settings, including nozzle temperature and filament flow rate. This will ensure consistent extrusion, minimizing the risk of gaps or under-extrusion in the print.
- Tweak Wall Thickness: Adjust the wall thickness setting in your slicing software to achieve the desired wall thickness. Keep in mind that thicker walls will consume more filament and take longer to print.
- Consider Varying Wall Widths: Experiment with varying wall widths in different sections of the model to create interesting visual effects. This technique can add depth and texture to your prints.
- Use optimal print speed: Adjust your print speed to a value suitable for your printer. Higher speeds may result in a loss of quality or increased chances of print failure, while slower speeds provide more precise and reliable results.
- Test and Fine-tune: Before attempting complex or large prints, conduct small test prints to gauge the performance of your printer and optimize its settings. Making small adjustments and fine-tuning the parameters will help you achieve consistent and successful vase mode prints.
- Be Mindful of Orientation: Pay attention to the orientation of your model on the print bed. Position it in a way that minimizes overhangs and maximizes stability during the printing process.
- Consider Manual Supports: For designs that require internal support or have complex features, consider adding manual supports. These can help maintain the shape and stability of the print.
- Post-processing Carefully: Handle vase mode prints with care during post-processing, as the single-wall structure is more delicate compared to solid prints. Use appropriate tools and techniques to remove any support structures or imperfections without damaging the print.
By following these tips, you can optimize your printing process and increase the chances of successful vase mode prints. Remember that experimentation and fine-tuning are key to achieving the desired results.
Applications of Vase Mode
Vase mode opens up a wide range of applications in the world of 3D printing. While its main purpose is to create visually stunning decorative objects, there are several other practical applications where vase mode can be utilized:
- Home Decor: Vase mode is perfect for creating unique vases, flower pots, and other decorative items that can add a touch of individuality to your home. You can experiment with different shapes, textures, and patterns to match your interior design.
- Artistic Sculptures: Since vase mode allows for intricate and visually striking designs, it is an excellent technique for creating artistic sculptures. Artists can explore the medium of 3D printing to bring their visions to life in a new and innovative way.
- Prototype Visualization: Vase mode can be useful for visualizing prototypes and product designs. By printing a concept in a simple and elegant vase mode, designers and engineers can get a better sense of how the final product might look and make necessary adjustments earlier in the development process.
- Jewelry and Accessories: Vase mode enables the creation of unique jewelry pieces and accessories such as bracelets, earrings, and pendants. Its ability to produce intricate and delicately designed objects makes it an ideal technique for crafting personalized accessories.
- Learning Tool: Vase mode can be a great educational tool for teaching geometry, mathematical concepts, and design principles. Students can explore the relationship between shape, symmetry, and aesthetics by creating their own vase mode designs.
- Gifts and Souvenirs: Personalized and customized gifts are always cherished by recipients. Vase mode allows you to create one-of-a-kind gifts and souvenirs that have a personal touch. You can design and print customized vases, figurines, or other unique items for birthdays, anniversaries, or special occasions.
- Art Installations: Vase mode can be used to create large-scale art installations that make a visual impact. The flowing, seamless structures created in vase mode can be combined to form eye-catching installations that engage viewers and create a unique atmosphere.
- Educational Models: Vase mode can be utilized to create educational models that showcase scientific concepts, anatomy, or historical artifacts. The single-wall structure allows for easier visualization and understanding of complex objects or concepts.
These are just a few examples of the versatile applications of vase mode in 3D printing. The only limit is your imagination! Experimentation and exploration of this technique can lead to innovative and captivating creations in various fields.
Conclusion
Vase mode is an exciting printing technique that allows 3D printing enthusiasts to create stunning, single-walled objects with a seamless and elegant appearance. By understanding the inner workings of vase mode, its benefits, limitations, and practical applications, you can unleash your creativity and take your 3D printing projects to the next level.
We explored the concept of vase mode and how it differs from traditional printing modes. Vase mode offers a range of benefits, including visually striking prints, reduced printing time and material usage, easier post-processing, and design flexibility. However, it also comes with some limitations, such as limited structural integrity, difficulties with overhangs, and print size constraints.
To achieve successful prints in vase mode, we provided valuable tips, such as selecting the right model, optimizing layer height and extrusion settings, tweaking wall thickness, and attention to orientation. Additionally, we discussed various practical applications of vase mode, from home decor and artistic sculptures to educational models and prototypes visualization.
By embracing vase mode, you can add a new dimension to your 3D printing endeavors, exploring the possibilities of creating intricate and visually impressive designs. Experiment, fine-tune your settings, and let your creativity guide you as you unlock the potential of vase mode in your 3D printing journey.