Introduction
Welcome to the world of 3D printing, where incredible creations can come to life layer by layer. One crucial aspect of 3D printing is infill, a fundamental component that impacts the strength, weight, and overall quality of the printed objects. Infill plays a vital role in determining the structural integrity and functionality of the final product. So, what exactly is infill in 3D printing and how does it work?
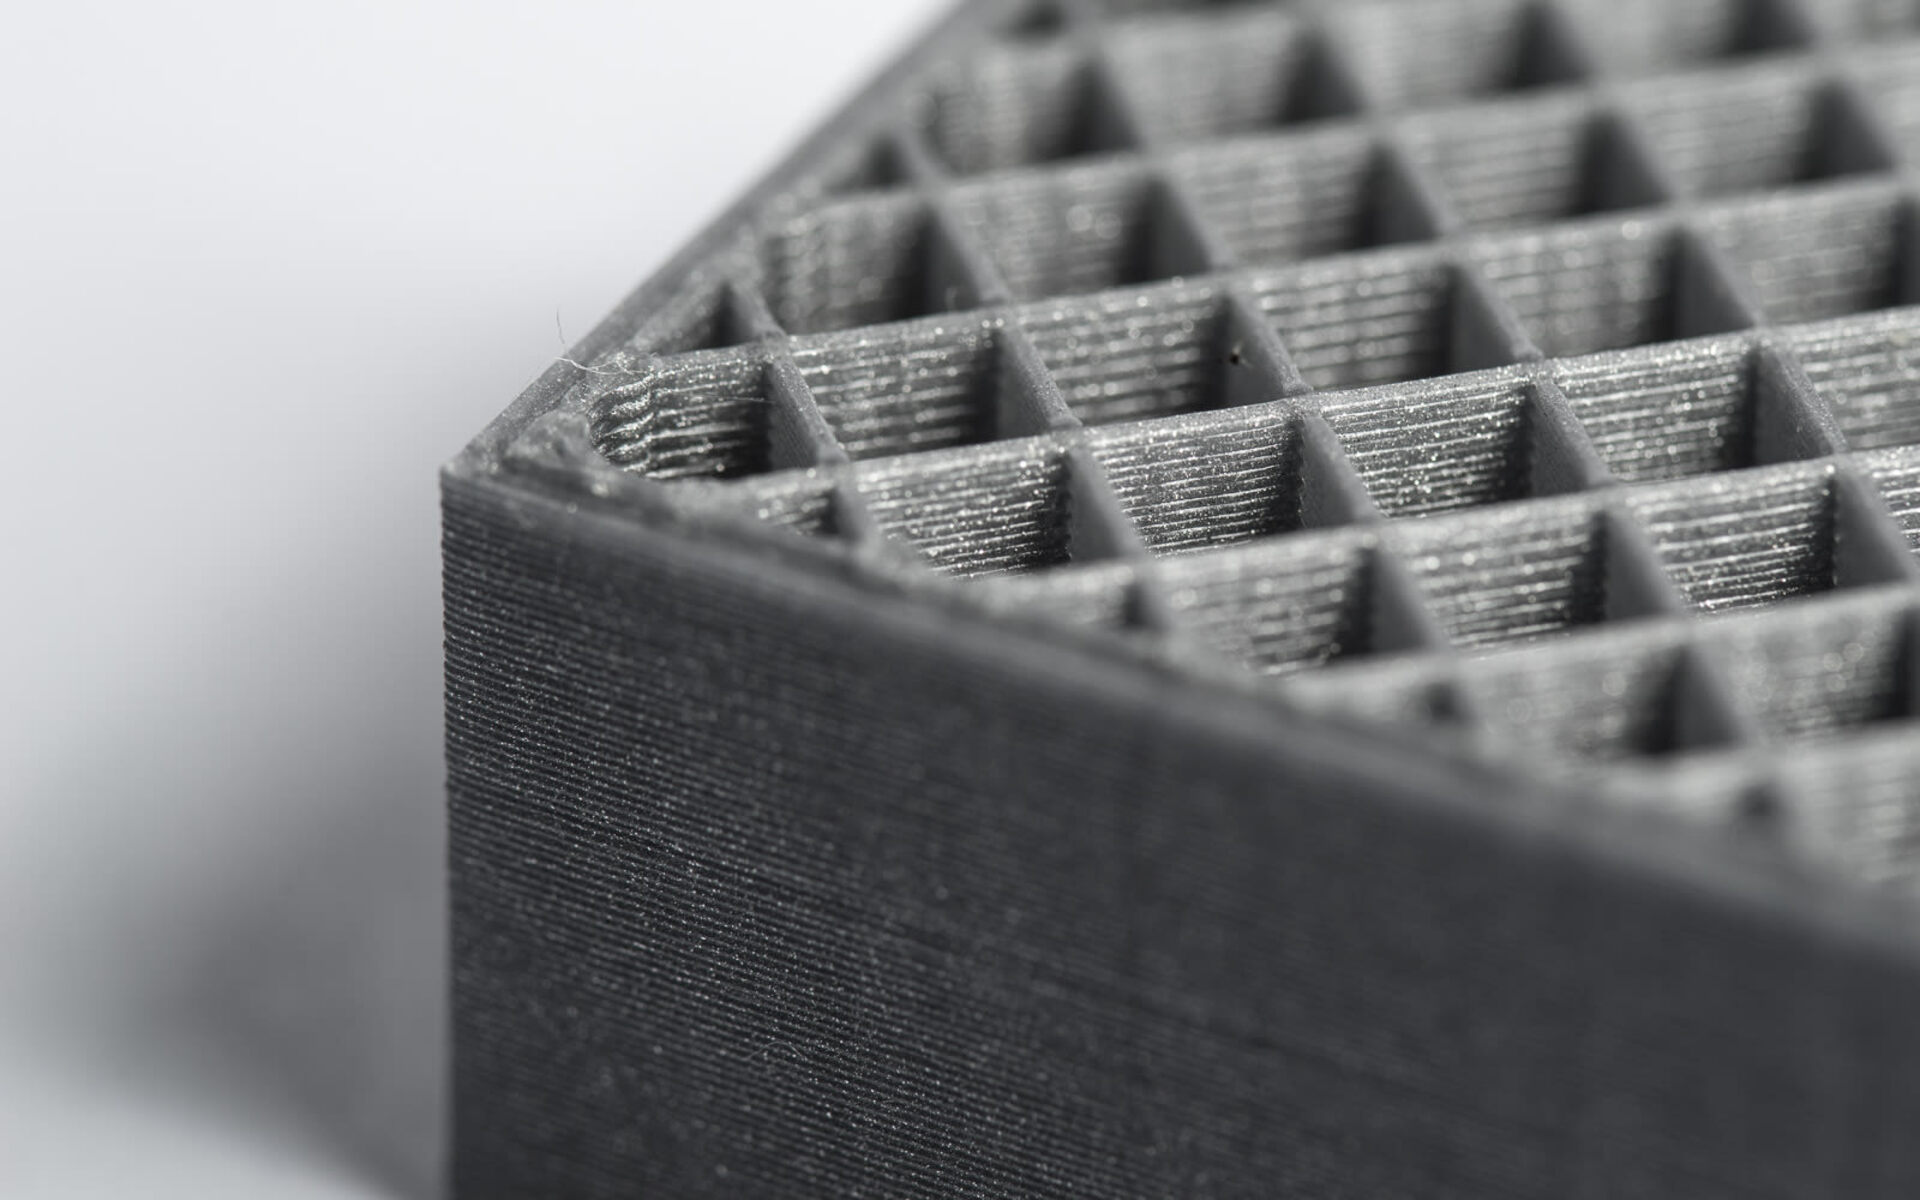
Infill refers to the internal structure of a 3D printed object. In simple terms, it is the pattern or lattice-like structure that fills the inside of the printed model. This structure provides support and strength to the object while reducing material and print time. Infill is essential because it prevents the object from being hollow or too dense, striking the right balance between strength and weight.
Understanding how infill works is key to optimizing the 3D printing process and achieving desired outcomes. The infill pattern is created by the 3D slicer software, which generates the toolpaths for the printer to follow. These toolpaths determine where the printer deposits the material and where it leaves empty space. The infill pattern varies depending on the desired strength, weight, and visual appearance of the final object.
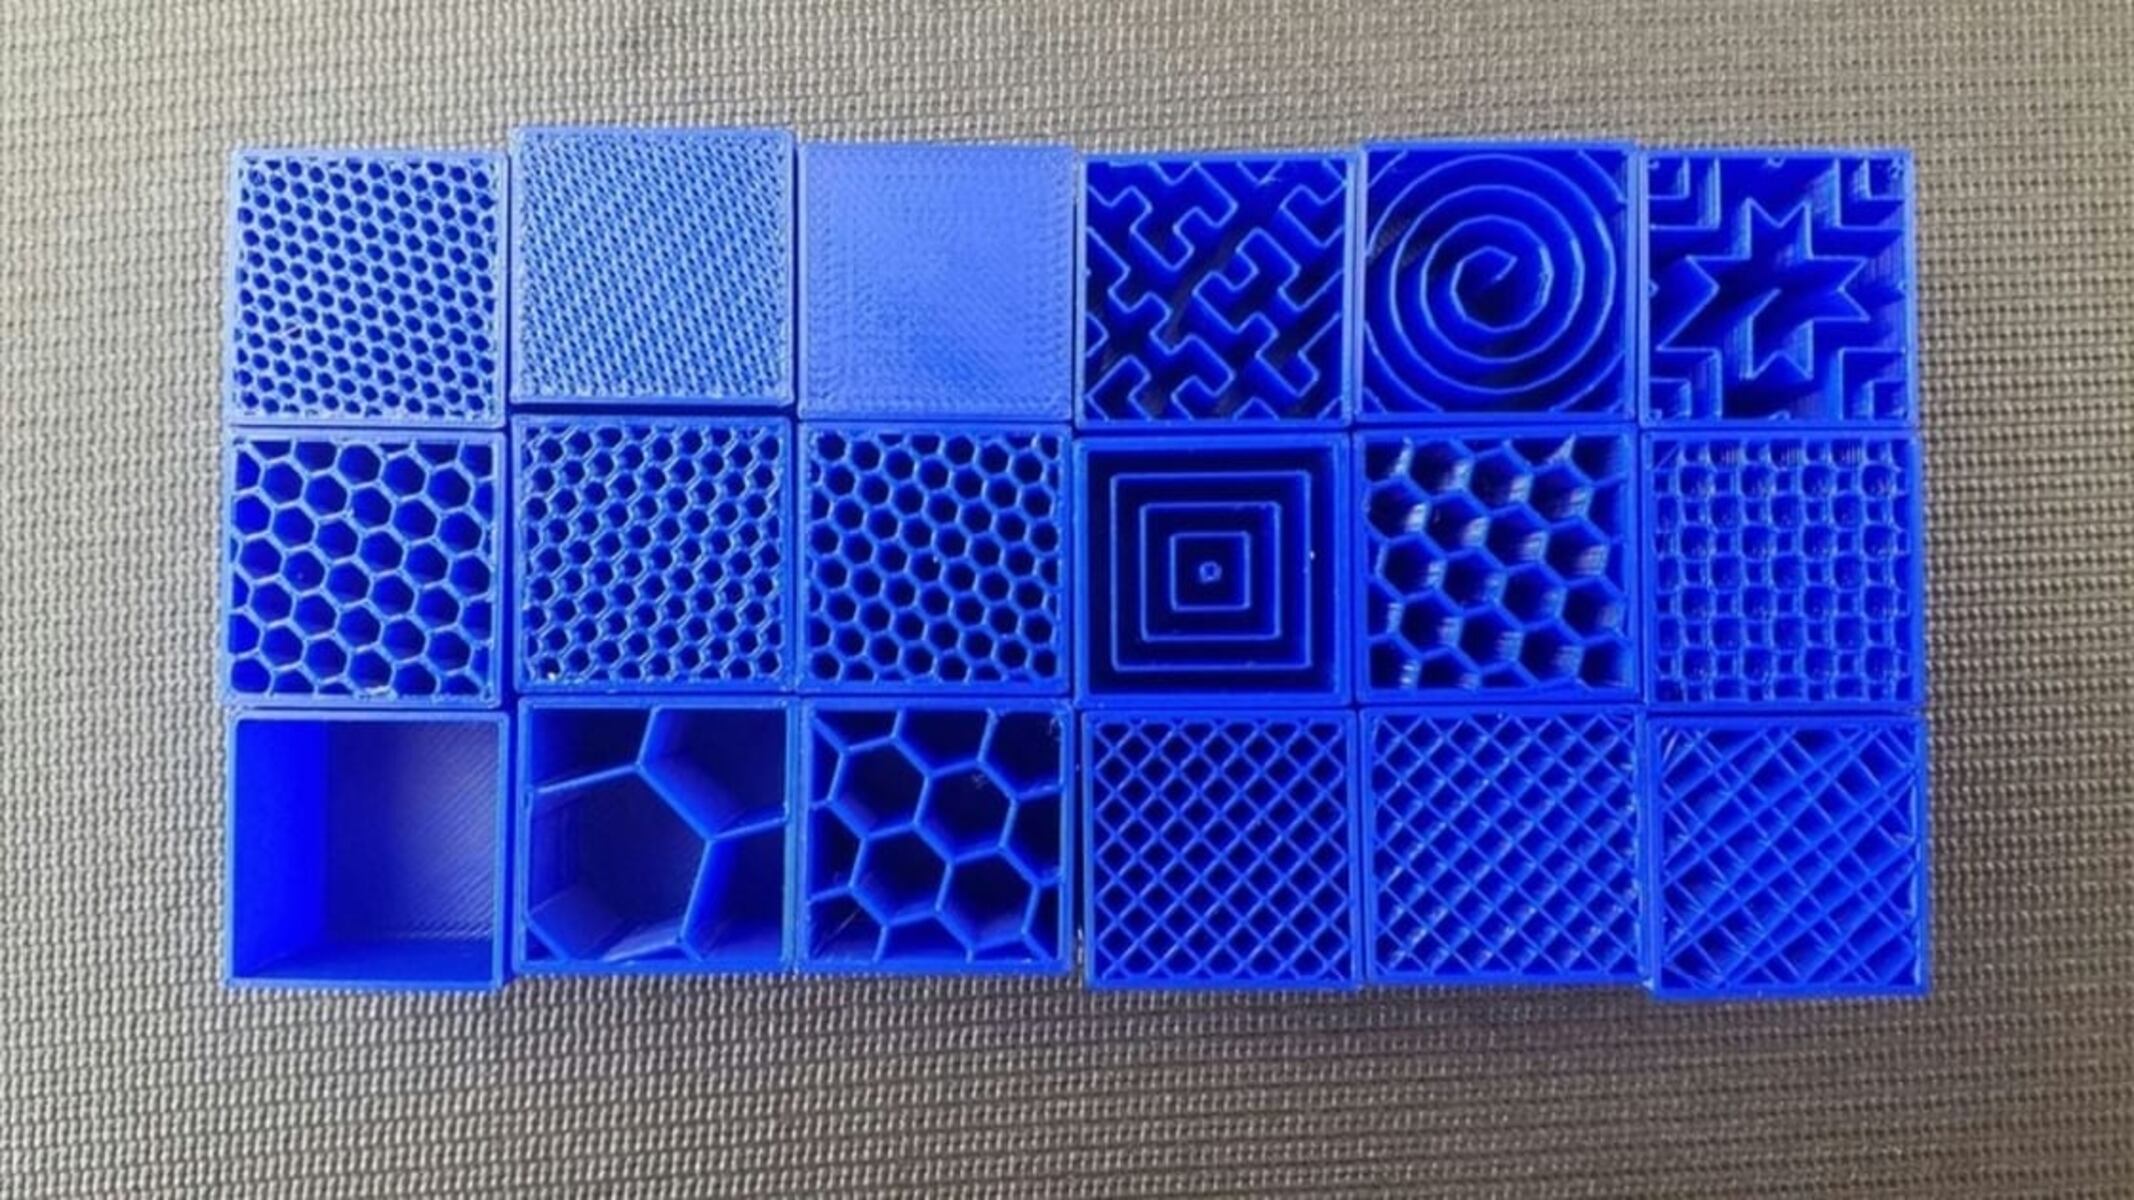
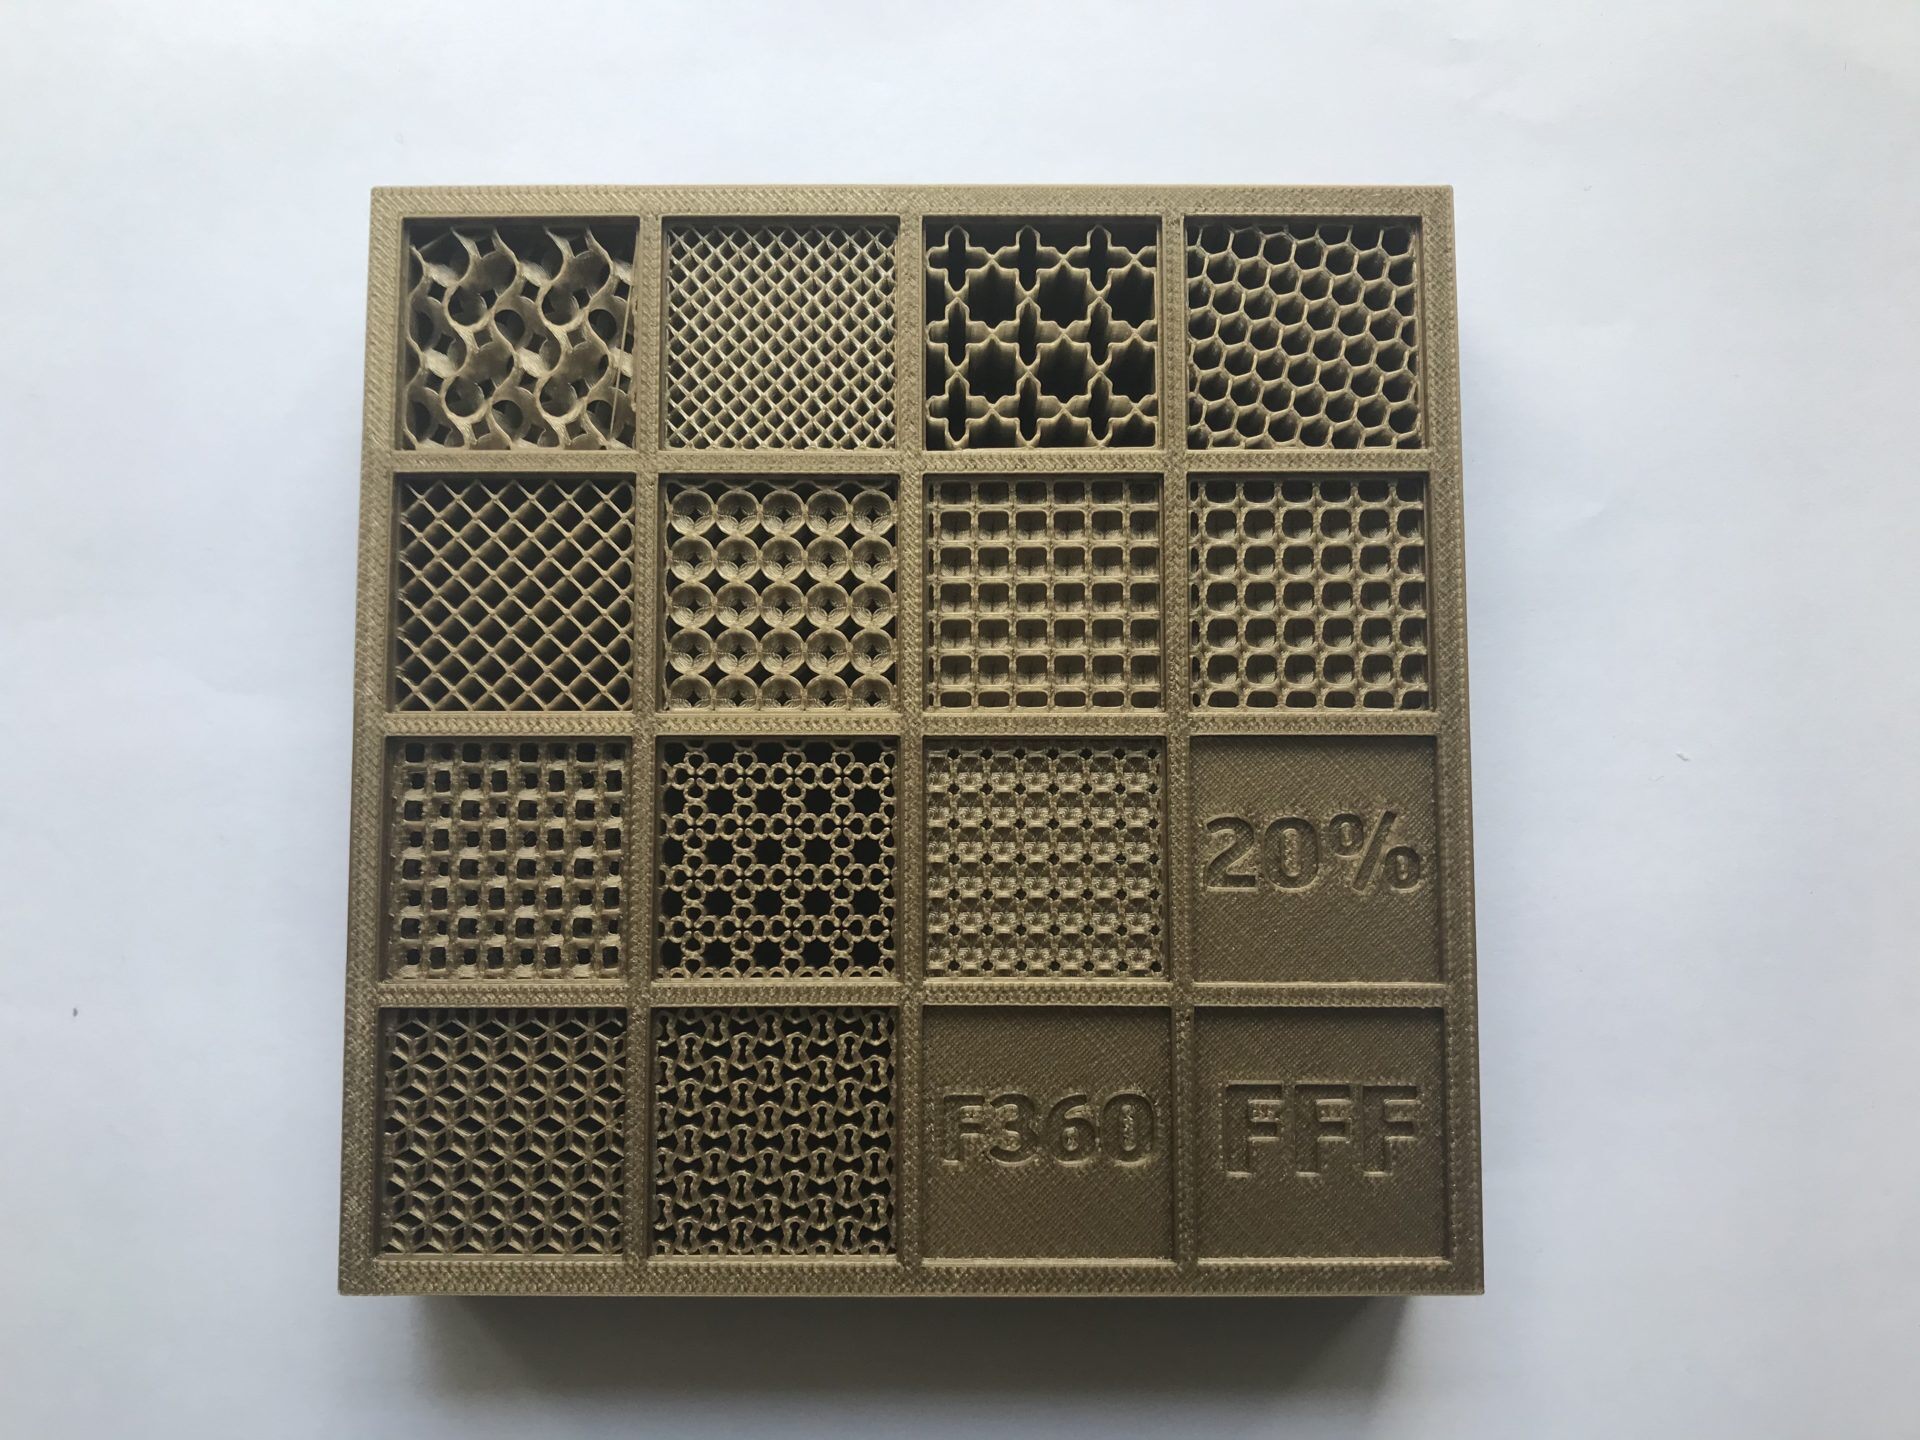
There are several different types of infill patterns available, ranging from basic to complex designs. The most common infill patterns include rectilinear, honeycomb, triangular, and gyroid, each with its own unique properties and characteristics. The choice of infill pattern depends on the specific requirements of the printed object, such as load-bearing capacity, flexibility, and aesthetic appeal.
When using infill, one essential factor to consider is the infill density, which refers to the amount of internal structure within the printed object. It is typically represented as a percentage, with higher percentages indicating a denser infill pattern. The infill density can be adjusted based on the desired strength and weight of the object. Understanding the effect of infill density on the final product is crucial for achieving the desired balance between strength and resource consumption.
In addition to strength and weight considerations, the infill percentage also affects the print time. Higher infill percentages generally result in longer print times, as more material is being deposited. Conversely, lower infill percentages can reduce the print time but may compromise the strength and durability of the object. Striking the right balance between infill density and print time is important for optimizing the 3D printing process.
Now that we have a basic understanding of what infill is and how it affects 3D printed objects, it’s time to delve deeper into the pros and cons of infill 3D printing. By considering the advantages and disadvantages, we can make informed decisions when utilizing infill in our 3D printing projects.
What Is Infill 3D Printing?
Infill 3D printing is a crucial aspect of the additive manufacturing process that determines the internal structure of a three-dimensional printed object. It is the pattern or lattice-like structure that fills the inside of the object, providing support, strength, and stability. Infill plays a significant role in achieving the desired strength-to-weight ratio, optimizing material usage, and improving the overall quality of the printed object.
When 3D printing an object, the printer deposits material layer by layer, creating the external surfaces. However, leaving the entire object hollow or completely solid may not be ideal. By incorporating infill, you can achieve a balance between strength and weight, enhancing the structural integrity of the object while conserving material.
The infill pattern is generated using specialized 3D slicer software that calculates the toolpaths for the printer. These toolpaths determine where the material will be deposited and where empty space will be left inside the object. By varying the infill pattern, you can achieve different properties in the printed object, such as flexibility, load-bearing capacity, and aesthetic appeal.
Infill patterns can range from basic shapes like rectilinear or triangular to more complex designs like honeycomb or gyroid. Each pattern has its own unique characteristics and benefits. The choice of infill pattern depends on the specific requirements of the printed object, including its intended use, load-bearing capabilities, and visual appearance.
In addition to the pattern, the infill density also plays a crucial role in infill 3D printing. Infill density refers to the amount of internal structure within the printed object, typically represented as a percentage. Higher infill percentages result in a denser internal structure, providing more strength but using more material and increasing print time. Lower infill percentages reduce material usage and print time but may compromise the strength and rigidity of the object. Selecting the appropriate infill density is crucial for achieving the desired balance between strength, weight, and resource consumption.
By incorporating infill in the 3D printing process, you can create objects with optimized strength and weight characteristics. Whether you are printing functional prototypes, mechanical parts, or artistic sculptures, infill 3D printing allows you to achieve the desired structural integrity and overall quality of your objects.
How Does Infill Work?
Understanding how infill works in 3D printing is essential for optimizing the strength, weight, and overall quality of the printed objects. Infill determines the internal structure of the object, providing support and stability while minimizing material usage.
The process starts with the 3D slicer software, which generates the toolpaths for the printer to follow. These toolpaths determine where the material will be deposited and where empty space will be left inside the object. The infill pattern is created based on the desired properties and characteristics of the final object, such as strength, flexibility, and appearance.
Once the infill pattern is defined, the printer starts depositing material layer by layer, gradually building the object. The infill is strategically placed inside the object, providing internal support without making it completely solid. This results in a structure that is strong and lightweight, striking the right balance between functionality and material efficiency.
There are several types of infill patterns, each with its own unique characteristics and benefits. Rectilinear infill, for example, features straight lines that intersect each other, creating a grid-like structure. This pattern is simple and easy to print, providing decent strength and stability. Honeycomb infill, on the other hand, consists of hexagonal cells interconnected to form a honeycomb-like structure. This pattern offers excellent strength-to-weight ratio and is commonly used in applications that require structural integrity.
The infill density is also a critical factor in how infill works. It refers to the percentage of the object’s volume filled by the infill structure. Higher infill percentages result in denser internal structures, providing increased strength but using more material. Lower infill percentages reduce material usage but can compromise the object’s strength. Determining the appropriate infill density requires considering the specific requirements of the object and striking a balance between strength, weight, and print time.
By carefully selecting the infill pattern and adjusting the infill density, you can optimize the 3D printing process and achieve the desired structural integrity and functionality of your objects. Whether you are printing mechanical parts, prototypes, or artistic designs, understanding how infill works enables you to create high-quality and efficient 3D printed objects.
Different Types of Infill Patterns
When it comes to infill 3D printing, there are several different patterns available, each with its own unique properties and benefits. The choice of infill pattern depends on the specific requirements of the printed object, such as strength, flexibility, and visual aesthetics. Let’s explore some of the commonly used infill patterns:
- Rectilinear: This infill pattern features straight lines that intersect each other, creating a grid-like structure. Rectilinear infill is simple to print and provides decent strength and stability. It is a versatile option suitable for a wide range of applications.
- Honeycomb: The honeycomb infill pattern consists of interconnected hexagonal cells, forming a honeycomb-like structure. This pattern offers an excellent balance between strength and weight, making it popular for applications that require structural integrity, such as aerospace and automotive parts.
- Triangular: Triangular infill is characterized by a series of triangles arranged in a repeating pattern. This pattern provides good strength and allows for efficient material usage. It is commonly used in applications where lightweight, rigid structures are desired.
- Gyroid: The gyroid infill pattern features a complex, lattice-like structure that provides excellent strength-to-weight ratio. This pattern offers high stability and is often chosen for applications that require strong but lightweight objects, such as architectural models and lightweight prototypes.
- Voronoi: Voronoi infill is based on the Voronoi diagram concept and features irregularly shaped cells with varying sizes and shapes. This pattern creates visually appealing and organic-looking structures. Voronoi infill is often used in artistic and decorative 3D printed objects.
These are just a few examples of infill patterns available in 3D printing. There are also other patterns like cubic, grid, and concentric, each with its own unique characteristics. Some slicing software even allows for custom infill patterns, giving designers the flexibility to create their own internal structures.
When selecting an infill pattern, it is important to consider the specific requirements of the printed object. Factors such as load-bearing capacity, flexibility, and visual appeal play a vital role in determining the most suitable infill pattern to use. By choosing the right infill pattern, you can optimize the strength, weight, and overall quality of your 3D printed objects.
Factors to Consider When Choosing Infill Density
Choosing the appropriate infill density is a critical decision in 3D printing. It determines the amount of internal structure within the printed object and plays a significant role in achieving the desired balance between strength, weight, and resource consumption. Here are some factors to consider when choosing infill density:
Strength Requirements: The intended use and load-bearing capacity of the printed object should guide the selection of infill density. Objects that need to withstand heavy loads or mechanical stress may require higher infill densities to provide sufficient structural integrity. On the other hand, objects that are mainly for decorative purposes or do not require significant strength can be printed with lower infill densities to conserve material and reduce print time.
Weight Considerations: Infill density directly affects the weight of the printed object. Higher infill densities result in denser internal structures, making the object heavier. If weight reduction is a priority, lower infill densities can be preferred, as they reduce material usage without sacrificing the overall stability and functionality of the object.
Material Usage: Infill density affects the amount of material consumed during the printing process. Higher infill densities require more material to fill the internal structure, increasing material costs. Therefore, it is essential to consider the material properties and cost implications when determining the infill density. Depending on the specific requirements of the object, a balance needs to be struck between material efficiency and achieving the desired strength.
Print Time: Infill density also impacts the printing time. Higher infill percentages generally result in longer print times because more material needs to be deposited to create a denser internal structure. Lower infill densities can reduce print time, making them ideal for situations where speed is a priority. However, it’s important to find a balance between print time and object strength, as reducing infill density too much may compromise the structural integrity of the printed object.
Print Resolution: The resolution or layer height of the printing also influences the choice of infill density. Objects printed with finer resolutions may benefit from higher infill densities to ensure that the internal structure matches the level of detail on the external surfaces. On the other hand, objects printed with coarser resolutions can often achieve sufficient strength with lower infill densities.
Considering these factors, it is important to strike a balance between strength, weight, material usage, print time, and print resolution when choosing the appropriate infill density for a 3D printed object. Evaluating the specific requirements and constraints of the project will help in making an informed decision and optimizing the overall quality and efficiency of the printed object.
The Importance of Infill Percentage for Strength and Weight
The infill percentage plays a crucial role in determining the strength and weight characteristics of a 3D printed object. By adjusting the infill percentage, you can strike a balance between structural integrity and material efficiency. Here’s why the infill percentage is important:
Strength: The infill percentage directly impacts the strength of the printed object. Higher infill percentages result in a denser internal structure, which improves the object’s ability to handle external forces or loads. This is particularly important for functional parts that require mechanical strength, such as tooling components, brackets, or robot parts. The correct infill percentage can ensure that the 3D printed object is strong enough to withstand its intended application.
Weight: The infill percentage also affects the weight of the printed object. Objects with higher infill percentages tend to be heavier due to the increased volume of material used to create the internal structure. This weight can be beneficial in some cases, such as when stability or rigidity is required. However, for applications where weight reduction is a priority, opting for lower infill percentages can help reduce the overall weight while maintaining adequate strength.
Structural Integrity: Achieving the right infill percentage is essential for ensuring the structural integrity of the 3D printed object. Insufficient infill can lead to weak and fragile objects that are prone to breakage or deformation. On the other hand, excessive infill can add unnecessary weight and material usage without significant strength benefits. Finding the perfect balance between infill density and structural integrity is key to producing robust and reliable 3D printed objects.
Material Efficiency: The infill percentage also relates to material efficiency in 3D printing. Higher infill percentages require more material, which increases printing costs. By optimizing the infill percentage, you can minimize material waste and improve resource utilization. This is especially important when working with expensive or specialized materials, as it can result in significant cost savings in the long run.
Printing Time: Another critical factor influenced by the infill percentage is the printing time. Higher infill percentages tend to increase print time due to the additional material deposition required to create the denser internal structure. The impact on print time may vary depending on the complexity of the model and the specific 3D printer used. By adjusting the infill percentage, you can strike a balance between achieving sufficient strength and reducing print time, ensuring efficient use of printing resources.
Considering the importance of strength, weight, structural integrity, material efficiency, and printing time, selecting the appropriate infill percentage is crucial for optimizing the 3D printing process. Determining the right balance based on the specific requirements of the object and its intended application is key to achieving high-quality, functional, and efficient 3D printed objects.
Infills and Print Time
Print time is a critical consideration in 3D printing, and the choice of infill pattern and density can significantly affect the amount of time it takes to complete a print. Here’s a closer look at how infills impact print time:
Infill Density: The infill density directly influences the print time. Higher infill percentages require more material to be deposited, resulting in more layers and hence a longer print time. Conversely, lower infill percentages reduce the amount of material and time required to create the internal structure. It’s important to consider the trade-off between print time and the desired strength and weight of the printed object when choosing the infill density.
Infill Pattern: The choice of infill pattern can also affect print time. Some infill patterns, such as rectilinear or grids, may require the printer head to move back and forth in a sequential manner, which can take longer compared to patterns like honeycomb or gyroid that allow for continuous and more efficient printing paths. Complex infill patterns may increase print time due to the intricacy of the internal structure.
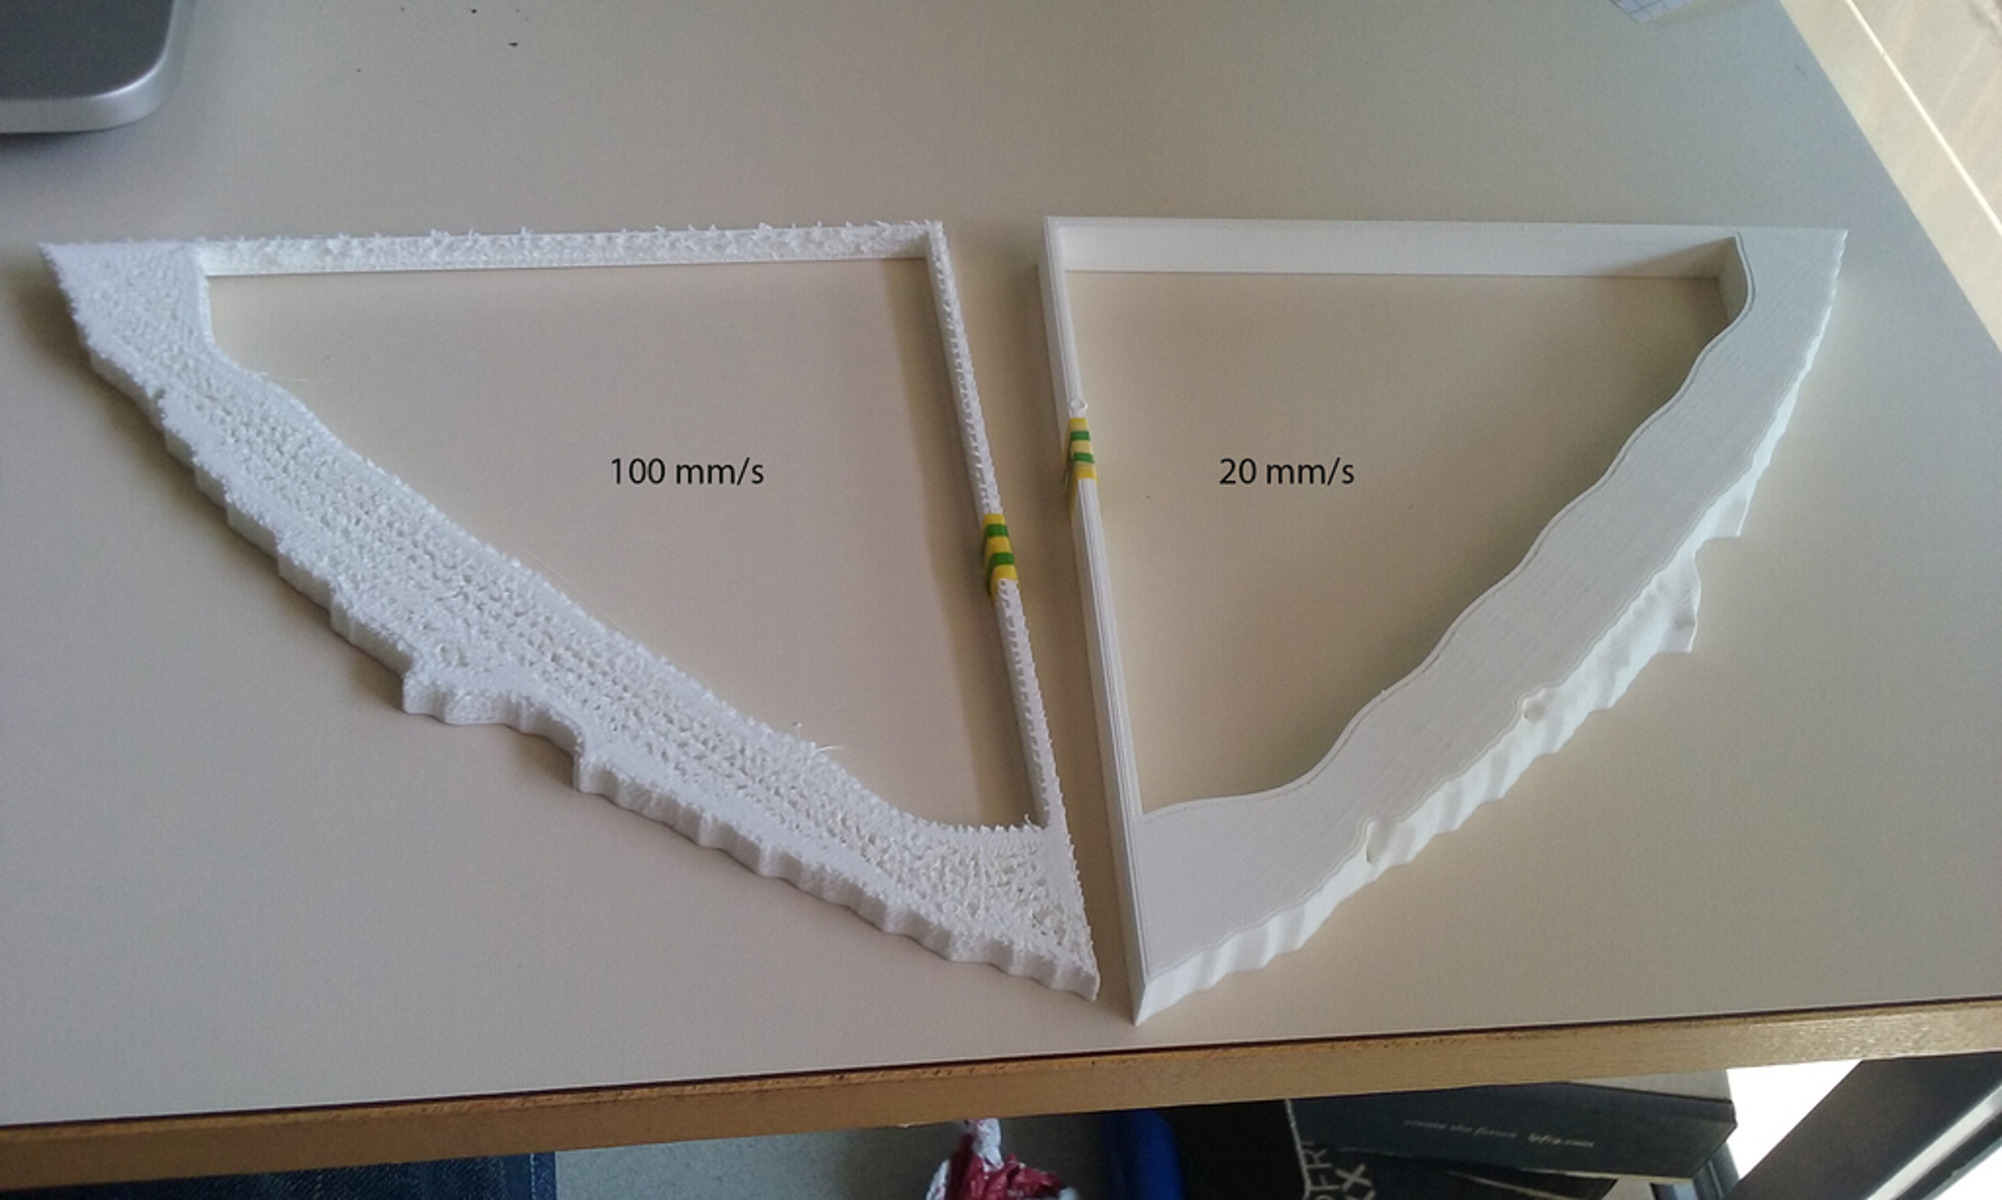
Printing Speed: Infill density can also affect the printing speed. Higher infill densities may require the printer to slow down to ensure accurate material deposition and proper adhesion between the layers. The printer speed may need to be adjusted to maintain print quality, which can add to the overall print time. Finding the right balance between speed and quality is crucial for optimizing print time without sacrificing the final result.
Object Size and Complexity: The size and complexity of the object being printed also play a role in print time. Larger objects require more time to complete, regardless of the infill density or pattern. Additionally, objects with intricate designs or fine details may require slower print speeds and additional layers, which can contribute to extended printing time. The infill density must be considered in combination with the object’s shape and features to estimate the overall print time accurately.
Print Settings: Another factor to consider is the print settings and parameters chosen for the specific 3D printer. Variables such as layer height, nozzle size, and printing temperature can impact print time. For example, using a smaller layer height or a smaller nozzle size may result in more layers and increased print time. Optimizing these print settings, along with the infill density, is essential to achieve the desired print time while maintaining print quality.
Considering the infill density, pattern, object size and complexity, printer settings, and desired print quality, it’s crucial to strike a balance between achieving the desired strength and weight of the print and optimizing the printing time. Each project will have its own unique requirements, and finding the right combination of factors will lead to efficient and successful 3D prints.
Pros and Cons of Infill 3D Printing
Infill 3D printing offers various advantages and disadvantages, and understanding these pros and cons is essential for making informed decisions in your 3D printing projects. Let’s explore some of the key benefits and drawbacks:
Pros:
- Strength and Stability: Infill structures provide internal support and enhance the structural integrity of 3D printed objects, making them stronger and more durable.
- Weight Optimization: By adjusting the infill density, you can achieve a balance between strength and weight, minimizing material usage and reducing the overall weight of the printed object.
- Structural Customization: Infill patterns can be customized to suit specific requirements, allowing for tailored internal structures that meet desired functionality and physical properties.
- Time and Cost Efficiency: Infill 3D printing minimizes print time and material consumption compared to printing solid objects, resulting in cost savings and faster production times.
- Flexibility and Versatility: The ability to choose from different infill patterns provides flexibility in achieving specific characteristics, such as stiffness, flexibility, porosity, or visual appeal.
- Aesthetics: Certain infill patterns, such as gyroid or Voronoi, can create visually appealing and organic-looking structures, adding aesthetic value to the printed object.
Cons:
- Increased Printing Time: Higher infill percentages or complex infill patterns often require more time to print, as more material needs to be deposited or intricate paths need to be followed.
- Material Consumption: Infill 3D printing requires additional material to create the internal structures, which can increase material costs, especially with higher infill percentages.
- Print Quality Limitations: Using low infill percentages to speed up printing time or reduce material usage may compromise the strength and stability of the object if it requires high load-bearing capabilities.
- Design Limitations: The choice of infill pattern and density may impose design limitations and affect the ease of post-processing or assembly of the printed object.
- Complexities in Choosing Optimal Parameters: Finding the right combination of infill density, pattern, and other print settings can be challenging, requiring experimentation and optimization for each specific project.
Understanding the pros and cons of infill 3D printing will help you make informed decisions and strike the right balance between strength, weight, cost, and print time in your 3D printing projects. Consider the specific requirements of each project to determine the appropriate infill strategy and achieve optimal results.
Conclusion
Infill 3D printing is a critical aspect of additive manufacturing that impacts the strength, weight, and overall quality of printed objects. By incorporating infill, designers can optimize the structural integrity while minimizing material usage and print time.
Understanding the different types of infill patterns and their properties allows for versatility and customization in achieving specific strength, flexibility, and aesthetic requirements. Each infill pattern offers unique advantages, whether it’s the simplicity of rectilinear or the strength-to-weight ratio of honeycomb. The choice of infill pattern depends on the intended application and the desired characteristics of the printed object.
The infill density plays a pivotal role in balancing strength, weight, and resource consumption. Higher infill percentages enhance strength but increase weight and material usage, while lower percentages reduce material consumption but may compromise strength. Finding the optimal infill density requires considering factors such as the intended use, load-bearing requirements, and required print time.
While infill 3D printing offers numerous benefits, there are also considerations to keep in mind. Print time can be affected by the infill density and pattern, and material consumption should be taken into account. Design limitations and choosing optimal parameters can pose challenges, but with experimentation and optimization, these can be overcome.
By carefully considering the pros and cons of infill 3D printing, designers and manufacturers can make informed decisions to achieve high-quality, functional, and efficient 3D printed objects. The ability to strike the right balance between strength, weight, print time, and resource consumption is crucial for successful 3D printing projects.
Infill 3D printing continues to evolve, with advancements in infill pattern generation and optimization algorithms. As technology progresses, it is expected that more sophisticated infill patterns and strategies will emerge, enabling even greater levels of customization and efficiency in the 3D printing process.