Introduction
Welcome to our guide on how to replace the hard disk in the Ultrabook Ideapad U430 Touch. As technology advances and our storage needs grow, it may become necessary to upgrade or replace the hard disk in your Ultrabook. Whether you want to increase the storage capacity or replace a faulty disk, this step-by-step tutorial will walk you through the process.
The Ultrabook Ideapad U430 Touch is a sleek and powerful device that offers a great computing experience. However, like any other computer, the hard disk can encounter issues over time. By replacing the hard disk, you can extend the lifespan of your Ultrabook, enhance its performance, and ensure that you have enough storage space for all your files, documents, and multimedia.
Before we dive into the step-by-step process, it’s crucial to note that replacing the hard disk requires some technical knowledge and caution. If you’re not comfortable working with computer hardware, we recommend seeking professional assistance. Additionally, make sure to back up all your important data before proceeding, as replacing the hard disk will erase all the existing data.
In this guide, we’ll cover the necessary tools and materials you’ll need, the steps to remove the old hard disk and install the new one, as well as how to restore your data and set up the new hard disk. By following these instructions, you’ll be able to successfully replace the hard disk in your Ultrabook Ideapad U430 Touch and get it up and running again in no time.
So, let’s get started and give your Ultrabook a new lease on life by replacing its hard disk!
Step 1: Gather the necessary tools and materials
Before you begin the process of replacing the hard disk in your Ultrabook Ideapad U430 Touch, you’ll need to gather a few tools and materials. Having these items on hand will ensure a smooth and hassle-free experience.
Here’s a list of the tools and materials you’ll need:
- Screwdriver: You’ll need a small Phillips-head screwdriver to remove the screws that secure the back cover of your Ultrabook.
- New hard disk: Make sure you have a compatible replacement hard disk ready for installation. Check the specifications of your Ultrabook and ensure that the new hard disk meets the required criteria in terms of size, interface, and storage capacity.
- Anti-static wrist strap: It’s essential to safeguard your Ultrabook against static electricity during the replacement process. An anti-static wrist strap will dissipate any static charge and protect the sensitive components of your device.
- Soft cloth: To prevent scratches or damage to the surfaces of your Ultrabook, have a soft cloth or microfiber cloth on hand to place it on while working.
- External hard drive or USB drive: Before replacing the hard disk, it’s crucial to back up all your data. An external hard drive or a USB drive with enough storage space will come in handy for this purpose.
- Operating system installation media: If you’re not cloning your old hard disk onto the new one, you’ll need the installation media for the operating system you want to install on the new hard disk.
- Optional: SATA to USB adapter: This adapter is useful if you want to clone your old hard disk onto the new one before installation. It allows you to connect both hard disks to your Ultrabook via USB.
Once you have all these tools and materials ready, you’ll be well-prepared to proceed with the next steps of replacing the hard disk in your Ultrabook Ideapad U430 Touch.
Step 2: Shut down and unplug the Ultrabook
Before you start working on your Ultrabook Ideapad U430 Touch, it’s essential to shut it down properly and disconnect any power sources to ensure your safety and prevent any damage to the device.
Follow these steps to shut down and unplug your Ultrabook:
- Save your work: Before shutting down your Ultrabook, make sure to save any open documents or files to prevent data loss.
- Close all applications: Exit any running applications or programs on your Ultrabook. This will ensure a clean shutdown process.
- Click on “Start” or the Windows icon: Located on the bottom left corner of your screen, click on the “Start” button or the Windows icon to open the Start Menu.
- Click on the power icon: In the Start Menu, you’ll see a power icon. Click on it to reveal a list of options.
- Choose “Shut down”: From the list of options, select “Shut down” to initiate the shutdown process.
- Wait for the Ultrabook to power off: Once you’ve selected “Shut down,” wait for your Ultrabook to completely turn off. You may see a spinning loading icon followed by a blank screen as the shutdown process completes.
- Unplug the power adapter: Once your Ultrabook is fully powered off, unplug the power adapter from the device. This will ensure no electricity is flowing through the Ultrabook during the replacement process.
With your Ultrabook shut down and unplugged, you’re now ready to proceed with the next steps of replacing the hard disk. Ensuring that your device is powered off and disconnected from any power sources will help prevent any accidental damage and ensure a safe working environment.
Step 3: Remove the back cover of the Ultrabook
Now that your Ultrabook Ideapad U430 Touch is powered off and unplugged, it’s time to remove the back cover to gain access to the internal components, including the hard disk.
Follow these steps to remove the back cover of your Ultrabook:
- Place your Ultrabook on a flat surface: Find a clean and sturdy workspace to work on your Ultrabook. Lay it down on a flat surface, such as a table or desk, with the bottom side facing up.
- Locate the screws: Look for the screws that secure the back cover of your Ultrabook. These screws are typically located around the edges of the device. They may be marked with small icons or symbols.
- Use a screwdriver: Take your small Phillips-head screwdriver and carefully unscrew all the screws securing the back cover. Make sure to keep these screws in a safe place as you’ll need them later to reattach the cover.
- Remove the back cover: Once all the screws are removed, gently lift off the back cover of your Ultrabook. You may need to apply a bit of pressure to release any clips or latches that hold the cover in place. Take your time and be careful not to force it.
With the back cover successfully removed, you’ll have a clear view of the internal components of your Ultrabook, including the hard disk. Take a moment to familiarize yourself with the layout and location of the different parts before moving on to the next step.
Note: It’s important to handle the back cover with care to avoid causing any damage. Make sure your workspace is clean and free from any debris that could scratch or harm the cover or other components of your Ultrabook.
Step 4: Locate and disconnect the hard disk
Now that you have successfully removed the back cover of your Ultrabook Ideapad U430 Touch, it’s time to locate and disconnect the old hard disk before installing the new one.
Follow these steps to locate and disconnect the hard disk:
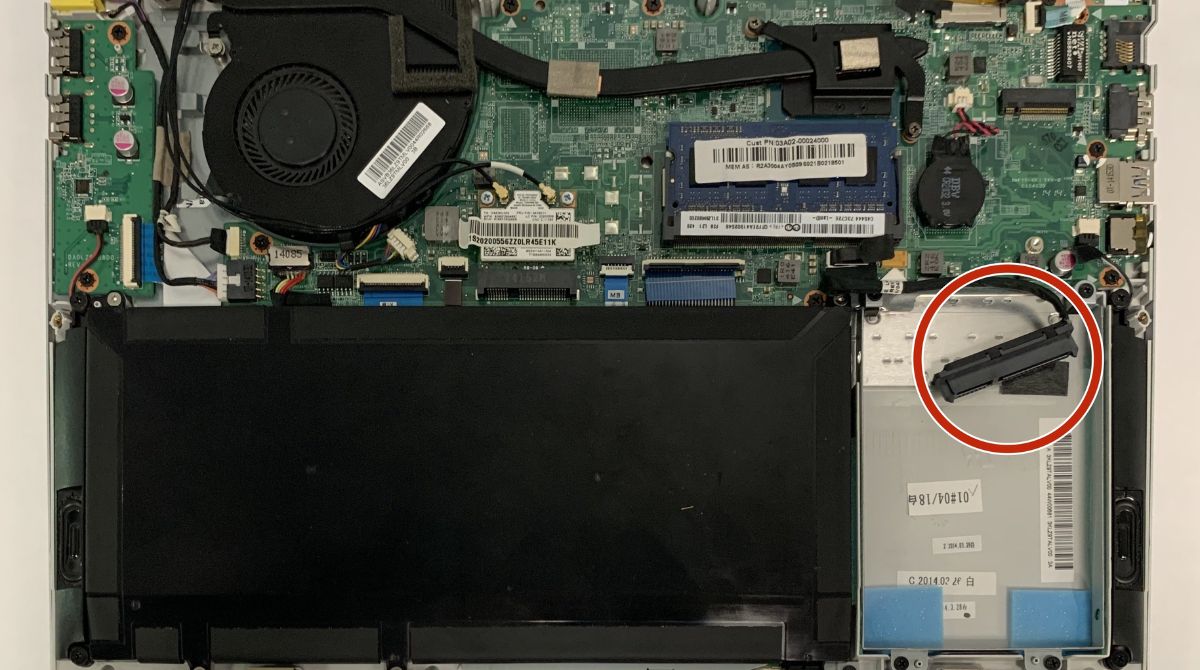
- Identify the hard disk: Look for a rectangular component within your Ultrabook that is typically secured with screws or brackets. This is likely to be the hard disk.
- Disconnect the cables: Carefully locate the SATA data cable and the power cable connected to the hard disk. Gently unplug these cables by pulling them straight out from their connectors. If there are any clips or latches securing the cables, release them before removing the cables.
- Remove any securing brackets: Depending on the configuration of your Ultrabook, there may be securing brackets or screws holding the hard disk in place. If you see any, use your screwdriver to remove them and set them aside.
- Remove the old hard disk: Once the cables are disconnected and any securing brackets are removed, carefully lift the old hard disk out of its slot. Take note of its orientation and position as you will need to install the new hard disk in the same way.
Throughout this process, it’s important to handle the hard disk and its cables with care. Avoid applying excessive force that could damage the connectors or other components. Take your time and be mindful of the delicate nature of these internal parts.
With the old hard disk successfully disconnected and removed, you’re now ready to move on to the next step of installing the new hard disk in your Ultrabook Ideapad U430 Touch.
Step 5: Insert the new hard disk
Now that you have removed the old hard disk from your Ultrabook Ideapad U430 Touch, it’s time to install the new one. Follow these step-by-step instructions to correctly insert the new hard disk:
- Check the new hard disk: Before inserting the new hard disk, ensure that it is compatible with your Ultrabook in terms of size, interface, and storage capacity. Verify that it matches the specifications of the old hard disk or the requirements specified by the manufacturer.
- Align the new hard disk: Orient the new hard disk in the same way as the old one. Pay attention to the connectors and position it correctly inside the slot. Make sure it aligns with the screw holes and any guiding pins, if present.
- Secure the new hard disk: If there were securing brackets or screws removed from the old hard disk, use them to secure the new hard disk in place. If necessary, carefully slide the new hard disk into any mounting brackets or bays provided in your Ultrabook.
- Reconnect the cables: Take the SATA data cable and the power cable that were disconnected from the old hard disk and carefully plug them into the corresponding connectors of the new hard disk. Ensure that they are firmly connected and properly aligned.
It’s crucial to handle the new hard disk with care to avoid any damage during installation. Avoid touching the connector pins and keep the disk free from fingerprints or other debris. Take your time to ensure a secure and proper connection.
Once the new hard disk is securely inserted and the cables are connected, you have completed the installation process. The new hard disk is now ready to be utilized in your Ultrabook Ideapad U430 Touch.
Step 6: Reattach the back cover of the Ultrabook
With the new hard disk successfully installed in your Ultrabook Ideapad U430 Touch, it’s time to reattach the back cover. Follow these steps to securely put the back cover back in place:
- Position the back cover: Take the back cover of your Ultrabook and position it carefully over the device. Ensure that it aligns properly with the edges and corners of the Ultrabook.
- Line up the screw holes: Align the screw holes on the back cover with the corresponding holes on the Ultrabook’s body. Take your time to ensure a proper alignment to avoid any issues when screwing the cover back on.
- Screw in the screws: Retrieve the screws that were removed earlier and use your screwdriver to tighten them back into place. Start with one corner and work your way around, tightening the screws gradually. Ensure they are snug but not overtightened to avoid damaging the cover or the device.
It’s important to handle the back cover and screws with care during this process to prevent any damage or misalignment. Take your time to ensure that the cover is securely fastened in place and that each screw is properly tightened.
Once the back cover is securely reattached, your Ultrabook Ideapad U430 Touch is almost ready to be powered on with the new hard disk.
Step 7: Power on and test the new hard disk
After reattaching the back cover of your Ultrabook Ideapad U430 Touch, it’s time to power on the device and ensure that the new hard disk is functioning correctly. Follow these steps to power on and test the new hard disk:
- Plug in the power adapter: Connect the power adapter to your Ultrabook and ensure that it is securely plugged into a power source.
- Press the power button: Locate the power button on your Ultrabook, typically found on the side or top of the device. Press and hold the button for a few seconds to power on the device.
- Observe the startup process: As the Ultrabook starts up, pay attention to the screen and any LED indicators. The device should go through the usual startup sequence, and you may see the manufacturer’s logo or a loading screen.
- Check for hard disk recognition: Once the Ultrabook has booted up, navigate to the operating system’s disk management utility or file explorer and verify that the new hard disk is detected and recognized. It should appear as a new storage device with the appropriate storage capacity.
- Perform a basic functionality test: Copy some files, open programs, and perform general tasks on your Ultrabook to ensure that the new hard disk is functioning properly. Pay attention to any unusual noises or performance issues that may indicate potential problems.
If the new hard disk is recognized and performs without any issues, congratulations! You have successfully replaced the hard disk in your Ultrabook. However, if there are any problems or the new hard disk is not functioning as expected, double-check the connections and seek professional assistance if needed.
Keep in mind that reinstalling the operating system and restoring your data will be necessary before fully utilizing the new hard disk. This will be covered in the next step.
Step 8: Restore data and set up the new hard disk
Now that you have successfully tested the new hard disk in your Ultrabook Ideapad U430 Touch, it’s time to restore your data and set up the newly installed drive. Follow these steps to complete the process:
- Reinstall the operating system: If you have not cloned the old hard disk onto the new one, you will need to reinstall the operating system. Use the installation media for your preferred operating system and follow the prompts to install it on the new hard disk.
- Install necessary drivers and software: After reinstalling the operating system, install any necessary drivers for your Ultrabook. These can usually be found on the manufacturer’s website. Additionally, install any software or applications that you require.
- Restore your data: If you backed up your data before replacing the hard disk, now is the time to restore it. Connect your external hard drive or USB drive containing the backup files and transfer your data back onto the new hard disk.
- Set up personalized settings: Customize your Ultrabook’s settings according to your preferences. This may include adjusting display settings, configuring Wi-Fi networks, and installing any additional software or updates that you need.
- Verify the functionality: Test your Ultrabook with the restored data to ensure that everything is working properly. Open files, launch applications, and perform other tasks to confirm that the new hard disk is functioning seamlessly.
By following these steps, you will have successfully restored your data and completed the setup of your new hard disk in the Ultrabook Ideapad U430 Touch.
It’s important to note that the process of restoring data and setting up the new hard disk may vary depending on your specific operating system and personal requirements. Take your time to ensure that all your data is properly restored and that your Ultrabook is set up to meet your needs.
Conclusion
Congratulations! You have successfully replaced the hard disk in your Ultrabook Ideapad U430 Touch. By following the step-by-step instructions in this guide, you have taken a significant step towards enhancing the performance and storage capacity of your device. Here’s a quick recap of the process:
- Gather the necessary tools and materials: Make sure you have the right tools and materials, including a screwdriver, new hard disk, anti-static wrist strap, soft cloth, and backup storage.
- Shut down and unplug the Ultrabook: Properly shut down your Ultrabook and disconnect it from any power sources.
- Remove the back cover of the Ultrabook: Carefully remove the screws and lift off the back cover to access the internal components.
- Locate and disconnect the hard disk: Identify the old hard disk and disconnect the cables and any securing brackets.
- Insert the new hard disk: Align the new hard disk with the slot and connect the cables securely.
- Reattach the back cover of the Ultrabook: Position the back cover and screw it back into place.
- Power on and test the new hard disk: Power on the Ultrabook and ensure that the new hard disk is recognized and functioning properly.
- Restore data and set up the new hard disk: Reinstall the operating system, restore your data, and customize the settings on your Ultrabook.
Remember, taking precautions and being cautious during the process will help ensure a smooth and successful hard disk replacement. If you encounter any difficulties or feel unsure about any steps, we recommend seeking professional assistance.
Replacing the hard disk in your Ultrabook Ideapad U430 Touch is a worthwhile investment, as it improves performance, provides additional storage space, and prolongs the lifespan of your device. With the new hard disk installed, you can now enjoy a faster and more efficient computing experience.
Thank you for following this guide, and we hope that your Ultrabook continues to serve you well with its upgraded hard disk.