Benefits of using a Smart TV without Wi-Fi
Smart TVs have become a popular choice for entertainment enthusiasts looking for a seamless streaming experience. However, relying solely on Wi-Fi for connectivity may not always be feasible. Fortunately, there are several benefits to using a Smart TV without Wi-Fi that can enhance your viewing experience.
1. Stability and reliability: Connecting your Smart TV to the internet without Wi-Fi eliminates the potential issues of a weak or unstable wireless connection. Using a wired connection, such as Ethernet, ensures a more stable and reliable connection, leading to smoother streaming and fewer interruptions.
2. Faster data transfer: With Wi-Fi, your Smart TV’s speed may be limited due to network congestion or distance from the router. By using a wired connection, you can enjoy faster data transfer rates, allowing for quicker downloads and smoother playback of high-quality content.
3. Enhanced security: Wireless networks can be susceptible to breaches and unauthorized access. By utilizing a wired connection, you can enhance the security of your Smart TV by reducing the potential risks associated with wireless networks.
4. Wider range of connectivity options: Connecting your Smart TV without Wi-Fi opens up a world of connectivity possibilities. You can use a mobile hotspot, a wired connection adapter, a media streaming device, or even a DVR or DVD player to access and play content on your Smart TV.
5. No network limitations: In some scenarios, you may encounter network limitations such as data caps or restricted access to certain websites and services. By using your Smart TV without Wi-Fi, you can bypass these limitations and have more control over your viewing experience.
6. Flexibility and portability: Using a Smart TV without Wi-Fi means you are not restricted to a specific location or dependent on the availability of a Wi-Fi network. You can easily move your TV to any room in your house or even take it with you on trips, as long as you have the necessary connectivity options.
7. Cost-effective: Setting up a Wi-Fi network in your home can be an additional expense. By utilizing alternative methods of connecting your Smart TV to the internet, you can save on the cost of purchasing a router or subscribing to an internet service provider.
Overall, using a Smart TV without Wi-Fi provides stability, faster data transfer, enhanced security, and a wider range of connectivity options. Whether you prefer a wired connection, a mobile hotspot, or a media streaming device, these benefits allow for a more reliable and versatile entertainment experience.
How to connect a Smart TV to the internet without Wi-Fi
If you own a Smart TV but don’t have access to a Wi-Fi network, there are still several ways to connect your TV to the internet and enjoy a wide range of online content. Here are some methods you can try:
1. Using an Ethernet cable: Most Smart TVs have an Ethernet port, allowing you to connect your TV directly to the internet using a wired connection. Simply plug one end of the Ethernet cable into the Ethernet port on your TV and the other end into your modem or router. This method offers a stable and reliable internet connection, ideal for streaming high-quality content.
2. Using a mobile hotspot: If you have a smartphone with a mobile data plan, you can use it as a mobile hotspot to connect your Smart TV to the internet. Enable the mobile hotspot feature on your phone and connect your TV to the hotspot network. Keep in mind that streaming content can consume a significant amount of data, so check your data plan to avoid exceeding your limits.
3. Using a wired connection adapter: Some Smart TVs may not have an Ethernet port, or you may prefer a wireless connection. In such cases, you can use a wired connection adapter. These adapters plug into the USB port or HDMI port of your TV and allow you to connect your TV to the internet using an Ethernet cable. Check your TV’s specifications or consult the manufacturer to find a compatible adapter.
4. Using a media streaming device: Another option is to connect a media streaming device, such as a Roku, Apple TV, or Amazon Fire Stick, to your Smart TV. These devices connect to the internet via Wi-Fi or Ethernet and allow you to access various streaming platforms and services. Simply connect the media streaming device to your TV using an HDMI cable, and follow the device’s setup instructions to connect it to the internet.
5. Downloading content to a USB drive: Some Smart TVs support playing content directly from a USB drive. You can download movies, TV shows, or other media onto a USB drive using a computer and then plug the drive into your TV’s USB port. This method allows you to enjoy offline content without the need for an internet connection.
6. Using a DVR or DVD player: If you have a DVR or DVD player with internet capabilities, you can connect it to your Smart TV using HDMI or other compatible cables. These devices often have built-in Wi-Fi or Ethernet connections, allowing you to access online content and streaming services directly through them.
Connecting your Smart TV to the internet without Wi-Fi opens up a world of possibilities for accessing online content and enjoying a wide range of entertainment options. Whether you choose to use an Ethernet cable, a mobile hotspot, a wired connection adapter, a media streaming device, or other methods, make sure to follow the manufacturer’s instructions and ensure compatibility between your TV and the chosen connectivity option.
Using an Ethernet cable to connect your Smart TV
One of the most reliable and straightforward methods to connect your Smart TV to the internet without Wi-Fi is by using an Ethernet cable. This method offers a stable and high-speed wired connection that ensures a seamless streaming experience. Here’s how you can set up your Smart TV with an Ethernet cable:
1. Begin by locating the Ethernet port on your Smart TV. It is usually located on the back panel of the TV and labeled as “LAN” or “Ethernet”. Ensure that your TV has this port before proceeding.
2. Connect one end of the Ethernet cable to the Ethernet port on your Smart TV. The Ethernet cable looks similar to a telephone cable but with a larger connector.
3. Next, locate the Ethernet port on your modem or router. Most modems and routers have multiple Ethernet ports, so choose any available port.
4. Connect the other end of the Ethernet cable to the Ethernet port on your modem or router. Ensure that the cable is securely connected to both the TV and the modem/router.
5. Once the cable is connected, your Smart TV should automatically detect the wired connection. If not, you may need to manually select the wired connection option in your TV’s settings. Refer to your TV’s user manual for specific instructions.
6. After the connection is established, navigate to the settings menu on your Smart TV and select the network settings. Look for the option to set up a wired connection or connect via Ethernet. Follow the on-screen instructions to complete the network setup process.
7. Once your Smart TV is connected to the internet via Ethernet, you can start enjoying a wide range of online content and streaming services. You can access popular streaming platforms like Netflix, Hulu, and YouTube, or even browse the web using the built-in web browser on your Smart TV.
Using an Ethernet cable offers several advantages over Wi-Fi, including increased stability, faster data transfer rates, and improved security. It eliminates the common issues associated with wireless connections, such as weak signals and network congestion. With a wired connection, you can enjoy uninterrupted streaming and smoother playback of high-definition content.
Remember to keep the Ethernet cable and ports clean and free from dust or debris to maintain a stable connection. Additionally, ensure that your modem or router is properly configured to provide internet access to your Smart TV through the Ethernet connection.
By using an Ethernet cable to connect your Smart TV, you can optimize your streaming experience and enjoy a reliable and fast internet connection without the need for Wi-Fi. It’s a simple and effective solution for those who want a stable and hassle-free way to access online content on their Smart TV.
Using a mobile hotspot to connect your Smart TV to the internet
If you don’t have access to a Wi-Fi network but have a smartphone with a mobile data plan, you can use it as a mobile hotspot to connect your Smart TV to the internet. Turning your phone into a hotspot allows you to share its internet connection with other devices, including your TV. Here’s how you can connect your Smart TV to the internet using a mobile hotspot:
1. Begin by ensuring that your smartphone’s mobile data plan supports tethering or hotspot functionality. Check with your mobile service provider or refer to your plan details to confirm if this feature is available to you.
2. On your smartphone, navigate to the device settings and look for the “Hotspot” or “Tethering” option. The location of this option may vary depending on your device and operating system.
3. Enable the hotspot feature on your smartphone. You may be asked to set up a hotspot name (SSID) and password for security purposes. Choose a unique name and create a strong password to protect your hotspot.
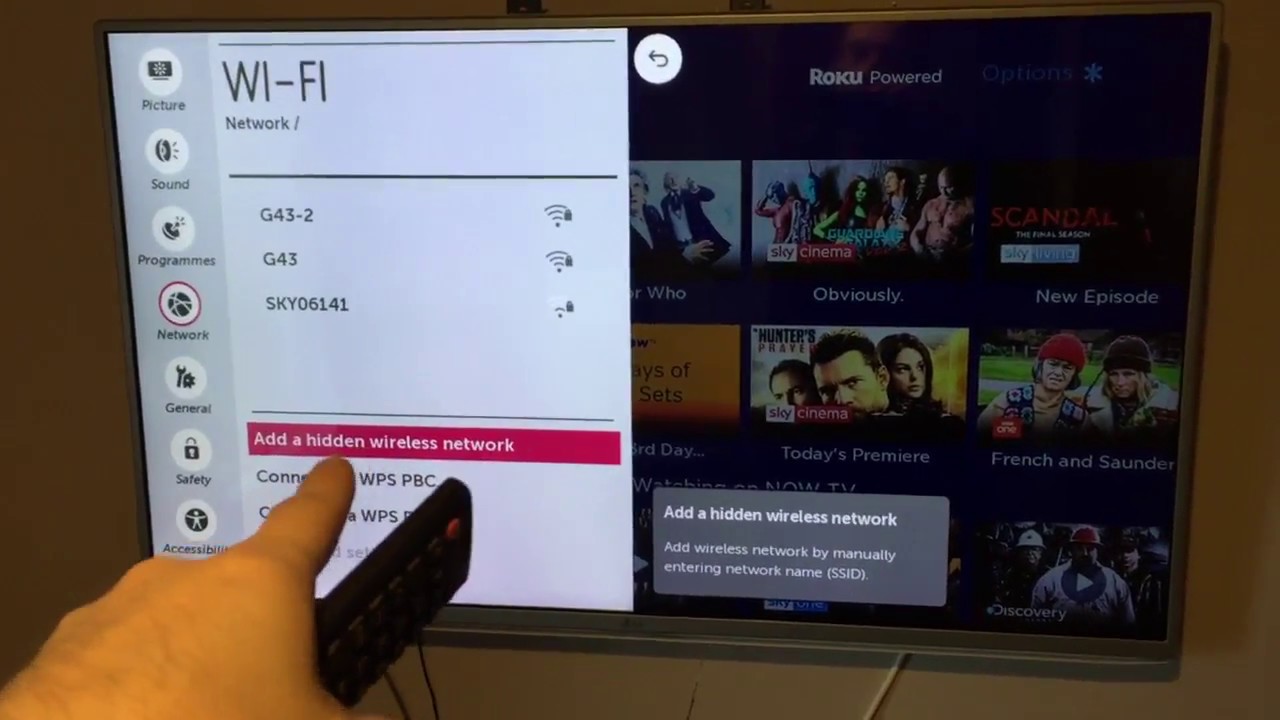
4. Once the hotspot is activated, grab your Smart TV remote and navigate to the network settings menu. Look for the option to connect to a Wi-Fi network.
5. Your Smart TV should detect the available Wi-Fi networks in the vicinity, including your smartphone’s hotspot. Select your hotspot name from the list of networks.
6. If prompted, enter the password you set for the hotspot on your smartphone. The Smart TV will attempt to establish a connection with the hotspot.
7. After a successful connection, your Smart TV is now connected to the internet using your smartphone’s mobile data. You can access streaming services, browse the web, and enjoy online content on your Smart TV, just like you would with a traditional Wi-Fi connection.
It’s important to note that using a mobile hotspot for your Smart TV can consume a significant amount of data from your mobile plan. Make sure you have an adequate data allowance or consider using an unlimited data plan to avoid any unexpected charges.
Additionally, using a mobile hotspot may not provide the same level of speed and stability as a dedicated Wi-Fi connection. Factors such as network congestion and signal strength can impact the quality of your internet connection on your Smart TV. It’s recommended to position your smartphone in close proximity to the TV and avoid any obstructions for the best signal reception.
Using a mobile hotspot to connect your Smart TV to the internet offers flexibility and convenience, especially in situations where a Wi-Fi network is not available. With just a few simple steps, you can enjoy your favorite online content on a larger screen without the need for a traditional Wi-Fi connection.
Using a wired connection adapter for Smart TVs
If your Smart TV does not have an Ethernet port or you prefer a wireless connection, you can still connect your TV to the internet without Wi-Fi by using a wired connection adapter. These adapters provide an alternative method to connect your Smart TV using an Ethernet cable or other wired connection options. Here’s how you can set up a wired connection adapter for your Smart TV:
1. Start by identifying the available ports on your Smart TV. Look for USB ports, HDMI ports, or other similar ports that can be used for connectivity. Check your TV’s specifications or consult the manufacturer’s instructions to determine the compatible ports for a wired connection adapter.
2. Once you have determined the appropriate port, obtain a compatible wired connection adapter. These adapters are typically available in electronic stores or online retailers. Ensure that the adapter you choose is specifically designed for your Smart TV model and supports the required connection type, such as Ethernet or HDMI.
3. Connect the wired connection adapter to the selected port on your Smart TV. Depending on the type of adapter you have, you may need to use a USB or HDMI cable to establish the connection. Ensure that the adapter is securely plugged into the port.
4. After the adapter is connected, you will need to connect the other end of the adapter to the internet source. If you are using an Ethernet-based adapter, connect one end of the Ethernet cable to the adapter and the other end to your modem or router. If you are using an HDMI-based adapter, connect the HDMI cable from the adapter to an available HDMI input on your TV, and connect the adapter to your home network using the instructions provided with the adapter.
5. Once the adapter is connected to both your Smart TV and the internet source, follow the on-screen instructions on your TV to set up the wired connection. This may involve selecting the appropriate input or connection type and configuring network settings. Consult your Smart TV’s user manual for specific instructions.
6. Once the connection is established, you should be able to access the internet on your Smart TV. You can now enjoy streaming services, browse the web, and access various online content using the wired connection provided by the adapter.
Using a wired connection adapter for your Smart TV offers an alternative method of connecting to the internet without relying on Wi-Fi. It allows for a stable and reliable connection, ensuring smooth streaming and faster data transfer rates. However, it’s important to ensure compatibility between the adapter and your Smart TV, as well as follow the manufacturer’s instructions for installation and setup.
By utilizing a wired connection adapter, you can enjoy the benefits of a wired internet connection on your Smart TV, even if it doesn’t have an Ethernet port. It provides a convenient and reliable solution for connecting your Smart TV to the internet without relying on Wi-Fi.
Using a media streaming device with your Smart TV
If you want to connect your Smart TV to the internet without Wi-Fi, using a media streaming device is a great option. These devices, such as Roku, Apple TV, or Amazon Fire Stick, connect to your TV and provide access to a wide range of streaming platforms and online content. Here’s how you can use a media streaming device with your Smart TV:
1. Start by selecting a media streaming device that is compatible with your Smart TV. There are various options available on the market, offering different features and functionalities. Make sure to choose one that suits your needs and supports the desired streaming platforms.
2. Connect the media streaming device to your Smart TV. Most devices connect to your TV via the HDMI port. Simply plug one end of the HDMI cable into the media streaming device and the other end into an available HDMI input on your Smart TV. Some devices may also require you to connect them to a power source using the supplied power adapter.
3. Power on your Smart TV and switch to the corresponding HDMI input that you connected the media streaming device to. Your TV should detect the device and display the setup screen or prompt you to complete the setup process. Follow the on-screen instructions to configure the device’s preferences and connect it to the internet.
4. Depending on the media streaming device you have, you may need to follow specific instructions to connect it to the internet. This usually involves selecting your Wi-Fi network and entering the password. Some devices also come with an Ethernet port, allowing you to establish a wired connection for a more stable internet connection.
5. Once the media streaming device is connected to the internet, you can start accessing a wide range of streaming platforms and content. Simply navigate through the device’s user interface using the provided remote or smartphone app, and select the desired streaming service or app. You can now enjoy popular streaming services like Netflix, Hulu, or Amazon Prime Video, and explore a vast library of movies, TV shows, and more.
Using a media streaming device with your Smart TV provides a convenient and versatile way to access online content. These devices often offer additional features, such as voice control, gaming, and app integration, enhancing your entertainment experience. They also provide regular software updates and support, ensuring compatibility with the latest streaming services and technologies.
It’s important to note that some media streaming devices may require subscription fees for certain services or content. Make sure to review the pricing and terms of the services you want to access before making any commitments.
By using a media streaming device with your Smart TV, you can transform your TV into a comprehensive entertainment hub. Enjoy the convenience of accessing popular streaming platforms, exploring a vast library of content, and discovering new and exciting entertainment options, all without the need for a Wi-Fi connection.
Downloading content to a USB drive and playing it on your Smart TV
If you want to enjoy offline content on your Smart TV without a Wi-Fi connection, one option is to download your favorite movies, TV shows, or other media onto a USB drive and play it directly on your TV. This method allows you to access and view content without relying on an internet connection. Here’s how you can download content to a USB drive and play it on your Smart TV:
1. Begin by selecting the content you want to download onto your USB drive. This can include movies, TV shows, videos, or even personal media files like photos and music. Ensure that the content is in a compatible format for your Smart TV to play.
2. Connect the USB drive to your computer or laptop. Use a USB cable or insert the USB drive into an available USB port on your computer.
3. Once the USB drive is connected, locate the content you want to download and transfer it to the USB drive. You can do this by simply dragging and dropping the files onto the USB drive, or by using a media management software to sync the content to the USB drive.
4. Depending on the size of the files and the transfer speed of your USB drive, the process may take some time. Ensure that the files are successfully transferred to the USB drive before safely ejecting it from your computer.
5. Once the content is downloaded onto the USB drive, remove it from your computer and connect it to the USB port on your Smart TV. Most Smart TVs have one or more USB ports located on the back or side panel of the TV.
6. Use your Smart TV remote to navigate to the media or USB input source on your TV. This will allow you to access the content stored on the USB drive.
7. Once the USB drive is recognized by your Smart TV, you can navigate through the files and folders to locate and play the downloaded content. Use the on-screen controls or your TV remote to control playback options such as play, pause, forward, and rewind.
Downloading content to a USB drive and playing it on your Smart TV provides a convenient way to enjoy offline entertainment without the need for Wi-Fi connectivity. It allows you to access your favorite movies, TV shows, and videos on a larger screen, giving you the flexibility to watch content at your own convenience.
Keep in mind that the compatibility of the file formats may vary based on your Smart TV’s capabilities. Ensure that the content is in a format supported by your TV to ensure smooth playback.
Additionally, make sure to regularly update your Smart TV’s firmware to ensure compatibility with various file formats and optimize performance when playing content from USB drives.
By downloading content to a USB drive and playing it on your Smart TV, you can enjoy a wide range of offline entertainment options and have complete control over your viewing experience, even without an internet connection.
Using a DVR or DVD player to watch content on your Smart TV
If you have a DVR (Digital Video Recorder) or DVD player with internet capabilities, you can use it to watch content on your Smart TV without the need for a Wi-Fi connection. These devices allow you to access online content and streaming services directly through them. Here’s how you can utilize a DVR or DVD player to watch content on your Smart TV:
1. Verify that your DVR or DVD player has internet capabilities. Some devices have built-in Wi-Fi or Ethernet connections, while others may require additional adapters or dongles to connect to the internet. Consult the device’s documentation or contact the manufacturer for specifics.
2. Connect the DVR or DVD player to your Smart TV using HDMI or other compatible cables. Ensure that the cables are securely plugged into both devices.
3. Connect the DVR or DVD player to the internet using the available connection method. If the device has built-in Wi-Fi, access the network settings to connect to your home Wi-Fi network. If it requires an Ethernet connection, connect one end of the Ethernet cable to the device and the other end to your modem or router.
4. Once the connection is established, power on your Smart TV and switch to the corresponding HDMI input to which the DVR or DVD player is connected.
5. Use the remote control that came with the DVR or DVD player to navigate through the device’s settings and menu options. Look for the option to access online content or streaming services. This may involve signing in to your accounts or selecting specific apps or channels.
6. Browse through the available content and select the movies, TV shows, or other media you want to watch. Use the remote control to control playback and access additional features provided by the device, such as recording capabilities on a DVR.
7. If using a DVD player, insert the DVD into the player and use the TV remote to switch to the appropriate input source. The DVD should automatically play on your Smart TV’s screen.
Using a DVR or DVD player with internet capabilities expands the functionality of your Smart TV by allowing you to access online content and streaming services through a dedicated device. It provides intuitive navigation and a user-friendly interface that makes it easy to browse and select the content you want to watch.
Always ensure that your DVR or DVD player is compatible with your Smart TV model and has the necessary features to support internet connectivity. Check for firmware updates regularly to ensure optimal performance and access to the latest streaming services.
By utilizing a DVR or DVD player with internet capabilities, you can enhance your viewing experience on your Smart TV and enjoy a wide range of online content and streaming services without the need for a separate Wi-Fi connection.
Connecting your Smart TV to a network using powerline adapters
If you want to connect your Smart TV to the internet without Wi-Fi, another option is to use powerline adapters. Powerline adapters allow you to establish a wired network connection using your existing electrical wiring, providing a reliable and stable connection for your Smart TV. Here’s how you can connect your Smart TV to a network using powerline adapters:
1. Start by obtaining a powerline adapter kit. These kits typically come with two adapters—one that you connect to your modem or router and another that you connect to your Smart TV.
2. Connect one of the powerline adapters to your modem or router using an Ethernet cable. Plug the adapter into a power outlet near your router to establish the network connection.
3. Next, connect the other powerline adapter to your Smart TV using another Ethernet cable. Plug this adapter into a power outlet near your Smart TV.
4. Once both powerline adapters are connected and powered on, they will establish a connection through your electrical wiring, creating a wired network connection for your Smart TV.
5. On your Smart TV, navigate to the network settings and select the wired network connection option. The TV should detect the network connection and configure the necessary settings automatically.
6. Once the network connection is established, your Smart TV is now connected to the internet using the powerline adapters. You can start enjoying online content, streaming services, and other internet-based features on your Smart TV.
Powerline adapters offer several advantages, including a stable and fast connection for your Smart TV. They eliminate the need for Wi-Fi and the potential issues associated with wireless connections, such as signal interference or limited range.
However, it’s important to keep in mind that powerline adapters may not work optimally in all electrical systems. Factors such as the age of the wiring, the distance between the adapters, and the electrical noise in your home can affect the performance of the connection. It’s recommended to plug the adapters directly into a power outlet and avoid using power strips or surge protectors, as they can interfere with the signal.
Ensure that you use powerline adapters that are compatible with your Smart TV and provide the necessary speeds and features to support your streaming requirements.
By connecting your Smart TV to a network using powerline adapters, you can enjoy the benefits of a wired connection without the need for Wi-Fi. It’s a reliable solution that offers a stable and fast network connection for your Smart TV, ensuring smooth streaming and a seamless viewing experience.
Tips for improving the performance of your Smart TV without Wi-Fi
If you’re using your Smart TV without a Wi-Fi connection, there are several tips and techniques you can employ to enhance its performance and ensure a smooth viewing experience. Here are some valuable tips to improve the performance of your Smart TV without Wi-Fi:
1. Position your Smart TV: Ensure that your Smart TV is placed in an optimal location that allows for good airflow and ventilation. Avoid placing it in an enclosed cabinet or near any heat sources, as excessive heat can affect the performance and lifespan of the TV.
2. Install the latest firmware: Regularly check for updates and install the latest firmware for your Smart TV. Firmware updates often include bug fixes, performance optimizations, and new features that can enhance the overall performance of your TV.
3. Optimize TV settings: Adjust the picture, sound, and other settings on your Smart TV to optimize its performance. Experiment with different picture modes and sound settings to find the right balance that suits your preferences and provides the best viewing experience.
4. Connect your Smart TV directly to the power outlet: Powerline adapters, surge protectors, or extension cords can sometimes interfere with the power supply to your Smart TV, affecting its performance. Connect your TV directly to a dedicated power outlet for a stable power source.
5. Keep the TV software up to date: Update the apps and software on your Smart TV regularly. App updates often include bug fixes, security patches, and performance improvements that can enhance the reliability and speed of your apps.
6. Clear cache and unnecessary data: Over time, your Smart TV can accumulate cache and temporary files that can impact its performance. Navigate to the settings menu and clear the cache and unnecessary data regularly to free up storage space and enhance the performance of your TV.
7. Manage background apps and processes: Many Smart TVs run background processes and apps that can consume system resources. Close unnecessary apps and processes when not in use to free up memory and improve the overall performance of your Smart TV.
8. Regularly clean the TV screen: Dust, fingerprints, and smudges can affect the clarity and picture quality of your Smart TV. Clean the screen regularly using a microfiber cloth to remove any dust or debris and ensure a clear and vibrant display.
9. Consider using a wired connection: If possible, connect your Smart TV to the internet using Ethernet or other wired connection options. A wired connection can provide a more stable and faster internet connection, resulting in smoother and uninterrupted streaming.
10. Limit simultaneous device connections: If multiple devices are connected to your network, it can cause congestion and slow down the internet speed for your Smart TV. Limit the number of simultaneous device connections when streaming content to ensure optimal performance.
By following these tips, you can improve the performance of your Smart TV without relying on Wi-Fi. Enhancing its performance will result in a better streaming experience, smoother playback, and overall enjoyment of your favorite content.