Introduction
Welcome to the world of Grammarly in Gmail! In today’s fast-paced digital era, effective communication is vital, and one of the key elements that contribute to clear and concise writing is impeccable grammar. Whether you are writing a professional email, a business proposal, or a personal message, ensuring that your writing is error-free and polished is essential.
With Grammarly, you can take your writing to the next level by minimizing spelling mistakes, grammatical errors, and punctuation slip-ups. Integrating Grammarly into your Gmail account allows you to have a seamless writing experience, where you can receive instant grammar checks and valuable suggestions directly in your email drafts.
Installation and activation of Grammarly in Gmail are quick and straightforward, requiring just a few simple steps. Once activated, the Grammarly interface will become an integral part of your Gmail account, offering you a range of writing and editing tools to enhance your writing proficiency.
In this article, we will explore the various aspects of using Grammarly in Gmail. We will begin by guiding you through the installation and activation process, ensuring that you are ready to unleash the power of Grammarly in your email compositions. Next, we will take an in-depth look at the Grammarly interface in Gmail, familiarizing you with the layout, features, and functionality of the tool.
Once you are acquainted with the Grammarly interface, we will dive into the process of writing and editing using Grammarly. From instant grammar and spelling checks to suggestions for sentence clarity and vocabulary enhancement, you will discover how Grammarly can elevate the quality of your writing, making it more impactful and error-free.
Furthermore, we will explore the different settings and preferences available within Grammarly, allowing you to tailor the tool to your specific writing style and preferences. Whether you want to adjust the types of errors Grammarly flags or customize your writing goals, you will have full control over the tool’s functionalities.
Finally, we will address common troubleshooting issues and frequently asked questions to ensure a seamless experience with Grammarly in Gmail. From resolving compatibility issues to addressing concerns about data privacy and security, we will provide the answers you need for a smooth and worry-free writing experience.
So, without further ado, let’s get started with installing, activating, and utilizing Grammarly in Gmail to unlock the full potential of your writing!
Installation and Activation
Getting started with Grammarly in Gmail is a breeze. Follow these simple steps to install and activate the Grammarly extension on your browser:
- Open your preferred web browser and go to the Grammarly website.
- Click on the Apps tab in the menu bar at the top of the page.
- Scroll down and click on Grammarly for Chrome to install the extension.
- A pop-up window will appear asking for permission to add the extension to your browser. Click Add extension to proceed with the installation.
- Once the extension is installed, you will be redirected to the Grammarly login page. If you don’t have a Grammarly account, you can create one for free by clicking on Create an account.
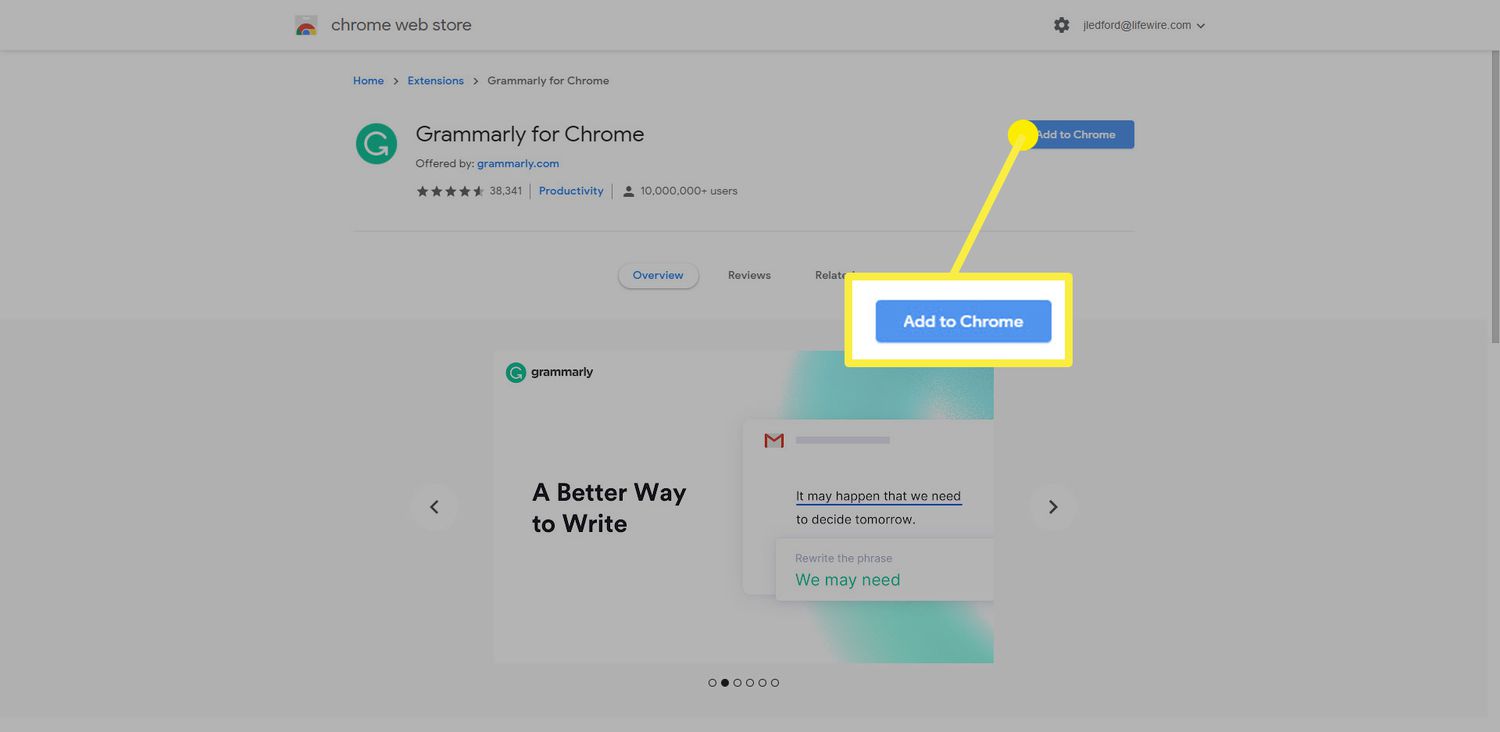
- After logging in or creating an account, select Grammarly for Gmail from the list of available products.
- Click on the Add to Chrome button to integrate Grammarly with your Gmail account.
- Grant any necessary permissions that Grammarly requires to function effectively with Gmail.
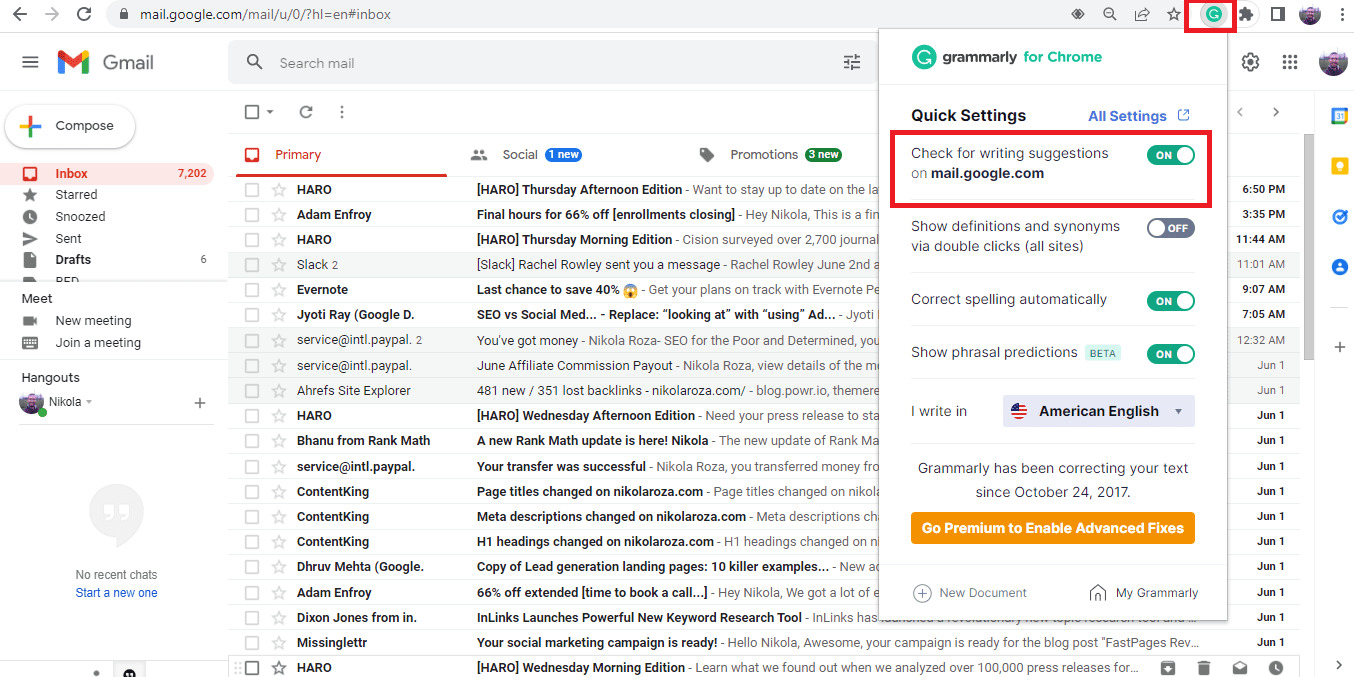
- Refresh your Gmail page, and you will see the Grammarly logo in the top-right corner of the email composition window.
Congratulations! You have successfully installed and activated Grammarly in Gmail. Now, every time you compose a new email or reply to a message, Grammarly will automatically start checking your writing for grammar, spelling, punctuation, and clarity issues.
It’s essential to note that Grammarly is also available as a standalone desktop app and a browser extension for other popular browsers like Firefox and Safari. You can choose to install and activate Grammarly on multiple platforms to have consistent grammar checking across your writing tasks.
With Grammarly now seamlessly integrated into your Gmail account, you can compose professional emails, draft business proposals, or even write personal messages with confidence. Let Grammarly be your trusted writing assistant, catching those pesky errors and helping you deliver polished and error-free content.
In the next section, we will delve into the Grammarly interface in Gmail, exploring its features and functionalities to make the most of this powerful writing tool.
Overview of the Grammarly Interface in Gmail
Once you have successfully activated Grammarly in Gmail, you will notice the Grammarly logo and toolbar appear in the email composition window. The Grammarly interface provides a range of features and functionalities to assist you in writing error-free and polished emails. Let’s take a closer look at what you can expect:
1. Grammar and Spelling Checks: As you type your email, Grammarly will automatically analyze your text for grammar and spelling errors. Underlined words or phrases indicate potential issues, and when you hover over them, Grammarly offers suggestions to correct the errors.
2. Punctuation and Sentence Structure: Grammarly goes beyond grammar and spelling, providing suggestions to improve your sentence structure and punctuation. It helps ensure that your writing flows smoothly and is easy to read.
3. Vocabulary Enhancement: Grammarly helps you enhance your vocabulary by suggesting alternative words or phrases for repetitive or overused terms. It can make your writing more engaging and varied.
4. Clarity and Conciseness: Grammarly’s advanced algorithms can detect unclear or convoluted sentences. It offers suggestions to make your writing clearer and more concise, ensuring your message is easily understood.
5. Tone and Style: Grammarly can even provide feedback on the tone and style of your email. It can detect instances where your writing may come across as too formal or informal, and suggest improvements to align with your intended tone.
6. Goals and Writing Insights: Grammarly allows you to set your writing goals, such as formal or informal, academic or casual, and more. The tool provides insights on your writing habits and offers suggestions for improvement based on your chosen goals.
7. Document Outline: Within the Grammarly sidebar, you have access to a document outline that provides an overview of your email’s structure. It allows you to navigate through your text quickly and easily.
8. Language Preferences: You can customize Grammarly’s language preferences to align with your writing needs. Whether you are writing in American English, British English, or other variations, Grammarly can adapt to your preferred language rules and conventions.
The Grammarly interface in Gmail is designed to empower you with the necessary tools to write effectively and confidently. With its real-time writing suggestions and comprehensive feedback, Grammarly can help you significantly improve the quality of your emails.
In the next section, we will explore the writing and editing process with Grammarly in greater detail, so you can make the most of the tool’s capabilities when crafting your emails.
Writing and Editing with Grammarly
Now that you are familiar with the Grammarly interface in Gmail, let’s dive into the process of writing and editing with Grammarly to enhance the quality of your emails. Here’s how you can make the most of Grammarly’s features:
1. Real-time Feedback: As you type your email in Gmail, Grammarly continuously checks your writing for errors and provides suggestions in real-time. Underlined words or phrases indicate potential issues, and all you need to do is click on them to see suggested corrections.
2. Utilize Grammarly Suggestions: When Grammarly identifies an error or offers a suggestion, take a moment to consider the recommendation. Grammarly provides valuable insights to improve grammar, punctuation, clarity, and more. It’s always a good idea to review the suggestions and implement the ones that strengthen your writing.
3. Contextual Suggestions: Grammarly takes into account the context of your email to provide accurate suggestions. For example, it understands whether you are writing a formal business email, a casual message, or a technical document. It tailors its suggestions accordingly, ensuring your writing matches the intended tone and purpose.
4. Review and Edit: After you have finished drafting your email, it’s crucial to review and edit your work. Grammarly can help you spot potential mistakes that might have slipped through your initial writing process. Take the time to carefully review the suggestions Grammarly provides and make the necessary edits.
5. Improve Clarity and Style: Grammarly not only helps with grammar and spelling but also enhances the clarity and style of your writing. It suggests improvements to sentence structure, vocabulary usage, and overall flow. By implementing these suggestions, you can ensure that your email is well-written and communicates your message clearly.
6. Proofread with Confidence: With Grammarly, you can be confident that your email is free from embarrassing grammar mistakes and typos. It acts as your personal proofreader, helping you present a professional image in your communication.
7. Learn from Mistakes: Grammarly not only corrects errors but also highlights frequent mistakes you tend to make. Pay attention to these recurring issues and use them as an opportunity for learning and improvement. Over time, Grammarly can help you strengthen your writing skills and become a better communicator.
By embracing Grammarly in your writing process, you can significantly improve the quality and effectiveness of your emails in Gmail. Don’t hesitate to utilize the suggestions provided and take the time to review and edit your work. With Grammarly as your writing companion, you have the tools and guidance needed to polish your emails to perfection.
In the next section, we will explore how you can adjust settings and preferences in Grammarly to tailor the tool to your specific writing needs.
Adjusting Settings and Preferences
Grammarly understands that every writer has unique preferences and needs. To cater to your specific writing style, Grammarly allows you to adjust various settings and preferences. Here’s how you can customize Grammarly in Gmail:
1. Access Grammarly Settings: Click on the Grammarly icon in the top-right corner of your Gmail composing window. A sidebar will appear with several options, including a gear icon for settings. Click on the gear icon to access Grammarly’s settings.
2. Writing Goals: In the settings menu, you will find the option to set your writing goals. Whether you want to write in a formal or casual tone or target a specific audience, selecting the appropriate writing goals will help Grammarly provide more relevant suggestions tailored to your specific needs.
3. Correction Preferences: Grammarly allows you to choose the types of errors it should flag. For example, you can select whether it should highlight grammar, spelling, punctuation, clarity, or style issues. By personalizing these preferences, you can focus on the aspects that are most important to you.
4. Plagiarism Detection: Grammarly offers a plagiarism detection feature for premium users. This feature can be enabled or disabled based on your requirements. If you often work with content that needs to be original, consider keeping the plagiarism detection feature enabled to ensure the integrity of your writing.
5. Language Preferences: Grammarly supports multiple English language variations, such as American English, British English, Canadian English, and more. In the settings menu, you can specify your preferred language to ensure that Grammarly applies the appropriate grammar rules and conventions for your region.
6. Keyboard Shortcuts: If you prefer using keyboard shortcuts for efficiency, Grammarly allows you to enable or disable them. You can customize the shortcuts based on your convenience and workflow.
7. Personal Dictionary: Grammarly allows you to add words to your personal dictionary. If you frequently use industry-specific terms, acronyms, or unique names, adding them to your personal dictionary will prevent Grammarly from flagging them as spelling errors.
8. Account and Subscription: Lastly, don’t forget to explore your Grammarly account settings in Gmail. Here, you can manage your subscription, upgrade to premium if desired, and access other account-related options.
By adjusting these settings and preferences, you can customize Grammarly to align with your unique writing style and requirements. Take some time to explore the settings menu and make the necessary adjustments to optimize your experience with Grammarly in Gmail.
In the next section, we will address common troubleshooting issues and frequently asked questions to ensure a seamless experience with Grammarly in Gmail.
Troubleshooting and FAQs
While using Grammarly in Gmail is typically a smooth experience, it’s not uncommon to encounter some issues or have questions along the way. Here, we’ll address some common troubleshooting scenarios and frequently asked questions related to Grammarly in Gmail:
1. Compatibility Issues: If you’re experiencing compatibility issues with the Grammarly extension in your browser, ensure that your browser is up to date. If the problem persists, try disabling other browser extensions temporarily to identify any conflicts.
2. No Suggestions or Errors Not Detected: If you’re not receiving any suggestions or if Grammarly is not detecting errors in your email, double-check that the Grammarly extension is enabled. Refresh the Gmail page and make sure Grammarly’s logo is visible in the email composition window.
3. Data Privacy and Security: Grammarly takes data privacy and security seriously. Your data is encrypted and stored securely. For more details about Grammarly’s data handling practices, refer to their privacy policy on the Grammarly website.
4. Subscription and Premium Features: If you’re using the free version of Grammarly, note that some advanced features like plagiarism detection and advanced writing suggestions are only available in the premium version. Consider upgrading if you require access to these additional features.
5. Missing Grammarly Toolbar: If the Grammarly toolbar is not appearing in your Gmail composing window, try clearing your browser cache and cookies. If the issue persists, uninstall and reinstall the Grammarly extension, ensuring that it’s enabled after installation.
6. Differences in Browser Versions: Certain functionalities in Grammarly may vary slightly across different browser versions. If you notice any differences, verify that you’re using the latest version of your preferred browser for optimal Grammarly performance.
7. Grammarly Not Working in Gmail App: Grammarly is primarily designed to work in web-based Gmail. It may not function in the Gmail mobile app or other email client applications. For the best experience, use Grammarly in a web browser on your desktop or laptop.
8. Account and Subscription Management: To manage your Grammarly account and subscription details, visit the Grammarly website and sign in. From there, you can update your payment information, change your subscription plan, or cancel your subscription if needed.
These are just a few troubleshooting scenarios and FAQs related to Grammarly in Gmail. If you encounter any other issues or have additional questions, referring to Grammarly’s Help Center or reaching out to their support team can provide further assistance.
Now that you have the tools to troubleshoot common problems and find answers to frequently asked questions, you can navigate any issues smoothly and continue to enjoy the benefits of using Grammarly in Gmail.
Conclusion
Grammarly in Gmail offers a powerful solution for enhancing your writing skills and ensuring error-free and polished emails. By installing and activating Grammarly in your Gmail account, you unlock a range of features and functionalities that can significantly improve your writing proficiency.
In this article, we covered the installation and activation process, providing step-by-step instructions to get Grammarly up and running in your Gmail account seamlessly. We then explored the Grammarly interface in Gmail, highlighting its various tools and capabilities for grammar checks, spelling corrections, style suggestions, and more.
We delved into the writing and editing process with Grammarly, emphasizing the importance of real-time feedback, utilizing Grammarly’s suggestions, and reviewing and editing your work for optimal results. We also discussed how you can adjust settings and preferences to customize Grammarly according to your specific writing style and preferences.
Additionally, we addressed common troubleshooting issues and provided answers to frequently asked questions to ensure a smooth experience with Grammarly in Gmail. These insights will assist you in overcoming compatibility issues, optimizing your Grammarly usage, and addressing any concerns related to data privacy and security.
Remember to regularly review and edit your emails with Grammarly to enhance clarity, style, and overall effectiveness. Utilize the features of Grammarly to expand your vocabulary, improve sentence structure, and ensure your writing matches the intended tone and purpose of your message.
With Grammarly as your reliable writing assistant in Gmail, you can compose flawless emails with confidence, leaving a lasting impression on your recipients. So, embrace Grammarly’s comprehensive grammar and writing assistance, and watch your email communications soar to new heights.
Now that you have a comprehensive understanding of Grammarly in Gmail, it’s time to put your knowledge into practice. Install, activate, and explore the tool’s features to transform your writing and communicate with clarity, precision, and professionalism.