Introduction
Welcome to the world of 3D scanning, where ordinary webcams can be transformed into powerful tools for capturing objects in three dimensions. With the advancements in technology, it’s now possible to turn your webcam into a 3D scanner, allowing you to create detailed digital replicas of real-life objects. Whether you’re a hobbyist, a designer, or an artist, this guide will walk you through the process of using a webcam as a 3D scanner.
While professional 3D scanners can be expensive, utilizing a webcam can provide a cost-effective alternative without sacrificing quality. By leveraging the capabilities of your existing webcam and a few software applications, you can unlock a whole new world of scanning possibilities.
Understanding the principles behind 3D scanning is crucial to achieving accurate and high-quality results. This process involves capturing the shape and details of an object from multiple angles and creating a digital representation that can be manipulated or even 3D printed. With the right techniques and equipment, you can create lifelike models of various objects, from intricate sculptures to everyday items.
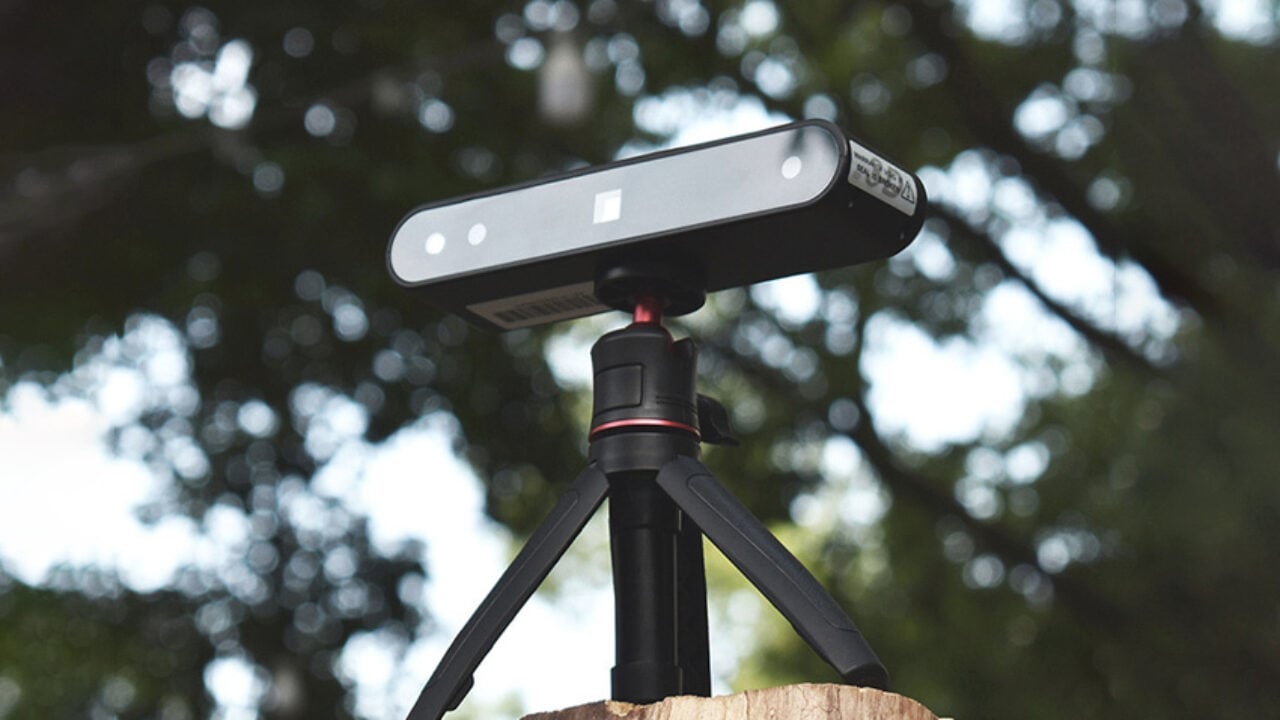
Choosing the right webcam is an essential step in the 3D scanning journey. While most webcams can be used for basic scanning, it’s important to consider certain features that can enhance the scanning process. Look for a webcam with a high-resolution sensor, good low-light performance, autofocus capabilities, and the ability to capture at least 30 frames per second. These features will ensure sharp and detailed scans.
In this guide, we will explore the steps needed to set up your webcam for 3D scanning. This includes installing the necessary scanning software, calibrating the webcam, and troubleshooting any issues that may arise. By following the instructions provided, you’ll be well on your way to creating impressive 3D scans with your webcam.
So, let’s dive in and unlock the potential of your webcam as a 3D scanner!
Understanding 3D Scanning
Before delving into the practical aspects of using a webcam as a 3D scanner, it’s important to grasp the fundamental principles behind 3D scanning. This knowledge will help you make informed decisions throughout the scanning process and achieve the best possible results.
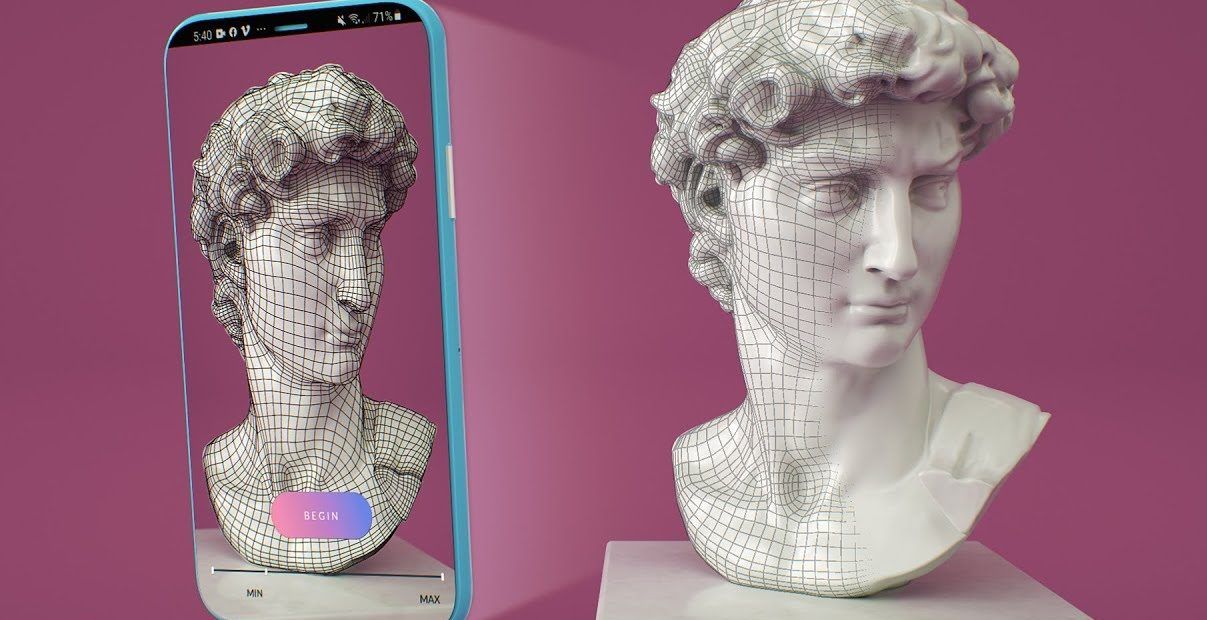
At its core, 3D scanning is the process of capturing the physical shape and details of an object and converting them into a digital format. This digital replica can be manipulated, analyzed, or even recreated using 3D printing technology. By scanning an object from different angles and capturing its geometry, texture, and color, you can create a highly accurate and realistic representation.
There are several techniques used in 3D scanning, but the two most common methods are structured light scanning and photogrammetry. Structured light scanning involves projecting a pattern of light onto the object and capturing how it deforms, allowing the scanner to calculate the shape and depth of the object. On the other hand, photogrammetry relies on taking multiple photographs of an object from different angles and extracting the shape and details through complex algorithms.
Webcam-based 3D scanning primarily employs the photogrammetry technique. By utilizing the high-resolution sensor and the ability to capture multiple images per second, webcams can effectively capture the necessary data to create 3D models. The key is capturing the object from different angles to ensure all the details are captured accurately.
It’s important to note that while webcams can produce impressive results, they do have limitations compared to professional 3D scanners. Factors such as lighting conditions, object surface complexity, and camera resolution can affect the scanning quality. Nevertheless, with proper techniques and post-processing, you can achieve excellent results with a webcam.
Understanding the concepts of point clouds, meshes, and textures is also crucial in 3D scanning. Point clouds are a collection of 3D coordinates that represent the surface of the scanned object. These points can be connected to form a mesh, which is a network of triangles that create a 3D shape. Lastly, the texture mapping process involves applying the captured photographs onto the surface of the mesh, resulting in a realistic appearance.
Now that you have a basic understanding of 3D scanning principles, it’s time to move on to the practical steps of setting up your webcam for scanning. In the next sections, we will dive into the details of choosing the right webcam, installing the necessary software, and calibrating your setup for optimal results.
Choosing the Right Webcam
When it comes to using a webcam as a 3D scanner, selecting the right webcam plays a crucial role in the quality of your scans. While most webcams can be used for basic scanning, certain features can greatly enhance your scanning experience and the accuracy of the resulting models.
One of the key factors to consider is the resolution of the webcam’s sensor. Look for a webcam with a high-resolution sensor, preferably at least 1080p. Higher resolution ensures that the details of the scanned object are captured accurately, resulting in more realistic and precise 3D models.
Low-light performance is another important aspect to consider. Since scanning objects may require controlled lighting conditions, a webcam that performs well in low-light environments will give you more flexibility in setting up your scanning area. Look for webcams with larger pixel sizes or those specifically designed for low-light conditions.
Autofocus capabilities can also be beneficial, especially when dealing with objects of various sizes. Being able to adjust the focus of the webcam automatically ensures that the scans remain sharp and in focus, regardless of the distance between the object and the camera.
Frame rate is an essential consideration for seamless scanning. Look for a webcam that can capture at least 30 frames per second. A higher frame rate allows for smoother and more accurate scanning, reducing the chances of motion blurring or distorted shapes in the resulting models.
It’s worth noting that some webcams come with additional features specifically designed for 3D scanning. These features may include depth-sensing capabilities or specialized software that simplifies the scanning process. While not necessary, these features can enhance the quality and efficiency of your scanning workflow.
Before making a final decision, it’s recommended to read reviews and compare different webcam models. Look for feedback from other users who have used the webcam for 3D scanning purposes to get an idea of its performance and suitability for your needs.
Remember, choosing the right webcam is an important investment that can greatly impact the quality of your 3D scans. Consider factors such as resolution, low-light performance, autofocus, and frame rate to ensure you select the webcam that best suits your scanning requirements.
Once you have chosen the perfect webcam, it’s time to move on to the next step – setting up the webcam for 3D scanning.
Setting Up the Webcam
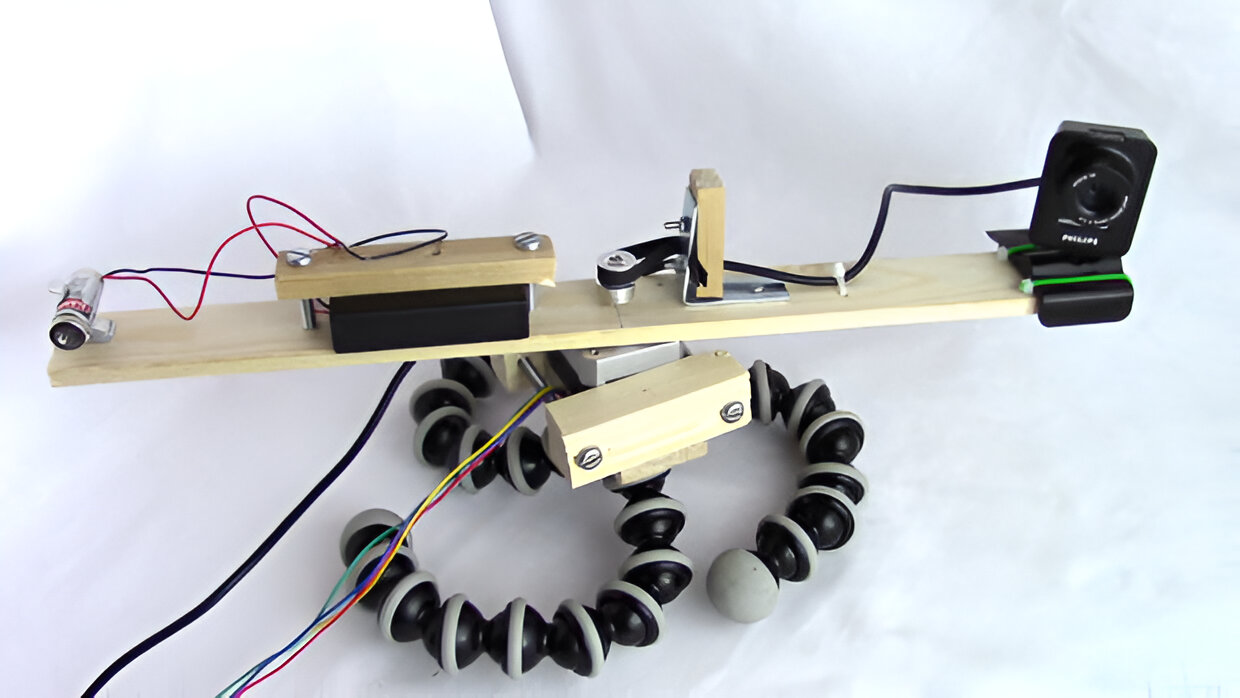
Now that you have chosen the right webcam for your 3D scanning endeavors, it’s time to set it up for optimal performance. The setup process involves ensuring proper positioning, lighting, and stability to capture high-quality scans.
The first step is to position the webcam in a stable and secure location. Mount it on a tripod if possible, as it provides stability and allows you to adjust the height and angle as needed. Make sure the webcam is securely attached to the tripod or any other mounting device to prevent any unwanted movement or vibrations during the scanning process.
Next, consider the lighting conditions in your scanning area. Ideally, you want a well-lit environment with consistent lighting. Avoid harsh shadows or intense light that can distort the shape and details of the object. If possible, use diffused lighting to create an even and soft light source. This can be achieved by using photography softboxes, umbrellas, or simply positioning the lights at an angle to minimize shadows.
Additionally, consider the background of your scanning area. A plain, non-reflective background, such as a white sheet or a light-colored wall, helps enhance the visibility of the object and makes it easier for the software to distinguish it from the background. Avoid busy or reflective backgrounds that can interfere with the scanning process.
Before starting the scanning process, it’s essential to ensure that the webcam is properly connected to your computer. Plug it into a USB port and make sure the computer recognizes the device. Check for any driver updates or software installations required for the webcam to function properly.
Once the webcam is connected and positioned, launch the scanning software you have chosen and make the necessary settings adjustments. The software will guide you through the scanning process, allowing you to preview and adjust the camera settings, such as exposure, focus, and white balance, to obtain the best possible scan quality.
Lastly, it’s a good practice to calibrate the webcam before starting the actual scanning process. Calibration involves capturing reference images or using calibration patterns provided by the scanning software. This step ensures accurate measurement and alignment of the captured frames, resulting in more precise 3D models.
With the webcam set up and calibrated, you are now ready to embark on your 3D scanning journey. In the next section, we will explore the process of installing scanning software to unlock the full potential of your webcam as a 3D scanner.
Installing Scanning Software
Now that you have set up your webcam for 3D scanning, the next step is to install the necessary scanning software. Scanning software plays a crucial role in capturing, processing, and converting the images from your webcam into 3D models.
There are several scanning software options available, each offering different features and capabilities. Some popular choices include Meshroom, ReconstructMe, and Skanect. It’s recommended to research and compare the options to find the software that best suits your needs and the compatibility with your webcam.
Start by visiting the official website of the scanning software you have chosen. Look for the download section, which usually provides a link to download the latest version of the software. Make sure to download the appropriate version for your operating system, whether it’s Windows, macOS, or Linux.
Once the download is complete, locate the installation file and run it to begin the installation process. Follow the on-screen instructions and choose the desired installation settings. It’s recommended to select the default settings unless you have specific preferences or requirements.
During the installation process, the software may prompt you to install additional drivers or libraries that are necessary for the software to function properly. Make sure to follow these prompts and allow the software to install any required components.
Once the installation is complete, double-check if there are any software updates available. Visit the software’s official website or check for update notifications within the software itself. Keeping the software up to date ensures you have access to the latest features and bug fixes.
After the software is installed and updated, launch it and familiarize yourself with the user interface. Most 3D scanning software features a user-friendly interface with intuitive controls and clear instructions for the scanning process.
Before you start scanning, it’s essential to read the software’s documentation or watch tutorial videos to understand the specific processes and features of the software. This will help you make the most of the software’s capabilities and avoid any common pitfalls.
With the scanning software successfully installed, updated, and ready to use, you are now equipped to capture 3D scans using your webcam. In the next section, we will explore the crucial step of calibrating your webcam to ensure accurate and high-quality scans.
Calibrating the Webcam
Calibrating your webcam is a critical step in the 3D scanning process as it ensures accurate measurements and alignment of the captured frames. Proper calibration helps minimize distortions and errors, resulting in more precise and realistic 3D models.
Before you begin the calibration process, make sure your scanning software supports webcam calibration. Most software options provide built-in calibration tools or offer guidance on how to calibrate your webcam.
The calibration process typically involves capturing reference images or using calibration patterns provided by the scanning software. These patterns consist of known dimensions, such as grids or dots, which help the software establish the spatial relationship between the camera and the object being scanned.
Start by following the instructions provided by your scanning software to prepare for calibration. This may involve printing out a calibration pattern or setting up a specific scene with the pattern displayed on a screen or board.
Position your webcam in a way that allows it to capture the calibration pattern clearly. It’s advisable to have the pattern fill most of the webcam’s field of view to ensure accurate calibration results.
Once your webcam is properly positioned and the calibration pattern is in place, capture multiple images of the pattern from different angles. Make sure to thoroughly cover the entire pattern, capturing it from various orientations.
Import the captured images into the scanning software and follow the calibration tool’s instructions. The software will analyze the images and use the known dimensions of the calibration pattern to calibrate the webcam’s parameters.
During the calibration process, pay attention to any prompts or options that may affect the calibration results. Some software may allow you to adjust settings such as camera distortion, focal length, or sensor size to further refine the calibration accuracy.
Once the calibration process is complete, the software will apply the calibrated parameters to subsequent scans, ensuring accurate measurements and alignment. It’s crucial to perform the calibration process periodically, especially if you make any changes to your scanning setup or move your webcam to a different location.
Keep in mind that the calibration accuracy can also be affected by factors such as lighting conditions, lens quality, and webcam stability. Therefore, it’s important to maintain consistent environmental conditions and ensure that your webcam is securely positioned throughout the scanning process.
By meticulously calibrating your webcam, you lay the foundation for achieving high-quality and precise 3D scans. With the calibration step completed, you are now ready to move on to the exciting part – scanning objects in 3D.
Scanning Objects in 3D
Now that your webcam is set up and calibrated, it’s time to dive into the exciting process of scanning objects in 3D. By following specific techniques and guidelines, you can capture detailed and accurate 3D models of various objects.
Start by selecting the object you want to scan. It’s advisable to begin with a simple object to familiarize yourself with the scanning process before moving on to more complex subjects. Objects with distinct features and textures tend to yield better results.
Position the object in the center of the scanning area, ensuring that it is well-lit and positioned on a plain and non-reflective surface. If necessary, use additional lighting sources to minimize shadows and enhance the visibility of the object’s details.
Double-check that your webcam is securely mounted and properly focused on the object. Take a few test photos to ensure that the framing and focus are adequate before starting the scanning process.
Follow the instructions provided by your scanning software on how to initiate the scanning process. Most software will guide you through the steps, which usually involve capturing multiple images of the object from different angles.
When capturing the images, it’s crucial to maintain a consistent distance between the webcam and the object throughout the scanning process. Any variations in the distance or angle can introduce distortions and affect the alignment of the resulting 3D model.
Move around the object systematically, ensuring that you capture the entire surface from various angles. It’s recommended to use a turntable or manually rotate the object to capture it from every side, allowing the software to create a complete and accurate 3D representation.
Pay attention to any instructions or prompts provided by the scanning software during the process. Some software may suggest capturing additional images or adjusting specific settings to optimize the quality of the scans.
Once you have captured all the necessary images, import them into the scanning software for processing. The software will align the images, extract the data, and generate a 3D model of the object based on the captured frames.
After the initial processing, you may need to fine-tune the 3D model using the tools provided by the scanning software. This can involve cleaning up artifacts, filling in holes, or smoothing the surface to achieve a more polished result.
Post-processing of the 3D model can also include applying textures or color information captured during the scanning process. This helps create a more visually appealing and realistic representation of the scanned object.
Keep in mind that scanning objects in 3D may require some trial and error. Experiment with different techniques, lighting setups, and scanning angles to refine your skills and achieve better results with each scan.
With practice and persistence, you will gain a deeper understanding of the nuances of 3D scanning and be able to capture stunning digital replicas of various objects.
In the next section, we will explore common troubleshooting steps and share some valuable tips to help you overcome any challenges you may encounter during the scanning process.
Troubleshooting and Tips
While scanning objects in 3D using a webcam can be an exciting process, it’s not without its challenges. In this section, we will explore common troubleshooting steps and share valuable tips to help you overcome any obstacles you may encounter during the scanning process.
Here are some troubleshooting tips to address common issues:
1. Insufficient lighting: If your scans appear too dark or lack detail, ensure that you have adequate lighting. Experiment with different lighting setups and positions to achieve even and well-balanced illumination.
2. Blurry scans: Blurriness in your scans may be due to camera movement or incorrect focus. Use a tripod or stable surface to minimize camera shake, and double-check the focus settings on both your webcam and scanning software.
3. Alignment problems: If your scanned images are misaligned or do not line up correctly, check that you captured enough overlapping images from different angles. Capture additional frames if necessary or adjust the alignment settings in your scanning software.
4. Distortions or artifacts: Visual distortions or artifacts can occur during the scanning process. Experiment with different scanning angles, distance, and lighting conditions to minimize these issues. Additionally, try using background removal techniques to improve the quality of your scans.
5. Slow scanning speed: If your scanning process is slow, consider optimizing your workflow. Make sure your computer meets the minimum requirements for the scanning software and close unnecessary applications to free up system resources.
Now, let’s explore some valuable tips to enhance your overall scanning experience:
1. Start with simple objects: Begin your 3D scanning journey with simple objects before moving on to complex subjects. This will help you understand the scanning process and improve your scanning skills gradually.
2. Experiment with different backgrounds: Explore using different backgrounds, such as colored sheets or textured surfaces, to enhance the visibility and details of your scans. Avoid backgrounds that reflect light or create distractions.
3. Utilize reference markers: Use reference markers, like colored stickers or known-sized objects, to aid in the alignment and scale calibration of your scans. This can improve accuracy and streamline the post-processing workflow.
4. Capture additional detail: To capture fine details, consider using a macro lens attachment or getting closer to the object. This can help in achieving higher-resolution scans for intricate objects.
5. Experiment with different scanning software: Explore various scanning software options to find the one that best suits your needs. Each software may offer different features, algorithms, and post-processing capabilities that can enhance your scans.
6. Learn from the community: Join online forums and communities dedicated to 3D scanning to learn from experienced users. Sharing your scans, troubleshooting issues, and seeking advice can significantly accelerate your learning process.
By following these troubleshooting steps and implementing these tips, you can overcome challenges and improve your scanning results. Remember, practice and persistence are key to mastering the art of 3D scanning with a webcam.
In the final section of this guide, we will conclude our journey and summarize the key points covered throughout the article.
Conclusion
Congratulations! You have reached the end of this guide on using a webcam as a 3D scanner. By leveraging the power of your webcam and the right scanning software, you can unlock a world of possibilities in creating detailed and realistic 3D models.
Throughout this guide, we covered the essential steps to successfully use your webcam as a 3D scanner. We started by understanding the principles of 3D scanning and the importance of choosing the right webcam for optimal results. We then delved into setting up the webcam, installing the necessary scanning software, calibrating the webcam, and scanning objects in 3D.
We explored troubleshooting techniques to overcome common challenges and shared valuable tips to enhance your overall scanning experience. From controlling lighting conditions to capturing overlapping images, these tips will help you achieve higher-quality and more accurate 3D scans.
It’s important to note that using a webcam as a 3D scanner has some limitations compared to professional scanning equipment. Factors such as lighting conditions, camera resolution, and stability can impact the quality of your scans. However, with practice and persistence, you can overcome these limitations and create impressive 3D models.
Remember, the process of 3D scanning using a webcam is an art that requires experimentation, learning from experienced users, and continuous improvement. Keep exploring, honing your skills, and seeking out new techniques to take your 3D scanning capabilities to the next level.
We hope this guide has provided you with valuable insights and practical knowledge to embark on your 3D scanning journey. So, grab your webcam, install the scanning software, and start capturing incredible 3D models of the world around you!