Introduction
Welcome to the world of Google Chrome, a fast and reliable web browser that powers millions of devices worldwide. Whether you’re using a Chromebook or any other device running on ChromeOS, keeping your Chrome browser up to date is essential for a seamless browsing experience.
Regular updates not only enhance the performance and security of your browser but also provide access to the latest features and improvements. In this article, we’ll guide you through the process of updating the Chrome browser on your Chromebook, ensuring that you’re always using the most recent version.
With the advancements in technology and the evolving nature of software, it’s important to keep your Chrome browser up to date. Updates often include bug fixes, security patches, and compatibility enhancements that help ensure a smooth and secure browsing experience. Additionally, new features and optimizations are regularly added, making it worthwhile to stay updated.
Whether you’re a casual internet user or rely on your Chromebook for work or school, updating your Chrome browser should be a priority. Fortunately, Google has made the process quick and easy, allowing you to update your browser automatically or manually, depending on your preference.
In the following sections, we’ll explain how to check the current version of Chrome browser on your Chromebook and guide you through the steps to update it automatically or manually using the built-in settings. We’ll also cover some common troubleshooting tips to help you overcome any update issues you may encounter.
So, let’s dive in and learn how to keep your Chrome browser up to date on your Chromebook, ensuring a secure and optimized browsing experience.
Checking the Current Version of Chrome Browser
Before updating your Chrome browser, it’s important to know which version you currently have installed. Checking the current version is a simple process and can be done in just a few steps:
- Launch your Chrome browser on your Chromebook.
- Click on the three-dot menu icon located in the top-right corner of the browser window.
- From the dropdown menu, hover over “Help” and then click on “About Google Chrome.”
- A new tab will open, displaying the current version of your Chrome browser.
The version number will be displayed on this page, along with other details such as the update status and any available updates. It’s important to note that the version number may vary depending on the time of checking, as Google regularly releases updates to ensure optimal performance and security.
Keeping track of the version number is useful for ensuring that you have the latest updates installed and for troubleshooting purposes if you encounter any issues while using the browser.
Once you’ve checked the current version of your Chrome browser, you can proceed to update it to the latest version available. There are two main methods you can use to update your Chrome browser on a Chromebook: automatic updates and manual updates.
In the next sections, we’ll explain both methods in detail, providing step-by-step instructions to help you keep your Chrome browser up to date with ease.
Updating Chrome Browser Automatically
Google Chrome is designed to automatically update itself in order to provide a seamless and secure browsing experience. By default, automatic updates are enabled on Chromebooks, ensuring that you receive the latest version of the Chrome browser without any manual intervention. Here’s how you can confirm and configure the automatic update settings:
- Launch your Chrome browser on your Chromebook.
- Click on the three-dot menu icon located in the top-right corner of the browser window.
- From the dropdown menu, hover over “Settings” and then click on “Advanced” to expand the settings options.
- Scroll down to the “System” section.
- Ensure that the toggle switch next to the “Automatic updates” option is turned on, indicating that automatic updates are enabled.
With automatic updates enabled, your Chrome browser will regularly check for updates in the background and download them automatically. The updates will be installed the next time you relaunch your browser, ensuring that you’re always using the latest version.
This seamless and automated approach to updating Chrome is designed to minimize interruptions and keep your browser up to date without any extra effort on your part. It’s important to note that automatic updates require an internet connection to download the updates.
By keeping the automatic update feature enabled, you can rest assured that your Chrome browser will receive the necessary updates, including important security patches and feature enhancements, ensuring a safe and optimized browsing experience.
In cases where automatic updates are disabled, it is recommended to enable them to benefit from the latest browser improvements. It’s important to keep in mind that manually updating the Chrome browser can be time-consuming and may result in missing out on critical security updates. Therefore, enabling automatic updates is the easiest and most efficient way to ensure that your Chrome browser is always up to date.
Now that you know how to enable and confirm automatic updates on your Chromebook, let’s explore the steps to manually update your Chrome browser using the (chrome://settings) page.
Updating Chrome Browser Manually using the (chrome://settings) page
If you prefer to have more control over the update process or if automatic updates are disabled on your Chromebook, you can manually update the Chrome browser using the (chrome://settings) page. This method allows you to check for updates and install them on your own schedule. Here’s how you can do it:
- Launch your Chrome browser on your Chromebook.
- In the address bar, type “chrome://settings” and press Enter.
- The Chrome settings page will open, displaying various options and settings.
- Scroll down to the bottom of the page and click on “About Chrome.”
- Chrome will begin checking for updates and will display the current version of the browser.
- If an update is available, click on the “Update” button to initiate the update process.
- Chrome will start downloading the update and will install it automatically once the download is complete.
- After the installation is finished, click on the “Relaunch” button to restart Chrome with the updated version.
Manually updating the Chrome browser using the (chrome://settings) page allows you to have more control over the update process. You can check for updates whenever you want and install them at your convenience. This method ensures that you have the latest version of Chrome installed on your Chromebook, providing you with the most up-to-date features and bug fixes.
It’s important to note that manual updates will only check for new versions of the Chrome browser and will not update the underlying Chrome operating system (ChromeOS) on your Chromebook. ChromeOS updates are separate and are handled automatically by the operating system itself.
Now that you know how to manually update your Chrome browser using the (chrome://settings) page, let’s explore another method to update Chrome using the ChromeOS settings.
Updating Chrome Browser Manually using the ChromeOS settings
In addition to updating the Chrome browser using the (chrome://settings) page, you can also manually update Chrome using the built-in ChromeOS settings. This method provides an alternative option for updating your browser without having to access the browser settings directly. Here’s how you can do it:
- Click on the time and date in the bottom-right corner of your Chromebook’s screen.
- In the pop-up menu that appears, click on the gear icon to open the ChromeOS settings.
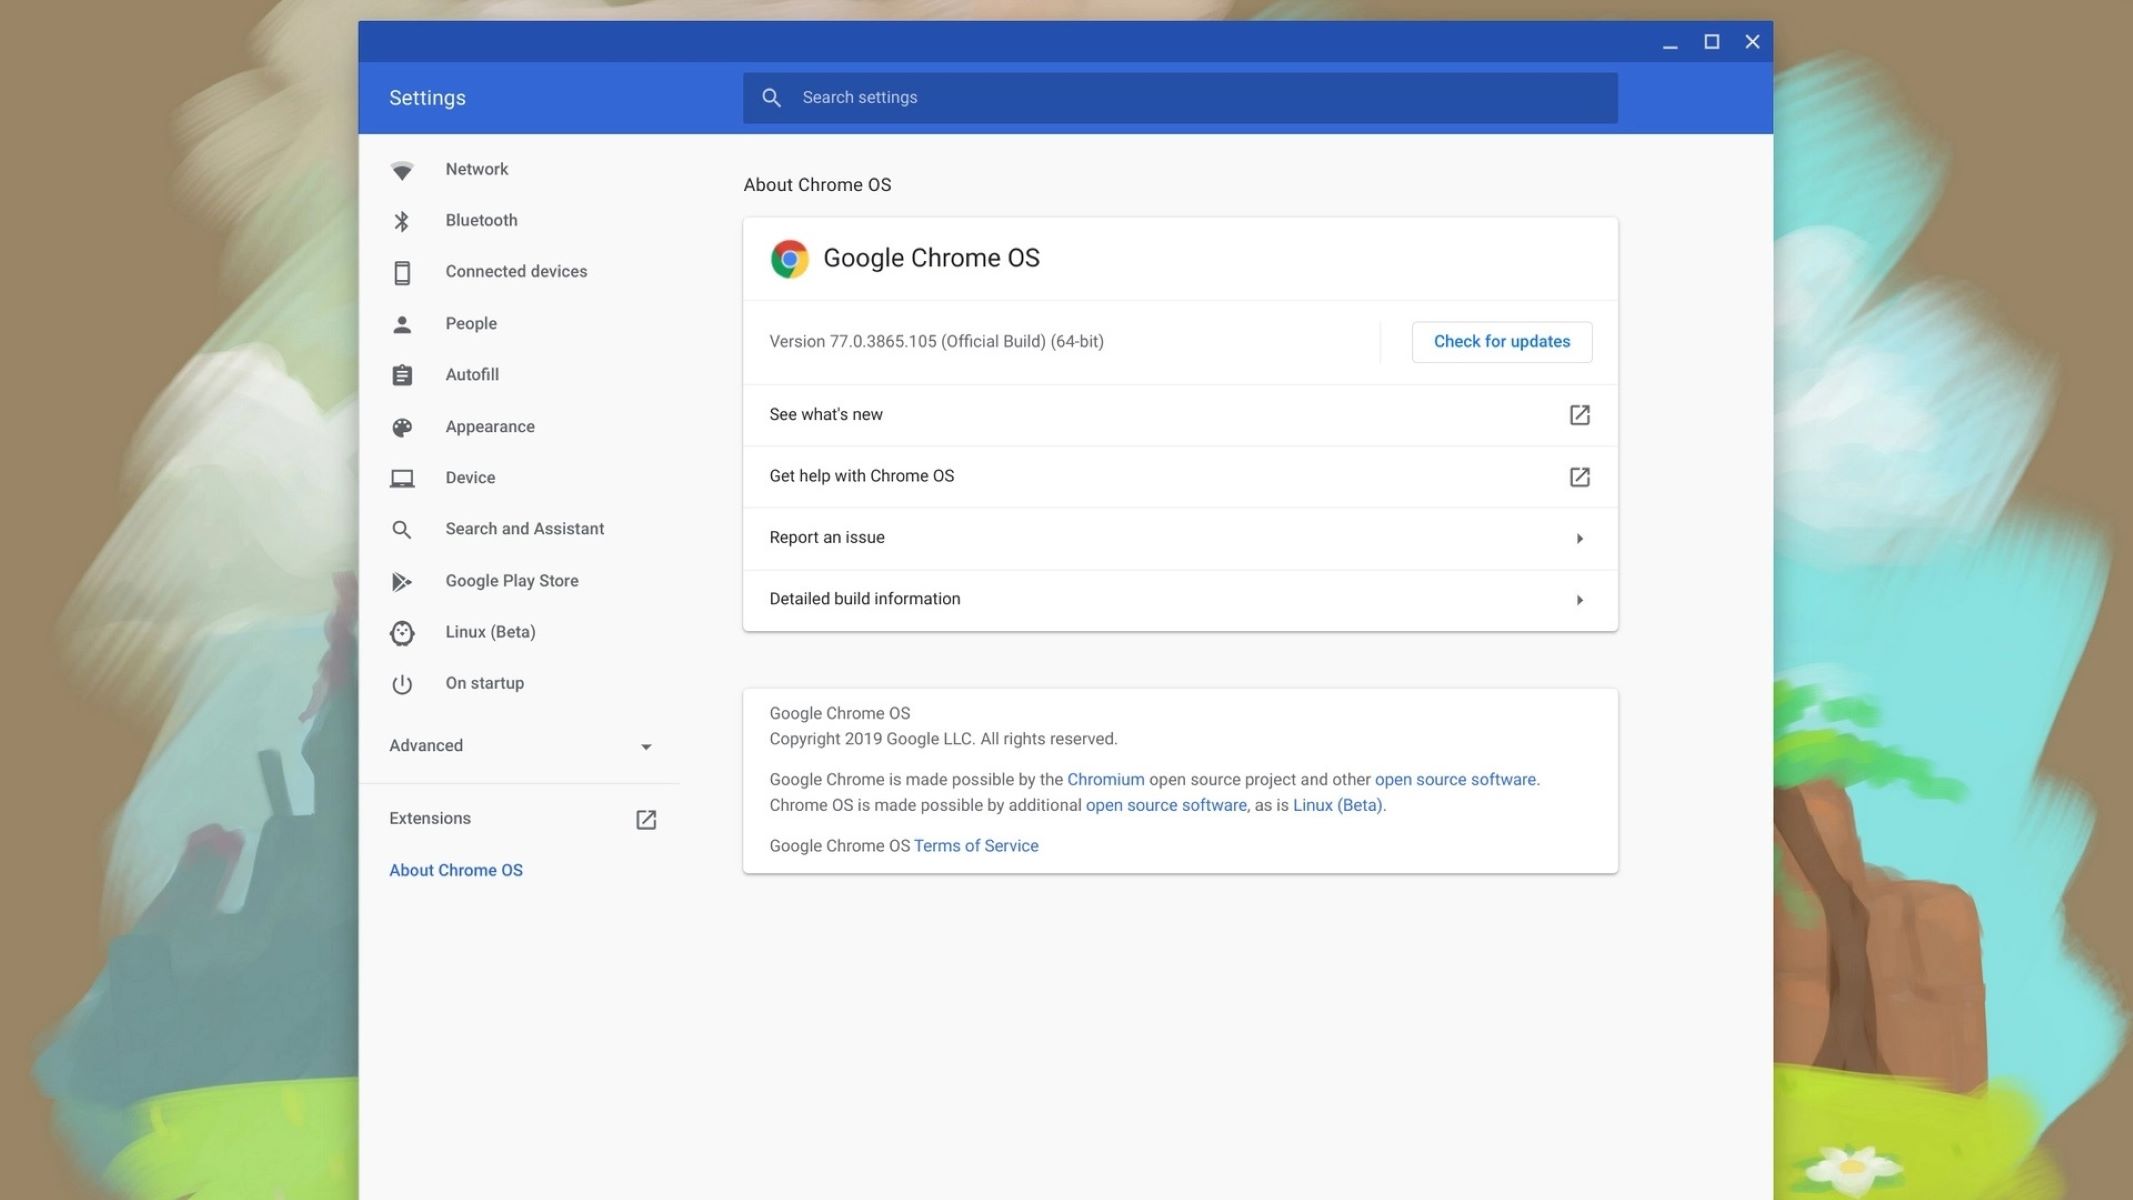
- Scroll down and click on the “About Chrome OS” option.
- ChromeOS will check for updates and display the current version of the operating system.
- If there is an available update for Chrome browser, you’ll see a “Check for updates” button.
- Click on the “Check for updates” button to start the update process.
- ChromeOS will download and install the update for the Chrome browser.
- Once the update is finished, you may need to restart your Chromebook to complete the installation.
Updating Chrome using the ChromeOS settings provides a convenient way to check for updates and install them directly from the operating system. This method ensures that you have the latest version of the Chrome browser installed, along with any necessary bug fixes, security patches, and performance enhancements.
It’s worth noting that updates to the Chrome browser and ChromeOS are independent of each other. Therefore, even if you update the Chrome browser using the ChromeOS settings, it won’t update the underlying ChromeOS version on your Chromebook. ChromeOS updates are separate and are handled by the operating system itself.
Now that you know how to manually update your Chrome browser using the ChromeOS settings, let’s explore some troubleshooting tips to help you overcome common update issues.
Troubleshooting Common Update Issues
While updating the Chrome browser on your Chromebook is usually a smooth and straightforward process, you may encounter some common issues along the way. Let’s explore a few troubleshooting tips to help you overcome these issues:
1. Slow or Frozen Update: If the update process seems slow or has frozen, try restarting your Chromebook and initiating the update again. This can help resolve temporary glitches or network issues that may be causing the slow update.
2. Insufficient Storage: If your Chromebook doesn’t have enough storage space, it may prevent the update from being installed. Clearing unnecessary files and freeing up disk space can resolve this issue. You can go to the ChromeOS settings and click on “Storage” to check the available space and manage your storage.
3. Internet Connectivity Issues: A stable internet connection is crucial for successful updates. If you’re experiencing network connectivity issues, try connecting to a different Wi-Fi network or restarting your router. You can also try updating your Chrome browser using a wired Ethernet connection for a more reliable update process.
4. Outdated ChromeOS: Ensure that your Chromebook is running on the latest version of ChromeOS. Chrome browser updates may require the latest ChromeOS version to be installed. Go to the ChromeOS settings and click on “About Chrome OS” to check for any available ChromeOS updates and install them if necessary.
5. Disable Extensions: Sometimes, browser extensions can interfere with the update process. To troubleshoot this, disable any extensions you have installed and then attempt the update again. After the update is complete, you can re-enable the extensions one by one to identify if there are any compatibility issues.
6. Contact Support: If you’ve tried the above troubleshooting steps and are still unable to update your Chrome browser, it’s recommended to contact Chromebook support for further assistance. They can guide you through more advanced troubleshooting techniques or provide specific instructions based on your device and setup.
By following these troubleshooting steps, you can overcome common update issues and ensure that your Chrome browser is always up to date on your Chromebook.
Now that we’ve covered troubleshooting common update issues, let’s wrap up this article.
Conclusion
Keeping your Chrome browser up to date on your Chromebook is essential for a seamless and secure browsing experience. Regular updates not only enhance performance and security but also provide access to the latest features and improvements.
In this article, we explored different methods to update the Chrome browser on your Chromebook. We learned how to check the current version of the browser, update it automatically, and update it manually using the (chrome://settings) page and the ChromeOS settings.
Enabling automatic updates ensures that your Chrome browser receives updates in the background without any manual intervention. It’s the easiest and most efficient method to stay up to date. However, for those who prefer more control, manually updating the Chrome browser using the browser settings or the ChromeOS settings provides a convenient alternative.
Additionally, we discussed some troubleshooting tips to help you overcome common update issues. Whether it’s slow or frozen updates, insufficient storage, connectivity issues, outdated ChromeOS, or conflicting extensions, these troubleshooting steps can help to address the problems and ensure successful updates.
By keeping your Chrome browser up to date, you’re not only ensuring optimal performance and security but also taking advantage of the latest features and improvements. So, make it a habit to regularly check for updates and install them on your Chromebook.
To summarize, keeping your Chrome browser up to date is crucial for a secure and enjoyable browsing experience on your Chromebook. Whether you choose automatic updates or prefer to update manually, the process is simple and can be done within the browser settings or through the ChromeOS settings.
Now that you have the knowledge and tools to keep your Chrome browser up to date, you can confidently browse the web and make the most of your Chromebook experience.