Introduction
Welcome to this helpful guide on how to unmute iMessage. If you’ve found yourself in a situation where your iMessage notifications seem to have gone silent, fear not! There are several reasons why your iMessage might be muted, and fortunately, the solutions are relatively simple. Whether you’re using an iPhone, iPad, or Mac, we’ve got you covered.
iMessage is a popular messaging platform that allows iOS and macOS users to send texts, photos, videos, and more to other Apple device owners. It offers a convenient way to stay connected with friends, family, and colleagues. However, sometimes users might encounter unexpected issues, such as their iMessage notifications being muted. This can be frustrating, especially if you rely on iMessage for important conversations or time-sensitive messages.
In the following sections, we will walk you through the steps to unmute iMessage on various Apple devices. We’ll cover iPhones, iPads, and Macs, ensuring that no matter what device you’re using, you’ll be able to restore the delightful sound of incoming iMessage notifications. So, let’s jump in and get your iMessage unmuted!
Why is my iMessage muted?
If you’ve noticed that your iMessage notifications are no longer making any sound or vibration, it’s likely that your iMessage is muted. There are a few reasons why this might happen, so let’s explore some of the common causes:
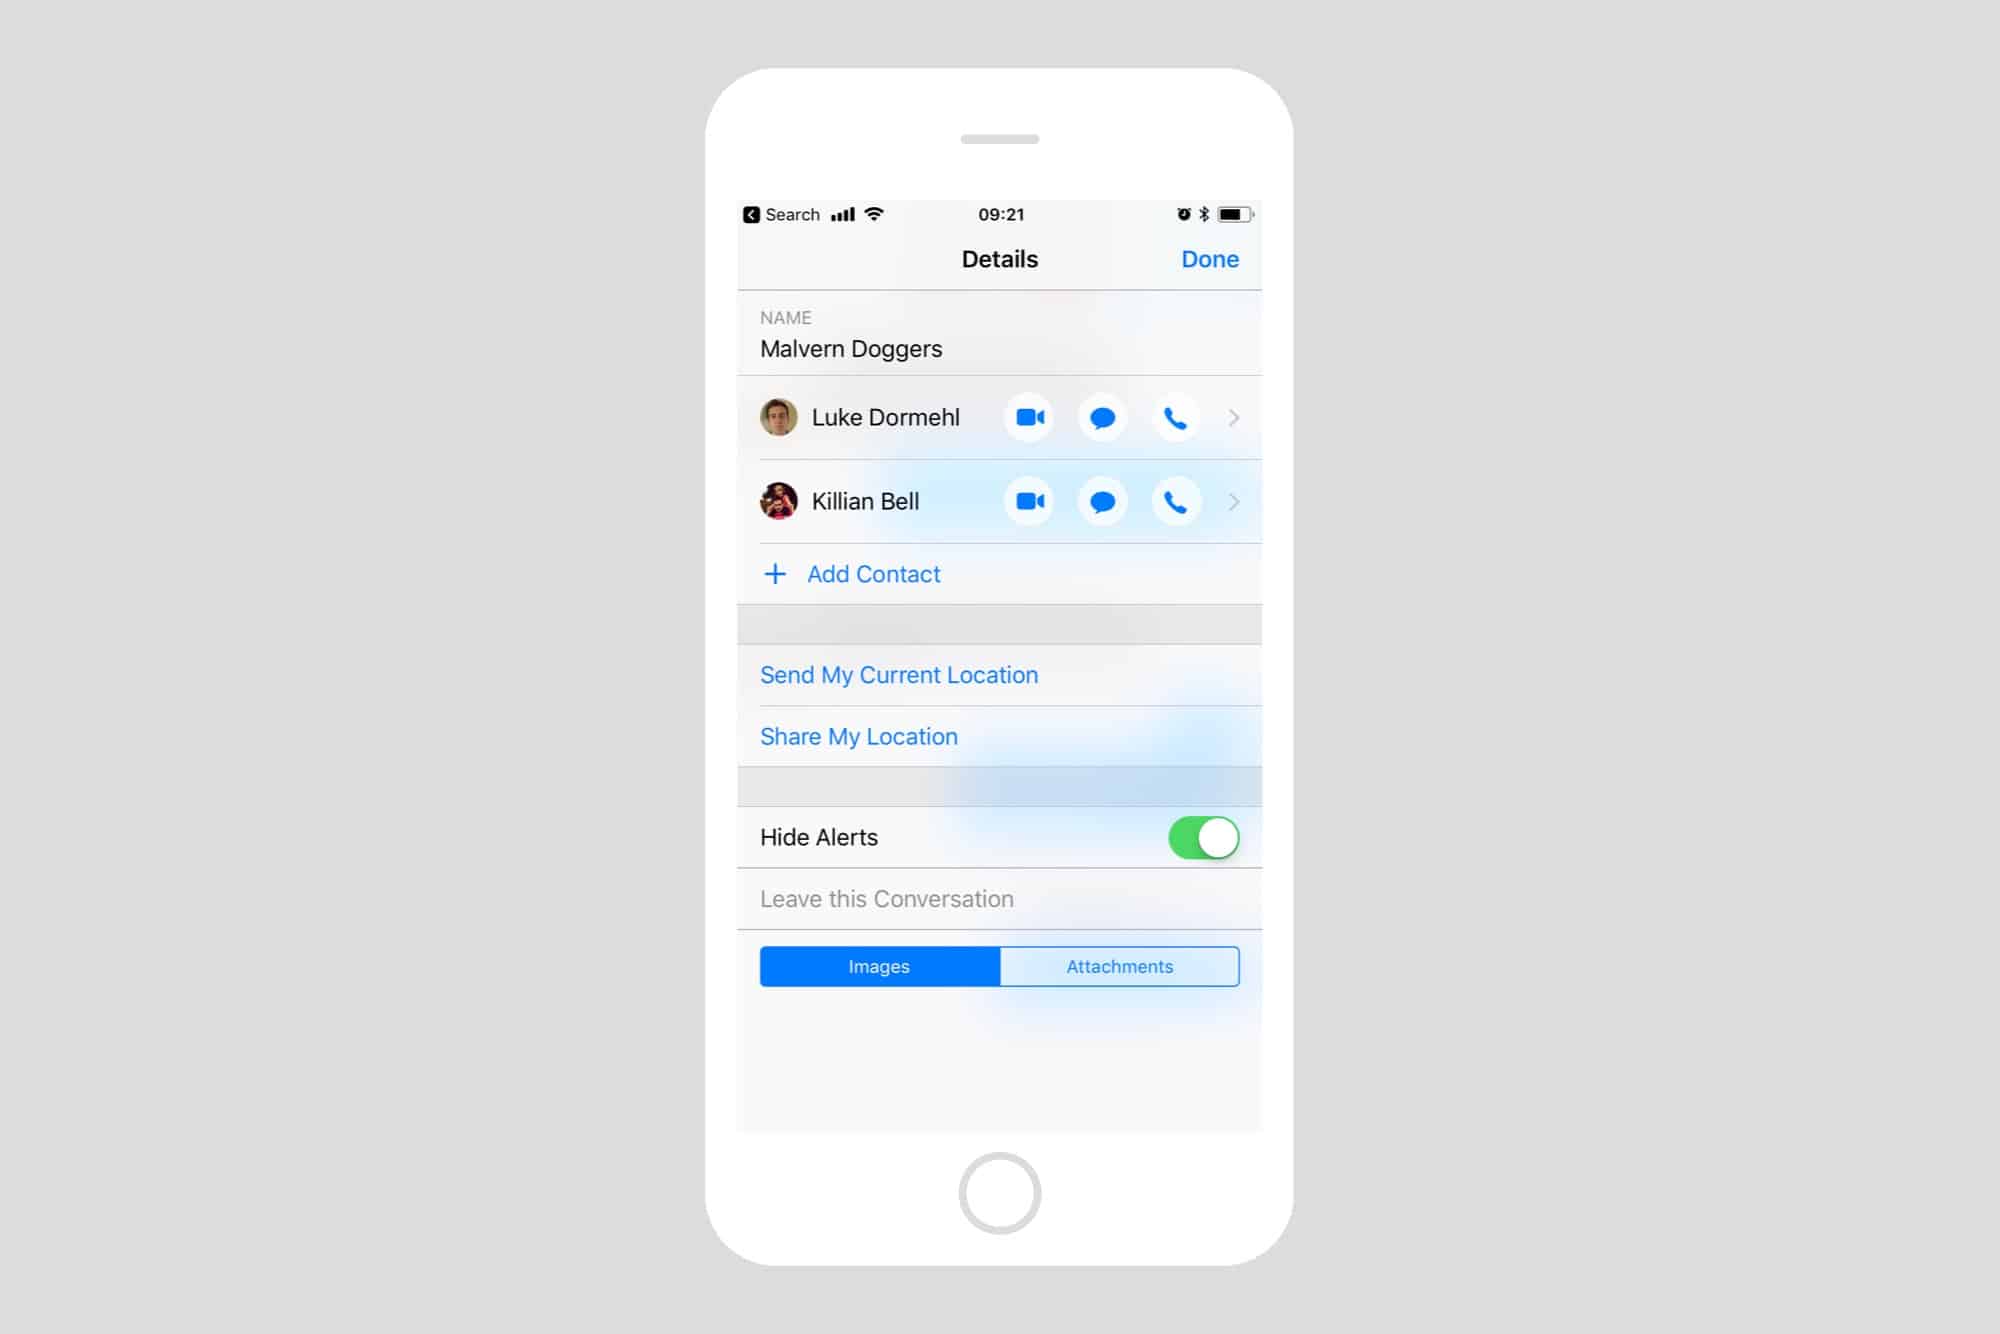
- Notification settings: One possible reason for your iMessage being muted is that the notification settings for the Messages app have been changed. It’s possible that the notification sound or vibration has been disabled, causing your iMessage notifications to appear silently.
- Do Not Disturb mode: Another reason your iMessage might be muted is if your device is in Do Not Disturb mode. This mode is designed to silence all incoming notifications, allowing you to focus or have uninterrupted sleep. However, it can inadvertently mute your iMessage notifications as well.
- Volume settings: It’s also worth checking your device’s volume settings. If the volume is turned all the way down or if you have the device in silent mode, you won’t hear any notification sounds or vibrations, including for iMessage.
- Software glitches: Occasionally, software glitches or bugs can cause unexpected issues with your iMessage notifications. These glitches might accidentally mute your notifications or change settings without your knowledge.
Now that we’ve explored some of the reasons why your iMessage might be muted, let’s move on to the solutions. In the next sections, we’ll guide you through the steps to unmute iMessage on your iPhone, iPad, and Mac.
How to unmute iMessage on iPhone
If your iMessage notifications on your iPhone are muted, there are a few simple steps you can take to unmute them. Follow these instructions to get your iMessage notifications back on track:
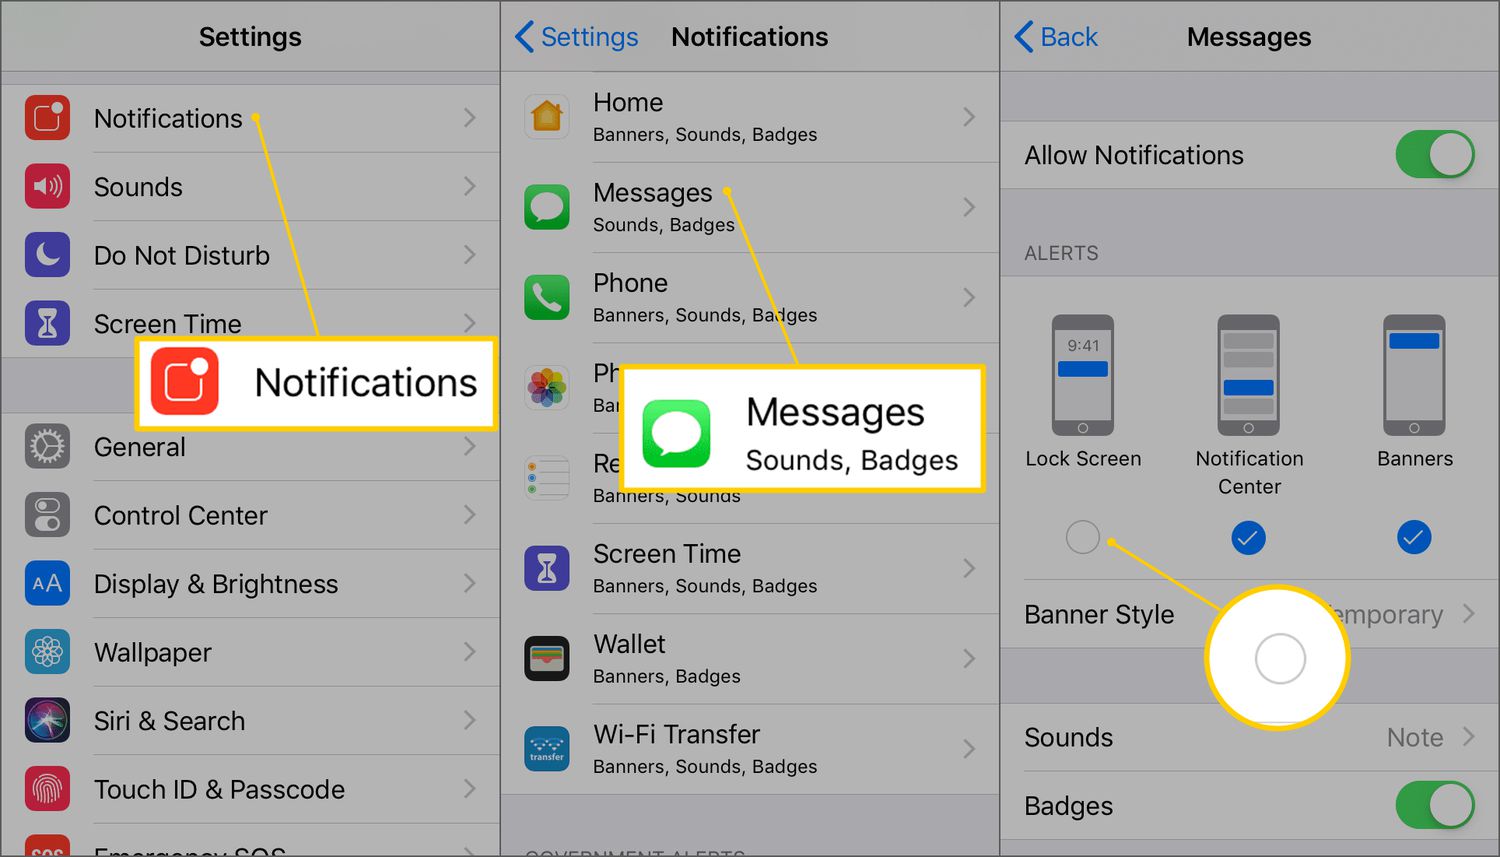
- Open the “Settings” app on your iPhone.
- Scroll down and tap on “Notifications.”
- Find and tap on “Messages” from the list of apps.
- Ensure that the “Allow Notifications” toggle is turned on.
- Scroll down and tap on “Sounds & Haptics.”
- Under the “Sounds and Vibration Patterns” section, choose your desired notification sound.
- Ensure that the “Vibrate” toggle is also turned on if you want your device to vibrate when receiving iMessage notifications.
- Exit the Settings app, and your iMessage notifications should now be unmuted.
If the issue persists even after following these steps, there might be an underlying software glitch. In such cases, it’s recommended to restart your iPhone and repeat the above steps. Restarting your device can help resolve minor software issues that might be affecting your iMessage notifications.
Remember, these steps are applicable to iPhones running the latest version of iOS. If you’re using an older version of iOS, the steps might vary slightly, but the general process should be similar.
Now that you know how to unmute iMessage notifications on your iPhone, let’s move on to the next section, where we’ll explore how to unmute iMessage on iPad.
How to unmute iMessage on iPad
If you’ve noticed that your iMessage notifications on your iPad are muted, don’t worry. You can easily unmute them by following these simple steps:
- Go to the home screen of your iPad and tap on the “Settings” app.
- In the Settings menu, locate and tap on “Notifications.”
- Scroll through the list of apps until you find “Messages” and tap on it.
- Make sure the “Allow Notifications” toggle is enabled.
- Now, tap on “Sounds & Haptics.”
- Under the “Sounds and Vibration Patterns” section, you can select the desired notification sound.
- If you want your iPad to vibrate when receiving iMessage notifications, ensure that the “Vibrate” toggle is also turned on.
- Exit the settings menu, and your iMessage notifications should now be unmuted on your iPad.
If your iMessage notifications are still muted after following these steps, you can try restarting your iPad. Sometimes, a simple restart can resolve any software glitches that might be causing the issue.
It’s important to note that the steps described above apply to iPads running the latest version of iPadOS. Older versions of iPadOS may have slightly different menu options, but the general process should be similar.
Now that your iMessage notifications are unmuted on your iPad, let’s move on to the next section, where we’ll explore how to unmute iMessage on your Mac.
How to unmute iMessage on Mac
If you’re using iMessage on your Mac and have noticed that your notifications are muted, don’t worry – you can easily unmute them with a few simple steps:
- Click on the Apple menu in the upper-left corner of your Mac’s screen.
- Select “System Preferences” from the dropdown menu.
- In the System Preferences window, click on “Notifications.”
- Scroll through the list of apps on the left-hand side and select “Messages.”
- Make sure the “Allow Notifications” checkbox is ticked.
- Under the “Message alert style” dropdown menu, select your preferred alert style. This determines how your iMessage notifications will appear on your Mac.
- Ensure that the “Play sound for notifications” option is selected.
- If you want your Mac to vibrate when receiving iMessage notifications, make sure the “Show notifications on lock screen” and “Badge app icon” options are also checked.
- Close the System Preferences window, and your iMessage notifications should now be unmuted on your Mac.
If your iMessage notifications are still muted after following these steps, try restarting your Mac. Sometimes, a system restart can help resolve any software-related issues that may be affecting your iMessage notifications.
Keep in mind that the steps provided above are based on the latest version of macOS. If you’re using an older version of macOS, the menu options may be slightly different, but the general process should be similar.
Now that your iMessage notifications are unmuted on your Mac, let’s move on to the next section for some troubleshooting tips in case you encounter any issues.
Troubleshooting tips
If you’ve followed the steps to unmute iMessage on your device but are still experiencing issues with your notifications, here are some troubleshooting tips to help you resolve the problem:
- Check Do Not Disturb mode: Make sure your device is not in Do Not Disturb mode. Swipe down from the top-right corner of your screen (or swipe up from the bottom if you have an older model) to access Control Center. If the crescent moon icon is highlighted, tap it to disable Do Not Disturb mode.
- Update your device: Ensure that your iPhone, iPad, or Mac is running the latest version of iOS or macOS. Software updates often include bug fixes and improvements that can resolve issues with notifications.
- Reset notification settings: If your notifications are still not working, you can try resetting the notification settings for the Messages app. Go to Settings > Notifications > Messages, and tap on “Reset to Default Settings.” Note that this will revert all your notification settings for Messages back to their default state.
- Check sound and volume settings: Verify that your device’s volume is turned up and not on silent mode. You can adjust the volume using the physical buttons on the side of your iPhone or iPad. On your Mac, you can control the volume through the speaker icon in the menu bar.
- Restart your device: A simple restart can often resolve temporary software glitches that might be affecting your notifications. Turn off your device, wait a few seconds, and then turn it back on again.
By following these troubleshooting tips, you should be able to resolve most issues related to muted iMessage notifications. If the problem persists, you may consider contacting Apple’s support team or visiting an Apple authorized service center for further assistance.
Now that you’re equipped with troubleshooting tips, let’s wrap up this guide on how to unmute iMessage.
Conclusion
Congratulations! You now know how to unmute iMessage on your iPhone, iPad, and Mac. We have covered the step-by-step instructions for each device to help you restore the delightful sound and vibration of iMessage notifications.
If you find that your iMessage notifications are muted, remember to check the notification settings, Do Not Disturb mode, and volume settings on your device. These simple adjustments can often resolve the issue and bring your iMessage notifications back to life.
In addition to the troubleshooting tips provided, it’s important to keep your device updated with the latest software. Software updates often include bug fixes and improvements that can help resolve issues with notifications and ensure optimal performance.
If you’ve followed all the steps and troubleshooting tips and are still experiencing problems with your iMessage notifications, don’t hesitate to reach out to Apple’s support team or visit an Apple authorized service center for further assistance. They will be able to provide you with personalized guidance and solutions to address your specific situation.
Remember, iMessage is a fantastic messaging platform that allows you to stay connected with your loved ones and colleagues. By making sure your iMessage notifications are unmuted, you can ensure that you’ll never miss an important message or conversation again!
We hope this guide has been helpful in resolving any issues you were facing with muted iMessage notifications. Thank you for reading, and happy messaging!