Introduction
Welcome to this guide on how to turn off Hide My Email. Apple’s Hide My Email feature is designed to enhance your privacy and security by providing you with a unique email address that can be used for online interactions. By using this feature, you can mask your actual email address and reduce the risk of spam and unwanted communications. However, there may be instances where you no longer require the Hide My Email feature or simply want to disable it. In this article, we will walk you through the steps to turn off Hide My Email and regain control over your primary email address.
With Hide My Email turned off, you can provide your actual email address to trusted individuals and organizations, ensuring that important messages and notifications reach you directly. This can be particularly beneficial when dealing with significant accounts, such as financial institutions, where it is essential to receive critical information promptly. Additionally, disabling Hide My Email can simplify your communication process, as you won’t need to monitor multiple email accounts.
Let’s get started with the step-by-step process of turning off Hide My Email and discover how you can take full control of your online presence.
Why You Might Want to Turn Off Hide My Email
While Apple’s Hide My Email feature offers several benefits in terms of privacy and security, there are certain scenarios where you might want to disable it. Here are a few reasons why you might consider turning off Hide My Email:
- Direct Communication: Hide My Email provides a layer of anonymity by masking your actual email address. However, there may be instances where you need to establish direct communication with individuals or organizations, such as for work purposes or personal interactions. By turning off Hide My Email, you can provide your primary email address and ensure seamless and unimpeded communication.
- Organizational Requirements: Some organizations or platforms may have specific policies that require the use of verified email addresses. In such cases, Hide My Email may not be compatible or accepted. By disabling it, you can comply with these requirements and maintain smooth interactions without any restrictions.
- Consolidating Email Accounts: Managing multiple email accounts can be overwhelming and time-consuming. If you’ve been using Hide My Email for various online platforms or services, turning it off and providing your primary email address can help consolidate your accounts and streamline your communications.
- Receiving Important Notifications: Certain emails, such as account verification or password reset messages, may be marked as suspicious or filtered out when sent to a masked email address. By disabling Hide My Email, you can ensure that these crucial notifications reach your primary inbox and avoid the risk of missing out on important updates.
- Updating Email Preferences: If you’ve been using Hide My Email for a while and have now decided to switch to a different email provider or service, turning it off would be necessary. By doing so, you can update your email preferences, switch to a new platform, and enjoy a seamless transition without any interruptions.
Understanding why you might want to turn off Hide My Email can help you determine when it’s the right time to disable this feature. By evaluating your specific needs and preferences, you can make an informed decision that best suits your online communication requirements.
Steps to Turn Off Hide My Email
Turning off the Hide My Email feature on your Apple device is a straightforward process. Follow the steps below to disable Hide My Email and regain control over your primary email address:
- Step 1: Open the Settings app
- Step 2: Tap on your Apple ID
- Step 3: Tap on “iCloud”
- Step 4: Tap on “Hide My Email”
- Step 5: Toggle off “Hide My Email”
Launch the Settings app on your Apple device. Look for the familiar gear-shaped icon on your home screen and tap on it to access the settings.
Once you have opened the Settings app, locate and tap on your Apple ID at the top of the screen. This will bring you to a new screen with various settings and options.
Within your Apple ID settings, scroll down and look for the “iCloud” option. It should be listed among other options such as “Passwords & Accounts” and “iTunes & App Store.” Tap on “iCloud” to proceed.
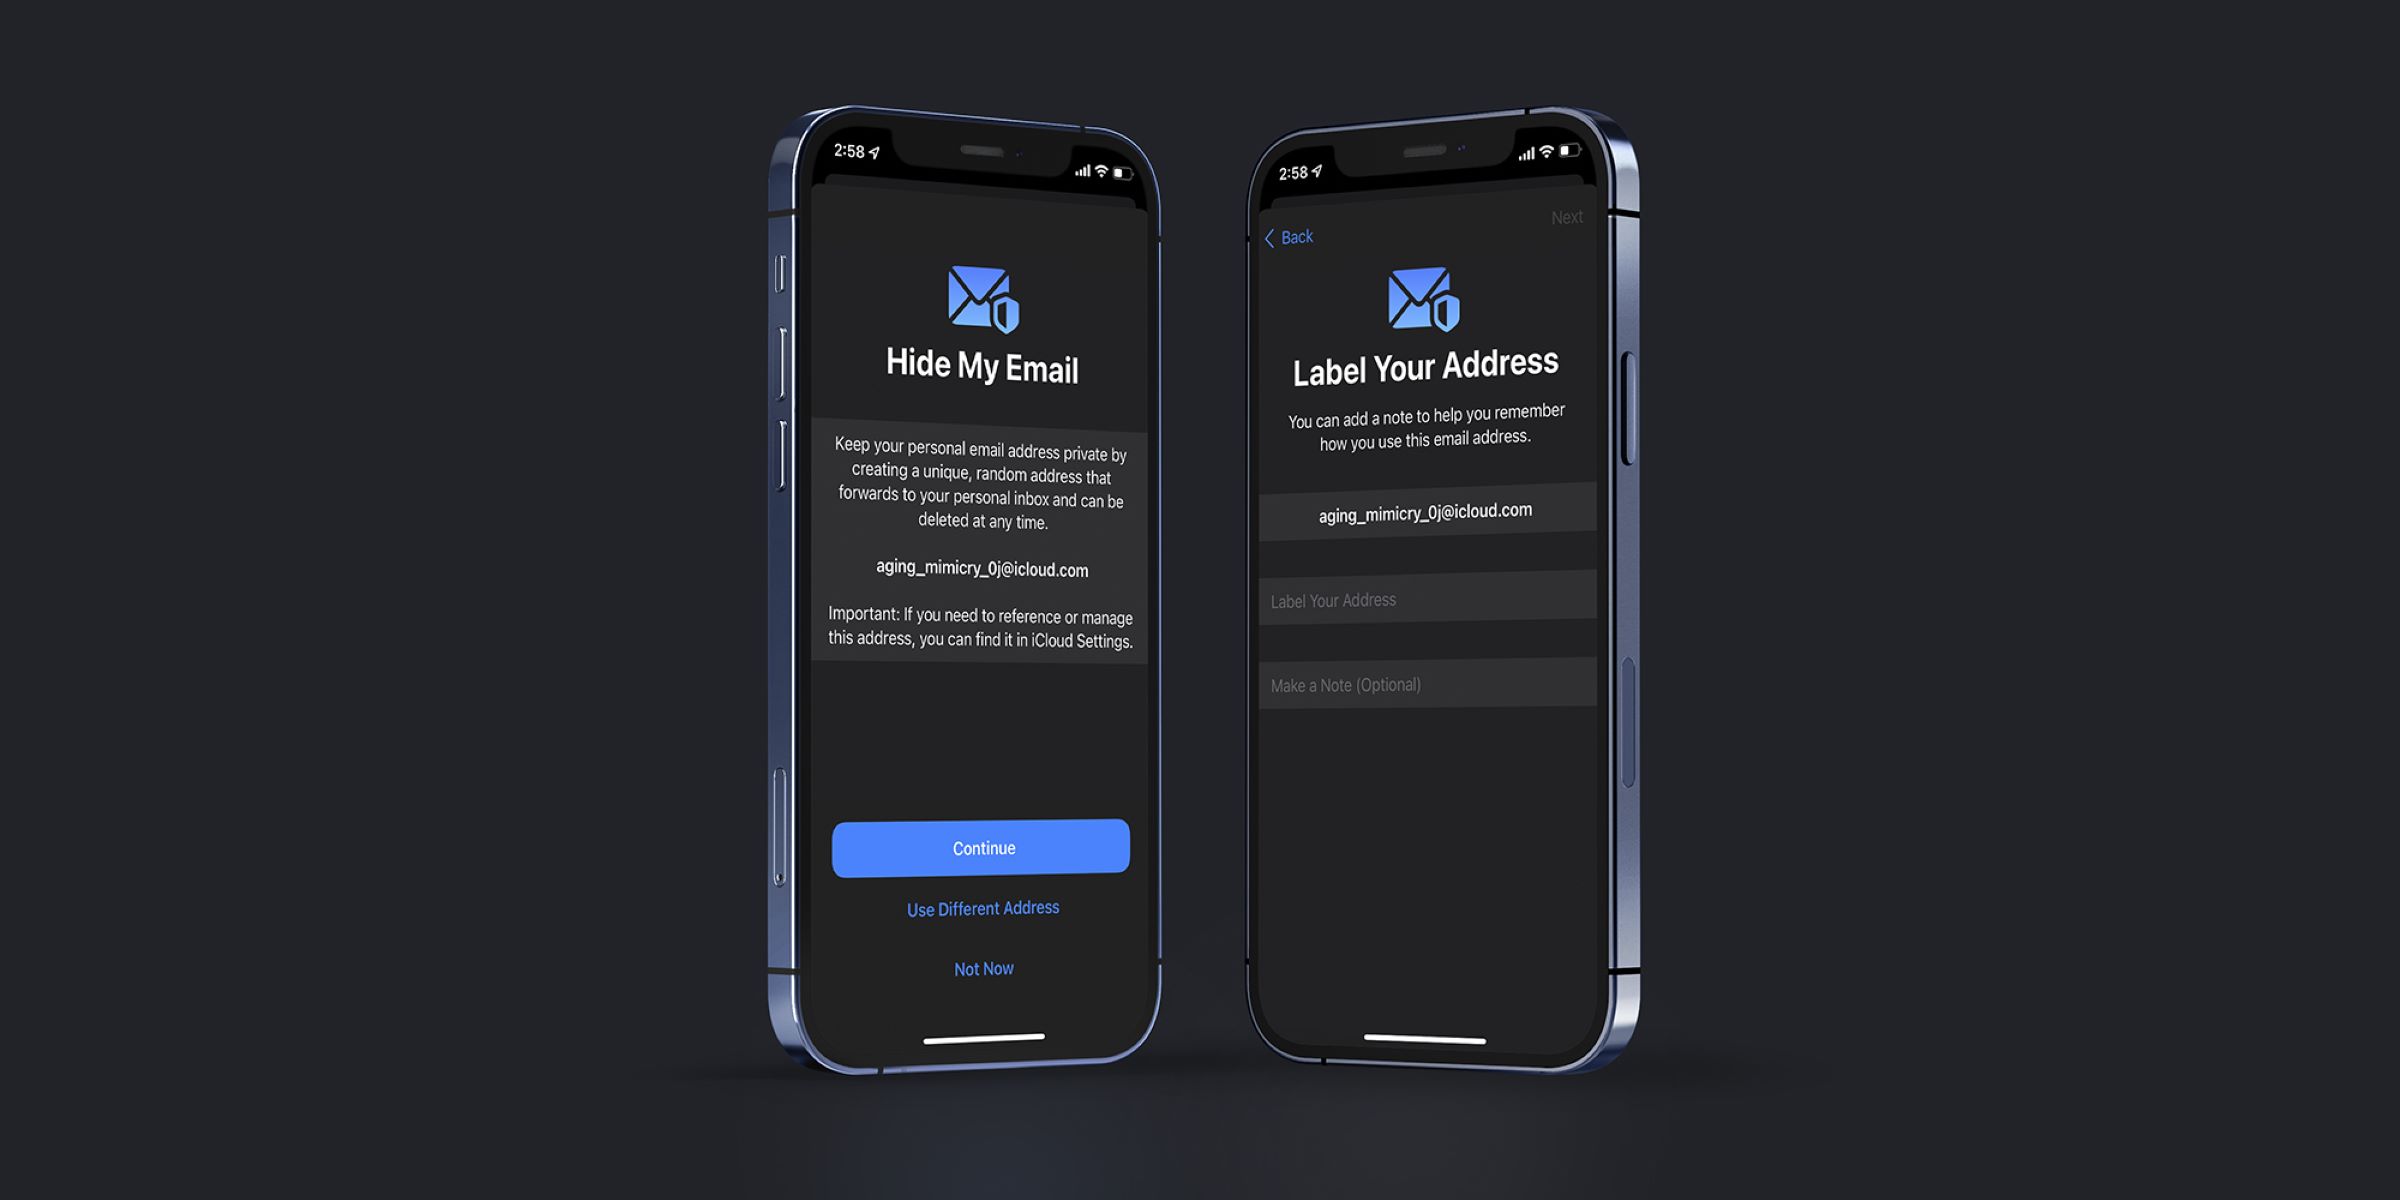
Within the iCloud settings, you will find a list of various features and options. Look for and tap on the “Hide My Email” option. This is where you can manage the Hide My Email feature and make changes as needed.
On the Hide My Email screen, you will see a toggle switch next to the “Hide My Email” label. To turn off the feature, simply tap on the toggle switch to the off position. This will disable Hide My Email and restore your primary email address as the default for future communications.
Once you have completed these steps, Hide My Email will be turned off, and you can start using your primary email address for your online interactions. Remember to update your email preferences and share your primary email address with trusted individuals and organizations to ensure seamless communication.
Step 1: Open the Settings app
The first step to turning off Hide My Email is to open the Settings app on your Apple device. The Settings app is where you can access and manage various settings and configurations for your device.
To locate the Settings app, look for the familiar gear-shaped icon on your home screen. It is typically found on the first page of your device’s home screen, but it may be located in a different location depending on your personal settings and organization of apps.
Once you have located the Settings app icon, tap on it to open the app. The app will launch, displaying a range of options and settings that you can customize according to your preferences.
By opening the Settings app, you gain access to a wealth of configuration options for your device, from changing display settings to managing app permissions. It is an essential tool for customizing and controlling your Apple device’s functionality.
After opening the Settings app, you will be ready to proceed to the next step in turning off Hide My Email. The subsequent steps will provide you with the necessary guidance to disable the feature and regain control over your primary email address.
Remember to proceed to Step 2: Tap on your Apple ID, to continue the process of turning off Hide My Email. Each step will bring you closer to disabling the feature and allowing you to use your primary email address for online interactions.
Step 2: Tap on your Apple ID
Once you have opened the Settings app on your Apple device, the next step is to tap on your Apple ID. Your Apple ID is the account that you use to log in to your device and access various Apple services and features.
To locate your Apple ID, look for your name or profile picture at the top of the Settings screen. It should be just below the search bar and above all the different sections and options available in the app.
When you tap on your Apple ID, a new screen will appear, providing you with a range of settings and options associated with your account. This screen is where you can manage your personal information, payment methods, iCloud settings, and more.
By tapping on your Apple ID, you are accessing a centralized hub that allows you to control and customize various aspects of your Apple experience. It is the gateway to managing your account settings and preferences.
After tapping on your Apple ID, you are making progress towards disabling Hide My Email. The subsequent steps will guide you through the process of turning off the feature and restoring your primary email address for online interactions.
Remember to proceed to Step 3: Tap on “iCloud”, to continue with the process of disabling Hide My Email. Each step brings you closer to regaining control over your email communication.
Step 3: Tap on “iCloud”
After tapping on your Apple ID in the Settings app on your Apple device, the next step is to tap on “iCloud”. The “iCloud” option allows you to access and manage your iCloud settings, including the Hide My Email feature.
Scroll down the screen after tapping on your Apple ID, and you will find the “iCloud” option amidst the various settings and options available. It is typically located below the “Passwords & Accounts” and above the “iTunes & App Store” options.
Tapping on “iCloud” will take you to a screen where you can manage your iCloud settings and preferences. This is where you can enable or disable various iCloud features, such as Hide My Email, to suit your personal needs.
The “iCloud” section provides you with control over your iCloud account, which is a vital aspect of your Apple device and ecosystem. It allows you to sync and access your data across multiple devices, backup your files, and manage various other features and services.
By tapping on “iCloud”, you are getting closer to disabling the Hide My Email feature. The subsequent steps will guide you through the process of turning off Hide My Email and regaining control over your primary email address for online interactions.
Remember to proceed to Step 4: Tap on “Hide My Email”, to continue the process of disabling Hide My Email. Each step brings you closer to restoring your primary email address and managing your online privacy effectively.
Step 4: Tap on “Hide My Email”
Once you have tapped on the “iCloud” option in the Settings app and accessed your iCloud settings, the next step is to tap on “Hide My Email”. This is where you will find the settings and options related to the Hide My Email feature.
Scroll down the screen after tapping on “iCloud”, and you will come across a list of various features and services associated with your iCloud account. Look for the “Hide My Email” option among these features, and then tap on it to proceed.
By tapping on “Hide My Email”, you will access the settings for this specific feature. Here, you can manage and make changes to your Hide My Email preferences.
The Hide My Email feature provides you with a unique email address that can be used for online interactions, masking your actual email address for privacy and security reasons. However, if you no longer require this feature or want to disable it, tapping on “Hide My Email” is the necessary step.
Disabling the Hide My Email feature allows you to use your primary email address for online interactions and communications. It can simplify your email management process and ensure that important messages and notifications reach you directly.
After tapping on “Hide My Email”, you are making progress towards disabling the feature and restoring your primary email address. The subsequent steps will guide you through the process of turning off Hide My Email effectively.
Remember to proceed to Step 5: Toggle off “Hide My Email”, to continue the process of disabling Hide My Email. Each step brings you closer to regaining control over your email communication.
Step 5: Toggle off “Hide My Email”
After accessing the settings for the Hide My Email feature by tapping on “Hide My Email” in your iCloud settings, you are now ready to disable the feature. The final step is to toggle off the “Hide My Email” option.
On the Hide My Email settings screen, you will see a toggle switch next to the “Hide My Email” label. This toggle switch allows you to turn the Hide My Email feature on or off.
To disable Hide My Email, simply tap on the toggle switch so that it is in the off position. When the toggle switch is off, it indicates that the Hide My Email feature is disabled and your primary email address will be used for online interactions.
By toggling off Hide My Email, you are signaling that you no longer want to mask your actual email address and that you want to use your primary email address for communication purposes.
Disabling Hide My Email can be beneficial in various situations. It allows you to establish direct communication with trusted individuals and organizations, ensures that important notifications reach your primary inbox, and simplifies your email management process.
Once you have toggled off “Hide My Email”, the feature will be disabled, and your primary email address will be restored as the default for your online interactions.
Congratulations! You have successfully turned off Hide My Email and regained control over your primary email address. Make sure to update your email preferences and inform relevant parties about the change, ensuring a seamless and efficient communication process.
Additional Considerations
While you have successfully turned off Hide My Email, there are a few additional considerations to keep in mind as you navigate your email communication:
- Privacy and Security: Disabling Hide My Email means that your primary email address will be used for online interactions. Ensure that you are cautious when sharing your email address and only provide it to trusted individuals and organizations.
- Unsubscribing from Unwanted Emails: With Hide My Email turned off, you may receive more unsolicited emails or be signed up for mailing lists without your knowledge. Take the necessary precautions to unsubscribe from any unwanted emails and regularly review your email settings for added control.
- Email Filters and Spam Settings: Adjust your email filters and spam settings to effectively manage incoming emails and prevent unwanted messages from cluttering your inbox. Familiarize yourself with the configuration options available in your email provider’s settings to optimize your email experience.
- Reviewing Privacy Settings: Take the opportunity to review your device’s privacy settings overall. Explore the various options available to customize your privacy and security preferences, ensuring that your personal data is protected and keeping you in control of your online privacy.
- Regular Account Check-ups: Periodically review your accounts and email settings to ensure that all configurations are accurate and up to date. This includes verifying your primary email address, updating contact information, and disabling or removing any unused or unnecessary accounts.
By considering these additional aspects, you can make the most of turning off Hide My Email and maintain a secure and efficient email communication experience.
Conclusion
Turning off Hide My Email on your Apple device is a simple process that allows you to regain control over your primary email address for online interactions. By following the step-by-step instructions provided in this guide, you can disable the Hide My Email feature and use your actual email address for communication purposes.
Whether you need to establish direct communication with trusted individuals or organizations, receive important notifications in your primary inbox, or consolidate your email accounts, turning off Hide My Email offers you the flexibility and control over your online presence.
Remember to consider the additional aspects discussed, such as privacy and security measures, managing unwanted emails, reviewing privacy settings, and conducting regular account check-ups. These considerations will help you optimize your email communication and protect your personal data.
We hope this guide has been helpful in assisting you with turning off Hide My Email. By disabling this feature and leveraging the full capabilities of your primary email address, you can enhance your online communication experience and ensure that important messages reach you directly.
Should you ever decide to enable Hide My Email again in the future, you can refer back to this guide or explore the corresponding settings on your device.
Thank you for following along! If you have any further questions or need assistance, feel free to consult Apple’s support resources or reach out to their customer service. Happy emailing!