Introduction
Welcome to our guide on how to test for a bad PSU (Power Supply Unit). A power supply is a vital component of any computer system, as it provides the necessary electrical power to all the other hardware components. When a PSU starts to fail, it can cause a range of issues, from random crashes and system instability to complete system failure. Therefore, it is crucial to diagnose and address any potential problems with the PSU early on.
In this article, we will discuss various signs that may indicate a faulty PSU and provide you with step-by-step instructions on how to perform different tests to determine whether your PSU is the culprit. We will explore three different methods of testing: the paperclip test, using a digital multimeter, and using a power supply tester. These methods require different tools, so make sure to have them handy before starting the testing process.
It is important to note that unless you have experience working with electronics, it is recommended to seek professional assistance when dealing with a faulty PSU. Opening the power supply unit can be dangerous and may void any existing warranties. However, if you are confident in your abilities and take the necessary precautions, these tests can give you a better understanding of your PSU’s condition.
By diagnosing a faulty PSU early on, you can prevent potential damage to your other computer components, save time troubleshooting other potential causes, and avoid costly repairs or replacements. So, without further ado, let’s dive into the signs of a bad PSU and the testing methods you can employ.
Signs of a Bad PSU
Identifying the signs of a failing PSU is crucial in determining whether the power supply unit is the root cause of the issues you are experiencing with your computer system. Here are some common signs that may indicate a bad PSU:
- Random System Crashes: If your computer suddenly shuts down or restarts without any apparent reason, it could be due to a faulty PSU. The power supply not supplying enough voltage or unstable power can lead to system instability.
- Intermittent Freezing or Lockups: A failing PSU can cause your computer to freeze or become unresponsive sporadically. This can be particularly noticeable when performing demanding tasks that require a significant amount of power.
- Error Messages or Blue Screens of Death (BSOD): If you frequently encounter error messages or the dreaded blue screen of death, it may be caused by a faulty power supply. Inadequate power delivery or fluctuations in voltage can lead to these system errors.
- Strange Noises: Unusual sounds coming from your computer, such as buzzing, clicking, or whining noises, can be indicators of a failing PSU. These noises can suggest issues with the internal components of the power supply.
- Overheating: A malfunctioning PSU can generate excessive heat, causing the overall system temperature to rise. If you notice that your computer is running hotter than usual, it could be due to a faulty power supply.
- Failure to Power On: If your computer fails to power on at all, it is possible that the PSU is not supplying any power to the system. However, it is essential to rule out other potential hardware or electrical issues before attributing it solely to the PSU.
Keep in mind that these signs can also be caused by other components or software issues. It is essential to rule out other possibilities and perform thorough testing to confirm if the PSU is indeed the problem. Now that you are aware of the signs of a bad PSU, let’s move on to the tools you will need to conduct the tests.
Tools Required for Testing
Before you can begin testing your power supply unit (PSU), you will need a few essential tools to ensure accurate results. Here is a list of the tools required for testing a PSU:
- Paperclip or PSU Tester: The paperclip test is one of the simplest and most common methods for testing a PSU. You will need a standard-sized paperclip bent into a U shape or a dedicated PSU tester, which is a small device specifically designed to test power supplies.
- Digital Multimeter: A digital multimeter is a versatile tool used for measuring various electrical properties, including voltage and resistance. It is useful for more advanced PSU testing methods and provides more accurate readings than simple paperclip tests.
- Power Supply Tester (Optional): Although not essential, a power supply tester can make the testing process easier and more convenient. It is a compact device with multiple connectors that allow you to test different aspects of the PSU, such as voltage levels, fan operation, and more.
- Screwdriver: Depending on your computer case, you may need a screwdriver to open the case and access the power supply unit. Ensure you have the appropriate screwdriver size for your specific case.
- Electrical Safety Equipment: Safety should always be a top priority when working with electronic components. It is recommended to have safety equipment such as rubber gloves, an anti-static wrist strap, and safety goggles to protect against electric shocks and other potential hazards.
Having these tools ready before starting the testing process will ensure you are well-equipped to diagnose and evaluate the condition of your PSU effectively. Moreover, it is important to work in a well-lit and static-free environment to minimize the risk of damaging any sensitive components during the testing process.
Now that you have gathered the necessary tools, let’s move on to the step-by-step procedures for testing your PSU using different methods.
Procedures for Testing
Now that you have the required tools, it’s time to delve into the procedures for testing your power supply unit (PSU). We will discuss three different testing methods: the paperclip test, using a digital multimeter, and using a power supply tester. Follow the steps below for each method:
Method 1: Paperclip Test
- Ensure your computer is turned off and unplugged from the power source.
- Locate the 24-pin ATX power connector on your PSU’s cables. This connector supplies power to the motherboard.
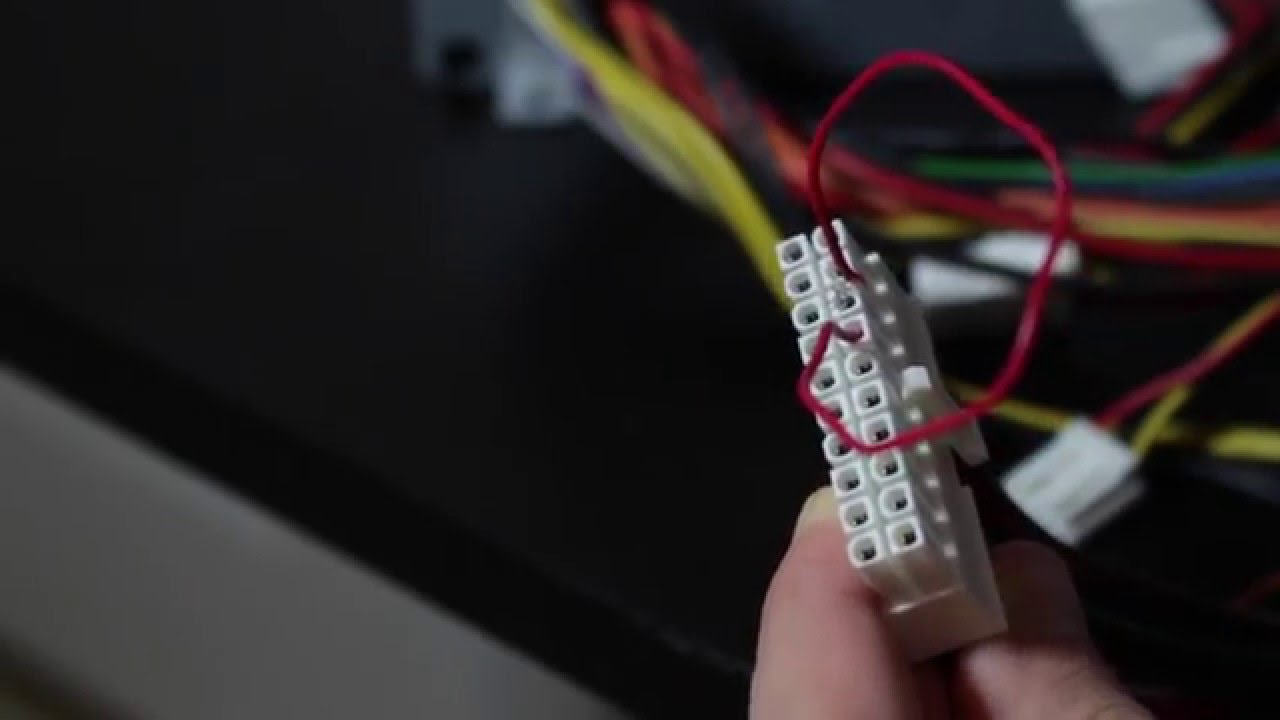
- Take a standard-sized paperclip and bend it into a U shape.
- Insert one end of the paperclip into the green wire pin of the 24-pin ATX power connector.
- Insert the other end of the paperclip into any of the black wire pins adjacent to the green wire pin.
- Plug in the PSU and switch it on. If the PSU’s fan starts spinning, it indicates that the power supply is working fine. If it does not spin, it might be a sign of a faulty PSU.
- Remember to turn off and unplug the PSU before removing the paperclip.
Method 2: Using a Digital Multimeter
- Turn off and unplug your computer from the power source.
- Open your computer case and locate the 24-pin ATX power connector.
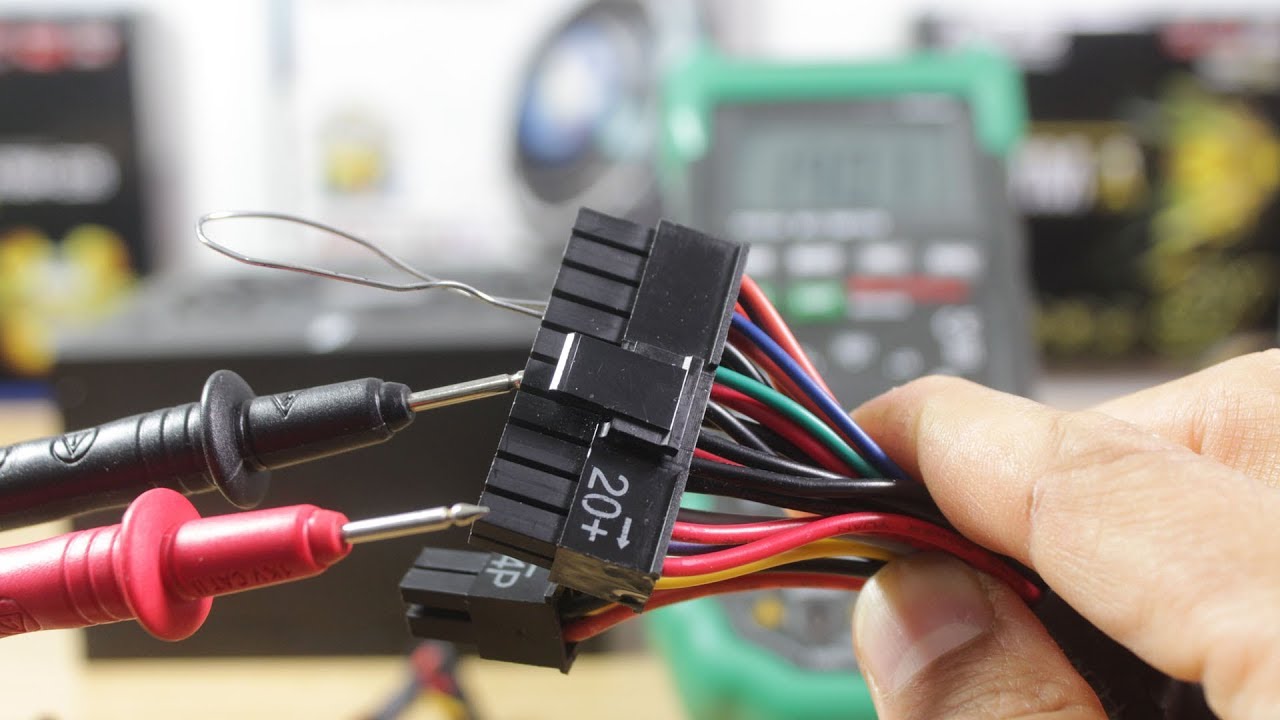
- Connect the black probe of the digital multimeter to any of the black wire pins on the ATX connector.
- Connect the red probe to the yellow wire pin, which measures +12V.
- Switch on the PSU and observe the multimeter reading. It should be around +12V, with a small margin of error.
- Repeat the process for the red wire pin, which measures +5V.
- If the readings deviate significantly from the expected values, it may indicate a faulty PSU.
- Turn off and unplug the PSU, then close your computer case.
Method 3: Using a Power Supply Tester
- Follow the manufacturer’s instructions for connecting the power supply tester to your PSU.
- Plug in the PSU and switch it on.
- Refer to the power supply tester’s manual to interpret the readings. It should indicate whether the PSU is functioning correctly or if there are any issues.
- Take note of any error codes or abnormal readings displayed by the power supply tester.
- Turn off and unplug the PSU, then remove the power supply tester.
Performing these tests will help provide insights into the health of your PSU and whether it is causing any issues in your system. However, keep in mind that these tests only provide a general assessment and are not foolproof. For a more in-depth analysis, it is recommended to consult a professional technician or consider replacing the PSU if necessary.
Method 1: Paperclip Test
The paperclip test is a simple yet effective method to determine if your power supply unit (PSU) is working properly. Follow the steps below to perform the paperclip test:
- Ensure your computer is turned off and unplugged from the power source.
- Locate the 24-pin ATX power connector on your PSU’s cables. This connector supplies power to the motherboard.
- Take a standard-sized paperclip and bend it into a U shape.
- Insert one end of the paperclip into the green wire pin of the 24-pin ATX power connector.
- Insert the other end of the paperclip into any of the black wire pins adjacent to the green wire pin.
- Plug in the PSU and switch it on.
- If the power supply’s fan starts spinning, it indicates that the PSU is receiving power and is functioning correctly. The fan spinning is a positive indication of a healthy power supply.
- Remember to turn off and unplug the PSU before removing the paperclip.
The paperclip test bypasses the motherboard and other system components to directly power up the PSU. If the fan doesn’t spin or if you don’t observe any signs of power, it might indicate a potential issue with the PSU. However, it’s important to note that the paperclip test only confirms if the PSU receives power. It doesn’t provide detailed information about the PSU’s overall functionality or voltage output.
Additionally, performing the paperclip test requires caution as it involves working with electrical components. Be sure to follow safety guidelines, such as wearing rubber gloves and working in a well-lit environment. If you’re uncomfortable performing this test on your own, it’s advisable to seek assistance from a professional technician.
While the paperclip test provides a basic understanding of whether your PSU is receiving power, it’s important to remember that it may not detect more complex issues that can cause system instability. If you have performed the paperclip test and suspect that your PSU is faulty, it’s recommended to consider further testing using a digital multimeter or a dedicated power supply tester for a more reliable assessment.
Method 2: Using a Digital Multimeter
Using a digital multimeter is a more accurate method to test the voltage output of your power supply unit (PSU). Follow the steps below to perform the test using a digital multimeter:
- Turn off and unplug your computer from the power source.
- Open your computer case and locate the 24-pin ATX power connector.
- Connect the black probe of the digital multimeter to any of the black wire pins on the ATX connector. This provides a common ground reference.
- Connect the red probe to the yellow wire pin, which measures +12V. Ensure a secure connection is made.
- Switch on the PSU, and observe the multimeter reading. It should display a voltage value around +12V, with a small margin of error.
- Repeat the process for the red wire pin, which measures +5V.
- If the voltage readings deviate significantly from the expected values, it may indicate a faulty PSU. In such cases, it is recommended to consult a professional technician for further assistance.
- Turn off and unplug the PSU, and securely close your computer case.
Using a digital multimeter offers more precise voltage readings, allowing for a more accurate assessment of your PSU’s functionality. Comparing the measured voltage values against the expected values (+12V and +5V) provides a better indication of whether your PSU is operating within acceptable limits.
However, to obtain accurate readings, ensure that the digital multimeter is set to the appropriate voltage range and that the probes are securely connected to the designated pins. It’s also essential to be cautious while working around electrical components and to follow safety guidelines, such as wearing rubber gloves and working in a static-free environment.
While the digital multimeter test provides more comprehensive results than the paperclip test, it still has limitations. It primarily focuses on measuring voltage output and may not detect other issues that can affect the PSU’s performance, such as fluctuating voltage levels under load. For a thorough evaluation of your PSU, you may consider using a dedicated power supply tester or consulting a professional technician.
Method 3: Using a Power Supply Tester
Using a power supply tester is a convenient and reliable method to test the functionality of your power supply unit (PSU). Follow the steps below to perform the test using a power supply tester:
- Refer to the manufacturer’s instructions to determine the appropriate connectors and cables required for your specific power supply tester.
- Turn off your computer and unplug it from the power source.
- Open your computer case and locate the PSU cables that connect to the motherboard, peripherals, and other components.
- Connect the corresponding connectors from the power supply tester to the corresponding PSU cables, following the labels or markings on the tester.
- Ensure all connections are secure and properly inserted into the corresponding sockets.
- Plug in the power supply and switch it on.
- Refer to the power supply tester’s manual for interpreting the readings or indicators displayed on the tester. It should indicate if the PSU is functioning correctly or if there are any potential issues.
- Take note of any error codes or abnormal readings displayed by the power supply tester for further analysis.
- Turn off and unplug the power supply, and disconnect the power supply tester from the PSU cables.
- Securely close your computer case.
A power supply tester provides a comprehensive assessment of the PSU’s functionality by examining various aspects, such as voltage levels, fan operation, and other critical parameters. The tester typically displays the results through LED lights or a digital display, making it easier to interpret the readings and identify any potential issues with the PSU.
Using a power supply tester eliminates the need for manual calculations or interpretation of voltage readings. It provides a more user-friendly and standardized approach to testing your PSU’s performance. By relying on a dedicated device, you can have more confidence in the accuracy of the results.
Remember to follow safety precautions, such as working in a well-lit and static-free environment, and ensure that all connections between the power supply tester and PSU cables are correctly established. If you encounter any abnormal readings or suspect a faulty PSU based on the power supply tester results, it is advisable to seek further assistance from a professional technician.
Performing this thorough analysis with a power supply tester enables you to diagnose potential issues with your PSU more effectively and make informed decisions about repairs or replacements.
Recognizing Different Types of PSU Failures
Power supply unit (PSU) failures can occur in various ways, and understanding the different types of failures can help in diagnosing and addressing the issue appropriately. Here are some common types of PSU failures to be aware of:
Complete PSU Failure: This type of failure occurs when the PSU stops functioning entirely. In such cases, the PSU does not provide any power to the computer components, resulting in a complete system failure. A complete PSU failure may be caused by various factors, including power surges, component deterioration, or manufacturing defects.
Overheating: Overheating is a common issue with power supplies. Excessive heat can cause the PSU to shut down or operate abnormally, leading to system instability or crashes. This can be caused by insufficient cooling or airflow within the computer case, a malfunctioning fan in the PSU, or excessive dust accumulation.
Underperforming PSU: An underperforming PSU refers to a power supply unit that does not deliver the required voltage levels consistently. This can cause instability and system crashes, or it may result in the computer components not receiving enough power to operate optimally. Underperforming PSUs can occur due to aging, improper power distribution, or faulty components.
Fluctuating Voltage: Fluctuating voltage occurs when the PSU outputs inconsistent or unstable voltage levels. This can lead to system instability, hardware malfunctions, or even permanent damage to computer components. Fluctuations in voltage can be caused by issues with the PSU’s regulation circuitry, improper connections, or power grid disturbances.
Electrical Noise: Electrical noise refers to unwanted signals or interference present in the power supply’s output. This can manifest as static or buzzing sounds, graphical artifacts on the screen, or audio disturbances. Electrical noise can result from faulty capacitors, poorly shielded components, or inadequate grounding.
Overload Protection Activation: Overload protection is a safety feature in modern PSUs that helps prevent damage to the unit and other computer components. When the power demand exceeds the PSU’s capacity, the overload protection mechanism will activate, causing the PSU to shut down or enter a protective mode. This can occur due to power-hungry components, inadequate power supply rating, or a faulty overload protection circuit.
It’s important to recognize these different types of PSU failures so that you can troubleshoot and initiate appropriate solutions. If you experience any issues or suspect a PSU failure, it is recommended to consult with a professional technician to diagnose and resolve the problem effectively.
Conclusion
Testing for a bad power supply unit (PSU) is an essential step in diagnosing and resolving hardware-related issues within your computer system. By recognizing the signs of a bad PSU and utilizing the appropriate testing methods, you can effectively determine if the PSU is the source of your problems.
In this guide, we discussed the signs of a bad PSU, including random system crashes, intermittent freezing or lockups, error messages or blue screens of death, strange noises, overheating, and failure to power on. By identifying these indicators, you can narrow down the possible cause of the issues you are experiencing.
We also covered the tools required for testing, such as a paperclip or PSU tester, a digital multimeter, a power supply tester, a screwdriver, and proper electrical safety equipment. These tools will ensure that your testing process is accurate and safe.
We discussed three methods for testing a PSU: the paperclip test, using a digital multimeter, and using a power supply tester. Each method offers its own advantages and accuracy levels, allowing you to choose the most suitable method based on your needs and expertise.
Lastly, we explored different types of PSU failures, including complete failure, overheating, underperforming PSU, fluctuating voltage, electrical noise, and overload protection activation. Being aware of these various failure types can aid in identifying the specific issue with your PSU.
Remember, if you are unsure or uncomfortable performing any PSU tests on your own, it is always wise to seek professional assistance from a certified technician. They can offer expert guidance and ensure that the testing process is conducted safely.
By following these guidelines and conducting thorough testing, you can accurately diagnose the condition of your PSU, minimize the risk of further hardware damage, and make informed decisions regarding repairs or replacements. A reliable and properly functioning PSU is crucial for the overall stability and performance of your computer system.
So, take the time to test your PSU when necessary, and ensure that it is in optimal working condition to enjoy a smooth and trouble-free computing experience.


