Introduction
Welcome to our guide on how to tell if a graphics card is dead. Graphics cards are crucial components in gaming rigs and computers used for graphic-intensive tasks. They handle the rendering of images, videos, and animations, ensuring smooth and visually pleasing experiences. However, like any electronic device, graphics cards can experience issues and even fail over time.
Identifying if your graphics card is dead or on the verge of failure is essential for troubleshooting and making informed decisions about repairs and upgrades. This article will discuss the common symptoms that indicate a dead graphics card and provide steps to diagnose the issue.
Before we dive into the details, it’s important to understand that a dead graphics card refers to a malfunctioning or non-functional card that can no longer perform its intended tasks. It can be caused by various factors such as age, overheating, electrical issues, or physical damage.
It’s worth noting that the symptoms we’ll discuss in this guide aren’t exclusive to dead graphics cards. Some issues can be resolved through troubleshooting or driver updates. However, if you’ve exhausted all possibilities and are still experiencing these symptoms, it’s likely that your graphics card needs either repair or replacement.
Now, let’s explore the common symptoms that may signify a dead graphics card. By identifying these indicators, you can take the appropriate steps to diagnose the issue and find a solution.
Common Symptoms of a Dead Graphics Card
When a graphics card is dead or starting to fail, it often exhibits noticeable symptoms. These indicators can help you determine if your graphics card is the culprit behind your computer’s display issues. Let’s explore some of the most common symptoms of a dead graphics card:
1. Black Screen: One of the most apparent signs of a dead graphics card is when your computer’s screen goes completely black. If you see no display output, even after restarting your computer, it could indicate a problem with the graphics card.
2. No Display Output: In addition to a black screen, you may experience a complete lack of display output. This means that you won’t see anything on your monitor, and the screen remains blank, even though your computer is powered on.
3. Artifacts or Glitches on the Screen: Another common symptom is the appearance of strange artifacts or glitches on your screen. These may manifest as flickering lines, distorted images, or random colored pixels. If you observe unusual graphical anomalies, it could indicate a problem with the graphics card’s hardware or memory.
4. Overheating and Fan Failure: Graphics cards can generate a significant amount of heat during operation, and they rely on fans to keep them cool. If you notice that your graphics card’s temperature is consistently high or that the fans are not spinning correctly, it may be a sign of impending failure. Overheating can cause the graphics card to malfunction and lead to performance issues.
5. Computer Freezing or Crashing: A dying graphics card can cause your computer to freeze or crash intermittently. If you experience frequent system freezes or crashes during graphic-intensive tasks, it’s worth considering the possibility that your graphics card may be failing.
6. Invalid or Outdated Drivers: Graphics card drivers play a crucial role in ensuring compatibility and optimal performance. If you encounter driver-related issues such as driver crashes, blue screen errors, or the inability to install updated drivers, it could be a sign of a failing graphics card.
Remember that these symptoms alone are not definitive proof of a dead graphics card, as they can also occur due to other factors like driver conflicts or software issues. However, if you experience multiple symptoms simultaneously and have ruled out other potential causes, it’s likely that your graphics card needs attention.
Black Screen
One of the most common and noticeable symptoms of a dead graphics card is encountering a black screen. This occurs when your computer’s monitor fails to display any image or output, even when the system is powered on.
A black screen can happen suddenly, or it may occur after a computer restart or during booting. In most cases, if you see a black screen and there is no error message or any other indication of the problem, it is likely related to the graphics card.
There are various reasons why a black screen occurs, and it’s important to eliminate other potential causes before determining if the graphics card is at fault. Here are some steps you can take to troubleshoot the issue:
1. Check the Monitor Connection: Ensure that the monitor cable is securely connected to both the computer and the monitor. Sometimes, a loose or faulty cable can cause a black screen. Try disconnecting and reconnecting the cable or using a different cable to rule out any connection problems.
2. Test with a Different Monitor: Connect your computer to a different monitor or TV to see if the black screen persists. If the other monitor displays the image correctly, it suggests that your original monitor may be faulty. However, if the black screen persists on multiple monitors, it is more likely a graphics card issue.
3. Check the Power Supply: Insufficient power supply can also cause a black screen. Ensure that your power supply unit is providing enough power to both the graphics card and other components in your computer. Consider checking the power cables and testing with a different power supply if possible.
4. Reinstall Graphics Drivers: Faulty or outdated graphics drivers can sometimes lead to a black screen. Uninstall your current graphics driver and reinstall the latest version from the official manufacturer’s website. Make sure to follow the proper steps for driver installation to avoid any issues.
If none of these steps resolves the black screen issue, it could indicate a dead graphics card. At this point, it may be necessary to consult a professional or consider getting a replacement graphics card.
Keep in mind that a black screen can also occur due to other hardware or software faults. It’s crucial to rule out these possibilities before concluding that the graphics card is the cause. If you are unsure or uncomfortable troubleshooting the issue yourself, seeking assistance from a knowledgeable technician is recommended.
No Display Output
Another common symptom of a dead graphics card is experiencing no display output. This means that your computer is powered on, but no image or signal is being sent to the monitor, resulting in a blank screen.
When you encounter no display output, it’s important to first ensure that your monitor is functioning correctly. Check if the monitor power is on, the cables are properly connected, and the brightness and contrast settings are adjusted properly. Additionally, verify that the monitor is set to the correct input source.
If you’ve confirmed that the monitor is working properly, you can then focus on troubleshooting the graphics card. Here are some steps you can take:
1. Verify the Graphics Card Connection: Ensure that the graphics card is securely inserted into the appropriate slot on the motherboard. Sometimes, a loose or improperly seated card can result in no display output. Carefully remove and reinsert the graphics card, making sure it is properly aligned and firmly seated.
2. Test with Different Video Ports: If your graphics card has multiple video output ports (such as HDMI, DisplayPort, or DVI), try connecting your monitor to a different port. This helps determine if the issue is specific to one port or if there is a general problem with the graphics card.
3. Check BIOS Settings: Access the BIOS (Basic Input/Output System) of your computer and verify that the graphics card is recognized and properly configured. Some BIOS settings may need adjustment to prioritize the dedicated graphics card over any integrated graphics options.
4. Test with a Different Graphics Card: If possible, borrow or obtain a spare graphics card to replace your current one temporarily. Connect the monitor to the new graphics card and check if display output is restored. If it is, it suggests that your original graphics card may be faulty.
5. Consult a Professional: If you have exhausted all troubleshooting steps and still experience no display output, it is likely that your graphics card is dead or malfunctioning. At this point, it may be necessary to seek professional assistance or consider replacing the graphics card.
Remember that no display output can also be caused by issues with the motherboard, power supply, or other hardware components. It’s essential to rule out these possibilities before concluding that the graphics card is the culprit.
If you are unsure or uncomfortable performing the troubleshooting steps yourself, it’s recommended to seek help from a qualified technician who can diagnose and resolve the issue efficiently.
Artifacts or Glitches on the Screen
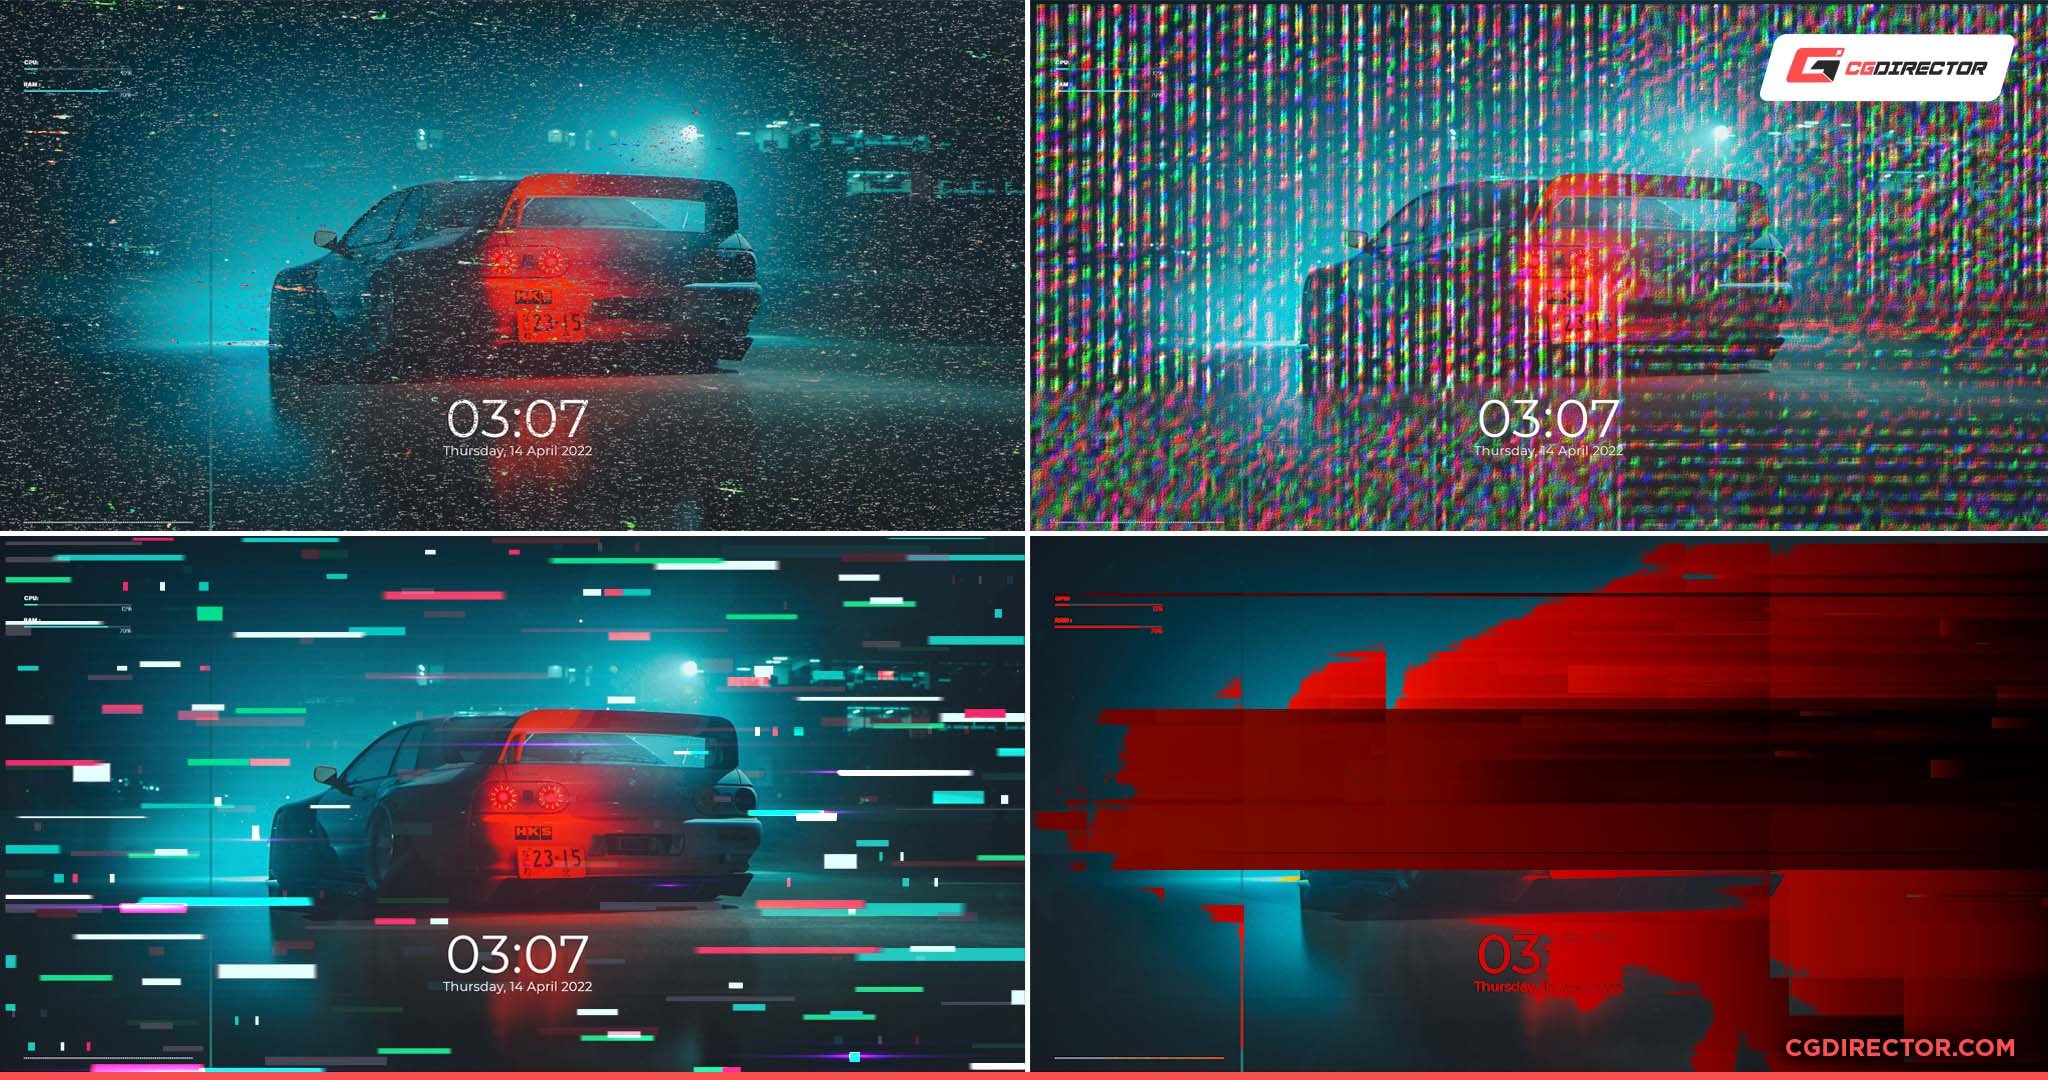
One of the visual indicators of a dead or failing graphics card is the presence of artifacts or glitches on the screen. These anomalies can manifest in various forms, such as flickering lines, distorted images, random colored pixels, or screen tearing.
When you encounter artifacts or glitches on the screen, it’s crucial to determine whether the issue lies with the graphics card itself or if it’s a result of other factors. Here are some steps to help you troubleshoot:
1. Check the Display Cable: Ensure that the display cable connecting your graphics card to the monitor is firmly plugged in and not damaged. A loose or faulty cable connection can cause visual artifacts or glitches. Try using a different cable or reconnecting the current one to rule out any connection issues.
2. Clean the Graphics Card and Ports: Dust accumulation or dirt on the graphics card or its ports can interfere with the signal and lead to visual anomalies. Carefully disconnect the graphics card, clean it using compressed air or a soft brush, and gently wipe the ports. Reinstall the card after ensuring it is dry and clean.
3. Monitor for Overheating: Overheating can cause artifacts and glitches on the screen. Monitor the temperature of your graphics card using software or the manufacturer’s tools. If it consistently reaches high temperatures, it may be necessary to improve airflow in your system or check the functioning of the graphics card’s cooling system.
4. Test with a Different Monitor: Connect your computer to a different monitor or TV to see if the artifacts or glitches persist. If the issue is resolved with a different display, it suggests that the original monitor may be the problem. However, if the artifacts or glitches occur on multiple displays, it is more likely tied to the graphics card.
5. Update or Rollback Graphics Drivers: Outdated or incompatible graphics drivers can cause visual disturbances. Try updating your graphics card drivers to the latest version from the manufacturer’s website. If the issue persists, attempt to rollback the drivers to a previous version that was stable and free from visual anomalies.
6. Test with a Different Graphics Card: If possible, try using a different graphics card in your system. This helps determine if the artifacts or glitches are caused by the original graphics card. If the issue is resolved with the new graphics card, it confirms that the original card is either failing or has a hardware defect.
If these troubleshooting steps do not resolve the artifacts or glitches on the screen, it is likely that your graphics card is dead or experiencing a hardware malfunction. In such cases, seeking professional assistance or considering a replacement may be necessary.
Remember, artifacts and glitches can sometimes be caused by other factors such as software conflicts or faulty monitors. Therefore, it’s essential to eliminate these possibilities through thorough troubleshooting before concluding that the graphics card is the primary culprit.
Overheating and Fan Failure
When it comes to graphics cards, overheating and fan failure are two critical issues that can indicate a failing or dead graphics card. Graphics cards generate a significant amount of heat during operation, and they rely on cooling fans to keep them within optimal temperature limits. If these fans fail or the card becomes too hot, it can lead to performance issues and potential hardware damage.
Here are some symptoms and steps to help you identify and address overheating and fan failure:
1. High GPU Temperature: Monitor the temperature of your graphics card using software provided by the manufacturer or third-party applications. If the temperature consistently exceeds the recommended limits during normal use or under heavy load, it may indicate inadequate cooling or fan failure.
2. Excessive Fan Noise or No Fan Noise: Pay attention to your graphics card’s fan noise. A gradual increase in fan noise may indicate a higher workload or inadequate cooling. Conversely, no fan noise at all could mean that the fans have stopped functioning altogether.
3. Visually Inspect Fans: Physically inspect your graphics card’s fans to ensure that they are spinning correctly. Power down your system and open the computer case to access the graphics card. Look for any dust buildup, cable obstructions, or physical damage that may impede the fan’s movement. Clean the fans carefully using compressed air or a soft brush to remove any accumulated dust or debris.
4. Check Fan Speed: Verify the fan speed of your graphics card using software or the BIOS. If the fan speed remains consistently low or if it fails to increase under heavy load, it could indicate a problem with the fan controller or motor.
5. Improve Airflow: Ensure that your computer’s airflow is optimal. Make sure that the case fans are functioning correctly and that there is proper circulation of air around the graphics card. Remove any obstacles or cables that may impede airflow and consider additional cooling solutions if needed, such as case fans or liquid cooling systems.
6. Replace the Fan: If your graphics card’s fan is not functioning properly, you may need to replace it. Consult the manufacturer’s website or contact their support for information regarding compatible replacement fans. Alternatively, you can find third-party cooling solutions designed specifically for graphics cards.
Overheating and fan failure can lead to reduced performance, system instability, and even permanent damage to your graphics card. It’s crucial to address these issues promptly to avoid further complications and potential data loss.
If you’ve taken the necessary steps to address overheating and fan failure, but the issues persist, it may indicate a more severe problem with the graphics card itself. In such cases, it is recommended to consult with a professional or consider a replacement graphics card.
Remember to regularly monitor your graphics card’s temperature and fan performance to ensure that it remains within acceptable limits. Keeping your graphics card cool and properly maintained will help prolong its lifespan and ensure optimal performance for your gaming or graphic-intensive tasks.
Computer Freezing or Crashing
If you find your computer frequently freezing or crashing during graphic-intensive tasks, it could indicate a problem with your graphics card. This symptom can be frustrating and disruptive, but it serves as a clear signal that something is amiss.
There are several reasons why a failing graphics card may cause your computer to freeze or crash. Here are some steps to help you diagnose and address this issue:
1. Monitor System Temperatures: High temperatures can lead to system instability. Check the temperature of your graphics card using software or the manufacturer’s diagnostic tools. If the temperature consistently exceeds the recommended limits, it could be a sign of inadequate cooling or fan failure.
2. Dust and Debris: Dust accumulation on the graphics card’s heatsink and fans can impede airflow and cause overheating. Power down your system, open the computer case, and gently clean the graphics card using compressed air or a soft brush. Make sure to remove any accumulated dust or debris carefully.
3. Update Graphics Card Drivers: Outdated or incompatible graphics card drivers can cause crashes and freezes. Ensure you have the latest drivers installed from the manufacturer’s website. Consider using specialized driver installation software to ensure a clean installation and avoid conflicts.
4. Test with Different Applications or Games: If your computer only freezes or crashes when running specific applications or games, it could be an issue related to software compatibility or optimization. Try running different applications or games to see if the issue persists. If it occurs across various applications, it is more likely a hardware-related problem.
5. Check for Error Messages: Pay attention to any error messages or blue screen codes that appear when your computer freezes or crashes. These messages can provide valuable information about the specific issue causing the problem. Note down the error codes or messages and search online for possible solutions or seek assistance from technical forums.
6. Test with a Different Graphics Card: If possible, try using a different graphics card in your system. Swap out the original card and observe if the freezing or crashing issue persists. If the problem disappears with the new card, it confirms that the original graphics card is likely the cause of the instability.
If these steps do not resolve the freezing or crashing issues, it is probable that your graphics card requires further attention or replacement. Consult a professional technician or the graphics card manufacturer’s support team for assistance and guidance.
Keep in mind that freezing or crashing can also occur due to other factors, such as insufficient system memory, driver conflicts, or faulty power supply units. It is crucial to rule out these possibilities through thorough troubleshooting before concluding that the graphics card is solely responsible.
Regularly maintaining your system, including keeping the graphics card and drivers up to date, can help prevent freezing and crashing issues. Additionally, ensuring proper cooling and adequate power supply for your graphics card will contribute to stable performance and a more enjoyable computing experience.
Invalid or Outdated Drivers
Invalid or outdated graphics card drivers can often cause various issues, including performance problems, display glitches, and system instability. If you’re experiencing any of these issues, it’s essential to consider the possibility that your graphics card drivers are the culprit.
Here are some steps to diagnose and address problems related to invalid or outdated drivers:
1. Identify Driver Version: Determine the current version of your graphics card driver. You can usually find this information in your operating system’s device manager or through the graphics card control panel. Compare this with the latest driver version available on the manufacturer’s website.
2. Update Drivers: If a newer driver version is available, download and install it from the manufacturer’s official website. Make sure to choose the correct driver version that corresponds to your operating system and graphics card model. Follow the installation instructions provided by the manufacturer to ensure a smooth and successful update process.
3. Clean Driver Installation: To ensure a clean and error-free driver update, consider using specialized driver installation software. These programs can help remove old driver remnants, perform a fresh installation, and optimize driver settings for your system. This can help resolve conflicts and improve overall driver performance.
4. Rollback Drivers: If you recently updated your graphics card driver and started experiencing problems, you can try rolling back to a previous version. Go to your operating system’s device manager, locate the graphics card entry, and choose the “Rollback Driver” option. This reverts the driver to a previously installed version that worked stably for your system.
5. Perform Clean Uninstall and Reinstall: If you continue to encounter driver-related issues, it may be necessary to perform a clean uninstall and reinstall of the graphics card drivers. Use specialized software or the manufacturer’s instructions to completely remove the existing drivers, restart your computer, and then reinstall the latest version.
6. Verify Driver Compatibility: Ensure that the driver version you’re using is compatible with your operating system, as well as any essential software or games you use. Incompatibilities can lead to instability and performance problems. Check the manufacturer’s website for compatibility information and any specific recommendations or known issues.
Invalid or outdated graphics card drivers can lead to a range of issues, but it’s important to note that not all problems are driver-related. If you’ve exhausted troubleshooting driver issues and continue to experience difficulties, it’s recommended to explore other potential causes or seek assistance from technical support channels.
Regularly checking for driver updates and keeping your graphics card drivers up to date is a good practice to ensure optimal performance and compatibility. Many driver updates include bug fixes, performance improvements, and support for new features, all of which contribute to a better computing experience.
Steps to Diagnose a Dead Graphics Card
If you suspect that your graphics card is dead or not functioning correctly, it’s essential to go through a systematic process to diagnose the issue accurately. Here are the steps you can take to determine if your graphics card is dead:
1. Checking Physical Connections: Verify that the graphics card is properly seated in its slot on the motherboard. Ensure that all power cables and connectors are securely attached to the card. Loose or disconnected connections can cause the graphics card to malfunction or not function at all.
2. Testing with Different Video Ports: If your graphics card has multiple video output ports (e.g., HDMI, DisplayPort, DVI), try connecting your monitor to each of them one at a time. If none of the ports display any output, it suggests that the graphics card is not functioning correctly.
3. Testing with a Different Graphics Card: If possible, borrow or obtain a spare graphics card and install it in your system. Connect the monitor to the new graphics card and observe if you are able to obtain a display output. If the new graphics card works properly, it indicates that your original graphics card is likely dead or malfunctioning.
4. Running Diagnostic Software: Many graphics card manufacturers provide diagnostic software that can help detect hardware issues. Download and install the appropriate diagnostic tool from the manufacturer’s website. Run the tool and follow the instructions to conduct a comprehensive test of your graphics card’s functionality.
5. Observing System Behavior: Monitor your system for any abnormal behavior that may indicate a dead graphics card. Look for symptoms like a black screen, no display output, artifacts or glitches on the screen, overheating, or frequent system freezes or crashes during graphic-intensive tasks. Note down any specific patterns or occurrences that you observe.
6. Seeking Professional Assistance: If you have followed all the above steps and are still unsure whether your graphics card is dead or if you are uncomfortable performing further troubleshooting, it’s advisable to seek assistance from a professional technician or the graphics card manufacturer’s support team. They can provide expert guidance and help diagnose the issue accurately.
Remember that while these steps can help you determine if your graphics card is dead, they don’t guarantee a definitive diagnosis. Some issues may require further testing or inspection by a professional. It’s crucial to consider other potential causes, such as software conflicts or hardware failures, before concluding that the graphics card is dead.
If you determine that your graphics card is dead, you can explore options like warranty claims, repairs, or replacing the card with a new one based on your specific circumstances and budget. Proper diagnosis ensures that you make informed decisions about addressing the issue and getting your system back up and running smoothly.
Checking Physical Connections
When diagnosing a potentially dead graphics card, it’s important to start with a basic check of the physical connections. Loose or faulty connections can cause a range of issues, including a non-functional or malfunctioning graphics card. Here are the steps to follow when checking the physical connections:
1. Power Down Your System: Before proceeding with any physical checks, ensure that your computer is fully powered down and disconnected from any power source. This will prevent any accidental damage and ensure your safety during the inspection.
2. Open the Computer Case: Depending on your computer model, use the appropriate tools to open the computer case. This will give you access to the internal components, including the graphics card.
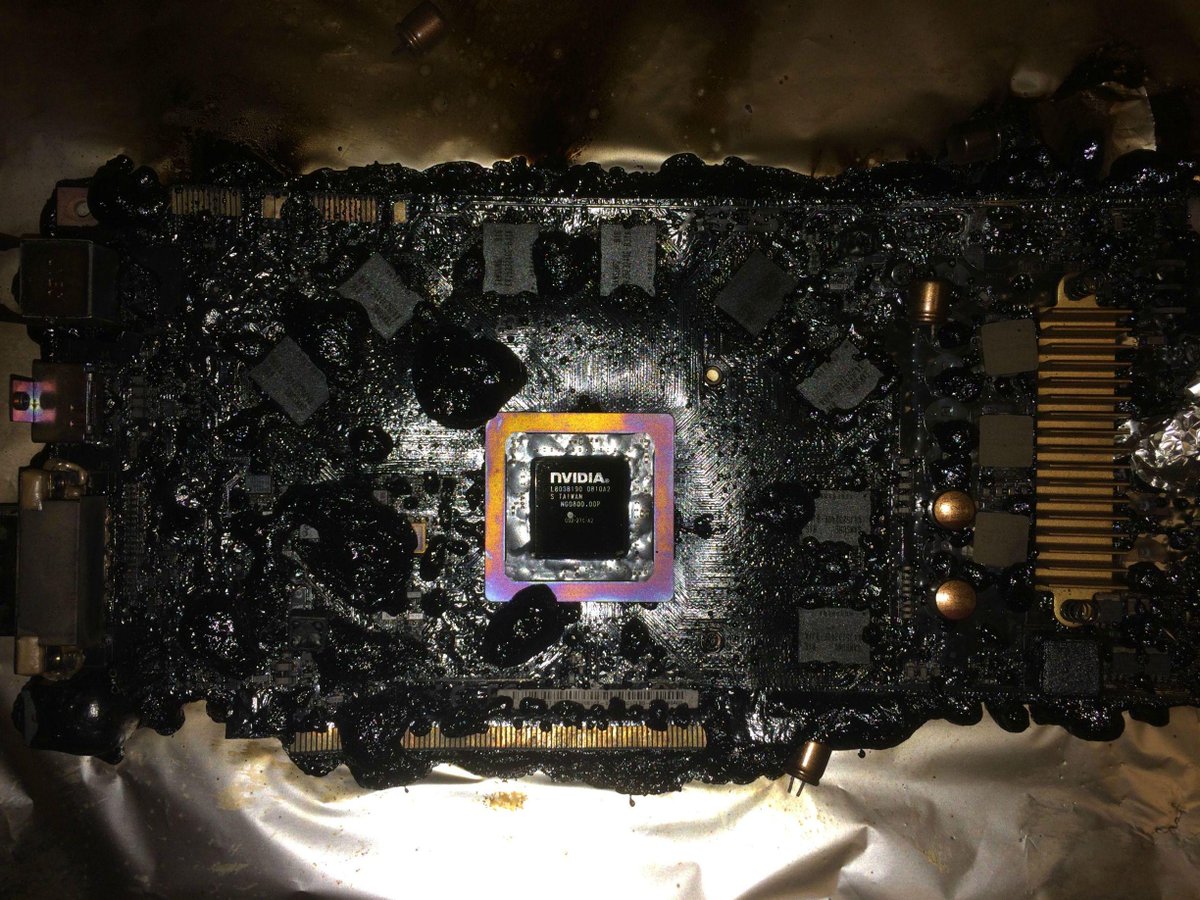
3. Inspect the Graphics Card: Locate the graphics card within your computer. It is usually inserted into a dedicated slot on the motherboard. Carefully examine the card for any visible signs of damage or physical abnormalities. Look for bent pins, burns, discolored components, or swollen capacitors. These can indicate potential issues with the graphics card.
4. Ensure Proper Seating: Verify that the graphics card is securely and properly seated in the slot on the motherboard. Gently press down on the card to ensure it is fully inserted. Loose or improperly seated connections can prevent the graphics card from functioning correctly.
5. Check Power Connections: Confirm that all power cables and connectors are securely attached to the graphics card. Ensure that the power supply unit’s cables providing power to the graphics card (such as 6 or 8-pin connectors) are fully inserted and properly connected. Faulty or loose power connections can lead to a non-functional graphics card.
6. Clean the Connections: Dust or debris accumulation can interfere with the proper connection between the graphics card and the motherboard. Use compressed air or a soft brush to clean the connectors and remove any dirt or grime. Be gentle to avoid damaging the components.
7. Reassemble and Power On: Once you have checked all the connections and ensured they are secure, reassemble your computer by closing the case. Ensure that all screws and connectors are tightened properly. Finally, reconnect the power cord and power on your computer to observe if the graphics card functions correctly.
If the graphics card still exhibits issues after checking and securing the physical connections, it suggests that the problem may lie elsewhere, such as with the card itself or other components of your system. Further troubleshooting or professional assistance may be required to pinpoint the exact cause.
Remember that proper handling and caution should be exercised when working inside your computer. If you are unsure or uncomfortable performing the physical checks yourself, it is advisable to seek assistance from a knowledgeable technician who can ensure a safe and accurate inspection of your graphics card.
Testing with Different Video Ports
If you suspect that your graphics card may be dead or malfunctioning, one useful step in the diagnosis process is to test with different video ports. Graphics cards often come equipped with multiple video output ports, such as HDMI, DisplayPort, or DVI. By connecting your monitor to different ports, you can identify if the issue lies with a specific port or the entire graphics card. Here’s how to test with different video ports:
1. Identify Available Video Ports: Take note of the different video output ports available on your graphics card. These ports may vary depending on the model and brand of your graphics card.
2. Disconnect and Reconnect the Cable: Start by disconnecting the cable connecting your monitor to the graphics card. Inspect the cable for any damages or loose connections. Ensure that the cable is securely plugged into the graphics card and the monitor.
3. Connect to an Alternate Video Port: Choose a different video output port on the graphics card and connect the cable to it. For example, if you were previously using an HDMI port, switch to a DisplayPort or DVI port. Make sure the cable is securely plugged into the new port.
4. Power On the System: Once the cable is connected to the alternate video port, power on your computer and monitor. Allow your system to boot up completely and observe if you can see a display output on your monitor.
5. Test with Multiple Ports: If you don’t get any display output after testing with the first alternate video port, repeat the process with the remaining ports on your graphics card. Connect the cable to each port one at a time and power on your system to see if any of them provide a display.
6. Observe for Display Output: As you test different video ports, carefully observe your monitor for any signs of display output. Look for the “No Signal” message or a blank screen. If you still don’t see any display output from any of the ports, it may indicate a problem with the graphics card itself.
By testing with different video ports, you can determine if the issue lies with a specific port or if the entire graphics card is not functioning correctly. If you obtain display output from one or more alternate ports, it suggests that the original port may be faulty. In such cases, you can use a different port as a temporary solution or consider seeking professional assistance for repair or replacement of the graphics card.
It’s important to note that if none of the video ports provide a display output, it doesn’t necessarily confirm that the graphics card is dead. Other factors, such as software conflicts, driver issues, or even problems with the monitor or cable, can also cause a lack of display output. Further troubleshooting or professional guidance may be required to identify the precise cause of the problem.
Testing with a Different Graphics Card
If you suspect that your current graphics card may be dead or malfunctioning, one effective way to determine the cause of the issue is to test your system with a different graphics card. By swapping out your original card with a known working one, you can assess if the problem lies with the graphics card itself or with other components of your system. Here’s how to proceed with testing your system using a different graphics card:
1. Obtain a Spare Graphics Card: If available, borrow a spare graphics card from a friend, family member, or another computer. Alternatively, you can purchase or rent a temporary graphics card for testing purposes.
2. Power Down Your System: Before attempting to swap the graphics cards, make sure your computer is fully powered off and disconnected from any power sources. This ensures safety during the installation process.
3. Open Up Your Computer: Depending on your computer model, use the appropriate tools to open the computer case and gain access to the interior components.
4. Remove the Original Graphics Card: Carefully disconnect the power cables, if any, from your original graphics card. Then, release any securing mechanisms, such as screws or clips, to free the card from its slot on the motherboard. Gently pull the card out of the slot, making sure not to bend any components or damage any connectors.
5. Install and Connect the Spare Graphics Card: Take your spare graphics card and insert it into the vacant slot on the motherboard. Ensure that the card is aligned with the slot and properly seated. Secure it in place using screws or clips. Connect any necessary power cables to the new graphics card.
6. Reassemble and Power On: Close the computer case and ensure that all screws and connectors are tightened properly. Reconnect the power cord and power on your computer.
7. Observe for Display Output and System Stability: As your system boots up, carefully monitor your monitor for display output. If you see a clear image and no error messages, it indicates that the spare graphics card is functioning correctly. Continue to use your computer and perform tasks that previously caused issues to observe if the system remains stable and the graphics performance is satisfactory.
If the system functions properly with the spare graphics card and all previous issues are resolved, it suggests that the original graphics card is likely the cause of the problem. In such cases, you may consider repairing or replacing the faulty graphics card.
However, if the issues persist or new issues arise even with the spare graphics card, it indicates that the problem may lie elsewhere in your system, such as the motherboard, power supply, or other hardware components.
Remember to handle both the original and spare graphics cards with care, ensuring that they are properly seated, and all connections are securely attached. If you are unsure or uncomfortable performing the graphics card swap yourself, it is advisable to seek assistance from a knowledgeable technician.
Running Diagnostic Software
Running diagnostic software specifically designed for graphics cards can be a valuable step in determining whether your graphics card is dead or malfunctioning. These diagnostic tools can provide in-depth tests and analyses of your graphics card’s hardware and help identify any underlying issues. Here’s how to run diagnostic software to assess the health of your graphics card:
1. Identify the Manufacturer’s Diagnostic Software: Visit the official website of your graphics card manufacturer to locate and download their recommended diagnostic software. These tools are often available as standalone applications or bundled with driver packages.
2. Install the Diagnostic Software: Once you’ve obtained the diagnostic software, run the installer and follow the on-screen instructions to install it on your computer. Make sure to choose the correct version that corresponds to your operating system and graphics card model.
3. Launch the Diagnostic Software: Open the diagnostic software from the Start menu or desktop shortcut. In some cases, it may automatically launch after installation. The software generally provides a user-friendly interface that allows you to perform various tests and obtain detailed reports on your graphics card’s condition.
4. Perform Hardware Tests: Look for options within the diagnostic software to run hardware tests specifically designed for the graphics card. These tests typically assess the GPU, memory, cooling system, and other critical components. Follow the prompts and allow the diagnostic software to complete the tests.
5. Check for Error Messages or Failure Reports: After the tests are completed, review the software’s report for any error messages, warnings, or failure indications. Pay close attention to areas that highlight potential hardware failures or issues. Some diagnostics software provides a detailed breakdown of your graphics card’s health, which can help pinpoint specific problems.
6. Consult the Manufacturer’s Documentation: If you encounter any error messages or are uncertain about the diagnostic results, refer to the manufacturer’s documentation or support resources. The documentation may provide insights into the diagnostics software and offer troubleshooting steps or recommendations for the reported issues.
7. Act on the Diagnostic Results: Depending on the diagnostic software’s findings, you can take appropriate action. If the software identifies a specific hardware failure or problem, you may need to seek professional assistance for repairs or consider replacing the graphics card. Conversely, if the diagnostics report indicates that the graphics card is in good working condition, you can focus troubleshooting efforts elsewhere in your system.
Running diagnostic software provides valuable insights into the health of your graphics card and can help confirm or dismiss suspicions of a dead or malfunctioning graphics card. It is important to note that diagnostic software can sometimes produce false positives or false negatives, so it’s advisable to corroborate the findings with other troubleshooting methods.
If you are unsure about interpreting the diagnostic results or need additional guidance, don’t hesitate to reach out to the graphics card manufacturer’s support team or consult with a knowledgeable technician for further assistance.
Conclusion
Determining whether a graphics card is dead or malfunctioning can be a crucial step in troubleshooting display issues or system instability. By recognizing the common symptoms, conducting thorough tests, and utilizing diagnostic software, you can make an informed assessment of the graphics card’s condition. Here are key takeaways to remember:
1. Identify Symptoms: Be aware of common symptoms such as a black screen, no display output, artifacts or glitches on the screen, overheating, computer freezing or crashing, and driver-related issues.
2. Check Physical Connections: Ensure that the graphics card is properly seated in its slot and that all power connections are secure.
3. Test with Different Video Ports: Connect your monitor to different video ports on the graphics card to determine if the problem lies with a specific port or the entire card.
4. Test with a Different Graphics Card: Swap out your original graphics card with a known working one to observe if the issues persist, helping you identify if the problem lies with the graphics card or other components.
5. Run Diagnostic Software: Utilize diagnostic software provided by the graphics card manufacturer to perform hardware tests and gather detailed information about the health of the graphics card.
By following these steps, you can effectively diagnose a dead or malfunctioning graphics card and make informed decisions on repair or replacement options.
Keep in mind that these steps are a guide and troubleshooting graphics card issues can vary depending on individual circumstances and specific system configurations. It’s always recommended to consult the manufacturer’s documentation, seek assistance from technical support, or consult with a knowledgeable technician if you are unsure or uncomfortable with the diagnosis and troubleshooting process.
Remember, a dead graphics card does not necessarily mean the end of your system’s functionality. You can explore repair options, warranty claims, or consider upgrading to a new graphics card to restore optimal performance and enjoy smooth display experiences in your gaming or graphic-intensive tasks.