Introduction
Switching user accounts on Windows 10 allows multiple users to access the same computer, each with their own personalized settings, files, and applications. Whether you share your computer with family members or colleagues, knowing how to switch user accounts is an essential skill. Fortunately, Windows 10 offers several methods to make this process quick and seamless.
In this article, we will explore six different methods to switch user accounts on Windows 10. We will walk you through each method step-by-step, ensuring that you can easily navigate your way through the process. From using the Start menu and Lock screen to the Task Manager and keyboard shortcuts, you will have a range of options to choose from.
But why would you want to switch user accounts in the first place? Well, there are several scenarios where it becomes necessary. For instance, if you have a personal and work account on the same computer, switching between the two allows you to keep your personal and professional activities separate. Additionally, if you share your computer with others, it allows each user to have their own customized experience.
It’s important to note that switching user accounts does not log out the current user. Instead, Windows 10 suspends the active user session and takes you to the login screen where you can choose another user account to switch to. The suspended user session remains intact, allowing you to pick up where you left off once you switch back to that account.
Now that we have established the importance of switching user accounts and the purpose behind it, let’s dive into the various methods available in Windows 10. Feel free to choose the method that suits you best or experiment with different options to find your preferred way of switching user accounts.
Method 1: Using the Start menu
One of the easiest ways to switch user accounts on Windows 10 is by using the Start menu. Here’s how you can do it:
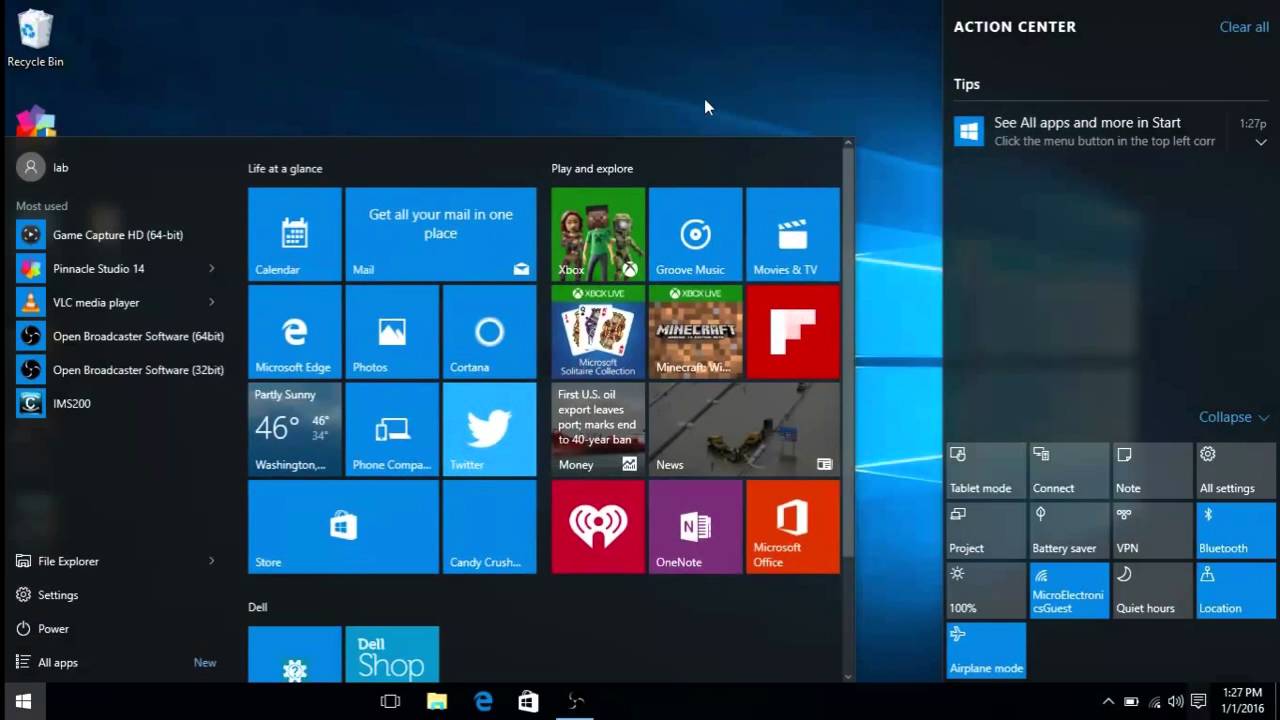
- Start by clicking on the “Start” button, usually located in the lower-left corner of the screen. This will open the Start menu.
- In the Start menu, click on your account name or picture, located at the top-left corner of the menu.
- A dropdown menu will appear, displaying all the available user accounts on your computer.
- Simply select the user account you want to switch to from the dropdown menu.
- Windows 10 will then switch to the selected user account, preserving the previous user’s session and taking you to their desktop environment.
This method is quick and convenient, allowing you to switch between user accounts in just a few clicks. The Start menu provides an easily accessible option to access different user accounts without the need to go through additional steps.
It’s important to note that when using this method, the previously active user’s session remains suspended in the background. This means that any unsaved work or open applications will remain as they were when you switch back to that account.
By utilizing the Start menu to switch user accounts, you can seamlessly transition between different user environments without interrupting your workflow. This is particularly useful in shared computer setups or when you need to quickly access a different user account without logging out of the current one.
Method 2: Using the Lock screen
Another method to switch user accounts on Windows 10 is by using the Lock screen. This method is particularly useful if you want a quick way to switch between users without going through the Start menu. Here’s how you can do it:
- Press the “Windows” key + “L” on your keyboard to lock your screen.
- The Lock screen will appear, displaying the current user’s account picture and the time.
- Click on the “Other user” button located at the bottom-left corner of the screen.
- Windows 10 will then take you to the login screen displaying all the available user accounts.
- Select the user account you want to switch to by clicking on it.
- You will then be prompted to enter the password for the selected user account, if applicable.
- Upon successful authentication, Windows 10 will switch to the selected user account.
The Lock screen method provides a straightforward and convenient way to switch between user accounts. It allows you to quickly switch users without the need to navigate through menus or access additional options.
One advantage of using the Lock screen method is that it adds an extra layer of security. When you lock your screen, unauthorized users won’t be able to access your account without entering the password. This can be particularly helpful in shared environments or when you step away from your computer momentarily.
Additionally, by using the Lock screen method, you can switch user accounts without disturbing the active user’s session. Any unsaved work or applications in use will remain intact, allowing you to seamlessly switch back to the previous user’s session when needed.
Method 3: Using the Task Manager
If you prefer a more advanced method to switch user accounts on Windows 10, you can utilize the Task Manager. The Task Manager provides a comprehensive view of all running processes and user sessions, making it a powerful tool for managing user accounts. Here’s how you can use the Task Manager to switch user accounts:
- Press the “Ctrl” + “Shift” + “Esc” keys on your keyboard to open the Task Manager.
- In the Task Manager window, navigate to the “Users” tab.
- Under the “Users” tab, you will see a list of all active user sessions on your computer.
- Simply right-click on the user account you want to switch to.
- From the context menu, select “Connect” or “Switch To”.
- Windows 10 will then switch to the selected user account, preserving the previous user’s session.
Using the Task Manager method provides a more comprehensive view of your computer’s current user sessions. This can be particularly useful if you want to monitor user activity or manage multiple user accounts simultaneously.
It’s important to note that when switching user accounts using the Task Manager, the previously active user’s session will remain active in the background. This means that any unsaved work or open applications will continue to run until you switch back to that user account.
The Task Manager method offers a versatile way to switch user accounts, especially for users who require more control over processes and sessions. It’s a useful option for power users or those who wish to manage user accounts from a centralized location without navigating through menus or screens.
Method 4: Using the Ctrl+Alt+Delete keys
Another straightforward method to switch user accounts on Windows 10 is by using the Ctrl+Alt+Delete keys. This method invokes a security screen that allows you to access various user options, including switching to a different user account. Follow these steps to switch user accounts using the Ctrl+Alt+Delete keys:
- Press the “Ctrl”, “Alt”, and “Delete” keys simultaneously on your keyboard.
- A security screen will appear, displaying several options.
- Click the “Switch User” option.
- Windows 10 will then display a list of available user accounts.
- Select the user account you want to switch to by clicking on it.
- If required, enter the password for the selected user account.
- Windows 10 will switch to the selected user account, preserving the previous user’s session.
Using the Ctrl+Alt+Delete method provides a quick and reliable way to switch user accounts. This keyboard shortcut combination is widely recognized and can be used efficiently without the need to navigate through menus or screens.
One advantage of using the Ctrl+Alt+Delete method is that it adds an extra layer of security. By invoking the security screen, you can ensure that the user switching process is authorized and prevent unauthorized access to your user accounts.
It’s worth noting that when switching user accounts using the Ctrl+Alt+Delete keys, the previously active user’s session will remain active. This allows you to seamlessly switch back to the previous user account and resume work without any interruption.
Whether you’re working in a shared environment or simply need to switch between user accounts quickly, the Ctrl+Alt+Delete method is a reliable option that offers both convenience and security. Give it a try and see how it fits into your workflow!
Method 5: Using the Sign out option
If you want to completely log out of your current user account and switch to another user on Windows 10, using the Sign out option is the way to go. Here’s how you can switch user accounts using the Sign out option:
- Click on the “Start” button, usually located in the lower-left corner of the screen, to open the Start menu.
- Click on your account name or picture, located at the top-left corner of the Start menu.
- A dropdown menu will appear, displaying all the available user accounts on your computer.
- At the bottom of the dropdown menu, click on the “Sign out” option.
- Windows 10 will then log out of the current user account and take you back to the sign-in screen.
- On the sign-in screen, select the user account you want to switch to by clicking on it.
- If required, enter the password for the selected user account.
- Windows 10 will then log in to the selected user account, providing a fresh user session.
Using the Sign out option allows you to completely switch user accounts, providing a clean start for the selected user. This method is ideal if you want to ensure that no trace of the previous user’s activities remains on the computer.
One benefit of using the Sign out option is that it allows each user to have their own personalized desktop and application settings. When you sign out and sign in with a different user account, you get a fresh start with a custom environment tailored to that user.
However, it’s important to note that when you choose to sign out, any unsaved work or open applications will be lost. Make sure to save your work and close any important applications before signing out to avoid any data or progress loss.
By using the Sign out option, you can switch between user accounts on Windows 10 while ensuring a clean and personalized experience for each user. Give it a try and see how it fits into your workflow!
Method 6: Using the Switch user button in the Start menu
Windows 10 provides a convenient method to switch user accounts directly from the Start menu. By utilizing the Switch user button, you can seamlessly transition between user accounts with just a few clicks. Here’s how you can switch user accounts using the Switch user button in the Start menu:
- Click on the “Start” button, usually located in the lower-left corner of the screen, to open the Start menu.
- At the top of the Start menu, next to your account name or picture, you will find the Switch user button.
- Click on the Switch user button.
- Windows 10 will display a list of available user accounts.
- Select the user account you want to switch to by clicking on it.
- If required, enter the password for the selected user account.
- Windows 10 will then switch to the selected user account, preserving the previous user’s session.
Using the Switch user button in the Start menu provides a quick and direct way to switch between user accounts. This method allows you to access different user environments without the need to navigate through additional screens or menus.
One advantage of using the Switch user button is that it keeps the previously active user’s session preserved in the background. This means that any unsaved work or open applications will remain intact, allowing you to seamlessly switch back to that user’s session when needed.
By utilizing the Switch user button, you can easily manage multiple user accounts on Windows 10. This is particularly useful in shared computer scenarios, allowing each user to have their personalized settings, files, and applications while maintaining a smooth and uninterrupted workflow.
Take advantage of the Switch user button in the Start menu to streamline your user account switching process on Windows 10. Experiment with this method and find out how it fits into your workflow and enhances your overall Windows experience.
Conclusion
Switching user accounts on Windows 10 is a necessary skill, whether you share your computer with others or need to separate personal and work activities. In this article, we explored six different methods to switch user accounts, each providing its own advantages and convenience.
Using the Start menu is one of the simplest methods, allowing for quick user account switching with just a few clicks. The Lock screen method provides a convenient way to switch users without accessing additional menus. The Task Manager method offers more advanced functionality for power users who want control over processes and sessions. The Ctrl+Alt+Delete method adds an extra layer of security while providing a straightforward way to switch user accounts. The Sign out option allows for a clean start with a fresh user session. Lastly, the Switch user button in the Start menu provides a direct and seamless method for account switching.
It’s important to note that regardless of the method you choose, Windows 10 preserves the previously active user’s session, allowing you to easily switch back without losing unsaved work or open applications. This ensures a smooth and uninterrupted workflow across user accounts.
By mastering these user account switching methods, you can enhance your productivity, personalization, and security on Windows 10. Whether you prefer quick clicks in the Start menu, utilizing keyboard shortcuts, or employing advanced tools like the Task Manager, you can easily navigate between user accounts to fulfill your specific needs.
Take the time to explore each method and determine which one works best for you. Experiment with different options and discover the user account switching workflow that suits your preferences and enhances your computing experience.
By mastering the art of switching user accounts, you can effortlessly navigate between multiple user environments, ensuring a seamless and personalized computing experience on Windows 10.