Introduction
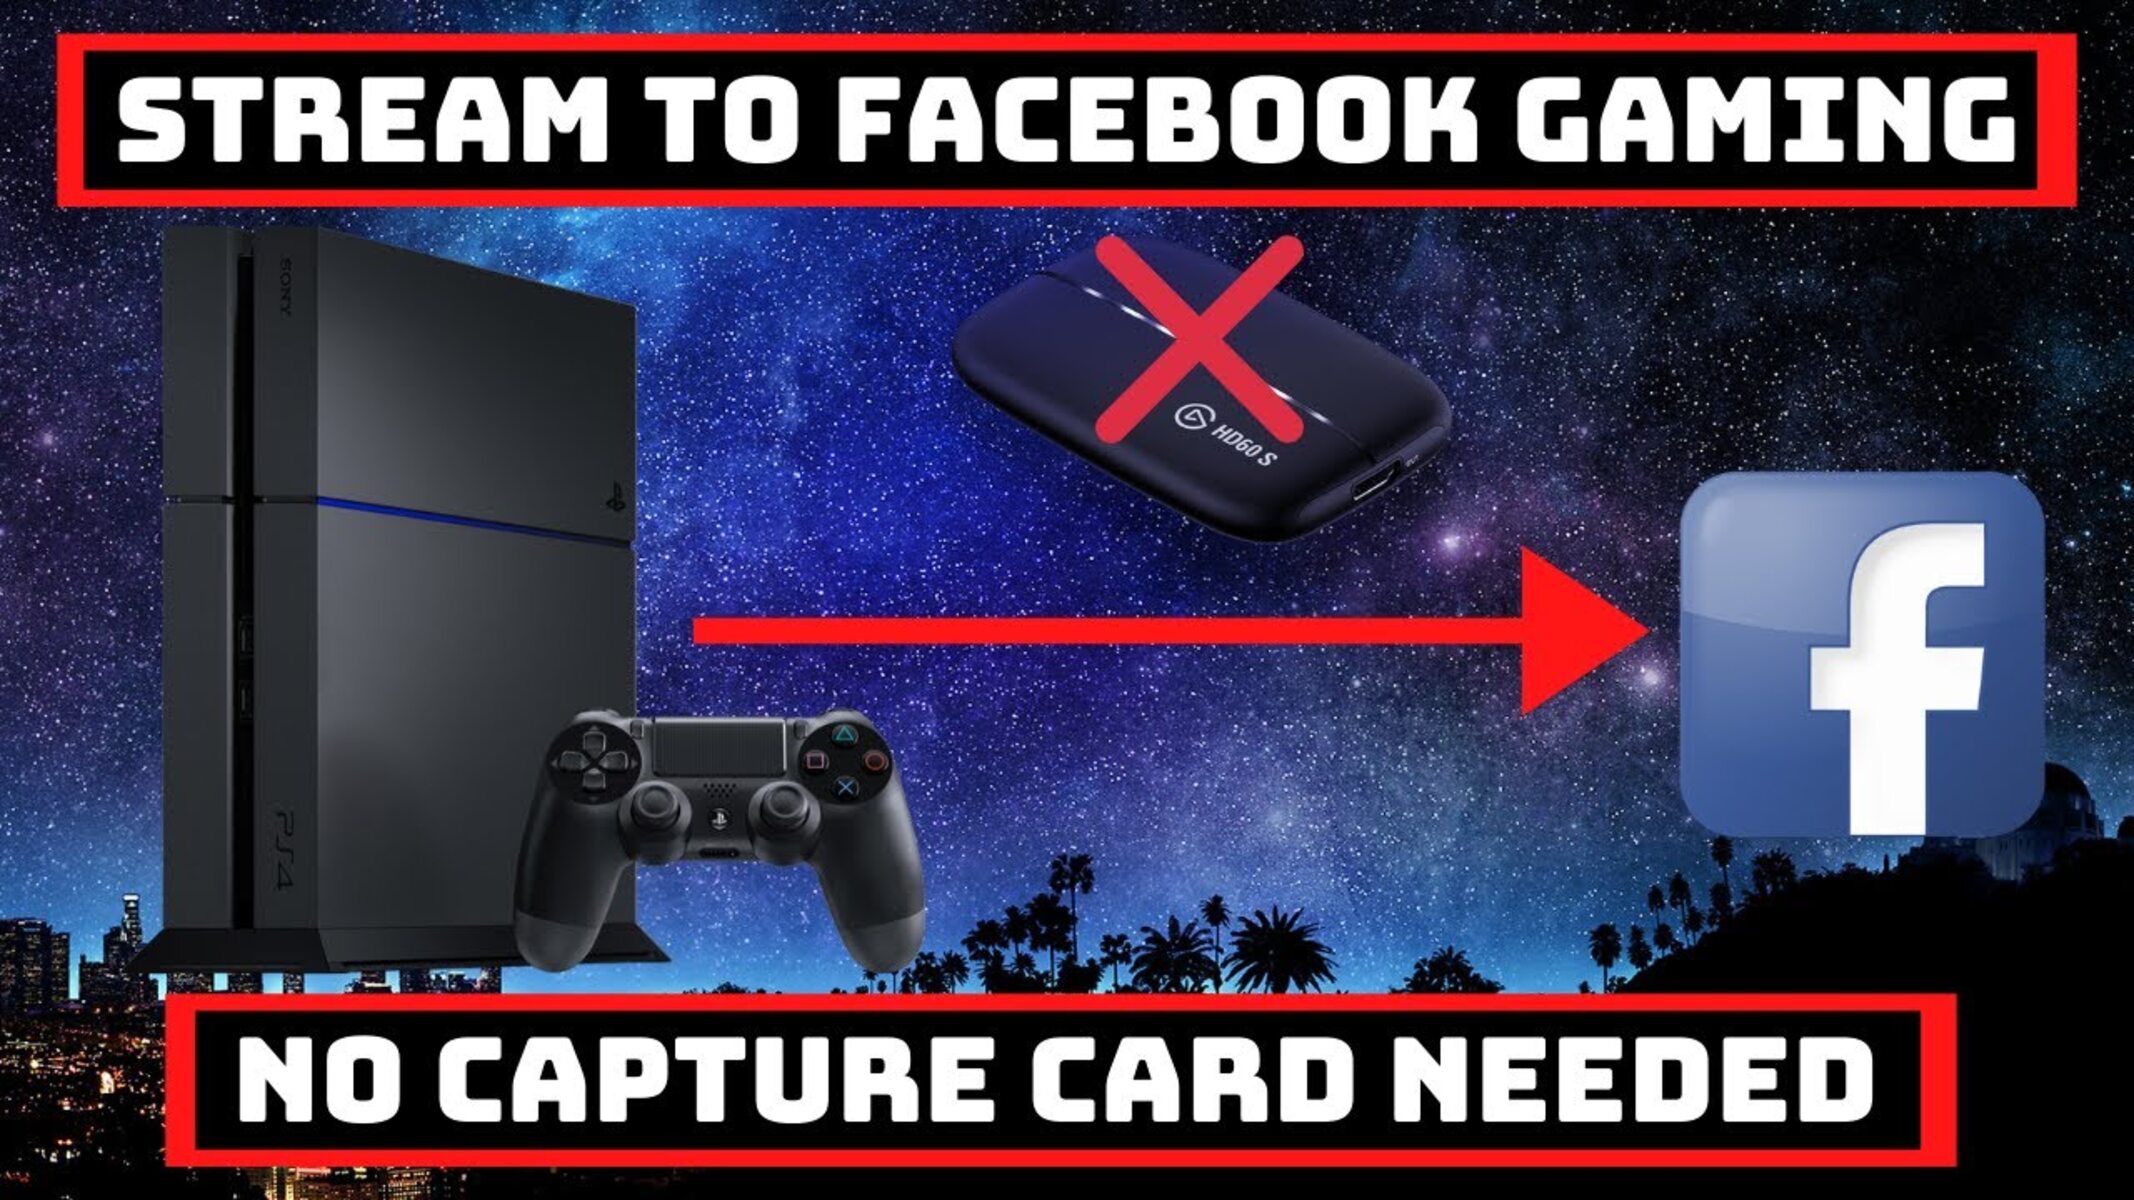
Welcome to this guide on how to stream your PS4 gameplay on Facebook without the need for a capture card. Broadcasting your gaming sessions on social media has become increasingly popular, allowing you to share your gaming experiences with friends, family, and a wider audience. While capture cards are commonly used for streaming purposes, they can be expensive and may not be accessible to everyone.
In this tutorial, we will walk you through the step-by-step process of setting up your PS4 stream on Facebook without the requirement of a capture card. We will be using some software and tools that will allow you to seamlessly stream your gameplay from your console to your computer, and then to Facebook Live.
Before we dive into the steps, it’s important to note that this method utilizes remote play technology to capture and transfer your PS4 gameplay to your computer. Therefore, you will need a computer that meets the required system specifications, a stable internet connection, and a Facebook account.
We understand that not everyone has access to a capture card or the budget to purchase one. That’s why this guide is designed to provide an alternative method that is both cost-effective and user-friendly. So, let’s get started on setting up your PS4 stream on Facebook without a capture card!
Requirements
Before we begin, there are a few things you’ll need in order to successfully stream your PS4 gameplay on Facebook without a capture card. Make sure you have the following requirements met:
- PS4 Console: Ensure that you have a PlayStation 4 console. This method is specifically for PS4 users.
- Computer: You will need a computer or laptop that meets the minimum system requirements to run the necessary software smoothly. Make sure your computer has a stable internet connection.
- PS4 Remote Play: This is a software developed by Sony that allows you to stream your PS4 gameplay to your computer. Make sure you have the latest version of PS4 Remote Play installed on your computer. You can download it from the official PlayStation website.
- OBS Studio: OBS Studio is a popular broadcasting software that will help you capture and stream your PS4 gameplay on Facebook Live. It’s free to download and available for Windows, Mac, and Linux. Make sure you have OBS Studio installed on your computer.
- Streamlabs OBS: Streamlabs OBS is a user-friendly version of OBS Studio that comes with additional features and customizations. It will be used in conjunction with OBS Studio. Make sure you have Streamlabs OBS installed on your computer.
- Facebook Account: You will need an active Facebook account to stream your gameplay on Facebook Live. If you don’t have one, sign up for free on the Facebook website.
Once you have all these requirements in place, you’re ready to move on to the next steps of the process. It’s important to ensure that all the software and tools are properly installed and updated before proceeding.
Step 1: Configuring Your PS4
The first step in streaming your PS4 gameplay on Facebook without a capture card is to configure your PS4 console. Follow the steps below to prepare your PS4 for streaming:
- Turn on your PS4 console and go to the “Settings” menu.
- Select “Remote Play Connection Settings” and enable the option for remote play.
- Connect your PS4 controller to your computer using a USB cable. This will allow you to control your PS4 gameplay from your computer.
- On your PS4, go to “Settings” again and select “Internet Settings”. Connect your PS4 to the same Wi-Fi network as your computer.
- Go back to the main menu and select “Power Saving Settings”. Disable the option for “Set Time Until PS4 Turns Off”. This will prevent your PS4 from automatically shutting down during your stream.
- Make sure your PS4 is updated to the latest firmware version. If there are any available updates, download and install them.
- Now, go to the PlayStation Store on your PS4 and search for “PS4 Remote Play”. Download and install the PS4 Remote Play application on your console.
Once you have completed these steps, your PS4 is now ready to be streamed to your computer. Make sure both your PS4 and computer are connected to the same Wi-Fi network for a stable connection.
With your PS4 configured, let’s move on to the next step of setting up remote play on your computer.
Step 2: Setting Up Remote Play on Your PC
Now that your PS4 is configured, it’s time to set up remote play on your PC. Follow these steps to get remote play up and running:
- Open the PS4 Remote Play application on your computer. You can find it in your programs or search for it in the start menu.
- Sign in to your PlayStation Network (PSN) account when prompted. Make sure you use the same account that you use on your PS4.
- If your PS4 and computer are on the same network, the application should automatically detect your console. If not, click on the “Settings” icon in the lower-left corner of the application and select “Manual Settings”. Enter your PS4’s IP address to establish a connection.
- Choose the resolution and frame rate for the remote play stream. It’s recommended to select “Standard (540p)” or “Low (360p)” if you have a slower internet connection or want to optimize performance.
- Enable the option for “Use the latest version of Remote Play”. This will ensure that you have the most up-to-date features and improvements.
- Click on the “Start” button to initiate the remote play connection. The application will take a few moments to connect to your PS4.
- You should now see your PS4’s screen mirrored on your computer. You can use your computer’s keyboard and mouse to control the PS4 gameplay. Alternatively, you can connect your PS4 controller to your computer using a USB cable for a more familiar gaming experience.
Ensure that the remote play connection remains stable throughout your stream. Any interruptions in the connection may impact the quality of your stream.
With remote play set up on your PC, we can proceed to the next step, which involves configuring OBS Studio to capture the remote play window and prepare for streaming.
Step 3: Configuring OBS Studio
Now that you have remote play set up on your PC, the next step is to configure OBS Studio to capture the remote play window and prepare for streaming. Follow these steps to configure OBS Studio:
- Open OBS Studio on your computer. If you haven’t already installed it, you can download it for free from the official OBS Studio website.
- In OBS Studio, click on the “+” icon under the “Sources” box to add a new source.
- Select “Window Capture” from the dropdown menu. Give it a descriptive name, such as “PS4 Remote Play.”
- In the “Window” dropdown, select the window that corresponds to your PS4 Remote Play application. It should be labeled as “PlayStation 4 – Remote Play.”
- Choose the desired settings for your window capture, such as the size and position. You can resize and reposition the capture window later if needed.
- Click “OK” to confirm the window capture settings.
At this point, OBS Studio is set up to capture the PS4 Remote Play window. You can see the PS4 gameplay displayed in the preview window of OBS Studio. However, we recommend adjusting a few additional settings to optimize your stream:
- Go to the “Settings” menu in OBS Studio.
- Under the “Output” tab, select the desired streaming output settings based on your internet connection and preferred streaming quality.
- Under the “Video” tab, set the base (canvas) resolution to match the resolution of your PS4 Remote Play window. The output (scaled) resolution can be adjusted according to your streaming preferences.
- Under the “Audio” tab, configure your audio settings. Select the appropriate microphone input and audio device.
Once you have configured OBS Studio to your liking, you are one step closer to streaming your PS4 gameplay on Facebook. In the next step, we will set up Streamlabs OBS to add overlays, scenes, and other customization options to enhance your stream.
Step 4: Setting Up Streamlabs OBS
To add overlays, scenes, and other customization options to your PS4 stream, we will now set up Streamlabs OBS. Follow these steps to configure Streamlabs OBS:
- If you haven’t already done so, download and install Streamlabs OBS from the official Streamlabs website. Streamlabs OBS is a user-friendly version of OBS Studio with additional features and customizations.
- Open Streamlabs OBS on your computer. Log in to your Streamlabs account or create a new one if you don’t have one already.
- On the Streamlabs OBS dashboard, click on the “+” sign under “Scenes” to create a new scene. Give it a descriptive name, such as “PS4 Gameplay.”
- Under the “Sources” box, click on the “+” sign and select the desired sources for your stream, such as webcam, chatbox, alerts, or overlays. You can customize the appearance and position of these elements on your stream.
- Configure each source according to your preferences and adjust their positions on the preview window to achieve the desired layout.
- Click on the “Settings” icon in the bottom-left corner of Streamlabs OBS. Here, you can fine-tune your stream settings, such as the resolution, frame rate, and bitrate.
- Once you have configured Streamlabs OBS and customized your stream elements, save your settings and close the settings window.
Now, Streamlabs OBS is ready to capture your PS4 gameplay from OBS Studio and apply the customizations you have created. Make sure OBS Studio is still running, as both software will work together to bring your stream to life.
With Streamlabs OBS set up, we’re almost ready to go live on Facebook. In the next step, we will prepare Facebook Live to broadcast your PS4 gameplay.
Step 5: Preparing Facebook Live
Before you start streaming your PS4 gameplay on Facebook, you need to prepare your Facebook Live settings. Follow these steps to get ready:
- Log in to your Facebook account on your computer or mobile device.
- On your Facebook homepage, click on the “Live” button, which is located just above the “Create Post” box.
- A new window will appear, allowing you to set up your Facebook Live stream. Enter a descriptive title for your stream and choose the appropriate privacy settings. You can choose to stream to your timeline, a group, an event, or a page.
- Select “Camera” as the video source and make sure the audio input is set to your desired microphone.
- If desired, enable the option to allow comments on your live stream and configure other settings, such as adding a custom thumbnail or scheduling your stream for a later time.
- Review your settings and make sure everything is set up correctly. Double-check your internet connection to ensure a stable stream.
- When you’re ready to go live, click on the “Go Live” button. Facebook will start setting up the live stream and will notify you when it’s ready.
With your Facebook Live settings configured, you’re just a few steps away from streaming your PS4 gameplay on Facebook. In the next step, we will connect OBS Studio to Streamlabs OBS to transfer your PS4 stream to Facebook Live.
Step 6: Connecting OBS Studio to Streamlabs OBS
To transfer your PS4 gameplay stream from OBS Studio to Streamlabs OBS and prepare it for broadcasting on Facebook Live, you need to connect the two software. Follow these steps:
- Ensure that both OBS Studio and Streamlabs OBS are open and running on your computer.
- In Streamlabs OBS, click on the “+” sign under “Sources” to add a new source.
- Select “Display Capture” from the dropdown menu. Give it a descriptive name, such as “OBS Studio Display Capture.”
- In the “Display” dropdown, choose the display where OBS Studio is running. If you have multiple displays, make sure to select the correct one.
- Click “OK” to confirm the display capture settings.
- You will now see the OBS Studio display captured within Streamlabs OBS. Resize and reposition the capture window as needed to fit your desired layout.
- Make sure the captured display is in the correct order within the sources list. Drag and drop it to the desired position if necessary.
By connecting OBS Studio to Streamlabs OBS, you can easily transfer your PS4 gameplay stream from OBS Studio to Streamlabs OBS, which includes all the customizations and overlays you have set up. This integration allows for a seamless streaming experience on Facebook Live.
With OBS Studio and Streamlabs OBS connected, we’re almost ready to start the PS4 stream. In the next step, we will go over how to start the PS4 stream and ensure that it is properly displayed within Streamlabs OBS.
Step 7: Starting the PS4 Stream
Now that OBS Studio and Streamlabs OBS are connected, it’s time to start the PS4 stream and ensure that it is properly displayed within Streamlabs OBS. Follow these steps to begin the PS4 stream:
- Make sure your PS4 console is turned on and connected to your computer via the PS4 Remote Play application.
- In OBS Studio, make sure the PS4 Remote Play window is visible and being captured by the window capture source.
- In Streamlabs OBS, ensure that the OBS Studio display capture source is being displayed and positioned correctly on your stream layout.
- Double-check that both OBS Studio and Streamlabs OBS are running smoothly and are not experiencing any technical issues.
- To start the PS4 stream, simply click on the “Start Streaming” or “Go Live” button in Streamlabs OBS. This will initiate the stream and broadcast your PS4 gameplay on Facebook Live.
During the PS4 stream, you can monitor your stream’s performance and make adjustments as necessary. Keep an eye on the stream preview within Streamlabs OBS to ensure that the captured PS4 gameplay is being displayed correctly and without any issues, such as lag or audio desynchronization.
You can interact with your viewers through the chatbox and engage with them while playing your favorite PS4 games. Don’t forget to have fun and be yourself during the stream!
Once you have finished streaming, you can stop the PS4 stream by clicking on the “Stop Streaming” button in Streamlabs OBS. Take some time to review your stream’s performance and gather any feedback or comments from your audience.
Now that you know how to start the PS4 stream, we’re ready to move on to the final step – going live on Facebook.
Step 8: Going Live on Facebook
The final step in streaming your PS4 gameplay on Facebook without a capture card is going live on Facebook itself. Follow these steps to start your live stream:
- Confirm that your PS4 stream is running smoothly in Streamlabs OBS and that you are satisfied with the layout and quality.
- On your Facebook homepage, navigate to your timeline, group, event, or page where you want to go live. Ensure that you have the necessary permissions to stream to that destination.
- Click on the “Live” button, located above the “Create Post” box, to open the Facebook Live window.
- In the Facebook Live window, you may see a preview of your live stream from Streamlabs OBS. Take a moment to review the preview and ensure that everything looks good.
- Write a compelling description or a catchy title for your stream. This will attract viewers and provide context for your PS4 gameplay.
- Once you are ready to go live, click on the “Go Live” button. This will start the live stream and broadcast your PS4 gameplay on Facebook to your audience.
- During the live stream, interact with viewers through the comments section and engage with them. Address any questions or comments that come up, and try to make the experience as interactive as possible.
- After you have finished your PS4 gameplay session, click on the “Finish” or “End Live Video” button to end the stream. Take a moment to thank your audience for tuning in and watching your stream.
Once the stream has ended, you can review the performance and engagement metrics of your live stream on Facebook. Use this feedback to improve future streams and make adjustments based on viewer preferences.
Congratulations! You have successfully streamed your PS4 gameplay on Facebook without the need for a capture card. Keep experimenting with different games, streaming setups, and engagement strategies to grow your audience and create memorable experiences for your viewers.
Conclusion
Streaming your PS4 gameplay on Facebook without a capture card is an accessible and cost-effective way to share your gaming experiences with friends and a wider audience. By following the steps outlined in this guide, you can easily set up and stream your PS4 gameplay on Facebook using just your console, computer, and the necessary software.
We started by configuring your PS4 and enabling remote play, allowing you to stream your gameplay to your computer. Then, we set up OBS Studio to capture the remote play window and Streamlabs OBS to add overlays and customization options. With everything in place, we connected OBS Studio to Streamlabs OBS, ensuring a smooth transfer of your PS4 stream and enhancements to your broadcast.
Preparing Facebook Live was the next step, where we reviewed the necessary settings and ensured that your stream would reach the desired audience. Finally, we went live on Facebook, engaging with viewers and creating an interactive streaming experience.
Remember to maintain a stable internet connection throughout the stream and periodically check the performance of your stream to ensure quality and address any issues that may arise. Additionally, engaging with your viewers through comments and other interactive elements will help create a more immersive experience for your audience.
Now that you have the knowledge and tools to stream your PS4 gameplay on Facebook without a capture card, feel free to experiment with different games, customizations, and engagement strategies. Have fun, be creative, and continue to connect with your audience through the world of live streaming.