Introduction
Welcome to the world of 3D scanning! The David 3D Scanner is a powerful tool that allows you to digitize real-world objects and turn them into digital models. Whether you’re an artist, designer, engineer, or enthusiast, the David 3D Scanner provides an easy and efficient way to capture detailed 3D data.
In this guide, we’ll take you through the step-by-step process of setting up your David 3D Scanner. By the end, you’ll be ready to start scanning and creating your own 3D models. So let’s dive in!
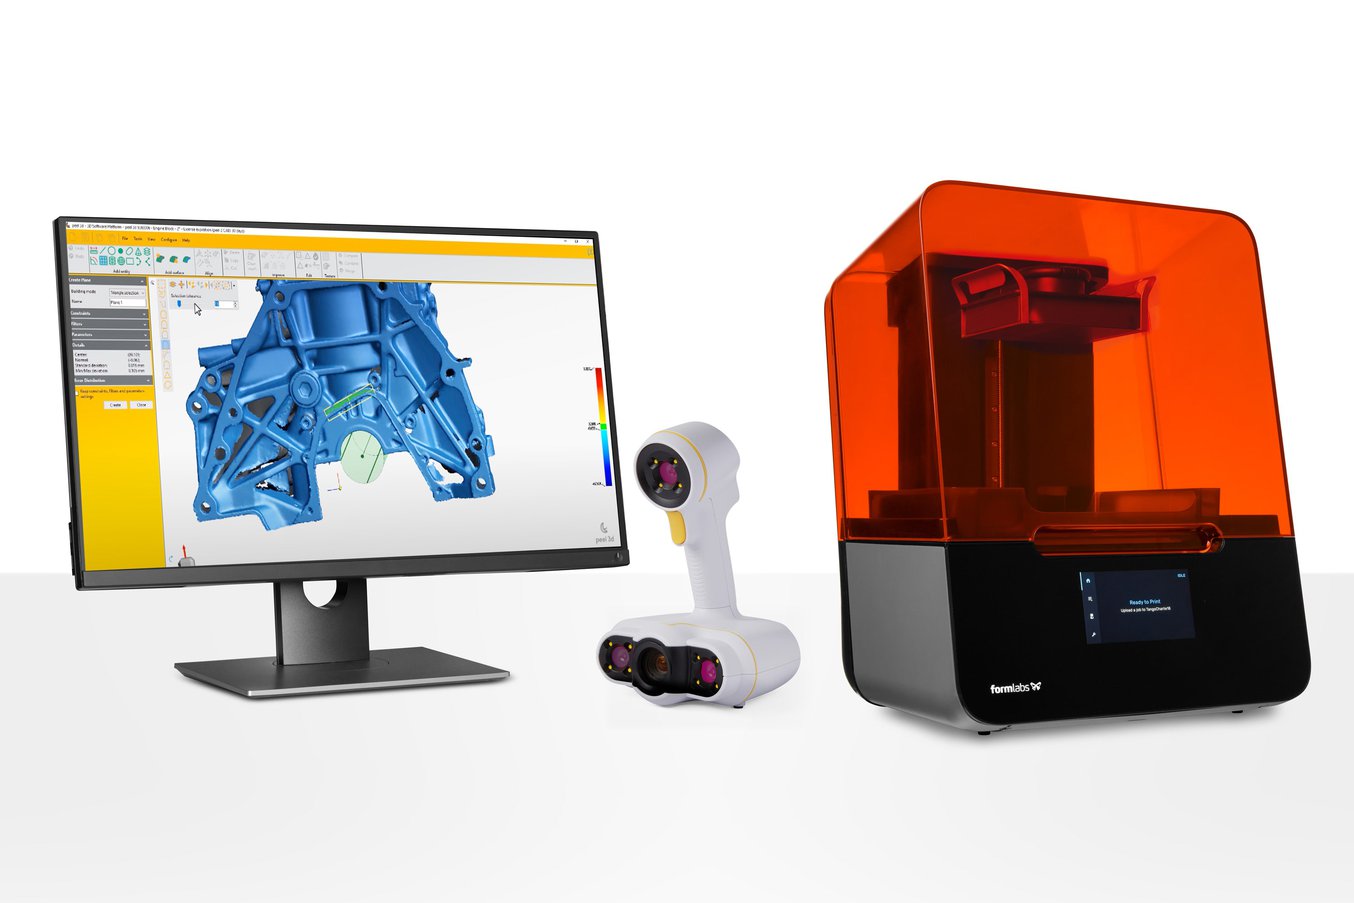
Before we get started, it’s important to note that the David 3D Scanner consists of both hardware and software components. The hardware includes a structured light scanner, a camera, and a projector. The software, known as David 3D-Scanner Software, is used to control the scanner, process the captured data, and export the models.
Setting up the David 3D Scanner involves unboxing the equipment, connecting the hardware components, installing the software, calibrating the scanner, performing the actual scanning, and post-processing the scanned data. Each step is crucial to ensure accurate and high-quality results.
With that said, let’s move on to the first step: unboxing the David 3D Scanner. Make sure you have all the required components and accessories handy before proceeding.
Requirements
Before you begin setting up the David 3D Scanner, it’s important to ensure that you have all the necessary requirements in place. Here’s a list of what you’ll need:
- A David 3D Scanner Kit: This includes the structured light scanner, camera, and projector. Make sure you have all the components from the kit, including any cables and accessories.
- A computer with the following specifications:
- Operating System: Windows 7, 8, or 10 (32-bit or 64-bit)
- Processor: Dual-core processor (Quad-core recommended)
- RAM: 4GB (8GB or higher recommended)
- Graphics Card: NVIDIA or AMD with OpenGL 3.3 support
- USB: USB 3.0 or higher for faster data transfer
- Storage: Sufficient free disk space for storing the scanned models
- A stable work surface: Make sure you have a sturdy table or desk to place the scanner and other equipment on during the setup and scanning process.
- A controlled lighting environment: For optimal scanning results, it’s important to have consistent lighting conditions. Avoid direct sunlight or harsh artificial lighting that could interfere with the scanning process.
- Access to a power source: The David 3D Scanner components, particularly the scanner and projector, require power to operate. Make sure you have access to electrical outlets to connect the power cables.
- An internet connection: While not mandatory for the initial setup, having a stable internet connection will allow you to access software updates and additional resources.
- Patience and enthusiasm: Setting up and using the David 3D Scanner might require some learning and troubleshooting along the way. Approach the process with patience and a willingness to explore and experiment.
By ensuring you have all these requirements met, you’ll be well-prepared to begin setting up your David 3D Scanner. Let’s move on to the next step: unboxing the scanner and its components.
Step 1: Unboxing the David 3D Scanner
Congratulations on your new David 3D Scanner! In this step, we’ll guide you through unboxing the scanner and its components. This process will ensure that you have all the necessary equipment and accessories ready for the setup.
Here’s how to unbox your David 3D Scanner:
- Find a clean, spacious area: Clear a space on a table or desk where you can easily access and organize the scanner components.
- Open the packaging: Gently unpack the David 3D Scanner kit, making sure to remove any protective packaging materials that may be present.
- Check the contents: Verify that you have all the components listed in the kit, including the scanner, camera, projector, cables, and any other included accessories. Refer to the user manual or documentation for a detailed list of contents.
- Inspect the components: Take a close look at each component to ensure there are no visible damages or defects. If you notice any issues, contact the distributor or manufacturer for assistance.
- Organize the accessories: Sort and organize the cables, power adapter, calibration panels, and any other accessories that came with the scanner. This will make it easier to find and connect them during the setup process.
- Prepare the workspace: Clear any clutter from your workspace and ensure that it is clean and free from dust or debris. This will provide a suitable environment for setting up and using the David 3D Scanner.
By following these steps, you’ll have successfully unboxed the David 3D Scanner and ensured that you have all the necessary components and accessories. Next, we’ll move on to connecting the scanner hardware in the second step of the setup process.
Step 2: Connecting the Scanner Hardware
Now that you have unboxed the David 3D Scanner and prepared your workspace, it’s time to connect the scanner hardware. This step involves setting up the structured light scanner, camera, and projector to ensure they work together seamlessly.
Follow these steps to connect the scanner hardware:
- Position the structured light scanner: Place the structured light scanner in a stable position on your workspace. Ensure that it is securely mounted and will not move during the scanning process.
- Mount the camera: Attach the camera to the designated mounting point on the structured light scanner. Make sure it is firmly in place and facing the correct direction.
- Connect the camera: Use the provided USB cable to connect the camera to your computer. Ensure that the USB connection is secure.
- Connect the projector: Attach the projector to the structured light scanner using the provided cables. Make sure the projector is positioned correctly and aligned with the camera.
- Connect the power cables: Plug in the power cables for the structured light scanner and projector. Ensure they are connected to a stable power source.
- Check the connections: Double-check all the connections to ensure they are secure and properly fitted. Loose connections can affect the functionality and accuracy of the scanner.
Once you have completed these steps, the scanner hardware should be connected and ready for the next stage of the setup process. In the next step, we will install the David 3D Scanner software, which will allow you to control and operate the scanner.
Step 3: Installing the David 3D Scanner Software
With the David 3D Scanner hardware connected, it’s time to install the software that will enable you to control and operate the scanner. The David 3D-Scanner Software provides a user-friendly interface for capturing, processing, and exporting 3D models.
Follow these steps to install the David 3D Scanner Software:
- Locate the software installation files: Depending on your purchase, the software may be provided either as a CD/DVD or as a downloadable file from the official David 3D Scanner website. Ensure you have the installation files ready.
- Insert the CD/DVD or open the downloaded file: If you have the software on a CD/DVD, insert it into your computer’s optical drive. If you have downloaded the software, locate the file and double-click to initiate the installation process.
- Follow the installation wizard: The installation wizard will guide you through the necessary steps to install the software. Read and accept the terms and conditions, choose a destination folder, and select any additional software components or plugins you wish to install (if applicable).
- Complete the installation process: Once you have configured the installation settings, click the “Install” or “Next” button to begin installing the software. Wait for the installation process to complete. It may take a few moments to several minutes, depending on your computer’s performance.
- Launch the David 3D-Scanner Software: After the installation is complete, locate the software shortcut on your desktop or in your Start menu. Double-click the shortcut to launch the software.
- Activate the software: When you launch the software for the first time, you may be prompted to activate it. Follow the on-screen instructions to activate the software using the provided serial number or license key. This will unlock the full functionality of the David 3D Scanner Software.
Once the installation and activation processes are complete, you are ready to proceed to the next step: calibrating the scanner. The David 3D Scanner Software will allow you to calibrate the hardware and optimize the scanning parameters to ensure accurate and precise results.
Step 4: Calibrating the Scanner
Calibrating the scanner is a crucial step to ensure accurate and precise 3D scanning results. The calibration process will optimize the scanning parameters and compensate for any potential distortions or misalignments in the hardware setup.
Follow these steps to calibrate your David 3D Scanner:
- Launch the David 3D-Scanner Software: Open the software on your computer by double-clicking the software shortcut.
- Select the calibration option: In the software interface, navigate to the calibration section. This may be located in the menu bar or as a dedicated button or tab.
- Prepare the calibration panels: The David 3D Scanner kit usually includes calibration panels. These panels have known patterns that the software uses to calibrate the scanner. Follow the instructions provided in the software or user manual to position and mount the calibration panels securely.
- Start the calibration process: Once the calibration panels are properly positioned, initiate the calibration process from the software. The software will guide you through the necessary steps to capture the calibration data.
- Follow the on-screen instructions: During the calibration process, the software will display instructions on the screen. This may involve scanning the calibration panels from different angles or distances. Make sure to adhere to the instructions provided.
- Complete the calibration: Once all the required calibration data is captured, the software will analyze and process the information to calibrate the scanner. This may take a few moments.
- Verify the calibration: After the calibration process is complete, the software may provide a summary or calibration report indicating the success of the calibration. Verify that the calibration results are within acceptable limits.
By following these steps, you will successfully calibrate your David 3D Scanner. Calibration is an essential step to ensure accurate and reliable 3D scanning results. Once the scanner has been calibrated, you can proceed to the next step: scanning objects with the David 3D Scanner.
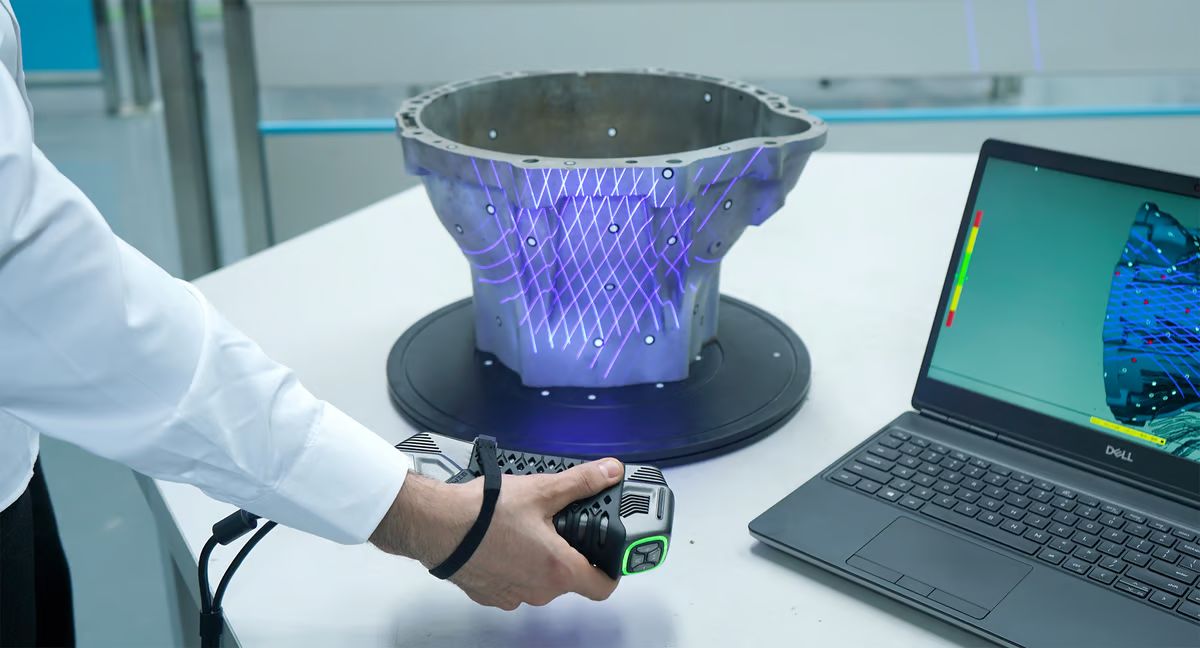
Step 5: Scanning with the David 3D Scanner
Now that your David 3D Scanner is calibrated, you’re ready to start capturing 3D data of real-world objects. In this step, we’ll guide you through the process of scanning with the David 3D Scanner.
Follow these steps to scan objects with the David 3D Scanner:
- Prepare the object: Choose the object you want to scan and ensure it is free from any dirt, debris, or reflective surfaces that may interfere with the scanning process.
- Position the object: Place the object on a stable surface within the scanning area of the David 3D Scanner. Consider using a turntable to rotate the object for a complete scan if necessary.
- Adjust the scanner settings: In the David 3D-Scanner Software, adjust the scanning parameters to suit the object and desired level of detail. This includes settings such as resolution, exposure, and texture capture.
- Start scanning: Use the software to initiate the scanning process. This will activate the projector, which will project a series of patterns onto the object, while the camera captures the distortion of these patterns to create a 3D representation.
- Move the scanner around the object: While scanning, carefully move the scanner around the object, ensuring that all sides and angles are covered. Follow the on-screen instructions provided by the software for guidance on movement and positioning.
- Monitor the scanning progress: Keep an eye on the scanning progress in the software interface. This will enable you to ensure that all areas of the object are adequately captured, and adjust the scanning process if necessary.
- Complete the scan: Once you are satisfied with the coverage and quality of the scan data, stop the scanning process in the software. The software will then process the captured data and generate a 3D representation of the object.
By following these steps, you’ll be able to capture high-quality 3D scans using the David 3D Scanner. Remember to experiment and practice with different objects and scanning techniques to enhance your skills and obtain the best results.
In the next step, we’ll explore how to post-process the scanned data to refine and enhance the 3D models created by the David 3D Scanner.
Step 6: Post-processing the Scanned Data
After scanning objects with the David 3D Scanner, the next step is to post-process the scanned data. Post-processing involves refining and enhancing the 3D models to achieve the desired level of quality and detail. In this step, we will guide you through the process of post-processing the scanned data.
Follow these steps to post-process the scanned data:
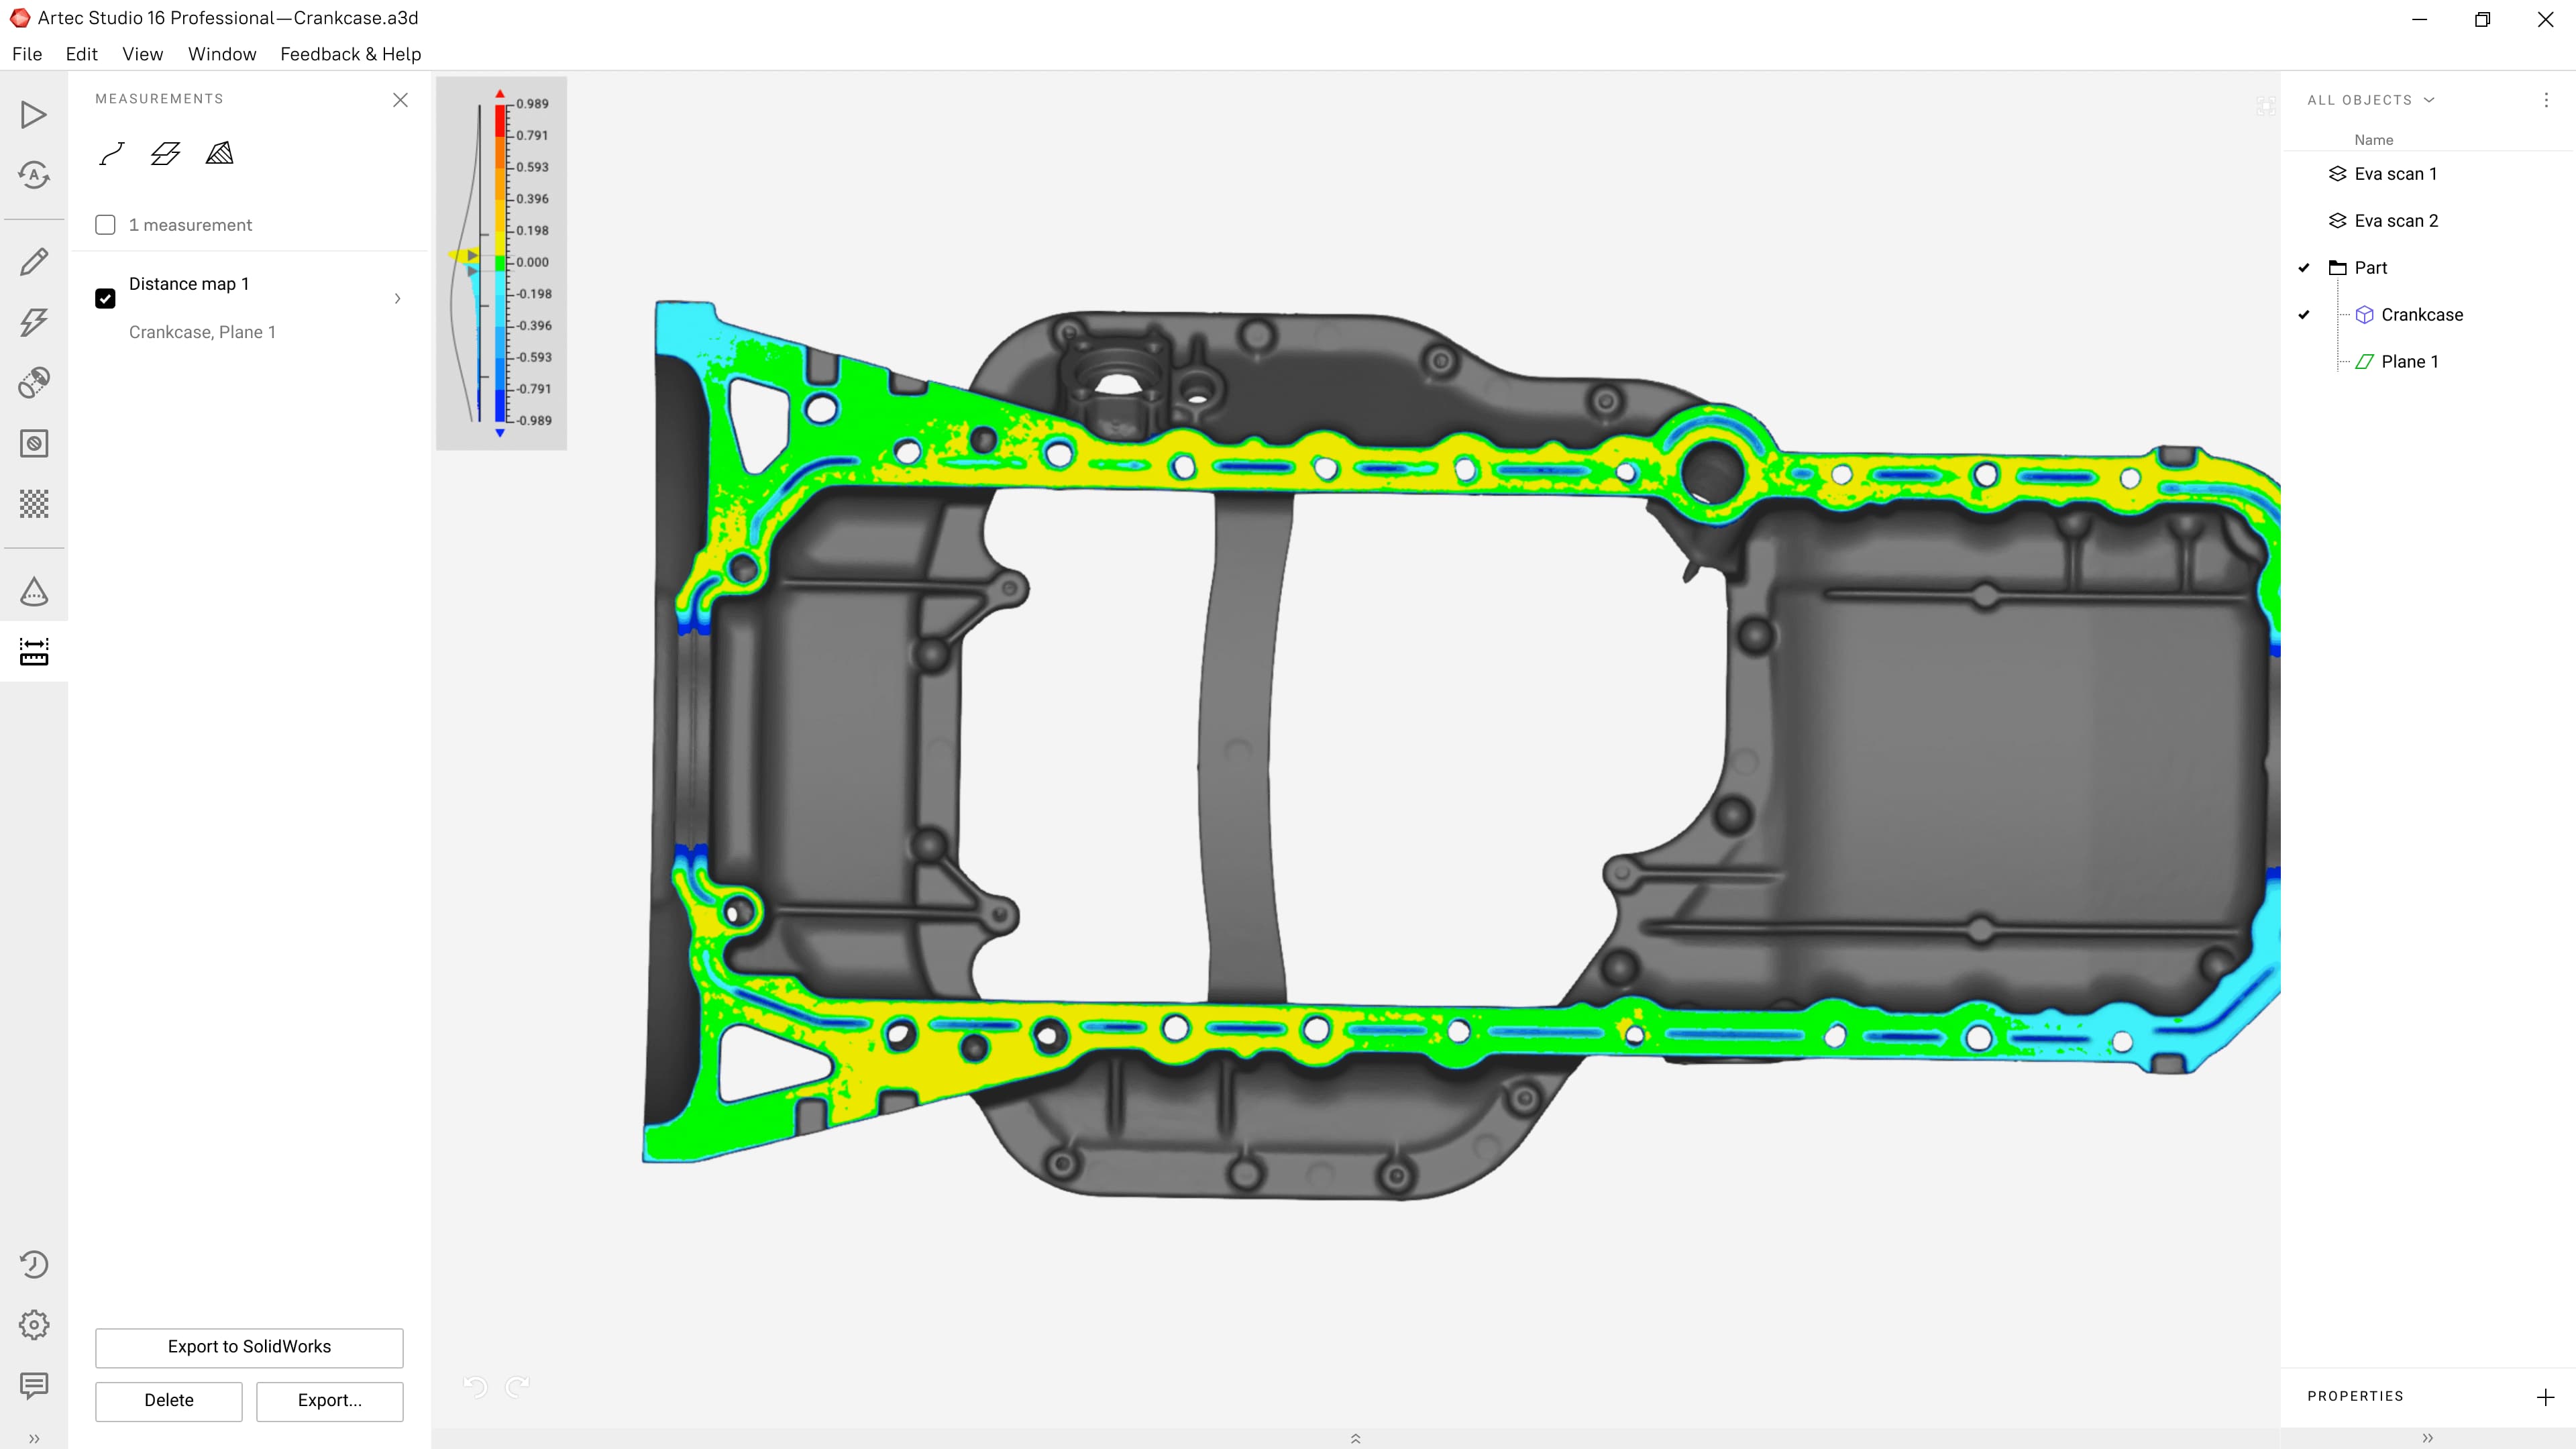
- Import the scanned data: In the David 3D-Scanner Software, import the scanned data that you captured during the scanning process. This will typically be in the form of a point cloud or a mesh.
- Clean up the scan: Use the software’s editing tools to remove any unwanted artifacts, such as noise or outliers, from the scanned data. This will help refine the shape and geometry of the 3D model.
- Fill in missing areas: If there are any areas that were not captured properly during the scanning process, use the software’s filling or sculpting tools to fill in the missing regions and ensure a complete 3D model.
- Smooth the model: If the 3D model has rough or jagged surfaces, use the software’s smoothing algorithms to achieve a more polished and natural appearance. This will help improve the visual quality of the model.
- Texture mapping: If texture data was captured during the scanning process, apply the texture to the model to add color and surface details. Use the software’s texture mapping tools to align and adjust the texture accurately.
- Refine the geometry: Use additional editing tools provided by the software to refine the geometry of the 3D model. This may involve adjusting the shape, proportions, or other specific details to achieve the desired result.
- Inspect and validate the model: Once the post-processing is complete, carefully inspect the model to ensure that it meets your requirements. Check for any remaining imperfections or issues and make adjustments as necessary.
By following these steps, you’ll be able to effectively post-process the scanned data from the David 3D Scanner. Experiment with different post-processing techniques and tools to enhance your models and achieve the best possible results.
In the next step, we’ll explore how to export and share the scanned models using the David 3D-Print software.
Step 7: Exporting and Sharing the Scanned Models through David 3D-Print
Once you have post-processed the scanned data and are satisfied with the results, the next step is to export and share the scanned models. The David 3D-Print software allows you to export the models in various file formats and prepare them for different applications. In this step, we will guide you through the process of exporting and sharing the scanned models.
Follow these steps to export and share the scanned models using David 3D-Print:
- Launch David 3D-Print: Open the David 3D-Print software on your computer by double-clicking the software shortcut.
- Import the scanned model: In the software interface, import the post-processed 3D model that you want to export and share. Make sure the model is properly aligned and oriented.
- Choose the export format: Select the desired file format for the exported model. The software supports various formats such as STL, OBJ, PLY, and more. Choose the format that is suitable for your intended use or application.
- Specify the export settings: Configure the export settings, such as the resolution, level of detail, and units of measurement, if applicable. Adjust these settings based on your specific needs and requirements.
- Export the model: Initiate the export process from the software. Specify the destination folder and file name for the exported model. Click the export button to start generating the file.
- Validate the exported model: Once the export process is complete, validate the exported model by opening it in a 3D viewer or modeling software. Ensure that the exported model retains the desired level of quality and detail.
- Share the model: Depending on your requirements, you can share the exported model through various means. This can include sharing the file directly with others, uploading it to online platforms, or preparing it for 3D printing.
By following these steps, you’ll be able to successfully export and share your scanned models using the David 3D-Print software. Ensure that you choose the appropriate file format and consider the specific requirements of your target application or usage.
Congratulations! You have now completed the entire process of setting up the David 3D Scanner, from unboxing the hardware to exporting the scanned models. With your newly acquired skills, you can continue to explore and experiment with the possibilities of 3D scanning and modeling. Happy scanning!
Conclusion
Setting up the David 3D Scanner can be an exciting and rewarding experience. By following the step-by-step process outlined in this guide, you have learned how to unbox the scanner, connect the hardware, install the software, calibrate the scanner, scan objects, post-process the scanned data, and export and share the scanned models. With these skills, you are now equipped to explore the world of 3D scanning and unleash your creativity.
The David 3D Scanner provides a powerful and user-friendly platform for capturing detailed and accurate 3D data. Whether you are an artist, designer, engineer, or hobbyist, the scanner opens up new possibilities for creating digital replicas of real-world objects. From capturing the intricate details of sculptures and artifacts to creating custom 3D models for game development or 3D printing, the David 3D Scanner is a valuable tool in your arsenal.
Remember, the key to achieving optimal results with the David 3D Scanner is practice and experimentation. Take the time to familiarize yourself with the software’s features, try different scanning techniques, and explore the post-processing options to refine your models. As you gain more experience, you will develop a deeper understanding of the scanner’s capabilities and how to use it to its fullest potential.
Now that you have completed this guide, it’s time to unleash your creativity and start scanning! Dive into exciting projects, collaborate with other enthusiasts, and share your scanned models with the world. Whether you’re documenting historical artifacts, creating digital characters, or prototyping new product designs, the David 3D Scanner is a powerful tool to bring your ideas to life.
So go forth and explore the world of 3D scanning with the David 3D Scanner. Embrace the possibilities, push the boundaries, and let your imagination soar. Happy scanning!