Introduction
When it comes to computers and gaming, having a powerful graphics card is essential. It’s responsible for rendering images, videos, and animations, ensuring a smooth and visually stunning experience. However, sometimes the default graphics card on your computer may not be the most suitable for your needs. Whether you’re a gamer looking for better performance or a professional requiring enhanced graphics capabilities, knowing how to set your default graphics card can make a significant difference.
In this article, we will guide you through the process of setting your default graphics card on both Windows and Mac operating systems. We’ll start by understanding the basics of graphics cards and their importance. Then, we’ll show you how to check your current default graphics card and update its drivers for optimal performance. Next, we’ll explain how to access your graphics card control panel, where you can make the necessary changes. We’ll provide step-by-step instructions for changing your default graphics card in Windows and Mac, ensuring clarity for users of both operating systems. Finally, we’ll address common issues you may encounter and offer troubleshooting tips to overcome them.
It’s important to note that the process of setting the default graphics card may vary slightly depending on your specific computer model and graphics card manufacturer. However, the general steps and concepts discussed in this article should apply to most situations.
By the end of this article, you’ll have the knowledge and confidence to select and configure the most suitable default graphics card for your computer. So, let’s dive in and explore the world of graphics cards, their settings, and how you can optimize your system for an exceptional visual experience.
Understanding Graphics Cards
Before we delve into the process of setting your default graphics card, let’s take a moment to understand what graphics cards are and why they are vital for your computer’s performance. A graphics card, also known as a video card or GPU (Graphics Processing Unit), is a specialized component responsible for processing and rendering high-quality images, videos, and animations on your computer screen. It offloads the burden of graphics processing from the computer’s main processor (CPU), allowing for faster and smoother visual performance.
Graphics cards are particularly important for tasks that require intense graphics processing, such as gaming, video editing, 3D rendering, and graphic design. They are equipped with dedicated video memory (VRAM) and powerful processors to handle the complex calculations involved in generating lifelike visuals. The performance of your graphics card directly impacts the quality, frame rates, and smoothness of your graphics-intensive applications.
When it comes to graphics card brands, the market is dominated by two major players: NVIDIA and AMD. Both companies offer a wide range of graphics cards catering to different user needs and budgets. Some of the popular models include NVIDIA GeForce RTX series, AMD Radeon RX series, and more.
To determine the performance level and capabilities of a graphics card, you need to consider factors such as the number of CUDA cores (for NVIDIA cards), stream processors (for AMD cards), clock speeds, memory bandwidth, and VRAM capacity. These specifications govern how well the graphics card can handle demanding tasks and provide a smooth and immersive visual experience.
It’s worth mentioning that newer generations of graphics cards often come with enhanced features like real-time ray tracing, deep learning super sampling (DLSS), and variable rate shading (VRS), which further elevate the realism and detail of your visuals.
Now that you have a basic understanding of graphics cards and their significance in your computer system, let’s move on to the next section, where we’ll explore how to check your current default graphics card.
Checking Your Current Default Graphics Card
Before you can change your default graphics card, it’s essential to know which graphics card your computer is currently using. This information will help you identify if any changes need to be made and ensure that you’re utilizing the correct graphics processing power. Here are a few methods you can use to check your current default graphics card:
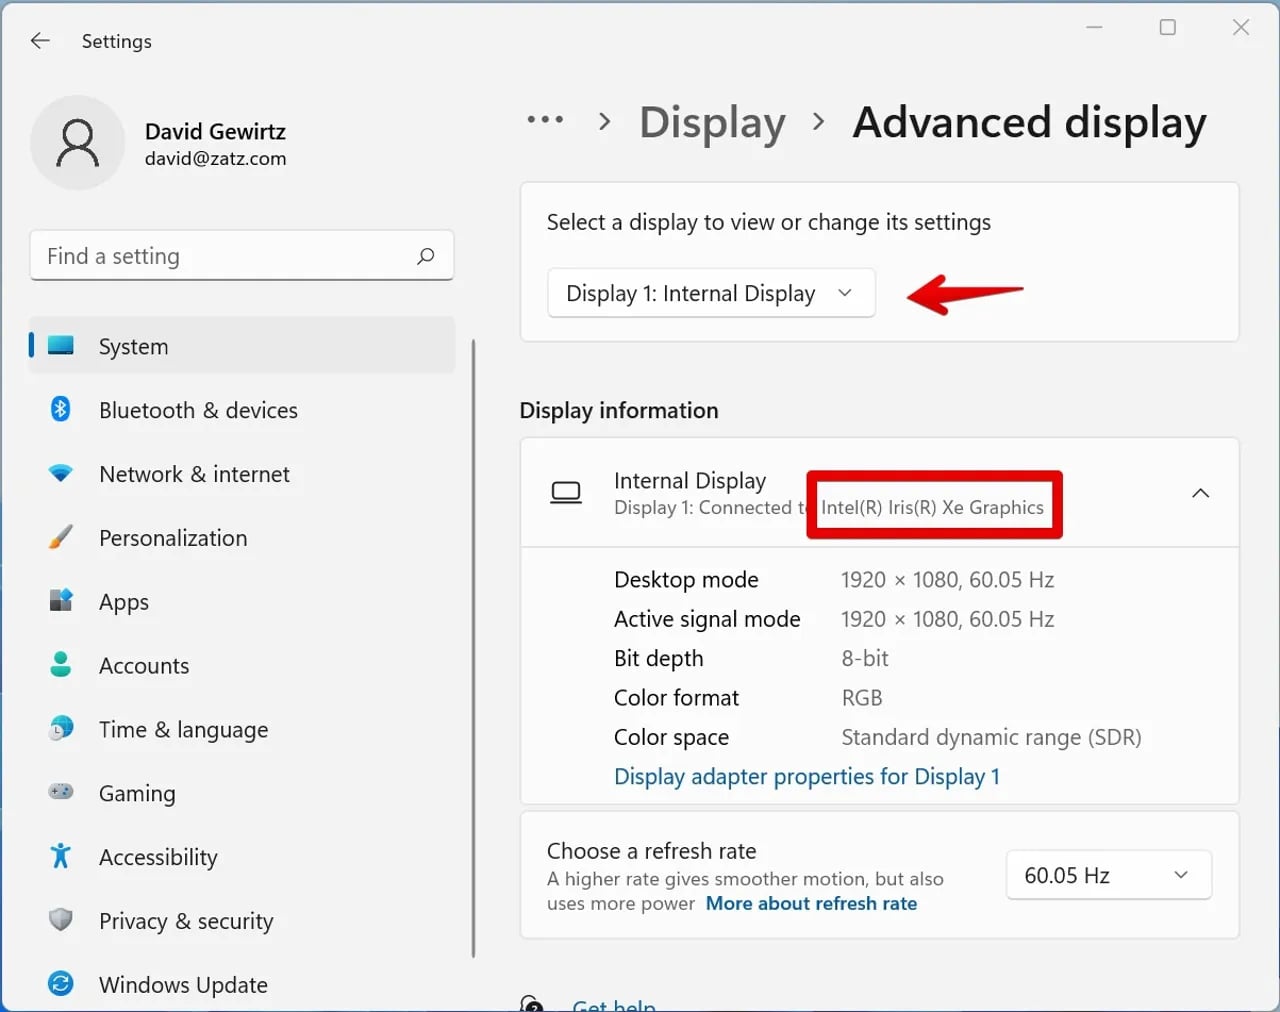
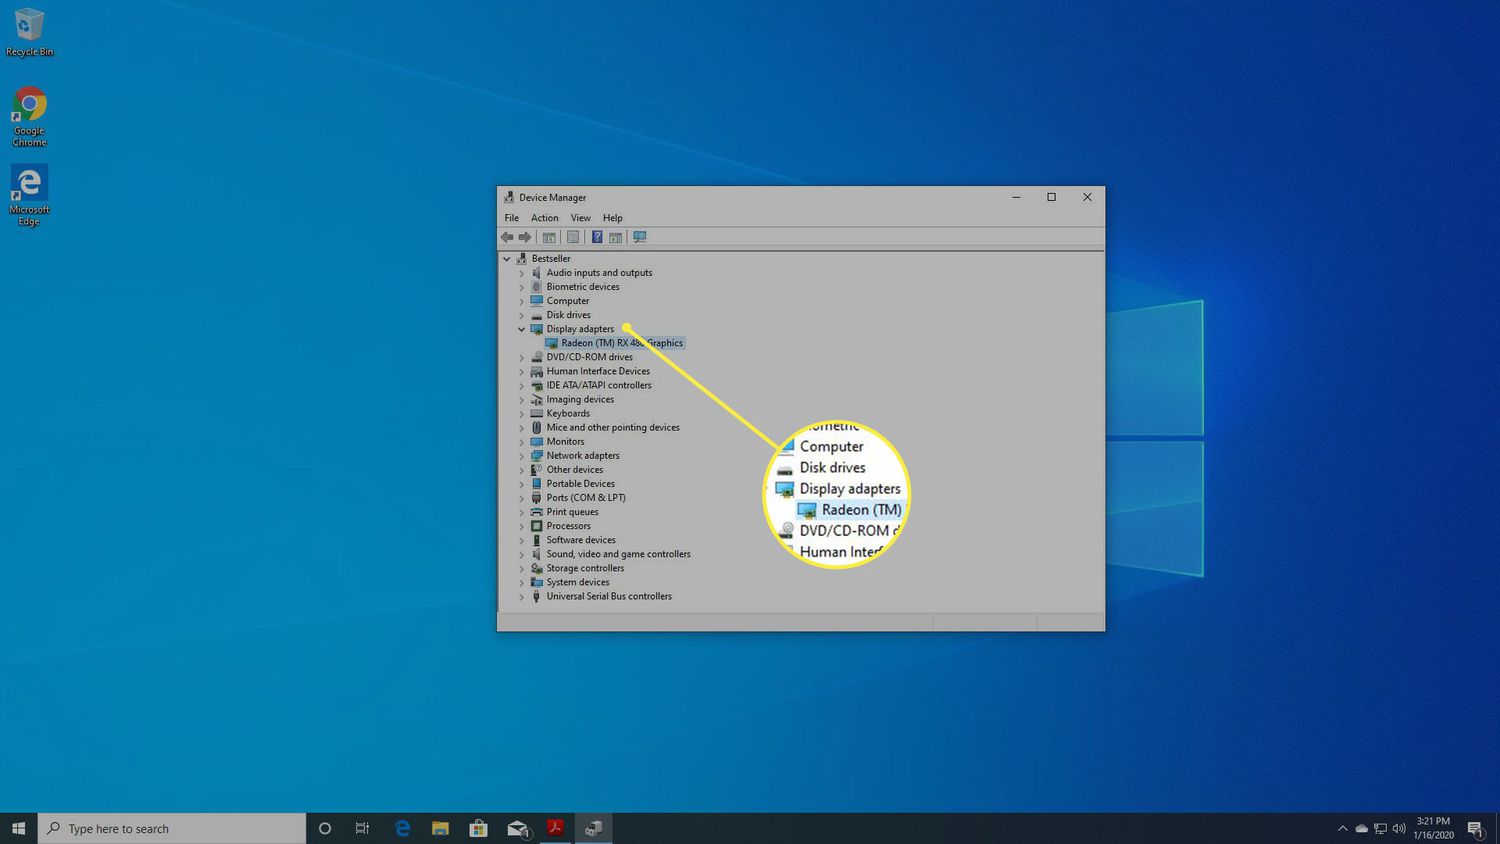
- Device Manager (Windows): On Windows systems, you can use the Device Manager utility to view the installed hardware devices, including your graphics card. To access Device Manager, right-click on the Start menu and select “Device Manager” from the list. Expand the “Display adapters” category, and you’ll see the name of your default graphics card listed.
- About This Mac (Mac): If you’re using a Mac, you can check your graphics card information through the “About This Mac” option. Simply click on the Apple menu in the top-left corner of the screen and select “About This Mac.” Then, click on the “System Report” button and navigate to the “Graphics/Displays” section. Here, you’ll find details about your current graphics card.
- Third-Party Diagnostic Tools: Another option is to utilize third-party diagnostic tools specifically designed for providing detailed system information. Popular tools like GPU-Z, Speccy, or CPU-Z can provide comprehensive information about your current graphics card, including its model, manufacturer, driver version, and more.
By verifying your current default graphics card, you can ensure that you’re working with the correct device and determine if any necessary updates are required. Speaking of updates, in the next section, we’ll discuss how to update your graphics card drivers for optimal performance.
Updating Graphics Card Drivers
To ensure your graphics card is performing at its best, it’s crucial to keep its drivers up to date. Graphics card driver updates often come with bug fixes, performance improvements, and compatibility enhancements for the latest games and software. Here’s how you can update your graphics card drivers:
- Windows: On a Windows computer, you can update your graphics card drivers through the Device Manager or by visiting the official website of your graphics card manufacturer. To update through the Device Manager, right-click on the Start menu, select “Device Manager,” expand the “Display adapters” category, right-click on your graphics card, and choose “Update driver.” Select the option to search automatically for updated driver software. If you prefer manual updates, visit the website of your graphics card manufacturer (NVIDIA or AMD) and download the latest driver for your specific graphics card model. Follow the installation instructions provided by the manufacturer.
- Mac: On a Mac, graphics card driver updates are typically included as part of macOS updates. To update your graphics card driver, you’ll need to install the latest macOS updates. Click on the Apple menu in the top-left corner, select “System Preferences,” and choose “Software Update.” If any updates are available, click “Update Now” to install them, including any graphics card driver updates.
It’s worth mentioning that some graphics card manufacturers offer software utilities, such as NVIDIA GeForce Experience or AMD Radeon Software, that provide an easy way to update drivers directly from within the application. These utilities often include additional features for optimizing your graphics settings and capturing gameplay footage.
After updating your graphics card drivers, it’s recommended to restart your computer for the changes to take effect. This will ensure that your system is utilizing the latest driver version and help prevent any compatibility issues or performance glitches.
Now that you have updated drivers, it’s time to gain access to your graphics card control panel, where you can make further adjustments. The next section will walk you through the process on both Windows and Mac operating systems.
Accessing Your Graphics Card Control Panel
To make changes to your graphics card settings, you need to access the control panel or settings panel provided by your graphics card driver software. This control panel allows you to customize various aspects of your graphics card, including display settings, performance options, and more. Here’s how you can access your graphics card control panel on both Windows and Mac operating systems:
-
Windows: On a Windows computer, the method for accessing your graphics card control panel may vary depending on whether you have an NVIDIA or AMD graphics card.
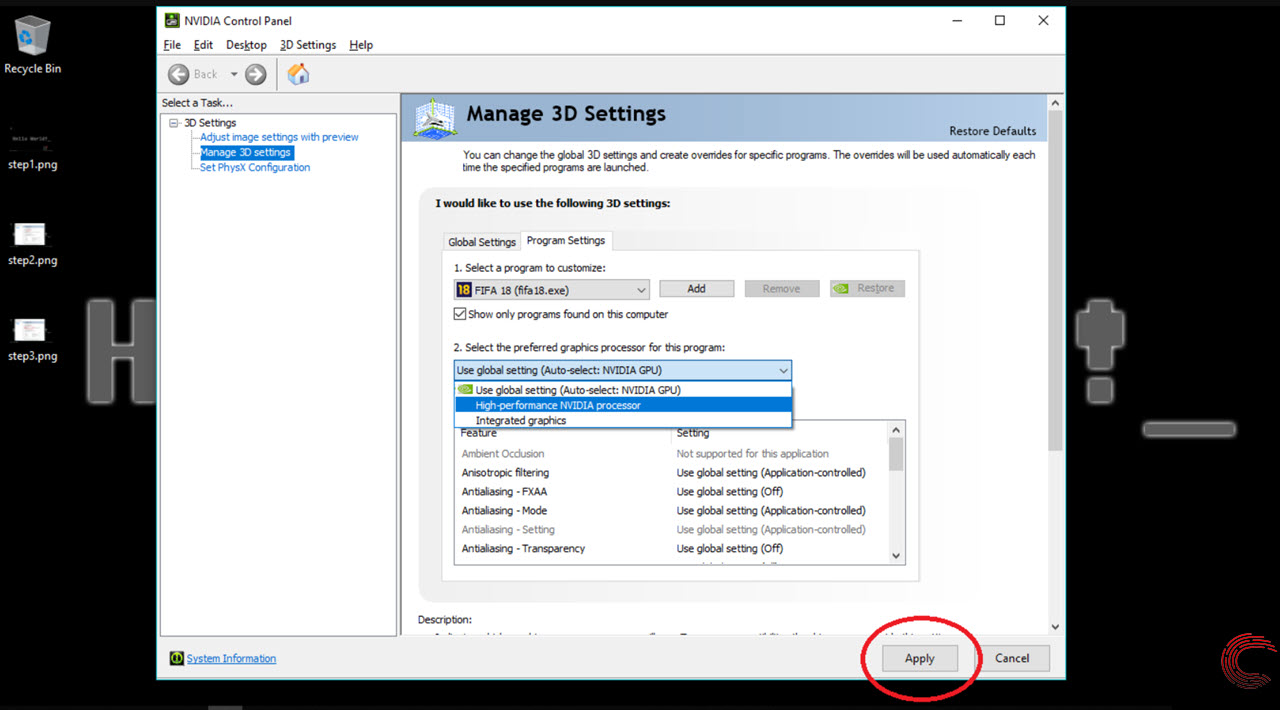
- For NVIDIA graphics cards: Right-click anywhere on your desktop and select “NVIDIA Control Panel” or “NVIDIA Graphics Properties” from the context menu. This will open the NVIDIA Control Panel where you can configure your graphics settings.
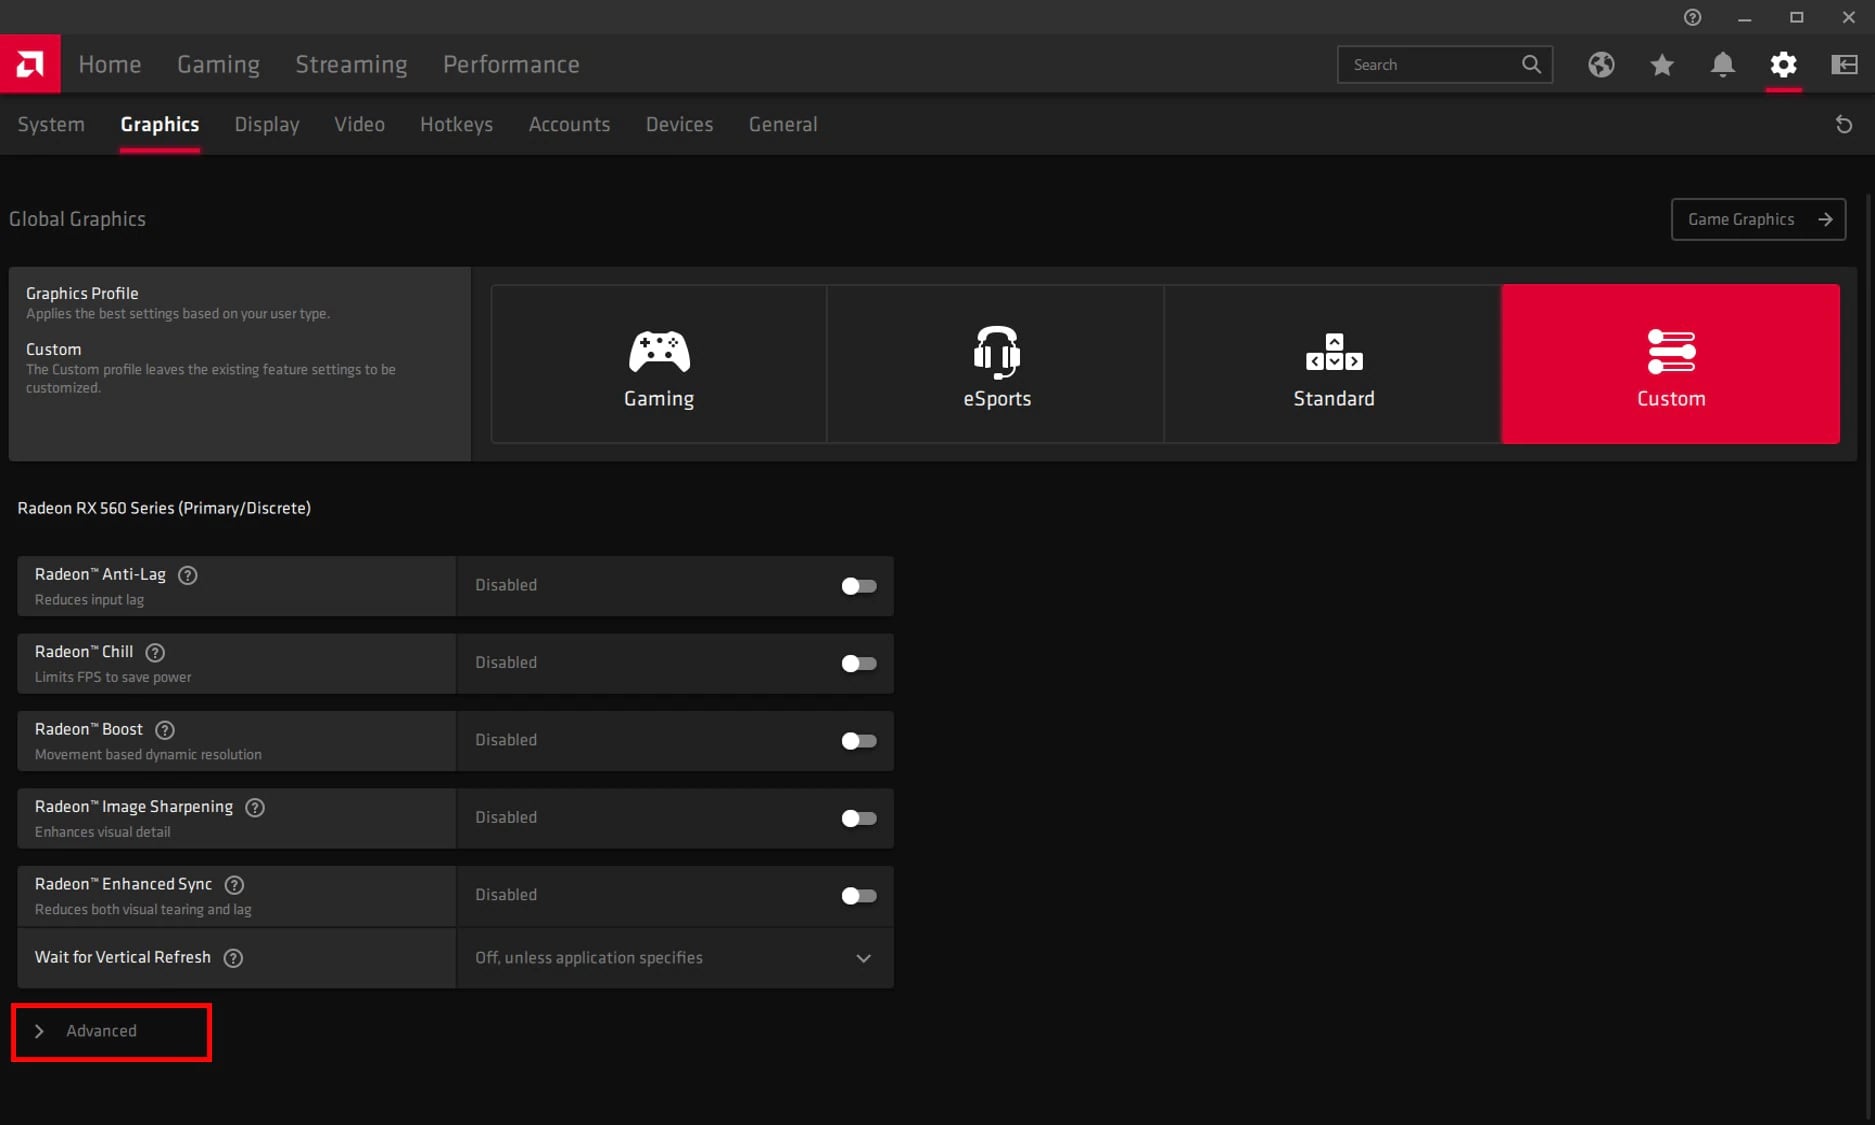
- For AMD graphics cards: Right-click anywhere on your desktop and select “AMD Radeon Settings” from the context menu. This will open the AMD Radeon Settings panel, allowing you to adjust your graphics card settings.
-
Mac: On a Mac, accessing your graphics card control panel is typically done through the System Preferences.
- For NVIDIA graphics cards on Mac: Click on the Apple menu in the top-left corner, select “System Preferences,” and click on “NVIDIA Driver Manager.” This will open the NVIDIA driver control panel on Mac.
- For AMD graphics cards on Mac: Click on the Apple menu in the top-left corner, select “System Preferences,” and click on “Displays.” From there, click on the “Arrangement” tab and then press the “Option” key. This will display the “Detect Displays” button, which will allow you to access the AMD graphics control panel.
Once you have successfully accessed your graphics card control panel, you can explore the various settings available to customize your graphics card’s performance, resolution, color calibration, and more. These settings will vary depending on your graphics card manufacturer and model. Take some time to familiarize yourself with the options and adjustments available to make informed changes that suit your needs.
In the next sections, we’ll walk you through the steps to change your default graphics card on both Windows and Mac operating systems, ensuring that you’re utilizing the desired graphics card for your specific requirements.
Changing Your Default Graphics Card in Windows
If you have multiple graphics cards installed on your Windows computer, you may need to change the default graphics card to ensure that the desired GPU is being utilized. Here’s how you can change your default graphics card in Windows:
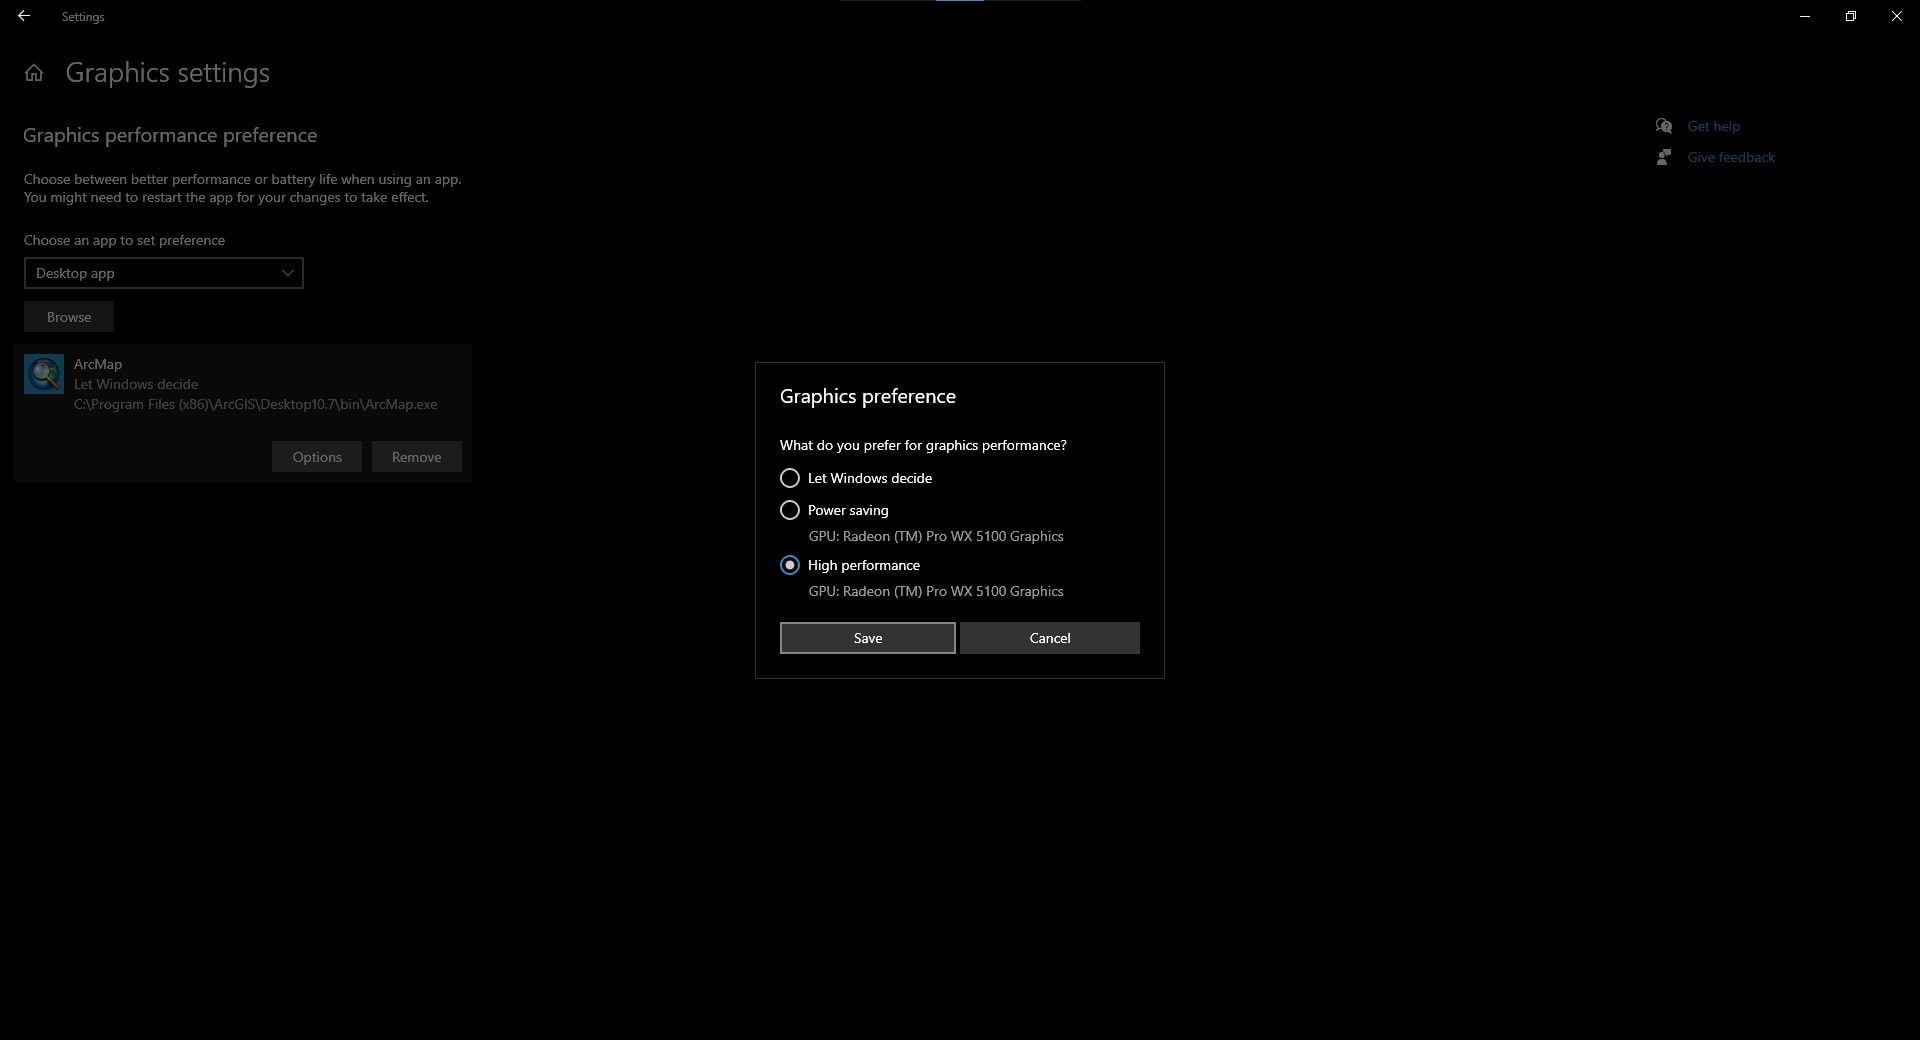
- Open the Graphics Settings: Right-click anywhere on your desktop and select “Display settings” from the context menu. In the Display settings window, scroll down and click on “Graphics settings” located under the “Advanced display settings” section.
-
Select the Default Graphics Card: In the Graphics settings panel, you’ll see two options: “Classic app” and “Universal app.”
- To change the default graphics card for a specific classic application, click on “Classic app” and then click on the “Browse” button to locate and select the executable file (.exe) of the application you want to modify. Once selected, click on “Options” to choose the default graphics card for that application.
- To change the default graphics card for all universal apps, click on “Universal app” and then click on the “Browse” button to locate and select the executable file (.exe) of any universal app. Next, click on “Options” to choose the default graphics card for all universal apps.
- Choose the Default Graphics Card: In the options dialog, select the “Power saving” option to use the integrated graphics (typically Intel) or select the “High performance” option to use the dedicated graphics card (NVIDIA or AMD). Click on the “Save” button to apply the changes.
It’s important to note that the specific steps may vary slightly depending on your Windows version or graphics card driver version. The interface and options explained here are based on Windows 10 and may differ on other versions.
After changing the default graphics card, you may need to restart the application or your computer for the changes to take effect. Once rebooted, the selected graphics card will be utilized as the default GPU for the chosen applications or universal apps.
Now that you know how to change your default graphics card in Windows, let’s move on to the next section, where we’ll explore how to change the default graphics card on Mac computers.
Changing Your Default Graphics Card on Mac
If you have multiple graphics cards installed on your Mac, you can choose which one to use as the default graphics card for your system. Here’s how you can change your default graphics card on a Mac:
- Open System Preferences: Click on the Apple menu in the top-left corner of your screen and select “System Preferences” from the dropdown menu.
- Access Energy Saver Preferences: In the System Preferences window, locate and click on the “Energy Saver” icon. This will open the Energy Saver preferences panel.
-
Select Graphics Card: In the Energy Saver panel, you’ll see a section titled “Automatic graphics switching.” Check or uncheck the box depending on your desired default graphics card.
- If the box is checked, your Mac will automatically switch between the integrated and dedicated graphics card based on the application’s demands to conserve power. This is the default setup on most Mac systems.
- If the box is unchecked, your Mac will use the dedicated graphics card (if available) at all times, providing maximum performance but potentially draining the battery more quickly.
After selecting the desired graphics card preference, close the Energy Saver preferences panel. It’s important to note that not all Mac models have dedicated graphics cards. Some Macs rely solely on integrated graphics, while others have both integrated and dedicated graphics options. The availability of options may vary depending on the specific Mac model you’re using.
You may need to restart your Mac for the changes to take effect. Once rebooted, your selected preference for the default graphics card will be applied, and the system will utilize the chosen GPU accordingly.
It’s worth mentioning that on Mac, the automatic graphics switching option is typically recommended to balance performance and power efficiency. However, if you require maximum graphics performance for specific tasks or applications, unchecking the box and using the dedicated graphics card as the default may be necessary.
Now that you know how to change your default graphics card on a Mac, you have the flexibility to customize your graphics usage based on your specific needs. In the next section, we’ll address common issues you may encounter during this process and provide troubleshooting tips to overcome them.
Troubleshooting Common Issues
While changing your default graphics card settings, you may encounter some common issues. Here are a few troubleshooting tips to help you overcome them:
- Driver Compatibility: Ensure that your graphics card drivers are up to date and compatible with your operating system. Visit the official website of your graphics card manufacturer (NVIDIA or AMD) and download the latest drivers for your specific model.
- Application-Specific Settings: Some applications have their own settings related to graphics card preferences. Check the application settings or options to ensure that the desired graphics card is selected as the default within the application.
- Restart System: If you’ve made changes to your graphics card settings and they aren’t taking effect, try restarting your computer. This can help apply the changes and ensure that the system recognizes the new default graphics card.
- Conflict with Other Software: Some third-party software, such as antivirus programs or system utilities, may conflict with your graphics card settings. Temporarily disable or uninstall any software that may be causing conflicts and test if the default graphics card setting works correctly.
- Check Connections: If you’re using an external graphics card, ensure that it is properly connected to your computer. Check the cable connections and make sure that the graphics card is securely seated in the appropriate slot.
- Seek Technical Support: If you’re encountering persistent issues or technical difficulties, reach out to the support channels provided by your graphics card manufacturer or consult professional technical support for further assistance.
By following these troubleshooting tips, you can overcome common issues and successfully configure your default graphics card settings on Windows or Mac. Remember to consult official documentation and resources specific to your graphics card model for additional troubleshooting guidance.
Now that we’ve explored troubleshooting tips, you have a solid foundation for resolving any issues that may arise during the process of changing your default graphics card. In the next section, we’ll wrap up this guide with a brief summary and final thoughts.
Conclusion
Setting your default graphics card is a crucial step in optimizing your computer’s performance, whether you’re a gamer, a professional working with graphic-intensive applications, or simply looking for a better visual experience. Understanding the basics of graphics cards, checking your current default graphics card, updating graphics card drivers, and accessing the graphics card control panel are essential steps in the process. Whether you’re using Windows or Mac, the steps and options may vary slightly, but the overall concepts remain the same.
By following the instructions outlined in this guide, you now have the knowledge to change your default graphics card on your computer. Remember to check for driver updates regularly, troubleshoot any issues that may arise, and explore the various settings available in the graphics card control panel to customize your graphics experience.
Always consult the official documentation and resources provided by your graphics card manufacturer for specific instructions that apply to your model. Additionally, be aware that different software applications may have their own settings related to default graphics card preferences.
Having the right default graphics card can enhance your gaming experience, enable smooth video editing, and provide the necessary power for graphic design applications. Whether you’re striving for high performance or power efficiency, understanding how to set your default graphics card is an important skill for any computer user.
Now that you have the knowledge, go ahead and explore the possibilities with your default graphics card. Enjoy smoother performance, stunning visuals, and an overall improved computing experience!