Introduction
Welcome to the world of Windows tablets, where portability meets productivity. Whether you’re using a Windows tablet for work or leisure, taking screenshots can be incredibly useful for capturing important moments or sharing information with others. In this article, we will explore various methods to conveniently take screenshots while in tablet mode on your Windows device.
Windows tablets offer a range of options when it comes to taking screenshots. With the ability to use physical buttons, built-in tools, or keyboard shortcuts, you have the flexibility to choose the method that works best for you. Whether you are a seasoned Windows user or new to the tablet experience, we have you covered with step-by-step guides for each method.
Before we dive into the specific methods, it’s worth mentioning that tablet mode optimizes your Windows interface for touch control, making it perfect for on-the-go productivity. You can enjoy a streamlined user experience with features such as a full-screen Start menu, simplified taskbar, and immersive apps.
Now, let’s explore the different methods you can use to capture screenshots on your Windows tablet, ensuring you never miss a moment or essential information.
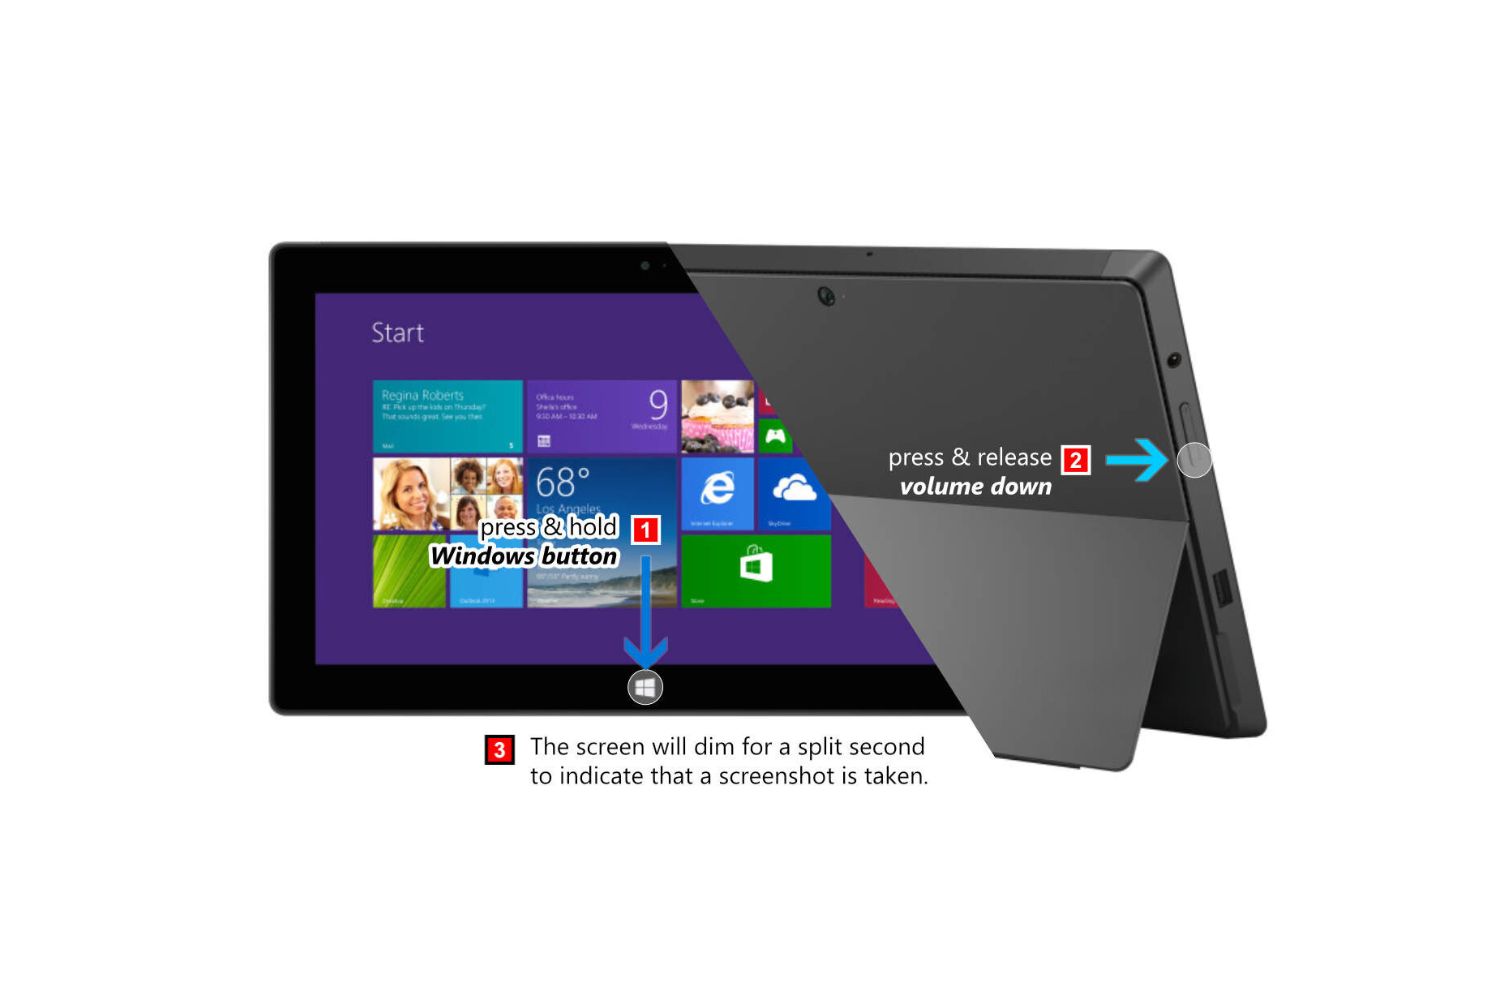
Method 1: Using the Windows Logo Button + Volume Down Button
One of the simplest and most straightforward methods to take a screenshot on your Windows tablet is by using the combination of the Windows logo button and the volume down button.
To capture a screenshot, follow these easy steps:
- Locate the Windows logo button on your tablet. It is usually located at the bottom center or side of the device.
- At the same time, press and hold the Windows logo button and the volume down button.
- You will see the screen briefly dim, indicating that the screenshot has been taken successfully.
- The screenshot will be saved in the Screenshots folder in your Pictures library.
This method is especially convenient for quick and spontaneous captures, allowing you to effortlessly capture the contents of your screen without the need for any additional tools or software.
With just a simple combination of buttons, you have the power to capture and save important information, stunning visuals, or anything else that catches your eye while using your Windows tablet in tablet mode.
Now that you know how to capture screenshots using the Windows logo button and volume down button, let’s explore another method that gives you a bit more flexibility and control over the captured image.
Method 2: Using the Snipping Tool
If you’re looking for more advanced options to capture specific areas of your screen or add annotations to your screenshots, the Snipping Tool is the perfect tool for the job. Here’s how you can use the Snipping Tool on your Windows tablet:
- Open the Start menu and search for “Snipping Tool”.
- Click on the Snipping Tool app to launch it.
- Once the Snipping Tool window opens, click on the “New” button.
- Your screen will fade and a cursor will appear, allowing you to select the area of the screen you want to capture.
- Click and drag your cursor across the desired area to capture it.
- Release the mouse button to take the screenshot.
- The captured image will appear in the Snipping Tool window, where you can add annotations or save it.
- Click on the “File” menu and select “Save As” to save your screenshot in your preferred location.
The Snipping Tool provides a range of capture options, including capturing full-screen, specific areas, or even free-form shapes. Additionally, you can use the pen and highlighter tools to add annotations to your screenshots, making it an excellent choice for those who require more control and customization.
Now that you’re familiar with the Snipping Tool, let’s move on to another method that uses a physical button combination for quick and convenient screenshot captures.
Method 3: Using the Print Screen (PrtScn) Button
If you prefer a classic approach to taking screenshots on your Windows tablet, the Print Screen (PrtScn) button is your go-to option. This method allows you to capture the entire screen and save it as an image. Follow these steps:
- Ensure that the content you want to capture is displayed on your screen.
- Locate the Print Screen (PrtScn) button on your keyboard. It is typically located in the top row, often labeled as “PrtScn” or “Print Screen”.
- Press the Print Screen (PrtScn) button. You will not receive any confirmation of the screenshot.
- Open an image editing software, such as Paint or Photoshop.
- Paste the captured screenshot by pressing “Ctrl + V” or selecting the “Paste” option from the Edit menu.
- Save the screenshot in your preferred image format and location by clicking “File” and selecting “Save As”.
The Print Screen (PrtScn) button captures the entire screen, including all open windows and applications. It’s a quick and simple method to capture what’s currently displayed on your screen, allowing you to easily share or save the captured image.
Now that you know how to use the Print Screen (PrtScn) button, let’s explore another method that combines the power of the Windows key and the Print Screen button to quickly save and locate your screenshots.
Method 4: Using the Windows + Print Screen (Win + PrtScn) Shortcut
If you’re looking for a quick and convenient way to take screenshots on your Windows tablet, the Windows + Print Screen (Win + PrtScn) shortcut is your ideal solution. This method captures the entire screen and automatically saves it to your designated Screenshots folder. Follow these steps:
- Make sure the content you want to capture is visible on your screen.
- Hold down the Windows key (typically located next to the spacebar) and press the Print Screen (PrtScn) button simultaneously.
- You will notice that the screen briefly dims, indicating that the screenshot has been successfully taken and saved.
- Open the File Explorer by pressing the Windows key + E.
- Navigate to the “Pictures” folder, followed by the “Screenshots” folder.
- There you’ll find the captured screenshot, saved with a date and time stamp as the file name.
The Windows + Print Screen (Win + PrtScn) shortcut is a time-saving method that eliminates the need to paste or open image editing software. Your screenshots are automatically saved, allowing you to quickly locate and access them whenever needed.
Now that you know how to use the Windows + Print Screen shortcut, let’s explore another built-in tool that offers more functionality and flexibility for capturing screenshots on your Windows tablet.
Method 5: Using the Snip & Sketch Tool
If you’re looking for a versatile and feature-rich tool to capture and annotate screenshots on your Windows tablet, the Snip & Sketch tool is an excellent choice. This built-in tool offers various capture options and editing features. Here’s how you can use the Snip & Sketch tool:
- Open the Start menu and search for “Snip & Sketch”.
- Click on the Snip & Sketch app to launch it.
- Click the “New” button in the top left corner of the Snip & Sketch window.
- Choose the type of capture you’d like to perform from the available options: Rectangular Snip, Freeform Snip, Window Snip, or Fullscreen Snip.
- Select the area you want to capture using your finger or stylus.
- Once the screenshot is captured, the Snip & Sketch editing toolbar will appear. Here, you can annotate the screenshot with a pen, highlighter, or text.
- Use the “Save” button in the toolbar to save the screenshot to your preferred location.
The Snip & Sketch tool offers a range of capture options, allowing you to choose the specific area of the screen you want to capture. Additionally, the built-in editing tools make it easy to add annotations or highlights to your screenshots before saving or sharing them.
With the Snip & Sketch tool, capturing and customizing screenshots on your Windows tablet becomes a seamless and efficient process, ensuring that you have the ability to capture important information or moments whenever you need to.
Now that you’re familiar with the Snip & Sketch tool, you have several methods at your disposal to capture and save screenshots on your Windows tablet. Choose the method that suits your preferences and needs, and never miss a screenshot-worthy moment again.
Conclusion
Taking screenshots on your Windows tablet in tablet mode is a breeze with the variety of methods available to you. Whether you prefer using physical buttons or built-in tools, you have the flexibility to capture and save important information, stunning visuals, or anything else that catches your eye.
In this article, we explored five different methods for taking screenshots on your Windows tablet. We started with the Windows logo button + volume down button combination, which offers a quick and effortless way to capture your screen. Then, we moved on to the Snipping Tool, which provides more advanced options for capturing specific areas and adding annotations.
We also covered the classic Print Screen (PrtScn) button method, perfect for capturing the entire screen. And, we introduced the Windows + Print Screen (Win + PrtScn) shortcut, which automatically saves the screenshot to your designated Screenshots folder.
Lastly, we discussed the Snip & Sketch tool, a versatile and feature-rich built-in tool that allows you to capture, annotate, and customize screenshots with ease.
With these methods at your disposal, you can choose the approach that best fits your needs and preferences. Whether you want quick snapshots or more control over your captures, Windows tablets offer a range of options to suit your style.
Now that you’re equipped with the knowledge of how to capture screenshots on your Windows tablet in tablet mode, you’ll never miss an opportunity to save and share important information or capture memorable moments. So go ahead, explore and master these methods, and enjoy a seamless screenshot experience on your Windows tablet.