Introduction
Instagram has become one of the most popular social media platforms, with millions of users sharing photos and videos every day. As an individual or business looking to maximize your presence on Instagram, it’s essential to optimize your posting strategy. One effective method is scheduling your posts in advance. By strategically planning and scheduling your content, you can streamline your Instagram marketing efforts and maintain a consistent and engaging presence on the platform.
Scheduling your Instagram posts offers numerous benefits, such as saving time, ensuring consistent engagement, and reaching your target audience at the most optimal times. Instead of constantly worrying about what to post and when, you can plan your content in advance and have it automatically published without any manual intervention.
In this article, we will explore the benefits of scheduling posts on Instagram and provide two methods for doing so effectively. Whether you’re an individual looking to build your personal brand or a business seeking to enhance your social media presence, learning how to schedule your Instagram posts will significantly impact your marketing strategy.
Benefits of Scheduling Posts on Instagram
Scheduling your Instagram posts can bring numerous advantages to your social media marketing strategy. Let’s delve into some of the key benefits you can gain by incorporating post scheduling into your Instagram routine.
1. Consistency: Consistency is crucial when it comes to maintaining an engaged audience on Instagram. By scheduling your posts, you can ensure a steady flow of content, reducing the likelihood of gaps in your posting schedule. This consistency builds trust with your followers and keeps them coming back for more.
2. Time-saving: Manually posting on Instagram can be time-consuming, especially if you’re doing it multiple times a day. With scheduling, you can dedicate chunks of time to plan and schedule posts in advance, freeing up valuable time for other important tasks in your business or personal life.
3. Optimal Timing: Timing is crucial in social media marketing. By analyzing your target audience and using insights and data, you can identify the most optimal times to reach your followers. With scheduling, you can set your posts to go live at specific times when your audience is most active, increasing the likelihood of engagement.
4. Reach Global Audiences: Instagram has a global user base, and reaching audiences in different time zones can be challenging. By scheduling your posts, you can cater to followers in various regions, ensuring that your content is delivered at the most convenient times for them.
5. Strategic Planning: Scheduling your posts allows for strategic planning and curating your Instagram feed. You can plan your content in advance, ensuring a balanced mix of promotional posts, creative visuals, and engaging captions. This strategic approach can help align your Instagram presence with your overall brand messaging and marketing goals.
6. Analyze and Evaluate: Most scheduling tools offer analytics features that provide insights into your post performance. You can track engagement rates, follower growth, and other key metrics to evaluate the effectiveness of your posts and make data-driven decisions for future content strategies.
How to Schedule Posts on Instagram
Now that we understand the benefits of scheduling posts on Instagram, let’s explore two effective methods for scheduling your content in advance. Whether you choose to use Instagram’s Creator Studio or third-party scheduling tools, the process is relatively straightforward. Let’s dive in!
Method #1: Using Instagram’s Creator Studio:
Instagram’s Creator Studio is a free tool designed specifically for content creators and businesses to manage their Instagram accounts. Here’s how you can schedule your posts using this platform:
- Create a Facebook Page: Instagram’s Creator Studio is linked to a Facebook Page, so if you don’t already have one, create a Facebook Page associated with your Instagram account.
- Connect Your Instagram Account: Go to Creator Studio, click on the Instagram icon, and follow the steps to connect your Instagram account to the Creator Studio.
- Create Your Post: Click on the “Create a Post” button and choose the “Instagram Feed” option. Upload your photo or video, add captions, hashtags, and any desired location tags.
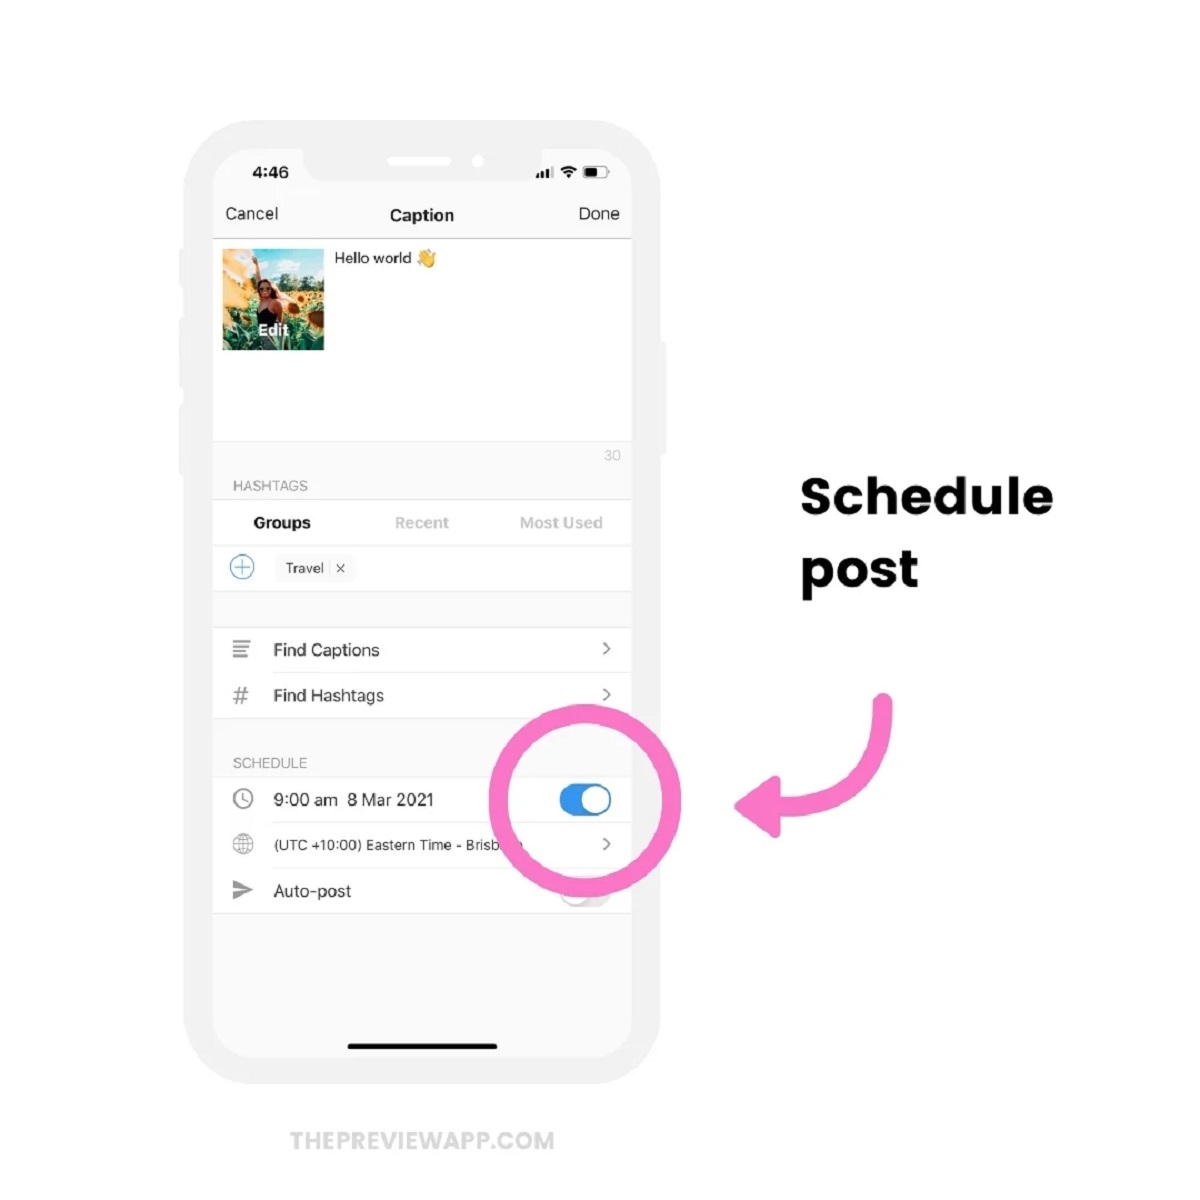
- Schedule Your Post: Instead of clicking on the “Publish” button, click on the down arrow next to it and select “Schedule.” Choose the date and time you want your post to go live and click on “Schedule.”
- Review and Manage Scheduled Posts: To view and manage your scheduled posts, go to the “Content Library” tab in the Creator Studio. From there, you can edit, reschedule, or delete your scheduled posts as needed.
Method #2: Using Third-Party Scheduling Tools:
If you prefer using third-party tools, several reputable scheduling platforms are available that offer advanced features to enhance your Instagram scheduling experience. Here’s a general step-by-step process for using third-party scheduling tools:
- Choose a Reliable Scheduling Tool: Research and select a third-party scheduling tool that suits your needs, taking into consideration features like post scheduling, analytics, and user-friendly interfaces.
- Set Up Your Account: Sign up and create an account on the chosen scheduling platform.
- Connect Your Instagram Profile: Follow the provided instructions to connect your Instagram profile to the scheduling tool. This may involve granting specific permissions or authorizing the tool to access your Instagram account.
- Create Your Content: Use the scheduling tool’s interface to upload your photos or videos, write captions, add hashtags, and select any desired settings for your posts.
- Schedule Your Posts: Set the date and time for your posts to go live, and click on the “Schedule” or similar button to save your scheduled posts.
Remember to monitor your scheduled posts and make any necessary adjustments as your social media strategy evolves. By utilizing either Instagram’s Creator Studio or third-party scheduling tools, you can gain better control over your Instagram posting schedule and enhance your overall Instagram marketing strategy.
Method #1: Using Instagram’s Creator Studio
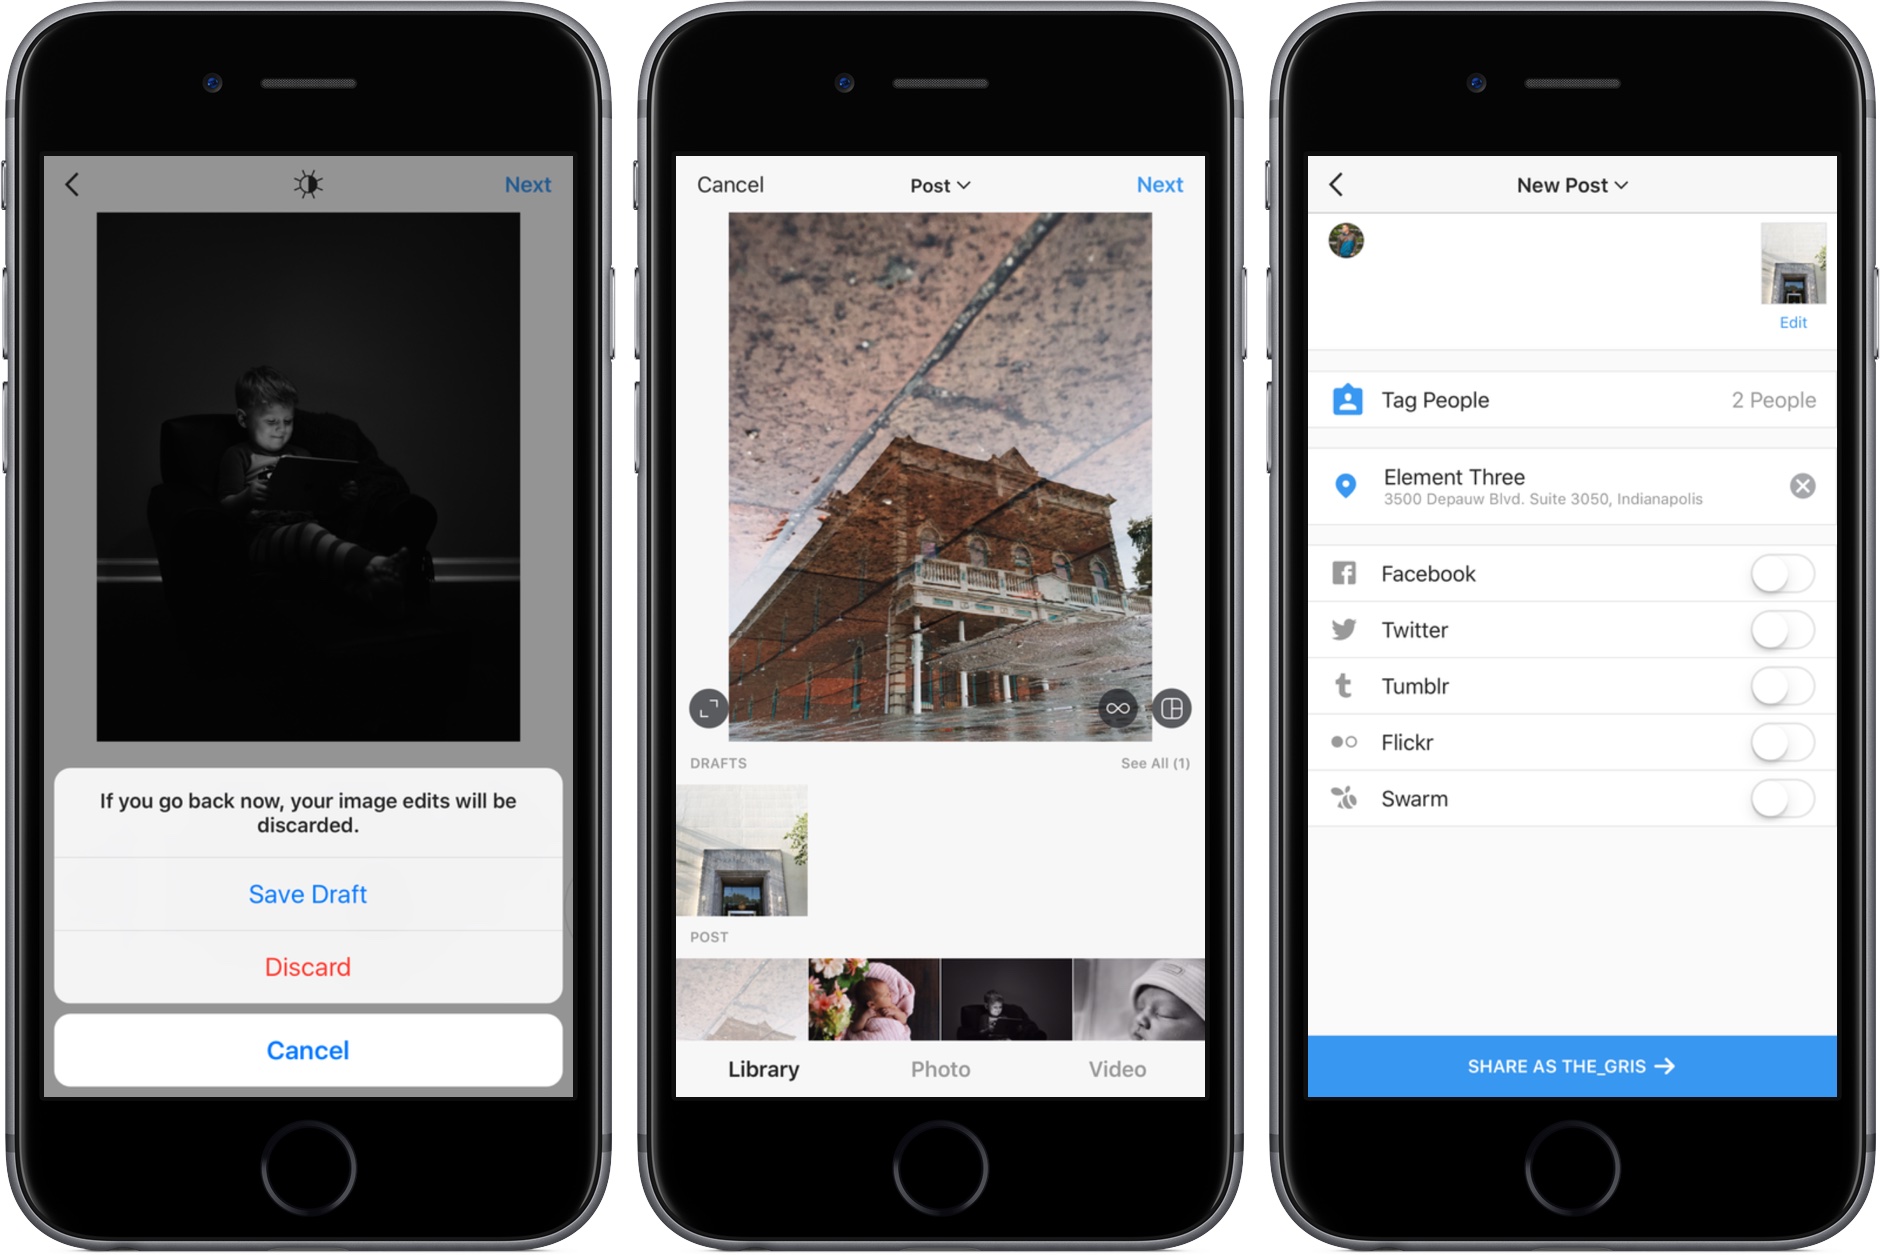
Instagram’s Creator Studio is a powerful tool that allows you to schedule and manage your Instagram posts directly from your desktop. With its user-friendly interface and seamless integration with Facebook, Creator Studio provides a convenient option for scheduling your Instagram content in advance. Here’s a step-by-step guide on how to schedule posts using Instagram’s Creator Studio:
- Create a Facebook Page: If you haven’t already, create a Facebook Page associated with your Instagram account. This is a necessary step as Creator Studio is linked to your Facebook Page.
- Connect Your Instagram Account: Visit Creator Studio by going to your Facebook Page and clicking on “Creator Studio” in the top menu. On the left-hand side, click on the Instagram icon, and follow the prompts to connect your Instagram account to the Creator Studio.
- Create Your Post: Click on the “Create a Post” button found at the top of the page. From the dropdown menu, select the “Instagram Feed” option. Here, you can upload your photo or video by either dragging and dropping the file or selecting it from your computer. Add your desired caption, tags, and location if applicable.
- Schedule Your Post: Instead of clicking on the “Publish” button immediately, click on the down arrow next to it and select “Schedule.” Choose the date and time you want your post to be published and click on “Schedule.”
- Review and Manage Scheduled Posts: To view and manage your scheduled posts, go to the “Content Library” tab in the Creator Studio. Here, you can see all your scheduled posts, make edits if needed, or delete the posts altogether.
One of the major advantages of using Instagram’s Creator Studio is the ability to schedule both photos and videos in advance. This makes it easier to plan your content strategy and maintain a consistent posting schedule without the need for manual intervention.
It’s important to note that Instagram’s Creator Studio is currently only available for business accounts and Instagram Creator accounts. If you have a personal account, you may need to switch to a business account to access this feature.
By utilizing Instagram’s Creator Studio, you can take control of your Instagram content schedule and streamline your posting process. The ability to schedule posts in advance allows you to focus on creating and engaging with your audience while ensuring a consistent presence on the platform.
Method #2: Using Third-Party Scheduling Tools
In addition to Instagram’s Creator Studio, there are several reliable third-party scheduling tools available that can enhance your Instagram scheduling experience. These tools often offer additional features such as advanced analytics, post optimization, and cross-platform scheduling. Here’s a general guide on how to schedule your posts using third-party scheduling tools:
- Choose a Reliable Scheduling Tool: Research and select a third-party scheduling tool that aligns with your needs and preferences. Look for features like post scheduling, analytics, user-friendly interfaces, and compatibility with Instagram.
- Set Up Your Account: Sign up and create an account on the chosen scheduling platform. Some tools may offer free plans with limited features or trial periods to help you evaluate their suitability before committing.
- Connect Your Instagram Profile: Follow the instructions provided by the scheduling tool to connect your Instagram profile. This often involves granting specific permissions to the tool to access your Instagram account and manage your posts.
- Create Your Content: Utilize the scheduling tool’s interface to upload your photos or videos, write captions, add hashtags, and customize any desired settings for your posts. Some tools may even provide editing capabilities to enhance and optimize your visuals.
- Schedule Your Posts: Specify the date and time for your posts to be published. The scheduling tool typically offers a calendar or timeline view where you can select the desired publication times. Take advantage of features that allow you to schedule posts at optimal times based on your audience’s engagement patterns.
Each third-party scheduling tool may have its own unique interface and features, so it’s essential to explore the specific instructions provided by the tool you are using. Make sure to familiarize yourself with the tool’s functionalities and take advantage of any additional features or integrations that can enhance your Instagram marketing efforts.
Remember to review and monitor your scheduled posts regularly. This includes checking for any conflicts or overlapping schedules, making adjustments as needed, and taking advantage of post analytics to evaluate the performance of your content. Being proactive and staying on top of your scheduled posts will help you maintain a consistent and engaging presence on Instagram.
Ultimately, the choice of a third-party scheduling tool should depend on your specific requirements and preferences. Take the time to research and experiment with different tools to find the one that best suits your needs and helps you achieve your Instagram marketing goals.
Step 1: Choose a Reliable Scheduling Tool
When it comes to scheduling your Instagram posts, choosing a reliable third-party scheduling tool is crucial. With a wide range of options available, it’s important to select a tool that fits your specific needs and offers the features and functionalities that align with your social media marketing goals. Here are some factors to consider when choosing a scheduling tool:
1. User-Friendly Interface: Look for a tool with an intuitive and easy-to-navigate interface. A user-friendly platform will save you time and frustration, allowing you to schedule posts efficiently and effectively.
2. Scheduling Options: Consider the scheduling options available. Look for tools that offer a variety of scheduling features, such as the ability to schedule single or multiple posts, set recurring schedules, or create customized posting calendars. The more flexibility you have, the easier it will be to manage your Instagram content.
3. Cross-Platform Compatibility: If you manage multiple social media accounts, it can be beneficial to choose a scheduling tool that supports scheduling on various platforms. This way, you can streamline your social media management efforts by using one tool for scheduling posts across different platforms.
4. Analytics and Insights: Consider whether the tool offers built-in analytics and reporting features. Tracking your post performance is crucial to measure the success of your Instagram strategy and make data-driven decisions. Look for tools that provide comprehensive insights into metrics such as engagement rates, follower growth, and audience demographics.
5. Collaboration Features: If you work with a team or have multiple contributors to your Instagram account, consider tools that offer collaboration features. Look for options that allow you to assign roles, manage permissions, and facilitate seamless collaboration among team members.
6. Customer Support: Check the availability and quality of customer support provided by the scheduling tool. It’s essential to have timely assistance and reliable support in case you encounter any technical issues or have questions regarding the platform’s features.
7. Cost: Evaluate the pricing plans and consider the value you’ll be getting for your investment. Some scheduling tools offer free plans with limited features, while others require a subscription or one-time payment. Take into account your budget and the features that are most important to your Instagram strategy.
By considering these factors, you can choose a reliable scheduling tool that aligns with your needs and helps you effectively manage your Instagram posting schedule. Take the time to explore different options, read customer reviews and comparisons, and even take advantage of free trials to ensure that the selected tool meets your expectations.
Remember, the right scheduling tool will not only simplify your workflow but also enable you to optimize your Instagram presence and achieve your marketing goals more efficiently.
Step 2: Set Up Your Account
Once you have chosen a reliable scheduling tool for your Instagram posts, the next step is to set up your account on the platform. This is an essential step that allows you to access the scheduling tool’s features and begin managing your Instagram posts effectively. Here’s a guide on how to set up your account on a third-party scheduling tool:
- Sign Up: Visit the website of your chosen scheduling tool and look for a “Sign Up” or “Get Started” button. Click on it to begin the account creation process.
- Create an Account: Fill in the required information, such as your name, email address, and a secure password. Some tools may also require additional details, such as your business name or social media handles.
- Verify Your Email: After completing the sign-up process, you may be prompted to verify your email address. This is typically done by clicking on a verification link sent to the email address you provided during sign-up.
- Choose a Plan: Some scheduling tools offer different pricing plans or subscription options. Evaluate the features and benefits of each plan and select the one that aligns with your needs and budget. If a free plan is available, consider using it if it meets your requirements.
- Complete Your Profile: Once you have signed up and selected your plan, take the time to complete your profile within the scheduling tool. This often involves providing additional details about your business, such as your social media handles, website URL, and any other relevant information.
- Connect Your Social Media Accounts: In order to schedule posts on Instagram, you need to connect your Instagram account to the scheduling tool. Look for the option to connect your social media accounts within the tool’s settings or account dashboard. Follow the instructions provided to authorize the tool’s access to your Instagram account.
- Authorize Permissions: As part of the connection process, the scheduling tool may require certain permissions to post on your behalf. This step is necessary for the tool to function properly and schedule your Instagram posts seamlessly. Review the permissions requested and grant the necessary access to continue.
Setting up your account on the scheduling tool is a one-time process that allows you to begin using the platform to its full potential. Be sure to review the tool’s documentation, tutorials, or support resources to familiarize yourself with its features and functionalities. Taking the time to set up your account correctly will ensure a smooth experience as you move forward with scheduling your Instagram posts.
Remember to keep your account credentials secure and regularly update any information as needed. If you encounter any difficulties during the account setup process, most scheduling tools offer customer support to assist you.
By successfully setting up your account on the scheduling tool, you are ready to move on to the next stage of scheduling your Instagram posts and optimizing your social media presence.
Step 3: Connect Your Instagram Profile
After setting up your account on the chosen scheduling tool, the next step is to connect your Instagram profile to the platform. This connection allows the scheduling tool to access your Instagram account, enabling you to schedule and manage your posts seamlessly. Here’s a step-by-step guide on how to connect your Instagram profile to a third-party scheduling tool:
- Access Account Settings: Navigate to the account settings or dashboard of the scheduling tool. Look for an option that allows you to connect social media accounts or specifically connect your Instagram profile.
- Choose Instagram: When prompted to select the social media platform you wish to connect, choose Instagram from the available options.
- Authorization: The scheduling tool will require your authorization to access your Instagram account. Click on the “Authorize” or “Connect” button to initiate the authorization process.
- Log in to Instagram: A new window or tab will open, redirecting you to the official Instagram login page. Enter your Instagram username and password to log in to your account.
- Grant Access Permissions: After logging in, Instagram will display a page requesting permission for the scheduling tool to access your account. Review the permissions being requested, which generally include managing your posts and viewing your profile information. Click on the “Authorize” or “Allow” button to grant the requested permissions.
- Return to the Scheduling Tool: Once you have granted the necessary permissions, you will be redirected back to the scheduling tool. Here, you should see a confirmation that your Instagram account has been successfully connected.
- Repeat for Multiple Accounts: If you have multiple Instagram accounts that you want to schedule posts for, you can repeat the above steps to connect each account to the scheduling tool. Ensure that you are logged out of any other Instagram accounts before proceeding.
The process of connecting your Instagram profile to the scheduling tool may slightly vary depending on the specific platform you are using. It’s important to follow the instructions provided by the scheduling tool and carefully review the authorization permissions before granting access to your account.
By connecting your Instagram profile to the scheduling tool, you unlock the ability to manage and schedule your posts directly from the platform. This connection allows for seamless integration, enabling you to efficiently plan and publish your Instagram content according to your desired schedule.
Keep in mind that you may need to reconnect your Instagram profile if you change your Instagram password or if there are any updates to the scheduling tool’s integration with Instagram. Regularly checking the connection status ensures that your posts continue to be published as scheduled.
Once your Instagram profile is successfully connected to the scheduling tool, you can proceed to the next steps of creating and scheduling your posts, optimizing your content strategy, and maximizing your Instagram marketing efforts.
Step 4: Create Your Content
With your Instagram profile connected to the scheduling tool, it’s time to focus on creating compelling content for your posts. The quality and creativity of your content are vital to engaging your audience and achieving your marketing goals. Here are some key steps to consider when creating your Instagram content:
- Define Your Brand Story: Clarify your brand’s identity and the story you want to convey through your Instagram posts. Determine your unique selling points, brand values, and the tone of voice you want to use in your captions. Align your content with your brand story to create a cohesive and consistent presence on Instagram.
- Plan Your Visuals: Visuals play a significant role in capturing attention on Instagram. Use high-quality photos or videos that are visually appealing and align with your brand aesthetics. Consider factors such as composition, lighting, colors, and overall visual style to maintain a consistent and recognizable look for your content.
- Write Engaging Captions: Craft captions that complement your visuals and capture the attention of your audience. Experiment with different caption lengths and styles, such as storytelling, question prompts, or call-to-actions. Use emojis, hashtags, and relevant mentions to enhance your captions and make them more engaging.
- Add Relevant Hashtags: Research and use relevant hashtags that align with your content and target audience. Include a mix of popular and niche hashtags to expand your reach and increase the chances of your posts being discovered by new users. Avoid using too many hashtags that may make your captions appear cluttered.
- Include Call-to-Actions: Encourage engagement from your followers by including clear and compelling call-to-actions in your captions. Ask questions, invite users to share their experiences or opinions, or prompt them to tag a friend. Engaging captions with call-to-actions can spark conversations and boost interaction on your posts.
- Create Captivating Video Content: Instagram offers various video formats, such as Reels, IGTV, and Stories. Experiment with different video types to keep your content dynamic and engaging. Consider using features like transitions, text overlays, and effects to add visual interest and convey your message effectively.
- Optimize Storytelling with Carousel Posts: Carousel posts allow you to share multiple images or videos in a single post, enabling you to tell a more comprehensive story or showcase various aspects of your product or service. Utilize the carousel feature to your advantage, keeping your audience engaged and encouraging them to swipe through your content.
Remember to keep your content authentic and relatable to your target audience. Showcase your brand’s personality and build a connection with your followers by sharing valuable and meaningful content. Experiment with different formats, themes, and strategies to discover what resonates best with your audience.
Utilize the features provided by your chosen scheduling tool to upload and customize your content. Take advantage of any editing tools, filters, or post optimization features to enhance your visuals and create an aesthetically pleasing Instagram feed.
By investing time and effort in creating quality content, you can establish a strong Instagram presence and increase audience engagement. Consistently delivering captivating content will strengthen the relationship with your followers and drive the success of your Instagram marketing efforts.
Step 5: Schedule Your Posts
After creating your captivating content, it’s time to schedule your Instagram posts using the scheduling tool of your choice. Scheduling your posts allows you to automate the publication process, ensuring that your content is shared at optimal times without requiring manual intervention. Here’s how you can schedule your posts effectively:
- Choose the Right Timing: Consider your target audience and their behavior on Instagram. Use Instagram Insights or data from your scheduling tool to identify the best times to schedule your posts for maximum engagement. Experiment with different posting times and track the performance of your posts to refine your scheduling strategy.
- Plan a Consistent Posting Schedule: Consistency is key to maintaining an engaged and loyal audience on Instagram. Create a posting schedule that aligns with your content strategy and brand goals. Determine how often you want to post, whether it’s daily, a few times a week, or at specific intervals. Strive to maintain a consistent rhythm to keep your followers interested and coming back for more.
- Choose the Date and Time: Within your scheduling tool, select the specific date and time you want your posts to be published. Some scheduling tools offer a calendar view, making it easy to select the desired publication dates. Consider the best days of the week and times when your target audience is active on Instagram to maximize visibility and engagement.
- Add Captions and Hashtags: Before scheduling your posts, make sure to add compelling captions and relevant hashtags. Craft engaging captions that complement your visuals and include a call-to-action if appropriate. Research and use hashtags that are popular within your niche to increase the visibility of your posts and attract relevant followers.
- Review and Preview: Take a final look at your scheduled posts to ensure everything looks good. Preview how your content will appear on Instagram, including images, captions, and hashtags. Make any necessary edits or adjustments to ensure the posts’ overall aesthetics and messaging are on point.
- Schedule and Automate: Once you are satisfied with your scheduled posts, click on the “Schedule” or similar button within your scheduling tool. The tool will automatically publish your posts according to the specified date and time. Sit back and relax as your content is shared with your audience without the need for manual intervention.
- Monitor and Engage: Even though your posts are scheduled, it’s essential to actively monitor and engage with your audience. Respond to comments, answer questions, and join relevant conversations to foster engagement and strengthen your relationship with your followers.
Keep in mind that scheduling your posts does not mean you should completely detach from your Instagram account. Stay involved, interact with your followers, and make adjustments to your strategy if necessary.
Remember that scheduling tools may have limitations or require a specific subscription plan for certain features or advanced scheduling options. Familiarize yourself with the capabilities of your chosen scheduling tool to make the most out of your scheduled Instagram posts.
By effectively scheduling your posts, you can maintain a consistent presence on Instagram, reach your target audience at the right times, and optimize your content strategy for maximum engagement and impact.
Tips for Effective Post Scheduling on Instagram
Scheduling your Instagram posts is a powerful strategy to optimize your social media presence and maximize engagement with your audience. To ensure the success of your scheduled posts, consider the following tips for effective post scheduling on Instagram:
- Know Your Audience: Understanding your target audience is essential for scheduling your posts effectively. Use Instagram Insights or analytics provided by your scheduling tool to gather data on your audience’s demographics, peak activity times, and engagement patterns. This information will help you schedule your posts when your audience is most likely to be online.
- Vary Your Content: Keep your Instagram feed fresh and engaging by incorporating a variety of content types and formats. Mix photos, videos, carousel posts, and Instagram Stories to offer diverse experiences to your audience. Experiment with different styles, themes, and topics to keep your content interesting and cater to varying preferences.
- Be Consistent: Consistency is key to building an engaged following on Instagram. Create a consistent posting schedule and stick to it. Regularly share high-quality, relevant content to keep your followers interested and coming back for more. Consistency will also help with algorithm visibility and maintaining a steady presence in your followers’ feeds.
- Optimize Caption Lengths: Vary your caption lengths depending on the type of content and your objectives. Some posts may benefit from shorter, punchy captions, while others may require longer, storytelling captions. Experiment with different lengths and see what resonates best with your audience. Remember to include relevant hashtags and calls-to-action to drive engagement.
- Use a Content Calendar: A content calendar is a helpful tool for planning and organizing your Instagram posts. It allows you to visualize your posting schedule, keep track of planned themes or campaigns, and ensure a diverse mix of content. A content calendar also helps you avoid any gaps or overlaps in your posting schedule and allows for efficient content creation and scheduling.
- Engage with Your Audience: Scheduling posts doesn’t mean fully automating your Instagram presence. Make sure to actively engage with your audience by responding to comments, liking and commenting on their posts, and participating in relevant conversations. Interacting with your followers not only shows that you value their engagement but also helps build strong relationships and loyalty.
- Monitor and Analyze: Regularly monitor the performance of your scheduled posts. Use the analytics provided by your scheduling tool or Instagram’s Insights to track engagement metrics, follower growth, and post reach. Analyzing this data will help you understand what content resonates with your audience and make informed decisions regarding your posting strategies.
- Stay Updated on Instagram Features: Instagram frequently updates its platform with new features and tools. Stay informed about these updates and explore how you can leverage them to enhance your scheduled posts. Features like IGTV, Instagram Reels, and the latest story stickers can add variety and creativity to your content, boosting engagement and visibility.
- Test and Iterate: Your Instagram strategy is not set in stone. Continuously test different tactics, schedules, and content types to identify what works best for your audience. Monitor the results and iterate your approach based on the feedback you receive. The key is to learn from your insights and apply those learnings to refine and improve your posting strategy.
By incorporating these tips into your post scheduling strategy, you can optimize your Instagram presence, boost engagement, and take your social media marketing efforts to new heights.
Conclusion
Scheduling your Instagram posts is an effective strategy for optimizing your social media presence and increasing engagement with your audience. By strategically planning and automating your content, you can save time, maintain consistency, and reach your target audience at the most opportune times. Whether you choose to use Instagram’s Creator Studio or third-party scheduling tools, the process is relatively straightforward and offers a range of benefits.
Using Instagram’s Creator Studio allows you to schedule posts directly from your desktop, leveraging its seamless integration with Facebook. On the other hand, third-party scheduling tools provide additional features like advanced analytics, cross-platform scheduling, and collaboration capabilities. Whichever option you choose, setting up your account and connecting your Instagram profile are essential steps in the process.
Creating engaging and visually appealing content is crucial for capturing your audience’s attention and driving engagement. Vary your content types and formats, and be consistent in your posting schedule to maintain a strong presence on Instagram. Utilize features like hashtags, captions, and calls-to-action to maximize the impact of your posts.
When it comes to scheduling, consider factors such as your audience’s behavior, optimal posting times, and the use of a content calendar. Engage with your audience regularly and monitor the performance of your scheduled posts using analytics and insights. By staying updated on Instagram’s features and continuously testing and iterating your strategies, you can constantly improve your post scheduling approach and achieve better results.
In conclusion, scheduling your Instagram posts can streamline your social media marketing efforts, increase your online visibility, and help you build a strong and engaged community. By utilizing the right tools, creating outstanding content, and adopting a strategic approach, you can create a consistent and impactful Instagram presence that resonates with your audience and contributes to the growth and success of your brand or personal brand.