Introduction
With the increasing demand for high-definition audio and video content, the need for transmitting HDMI signals over long distances has become essential. HDMI (High-Definition Multimedia Interface) is the standard for transmitting uncompressed audio and video signals. However, the limitation of HDMI cables being typically short in length poses a challenge when it comes to setting up a home theater system or installing a projector in a conference room.
This is where HDMI over Cat5 comes into play. HDMI over Cat5, also known as HDMI over Ethernet or HDMI extender, is a cost-effective solution that allows you to transmit HDMI signals over longer distances using standard Cat5 or Cat6 network cables. This technology converts the HDMI signals into a format that can be transmitted over Ethernet cables, greatly extending the reach of your audio and video devices.
Whether you’re a home theater enthusiast or a business professional looking to set up a reliable AV system, understanding how to run HDMI over Cat5 is crucial in order to achieve seamless high-definition audio and video transmission without compromising on quality.
In this guide, we will take you through the steps involved in running HDMI over Cat5, including the benefits of using this technology, the equipment needed, and a step-by-step process for setting it up. By the end of this guide, you’ll have the knowledge and confidence to extend your HDMI signals over longer distances using Cat5 cables.
What is HDMI Over Cat5?
HDMI over Cat5 is a technology that allows you to transmit HDMI signals over longer distances using Cat5 or Cat6 network cables. HDMI, which stands for High-Definition Multimedia Interface, is a standard digital interface used for transmitting high-quality audio and video signals between devices such as TVs, projectors, Blu-ray players, and gaming consoles.
While HDMI cables are known for their superior signal quality, they are typically limited by their length. This can be problematic when you need to set up audio and video devices in different rooms or locations that are far apart.
HDMI over Cat5 solves this problem by converting the HDMI signals into a format that can be transmitted over Ethernet cables. Cat5 or Cat6 cables are commonly used for networking purposes and are widely available and affordable. By utilizing these existing network cables, HDMI over Cat5 extends the reach of HDMI signals, allowing you to transmit audio and video over much longer distances.
One of the major advantages of using HDMI over Cat5 is the ability to transmit high-definition signals without any degradation in quality. The technology ensures that the audio and video signals remain uncompressed during transmission, resulting in crystal-clear images and immersive sound.
In addition to the length extension, HDMI over Cat5 also supports other features of HDMI, including 3D video, HDMI-CEC (Consumer Electronics Control) for device control, and audio return channel (ARC). This means you can enjoy all the benefits of HDMI connectivity even when your devices are connected over Cat5 cables.
Overall, HDMI over Cat5 offers a cost-effective and reliable solution for extending HDMI signals over longer distances. Whether you’re setting up a home theater system, conducting presentations in a conference room, or connecting audio and video devices in different rooms, HDMI over Cat5 provides a convenient and efficient way to transmit high-definition signals without sacrificing quality or breaking the bank.
Benefits of HDMI Over Cat5
HDMI over Cat5 offers a multitude of benefits for transmitting audio and video signals over longer distances. Whether you’re a homeowner, business professional, or AV enthusiast, understanding the advantages of using HDMI over Cat5 can help you make an informed decision when it comes to setting up your audio and video systems.
1. Extended Reach: One of the primary benefits of HDMI over Cat5 is the extended reach it provides. It allows you to transmit HDMI signals over distances of up to 100 meters (or approximately 330 feet). This makes it ideal for situations where your audio and video devices are in different rooms, floors, or locations that are far apart.
2. Cost-Effective Solution: HDMI over Cat5 eliminates the need for expensive long HDMI cables. Instead, it utilizes affordable and readily available Cat5 or Cat6 network cables. This significantly reduces the cost of cable installation, making it a more cost-effective solution for extending HDMI signals.
3. Uncompressed Audio and Video: HDMI over Cat5 ensures that audio and video signals remain uncompressed during transmission. This means you can enjoy high-definition audio and video without any degradation in quality. Whether you’re watching movies, playing games, or delivering professional presentations, the clarity and detail of the content will be maintained.
4. Easy Installation: Setting up HDMI over Cat5 is relatively straightforward. The equipment required, such as the transmitter and receiver, can be easily connected to your audio and video devices. Additionally, Cat5 or Cat6 cables are easy to handle and terminate, making the installation process hassle-free.
5. Supports HDMI Features: HDMI over Cat5 supports various HDMI features and functionalities, including 3D video, HDMI-CEC for device control, and audio return channel (ARC). This ensures that you can take advantage of all the features provided by HDMI, even when your devices are connected via Cat5 cables.
6. Flexibility and Scalability: HDMI over Cat5 allows you to expand your audio and video systems with ease. You can add additional HDMI over Cat5 extenders to transmit signals to multiple displays or receivers, providing flexibility and scalability to your setup.
7. Reliability: HDMI over Cat5 is a reliable technology that ensures stable and consistent transmission of audio and video signals. It utilizes the secure and robust nature of Ethernet cables, minimizing the risk of signal loss or interference.
In summary, HDMI over Cat5 offers an array of benefits, including extended reach, affordability, uncompressed audio and video, easy installation, support for HDMI features, flexibility, scalability, and reliability. Whether you’re integrating a home theater system, setting up a conference room, or connecting audio and video devices in different areas, HDMI over Cat5 provides a cost-effective and efficient solution for transmitting high-quality signals over longer distances.
Equipment Needed for HDMI Over Cat5
Setting up HDMI over Cat5 requires a few essential pieces of equipment to ensure the smooth transmission of audio and video signals. Here are the key components you will need:
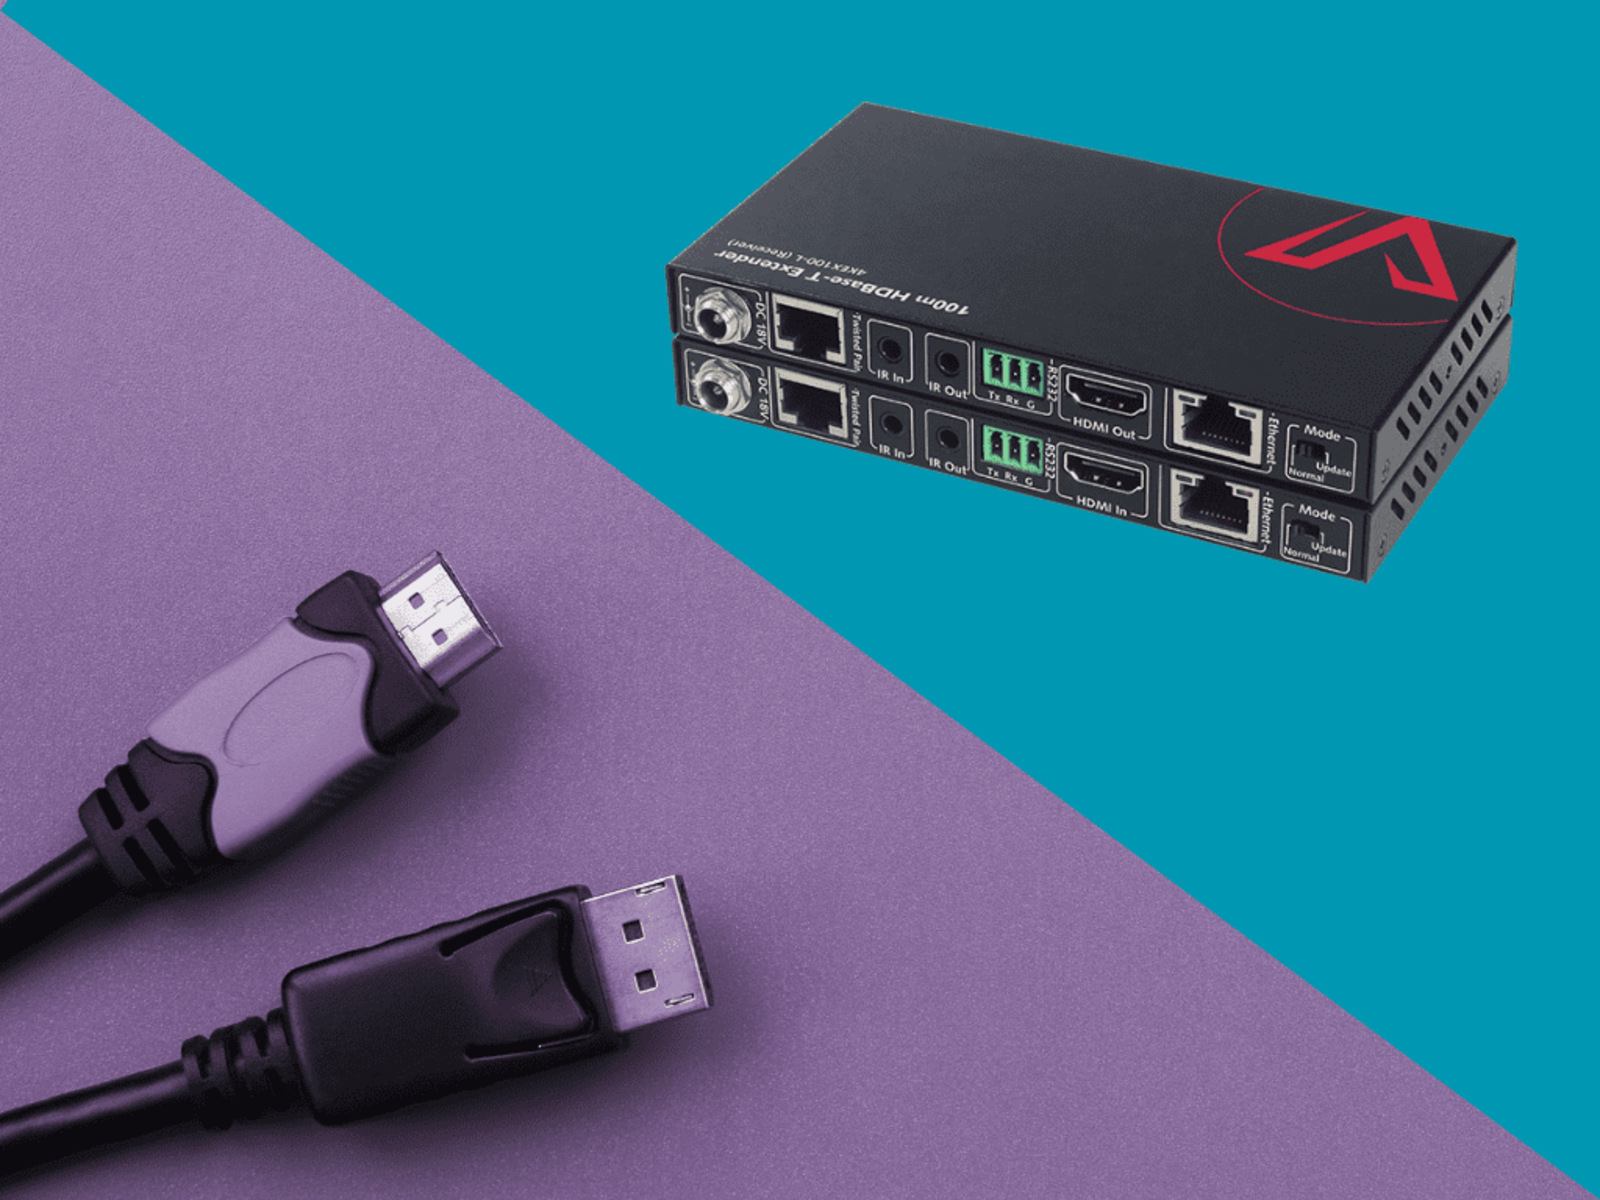
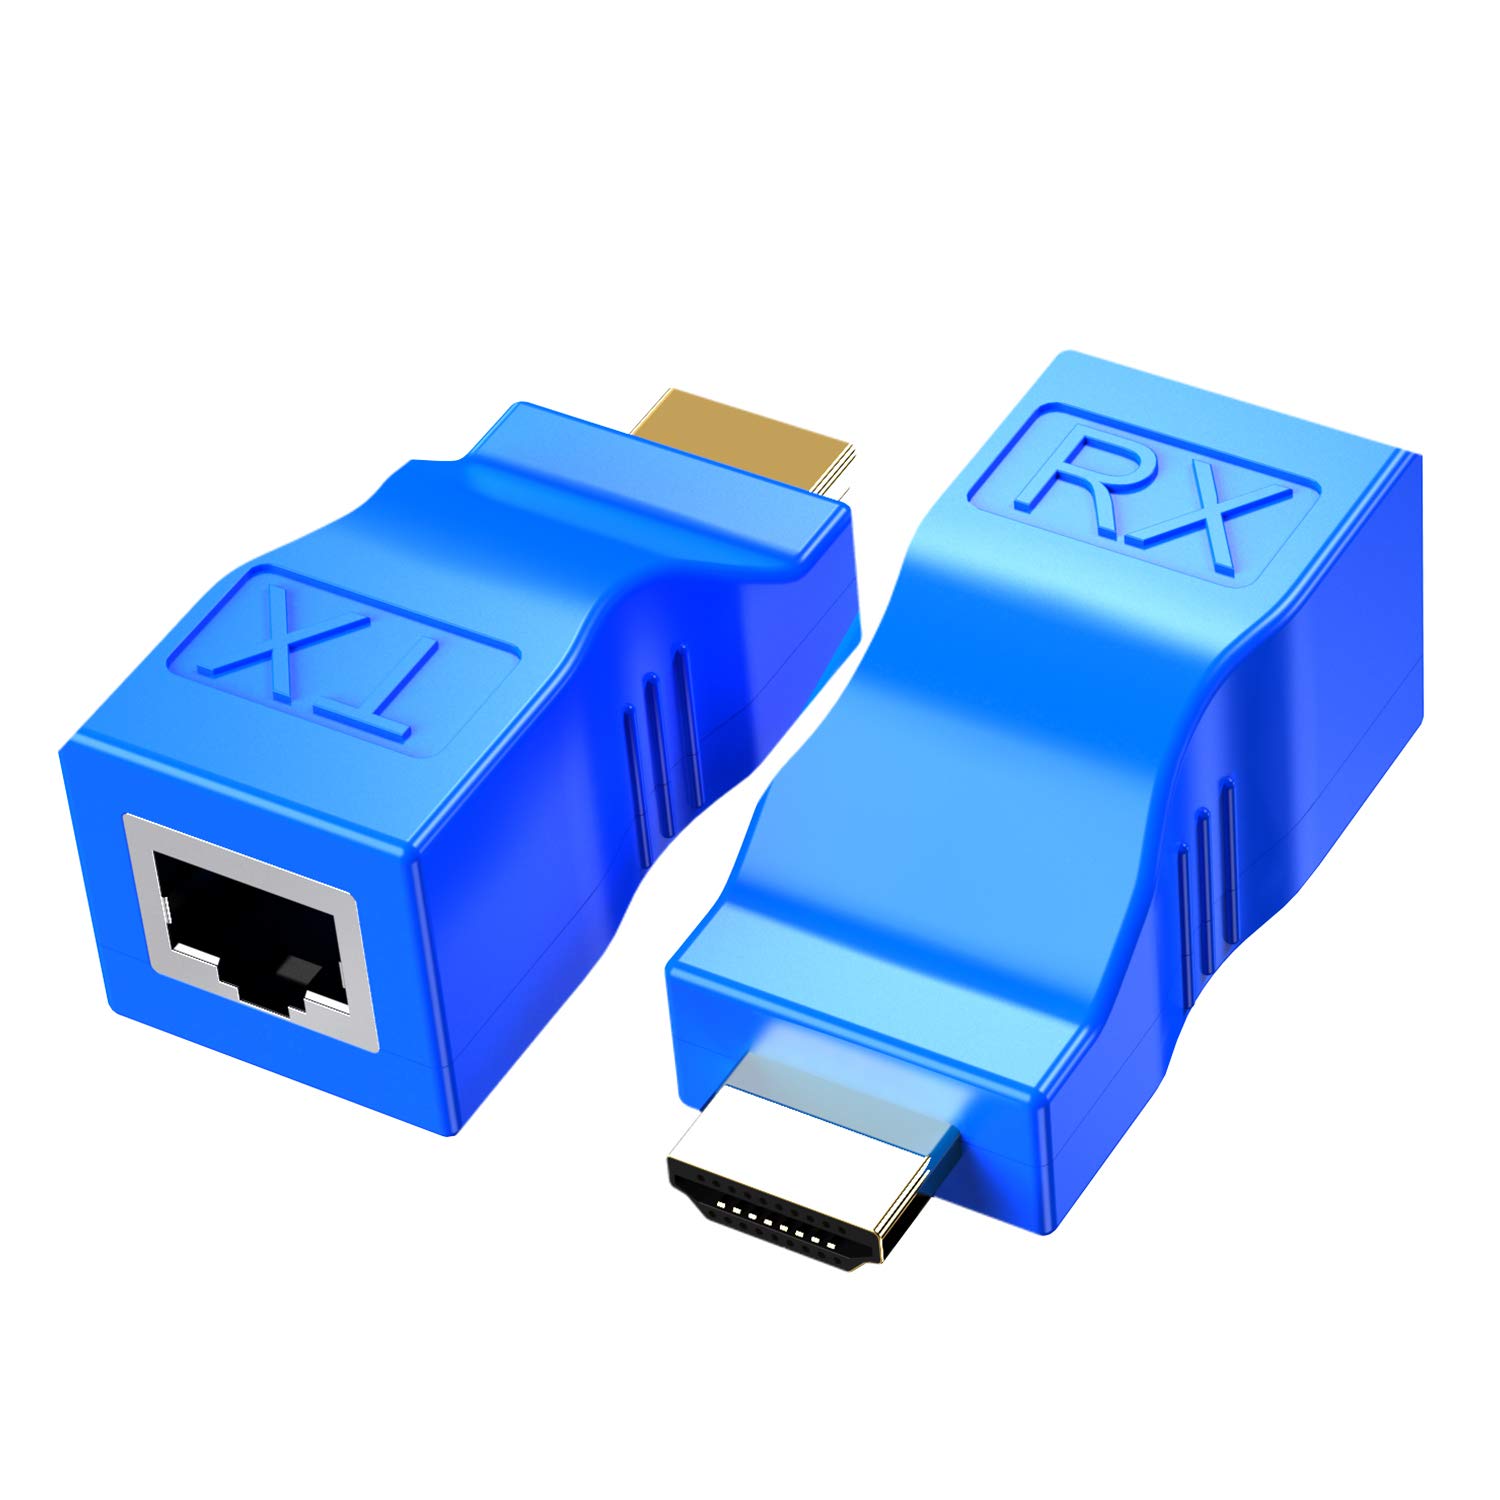
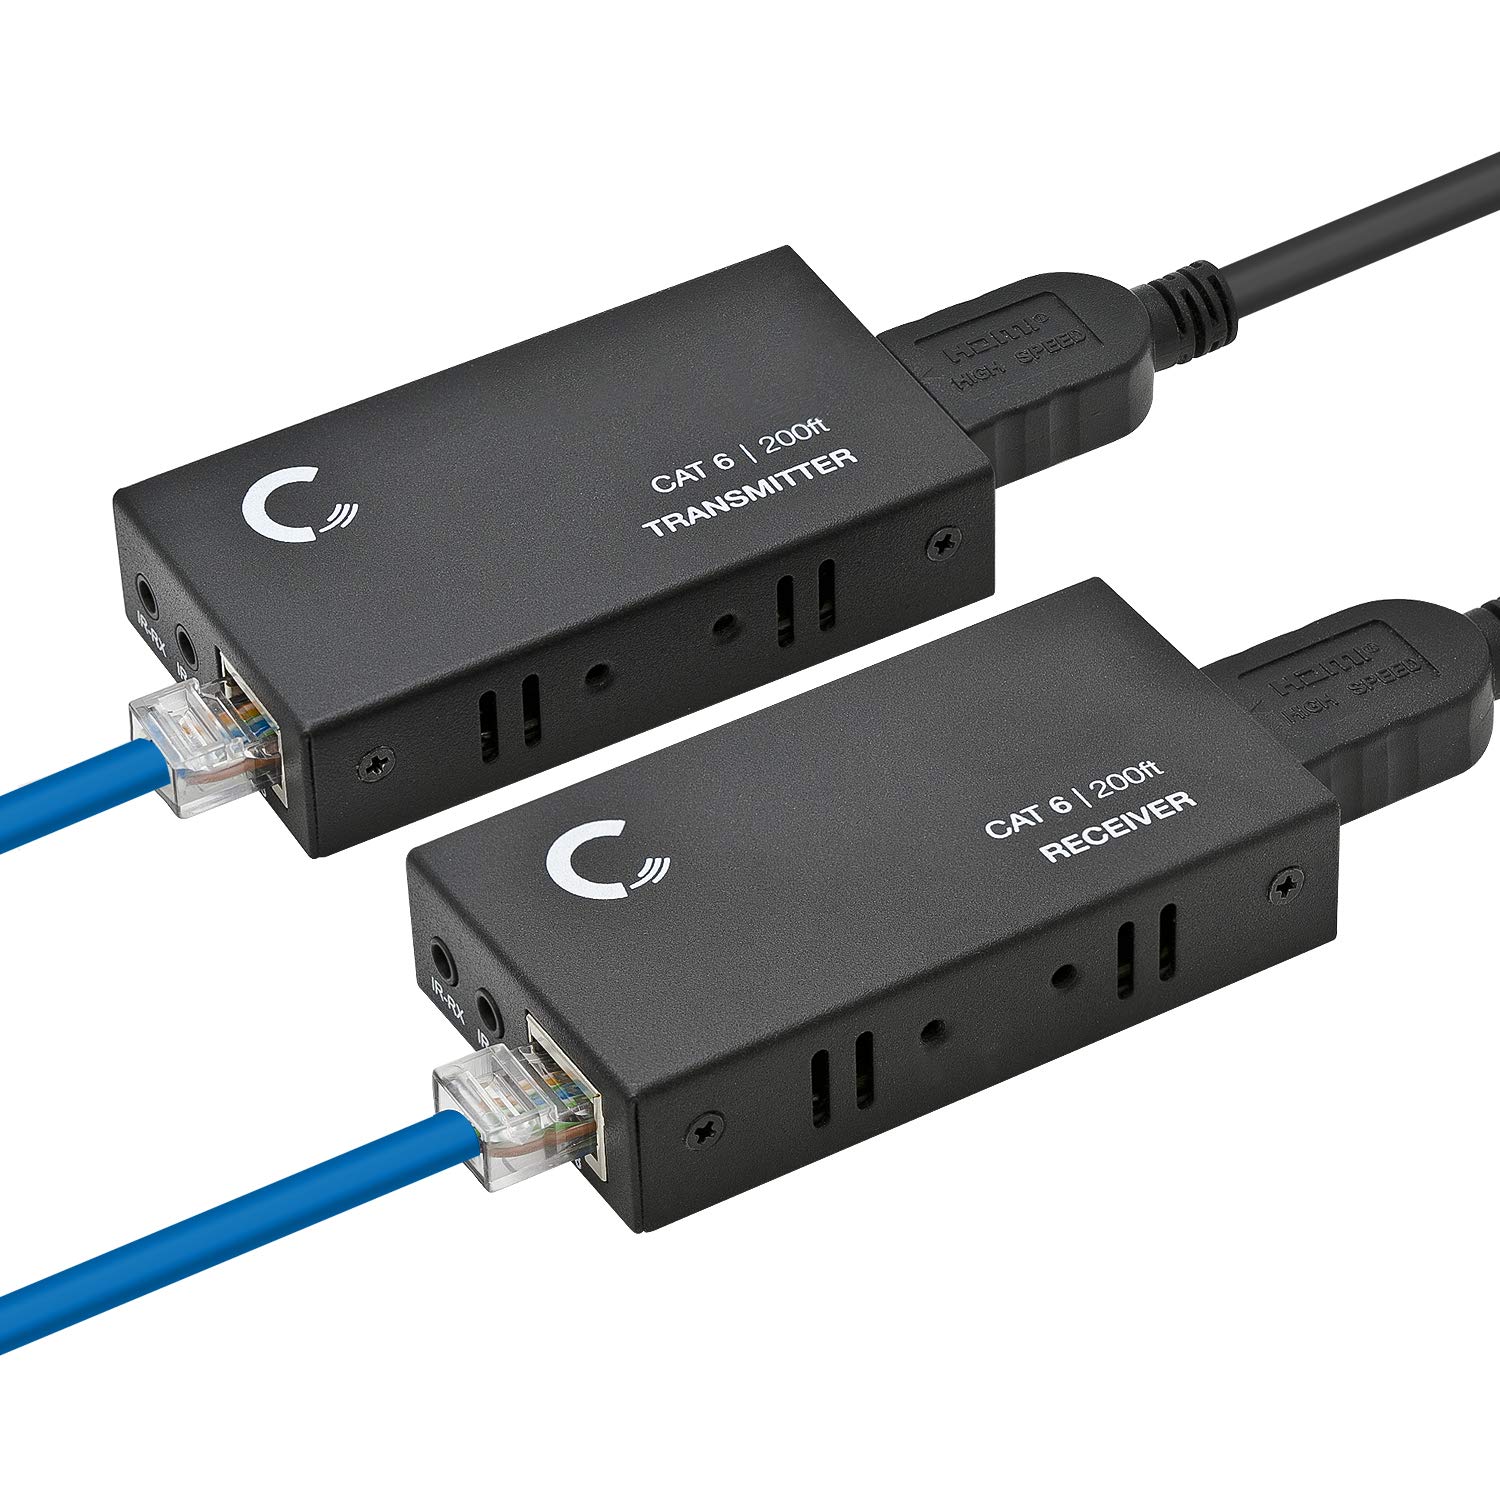
1. Transmitter: The transmitter is the device that converts the HDMI signals into a format that can be transmitted over Cat5 cables. It is usually connected to the HDMI output of your audio or video source, such as a Blu-ray player, gaming console, or computer.
2. Receiver: The receiver is the device that receives the transmitted signals and converts them back into HDMI format. It is typically connected to the HDMI input of your display device, such as a TV, projector, or monitor.
3. Cat5 or Cat6 Cables: To transmit the HDMI signals over longer distances, you will need Cat5 or Cat6 network cables. These cables are widely available and affordable. Make sure to measure the distance between the transmitter and receiver and acquire the appropriate length of Cat5 or Cat6 cables.
4. HDMI Cables: While HDMI over Cat5 technology uses Cat5 cables for signal transmission, you will still need HDMI cables for connecting the transmitter and receiver to your audio and video devices. Ensure that you have HDMI cables of sufficient length to connect all the necessary components.
5. Power Adapters: Most HDMI over Cat5 extenders require external power to operate. The transmitter and receiver units may come with their own power adapters or may be powered through a separate power supply. Make sure to have the appropriate power adapters or power supply available for each unit.
6. HDMI Matrix Switch (Optional): If you plan to connect multiple audio or video sources to multiple display devices, you might need an HDMI matrix switch. This device allows you to switch and distribute HDMI signals to different sources and displays, providing greater flexibility and control over your setup.
7. Mounting Hardware (Optional): If you wish to mount the transmitter or receiver units to a wall or any other surface, you may need mounting hardware. This will ensure a secure and organized installation, especially in situations where the devices need to be placed in a fixed position.
It’s worth noting that the specific equipment needed for HDMI over Cat5 can vary depending on the brand and model you choose. Be sure to check the product specifications and instructions provided by the manufacturer to ensure compatibility and proper setup.
Overall, the required equipment for HDMI over Cat5 includes the transmitter, receiver, Cat5 or Cat6 cables, HDMI cables, power adapters, optional HDMI matrix switch for multiple sources and displays, and optional mounting hardware. By having these essential components, you can successfully set up HDMI over Cat5 and enjoy the benefits of extended HDMI signal transmission.
Step 1: Determine the Distance and Setup
Before you begin setting up HDMI over Cat5, it’s crucial to determine the distance between your audio or video source (transmitter) and the display device (receiver). This will help you select the appropriate equipment and measure the length of Cat5 or Cat6 cables needed for your setup.
1. Measure the Distance: Use a measuring tape to determine the exact distance between the transmitter and receiver. This will ensure that you purchase cables of the correct length and avoid any unnecessary cable clutter.
2. Consider the Environment: Take into account any obstacles or potential signal interference that might affect the transmission. This includes walls, floors, and other electronic devices that can cause signal degradation. If you anticipate any interference, consider choosing HDMI over Cat5 equipment that offers higher quality or includes features to mitigate signal loss.
3. Plan the Installation: Visualize the placement of your audio and video devices and plan the installation accordingly. Determine the best locations for the transmitter and receiver, ensuring convenient access while maintaining optimal signal transmission.
4. Check Power Outlet Availability: Make sure there are enough power outlets near both the transmitter and receiver for the required power adapters. If necessary, consider using surge protectors or extension cords to ensure a reliable power supply.
Once you have determined the distance and setup requirements, you can move on to selecting the appropriate HDMI over Cat5 equipment and preparing for the actual installation. Having a clear understanding of your setup’s specifications and constraints will help streamline the process and ensure optimal performance.
Step 2: Choose the Right Equipment
Choosing the right equipment is crucial when setting up HDMI over Cat5, as it directly impacts the performance and compatibility of your audio and video transmission. Here are some factors to consider when selecting the equipment:
1. Quality and Compatibility: Ensure that the HDMI over Cat5 equipment you choose is of high quality and compatible with your audio and video devices. Read reviews and check compatibility specifications to avoid any issues with signal quality or device compatibility.
2. Distance Requirements: Consider the distance between the transmitter and receiver, as this will determine the maximum range of your HDMI over Cat5 extender. Choose equipment that supports the distance requirements of your setup. It’s essential to select equipment that can handle the desired distance without signal degradation.
3. Resolution and Bandwidth Support: If you plan to transmit high-resolution video or audio, ensure that the HDMI over Cat5 equipment supports the necessary resolutions and bandwidth. Check the specifications to confirm compatibility with the resolution and quality of your audio and video sources.
4. Features and Functionality: Consider any additional features or functionality that you require, such as support for 3D video, HDMI-CEC for device control, or audio return channel. Choose equipment that meets your specific needs and offers the desired features for your setup.
5. Budget: Determine your budget for the HDMI over Cat5 equipment and find options that fit within your price range. It’s important to balance cost with quality and functionality to ensure a satisfactory performance without breaking the bank.
6. Manufacturer and Support: Research the reputation of the manufacturer and consider the availability of customer support. Opt for well-established brands known for their reliable products and good customer service.
By carefully considering these factors, you can choose the right HDMI over Cat5 equipment that fits your specific requirements and ensures a seamless audio and video transmission experience. Taking the time to select the appropriate equipment will help avoid compatibility issues, signal loss, and other potential problems down the line.
Step 3: Prepare Cat5 Cable
Preparing the Cat5 cable is an important step in setting up HDMI over Cat5. Properly preparing the cable ensures reliable signal transmission and helps prevent any issues during installation. Follow these steps to prepare the Cat5 cable:
1. Measure and Cut: Measure the length of Cat5 cable needed based on the distance between the transmitter and receiver. Use a cable cutter or sharp scissors to cut the Cat5 cable to the desired length. Ensure the cut is clean and straight to avoid any signal interference.
2. Strip the Ends: Carefully strip around 1-2 inches of the outer protective sheath from both ends of the Cat5 cable. Use a cable stripper or a sharp knife, making sure not to damage the inner wires. After stripping, you should have access to the individual color-coded wires inside the cable.
3. Straighten the Wires: Straighten out the individual wires to ensure smooth and easy termination. Gently untwist and straighten each wire, being careful not to damage or break them. Keeping the wires neat and organized will make the termination process more manageable.
4. Remove Cross Talk: In some cases, it may be necessary to remove the cross talk from the wires. Cross talk occurs when adjacent wires’ signals interfere with each other, potentially degrading the signal quality. Carefully untwist and separate the pairs of wires, ensuring that they are not touching or overlapping.
5. Terminate the Ends: Depending on the HDMI over Cat5 equipment you are using, you may need to terminate the ends of the Cat5 cable with connectors or plugs. Follow the instructions provided by the manufacturer to correctly terminate the Cat5 cable ends. This step typically involves attaching RJ-45 connectors or plugs to the cable, ensuring proper alignment and secure connection.
6. Test Continuity: After preparing the Cat5 cable, it’s a good idea to test its continuity to ensure proper functionality. Use a cable tester or a multimeter to check for continuity across each wire. This will help identify any wiring issues or shorts that may need to be addressed before installation.
By properly preparing the Cat5 cable, you are taking essential steps to ensure a successful HDMI over Cat5 installation. Attention to detail during this step will minimize signal loss, interference, and other potential issues that may impact the quality of audio and video transmission.
Step 4: Connect the Transmitter and Receiver
Once you have prepared the Cat5 cable and chosen the right HDMI over Cat5 equipment, it’s time to connect the transmitter and receiver to establish the audio and video signal transmission. Follow these steps to connect the transmitter and receiver:
1. Locate the Transmitter and Receiver: Identify the transmitter and receiver units. The transmitter is typically connected to your audio or video source, such as a Blu-ray player or gaming console, while the receiver is connected to the display device, such as a TV or projector.
2. Connect the Transmitter: Take one end of the prepared Cat5 cable and secure it to the transmitter unit. Ensure a secure connection by firmly inserting the Cat5 cable into the designated port on the transmitter. If necessary, consult the equipment manual or manufacturer’s instructions for detailed guidance on connecting the Cat5 cable.
3. Connect the Receiver: Attach the other end of the Cat5 cable to the receiver unit in the same manner as the transmitter. Ensure a secure connection by properly inserting the Cat5 cable into the appropriate port on the receiver.
4. Connect HDMI Cables: Take HDMI cables and connect one end to the HDMI output port on the transmitter unit. Connect the other end of the HDMI cable to the HDMI input port on your audio or video source. Repeat this step for the receiver unit, connecting the HDMI cable from the HDMI output port on the receiver to the HDMI input port on your display device.
5. Secure Power Connections: Ensure that both the transmitter and receiver units have a reliable power source. Connect the power adapter or power supply to each unit and plug them into a nearby power outlet. Confirm that the power indicators on the transmitter and receiver are illuminated, indicating a successful power connection.
6. Verify Connections: Double-check all the connections, including the Cat5 cable, HDMI cables, and power connections, to ensure they are secure and properly aligned. Confirm that all cables are connected to the correct ports and that there are no loose or disconnected cables.
7. Power On and Test: Power on your audio or video source and the display device. Verify that the HDMI over Cat5 system is working correctly by testing the audio and video transmission. Play a video or audio file on your source device and check if the content is successfully displayed on the connected display device.
By following these steps, you can confidently connect the transmitter and receiver units of your HDMI over Cat5 system. Carefully ensuring secure and proper connections will lead to reliable audio and video signal transmission, allowing you to enjoy your content without any interruptions or quality issues.
Step 5: Testing and Troubleshooting
After connecting the transmitter and receiver units in your HDMI over Cat5 setup, it’s important to thoroughly test the system and troubleshoot any issues that may arise. Follow these steps to test and troubleshoot your HDMI over Cat5 installation:
1. Check Signal Quality: Verify the audio and video quality of the transmitted signal on the display device. Ensure that the image is sharp, colors are accurate, and audio is clear. If there are any issues with signal quality, check the cable connections and make sure they are secure. Additionally, check for any signal interference or loose connections.
2. Test Different Resolutions and Content: Play content with different resolutions and formats to ensure the HDMI over Cat5 system can handle various types of media. Check for any compatibility issues or distortion that may occur with specific resolutions or file formats. Adjust the settings on both the source device and display device, if necessary.
3. Inspect Cable Connections: Examine the Cat5 cable connections to ensure they are properly seated and securely attached to the transmitter and receiver units. Loose or poorly connected cables can result in signal loss or degradation. Reconnect any loose cables and confirm a secure connection.
4. Test Multiple Connections: If you have multiple HDMI over Cat5 extenders or multiple display devices, test each connection independently. This will help identify any specific issues with a particular extender or display device. Make sure each connection is functioning properly before proceeding.
5. Check Power and Power Delivery: Ensure that both the transmitter and receiver units have a stable power supply. Verify that the power adapters are plugged in securely and that there are no power interruptions. If there are any power-related issues, try using a different power outlet or utilizing a surge protector to ensure a consistent power source.
6. Reset and Reboot: If you encounter persistent issues with the HDMI over Cat5 system, try resetting or rebooting both the transmitter and receiver units. This can help clear any temporary glitches or errors that may be affecting the system’s performance.
7. Contact Manufacturer or Seek Professional Help: If you are unable to resolve any issues through troubleshooting, it is recommended to contact the manufacturer for further assistance. They can provide specific troubleshooting steps or arrange for repair or replacement if necessary. Alternatively, consult with a professional AV technician who can diagnose and rectify any complex issues.
Thorough testing and troubleshooting are essential to ensure the proper functioning of your HDMI over Cat5 system. By systematically checking the signal quality, cable connections, power supply, and seeking assistance when needed, you can resolve any issues and enjoy a seamless audio and video transmission experience.
Conclusion
Setting up HDMI over Cat5 provides a cost-effective and efficient solution for transmitting high-definition audio and video signals over longer distances. By understanding the steps involved, the benefits it offers, and the necessary equipment and preparations, you can successfully extend your HDMI signals using Cat5 or Cat6 network cables.
HDMI over Cat5 technology allows you to overcome the limitations of traditional HDMI cables, providing extended reach and flexibility. With the ability to transmit uncompressed audio and video signals, you can enjoy the same high-quality experience as with direct HDMI connections.
By determining the distance and setup requirements, choosing the right equipment, preparing the Cat5 cable, and connecting the transmitter and receiver, you can establish a reliable HDMI over Cat5 system. Thorough testing and troubleshooting ensure optimal performance and address any issues that may arise during the installation process.
Whether you’re a home theater enthusiast, a business professional, or simply looking to connect audio and video devices in multiple rooms, HDMI over Cat5 offers a practical solution. Its cost-effectiveness, compatibility with HDMI features, and ability to transmit high-definition signals make it a compelling choice for extending HDMI connections.
Incorporating HDMI over Cat5 into your AV setup opens up new possibilities for distributing audio and video signals over longer distances. From home theaters and conference rooms to educational environments and entertainment venues, this technology provides a seamless and efficient solution.
Embrace the power of HDMI over Cat5 and enjoy the benefits of extended HDMI connectivity without compromising on signal quality or breaking the bank. By following the steps outlined in this guide, you can successfully set up and utilize HDMI over Cat5 for your audio and video transmission needs.