Introduction
Resizing images on an Android device is a common task that many people often find themselves needing to do. Whether it’s to reduce the file size for sharing, fit an image into a specific frame, or optimize it for web usage, the ability to resize an image directly on your device can be a convenient feature.
In this article, we will explore various methods you can use to resize images on your Android device, ranging from using the built-in Photos app to utilizing third-party apps and even online image resizers. These methods cater to different preferences and requirements, so you can choose the one that suits your needs best.
Before we dive into the methods, it is worth mentioning that resizing an image involves changing its dimensions while maintaining the aspect ratio, or aspect ratio might change depending on the method you use. It’s also important to note that resizing an image may result in a loss of image quality, so it’s recommended to make a backup copy of the original image before making any alterations.
Now, let’s explore three different methods you can use to resize images on your Android device.
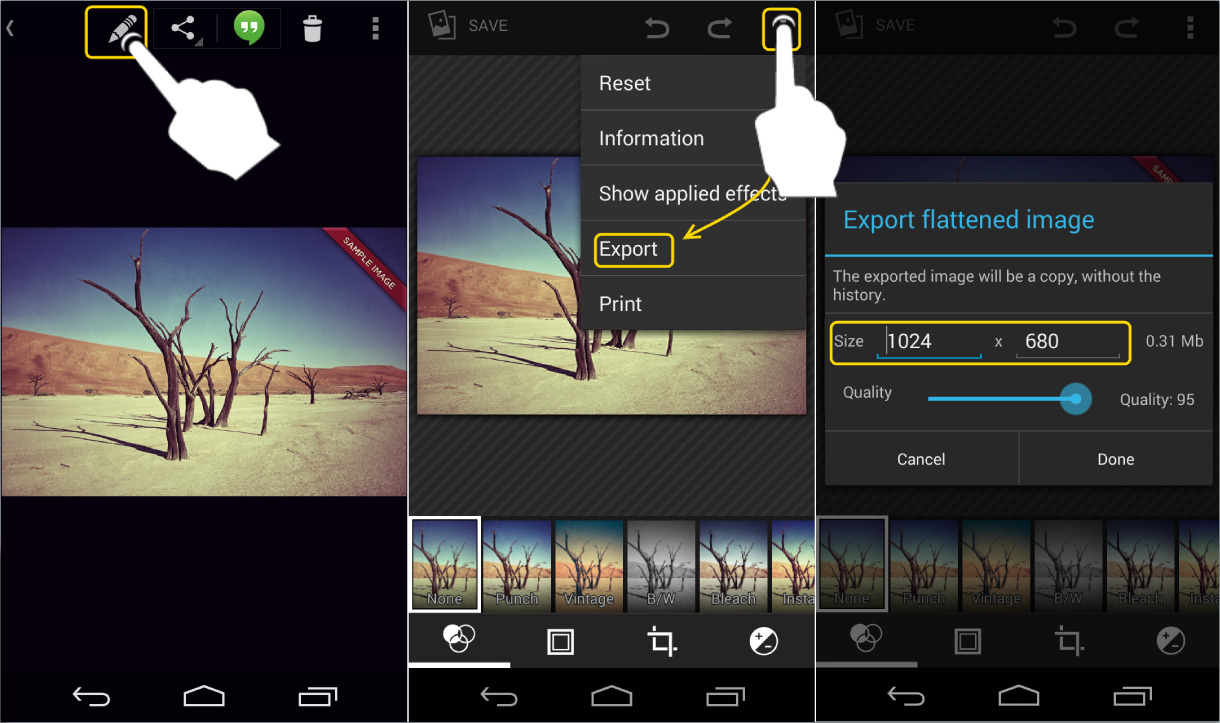
Method 1: Using the built-in Photos app
If you’re looking for a quick and simple way to resize images on your Android device, the built-in Photos app is a great option. This app comes pre-installed on most Android devices and offers basic editing features, including the ability to resize images.
Here’s how you can resize an image using the built-in Photos app:
- Open the Photos app on your Android device.
- Select the image you want to resize from your photo library.
- Tap on the edit icon (usually represented by a pencil or a slider icon).
- In the editing options, look for the resize tool. It may be labeled as “Crop” or “Resize”.
- When you find the resize tool, tap on it to access the resizing options.
- You’ll usually have the option to adjust the dimensions manually or choose from pre-defined aspect ratios.
- Once you’ve set the desired dimensions, click on the Apply or Save button to save the resized image.
It’s important to note that the specific steps may vary slightly depending on the version of the Photos app installed on your device. However, the basic concept remains the same.
The built-in Photos app is a convenient option for basic image resizing needs. However, if you’re looking for more advanced features or additional customization options, you may want to explore other methods discussed in the following sections.
Method 2: Using third-party apps
If you’re looking for more advanced resizing options or a user-friendly interface, using third-party apps can be a great choice. There are several reliable apps available on the Google Play Store that offer a wide range of features to resize images on your Android device.
Here are the steps to resize an image using a third-party app:
- Open the Google Play Store on your Android device and search for image resizing apps.
- Select a reputable app that has positive reviews and ratings.
- Download and install the app on your device.
- Launch the app and grant any necessary permissions.
- Select the option to resize an image or open the image you want to resize from your device’s gallery.
- Follow the app’s instructions to enter the desired dimensions or aspect ratio for the resized image.
- Once you’ve set the resizing options, tap on the Save or Apply button to save the resized image.
Some popular third-party apps for image resizing on Android include Pixlr, Photo Resizer, and Resize Me!. These apps offer additional features like batch resizing, image compression, and various resizing presets.
When using third-party apps, it’s essential to exercise caution and only download apps from trusted sources to ensure the security of your device and data. Additionally, keep in mind that some apps may have premium features or display ads, so be mindful of the app’s terms and conditions.
Using third-party apps can provide you with more flexibility and options when resizing images on your Android device. However, if you prefer a more accessible and hassle-free approach, you may want to explore the next method: using an online image resizer.
Method 3: Using an online image resizer
If you prefer a straightforward and hassle-free method to resize images on your Android device without the need to download any apps, using an online image resizer can be a convenient option. Online image resizers allow you to resize your images directly from your device’s browser, providing a simple and accessible solution.
Here’s how you can resize an image using an online image resizer:
- Open a web browser on your Android device.
- Search for an online image resizer in your preferred search engine.
- Select a reliable and reputable online image resizer from the search results.
- Upload the image you want to resize from your device’s storage or gallery.
- Follow the instructions on the website to enter the desired dimensions or aspect ratio for the resized image.
- Once you’ve adjusted the resizing options, click on the Resize or Apply button to begin the resizing process.
- After the image has been resized, you can choose to download it back to your device.
Many online image resizers offer additional features such as image compression, format conversion, and the ability to edit other aspects of the image like brightness and contrast.
It’s important to note that when using online image resizers, you should exercise caution and choose a trusted website to ensure the security and privacy of your images and data. Consider reading user reviews and doing some research before selecting an online image resizer.
Using an online image resizer can be a convenient option if you prefer not to install any additional apps on your device or if you need to resize images infrequently. However, it’s always good to have a backup plan in case you don’t have an internet connection or if the online service is temporarily unavailable.
Conclusion
Resizing images on your Android device can be a useful skill to have, whether you need to reduce the file size for sharing or fit an image into a specific frame. In this article, we explored three different methods you can use to resize images on your Android device.
The built-in Photos app provides a quick and straightforward option for basic image resizing needs. It allows you to resize images with a few simple steps, making it an accessible choice for many users.
If you’re looking for more advanced features and customization options, utilizing third-party apps can offer a wider range of resizing capabilities. These apps often provide additional features such as batch resizing and image compression, giving you more flexibility in resizing your images.
For those who prefer a hassle-free and app-free approach, using an online image resizer is a convenient option. It allows you to resize images directly from your device’s browser without the need to install any additional software.
Remember, when resizing an image, it’s essential to maintain the aspect ratio to avoid distorting the image. Additionally, making a backup copy of the original image is advisable in case you need to revert or resize it differently in the future.
Choose the method that best suits your needs and preferences. Whether you opt for the built-in Photos app, third-party apps, or online image resizers, these options provide you with the flexibility to resize and optimize your images according to your specific requirements.
Now that you have a better understanding of different methods for resizing images on your Android device, you can confidently resize images to suit your needs with ease and efficiency.