Introduction
Welcome to our guide on how to remove an SD card from your phone. SD cards have become an essential storage solution, allowing us to expand the capacity of our devices and store more photos, videos, and files. However, there are times when you may need to remove the SD card from your phone, whether it’s for upgrading to a larger card, transferring data to a new device, or troubleshooting issues.
Removing an SD card from your phone might seem like a simple task, but it’s important to do it correctly to avoid any damage to the card or the device. In this guide, we’ll take you through a step-by-step process on how to safely remove an SD card from your phone without any hassle.
Whether you’re using an Android or iOS device, the process for removing an SD card is relatively similar. However, there may be slight differences in the location of the SD card slot and the removal method, depending on the make and model of your phone. Don’t worry, we’ll cover the general steps that apply to most smartphones, so you’ll be able to remove your SD card with confidence.
Before we dive into the steps, it’s essential to note that removing the SD card should always be done when the phone is powered off. This precaution ensures that data is not being read or written to the card, reducing the risk of file corruption or damage. Now, let’s get started with the first step: powering off your phone.
Step 1: Power off your phone
The first step in removing an SD card from your phone is to power off the device. This step is crucial as it ensures that the SD card is not in use and avoids any potential data corruption or damage.
To power off your phone, locate the power button. It is usually positioned on the side or top of the device. Press and hold the power button until a menu appears on the screen. From the menu, select the option to power off or shut down your phone. Different phone models may have slight variations in the menu options, but the general process remains the same.
After selecting the power off option, wait for your phone to shut down completely. You can verify this by ensuring that the screen is turned off and there are no notifications or sounds coming from the device. Once your phone is powered off, you can safely proceed to the next step of removing the SD card.
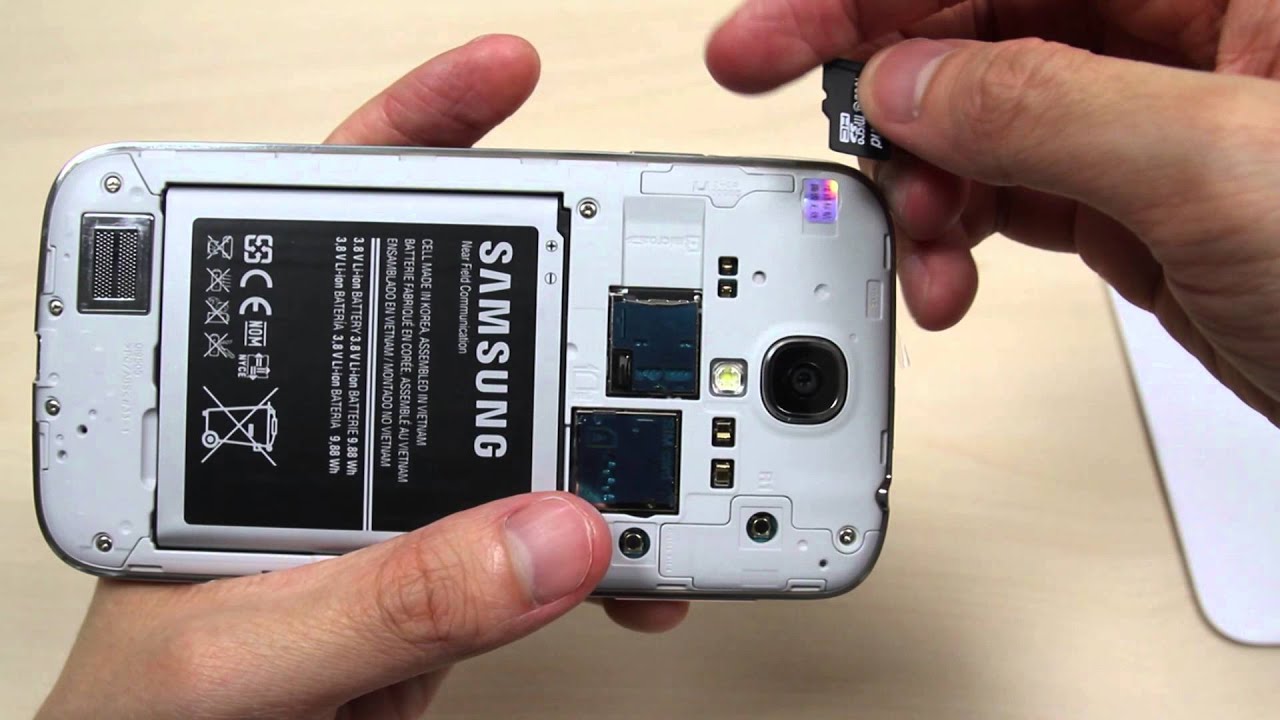
It is important to mention that if your phone has a removable battery, you should also remove the battery before proceeding to remove the SD card. Some phone models require the battery to be removed to access the SD card slot, while others have a separate slot for the card. Refer to your phone’s user manual if you are unsure about the location of the SD card slot and whether the battery needs to be removed.
By ensuring that your phone is powered off, you minimize the risk of any potential issues when removing the SD card. It reduces the chance of data loss or damage to the card or the phone itself. Once you have powered off your phone, you are ready to move on to the next step.
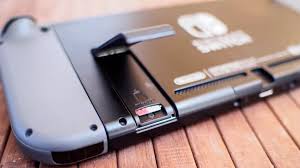
Step 2: Locate the SD card slot
After powering off your phone, the next step in removing an SD card is to locate the SD card slot on your device. The location of the SD card slot may vary depending on the make and model of your phone.
Most Android phones have the SD card slot located on the side of the device, typically near the volume buttons or SIM card tray. Some phones may have a small cover or slot labeled “SD” to indicate the location. On the other hand, iPhones and certain Android models may have the SD card slot located within the SIM tray.
If you are unsure about the exact location of the SD card slot on your specific device, refer to the user manual or do a quick online search for your phone’s make and model. You can find detailed diagrams or videos that illustrate the location of the SD card slot.
Once you have located the SD card slot, take a moment to familiarize yourself with its design. It is typically a small rectangular opening, often labeled with an “SD” or “MicroSD” logo. Some slots may have a small ejector button next to them, while others require a gentle push to release the SD card.
It’s important to note that not all phones support expandable storage via an SD card. iPhones, for example, do not have a built-in SD card slot and rely on internal storage only. If your phone does not have an SD card slot, you can skip this guide and proceed with other methods to manage your device’s storage.
Now that you have located the SD card slot, let’s move on to the next step of removing the SD card.
Step 3: Remove the phone’s back cover (if applicable)
Before accessing the SD card slot, you may need to remove the back cover of your phone. This step is necessary for phones that have a removable back cover design, which allows you to access the internal components, including the battery and SD card slot.
Not all phones have a removable back cover. Many modern smartphones have a unibody design, where the back cover is not meant to be removed by the user. In this case, you can skip this step and proceed to the next one.
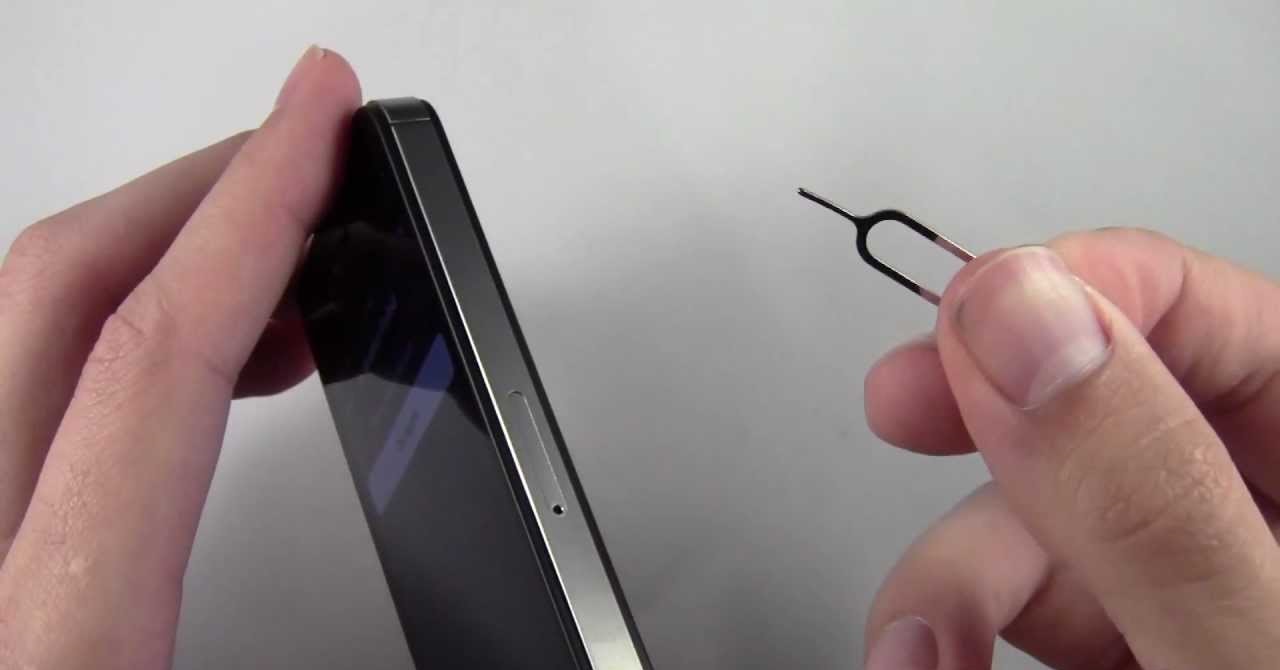
If your phone has a removable back cover, here’s how you can remove it:
- Locate the small notch or groove on the side or bottom edge of the phone’s back cover. This is usually near the charging port or headphone jack.
- Using your fingernail or a small, thin tool like a SIM card ejector pin, gently pry open the back cover by inserting it into the notch or groove.
- Once you have inserted the tool, apply a slight amount of pressure and carefully lift the back cover away from the phone. Be cautious not to use too much force as it may damage the cover or the phone’s internal components.
If you encounter any difficulty removing the back cover, refer to your phone’s user manual for specific instructions or search online for tutorials related to your phone model.
Removing the back cover gives you direct access to the internal components of the phone, including the SD card slot. With the back cover off, you can proceed to the next step of identifying the SD card.
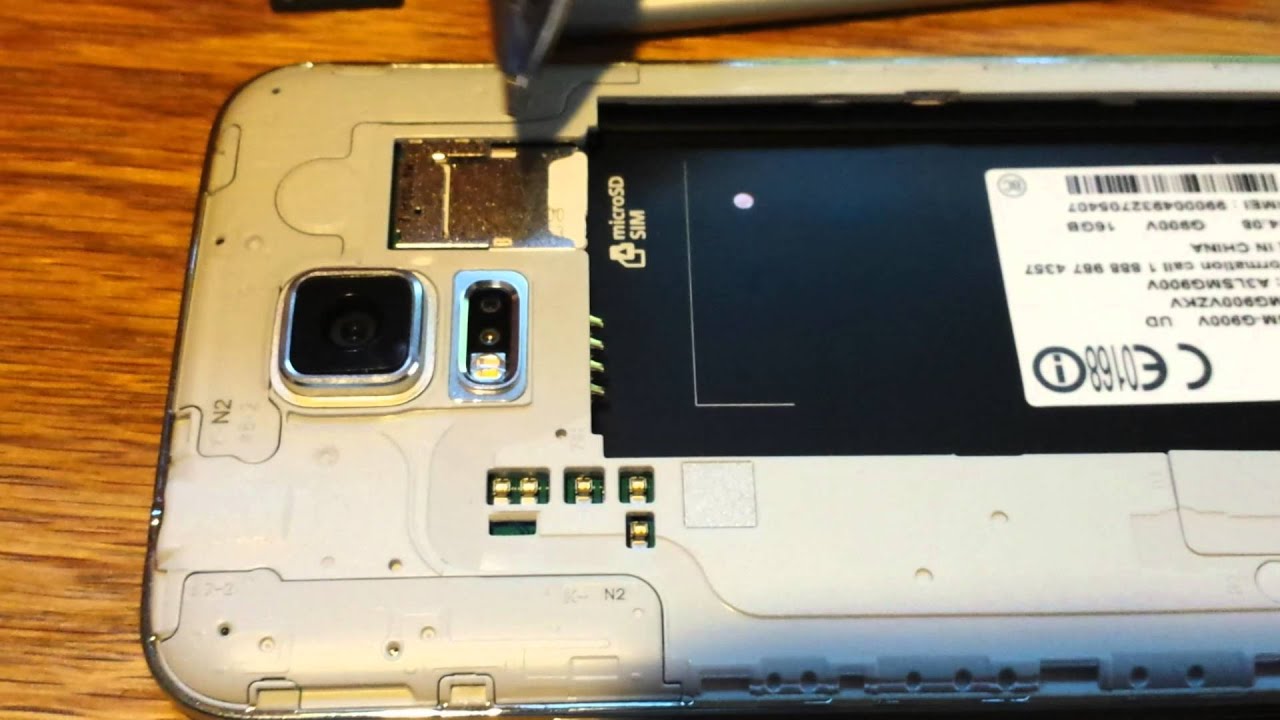
Step 4: Identify the SD card
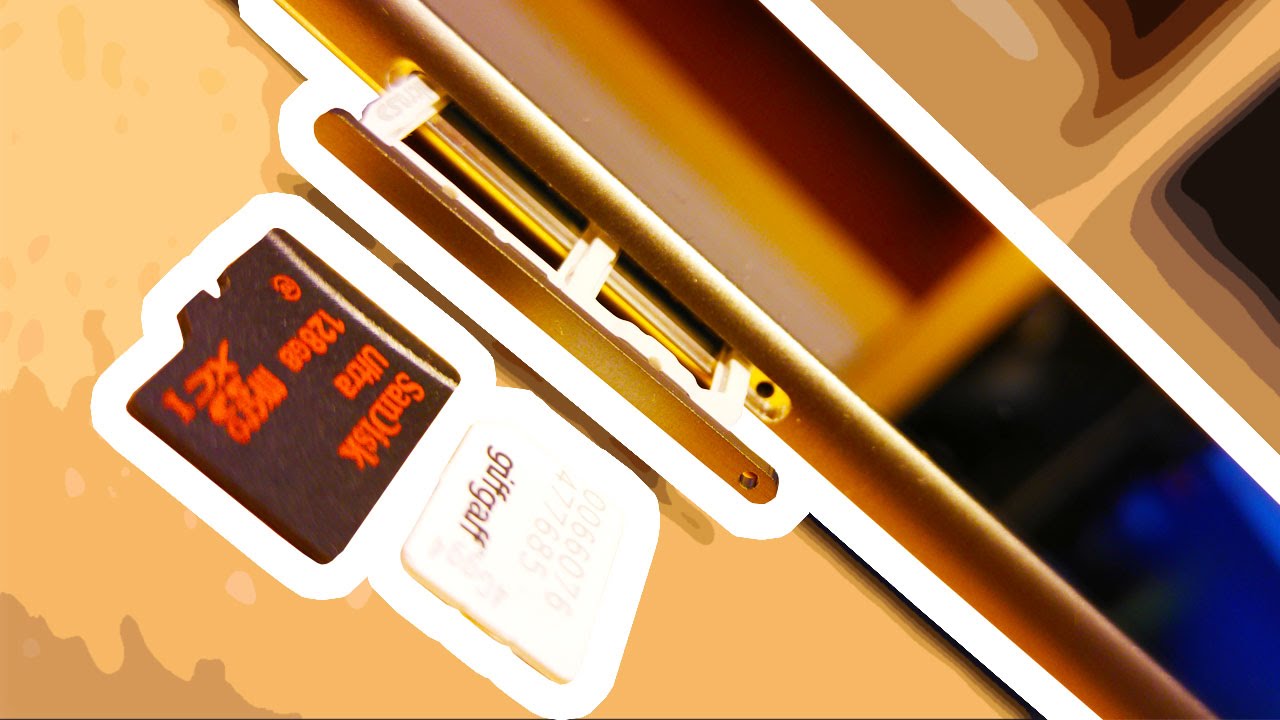
Now that you have removed the back cover (if applicable), the next step is to identify the SD card inside your phone. The SD card is a small, rectangular-shaped device that stores additional data and can be easily distinguished from other components inside your phone.
Look for a small slot or compartment labeled “SD” or “MicroSD” inside your phone. The SD card slot is typically located near the battery or within the area where the back cover was removed.
If your phone has multiple slots or compartments, take a closer look to identify the one specifically designated for the SD card. It may be labeled or indicated with icons or symbols that represent storage or memory.
If you are unsure about the location or identification of the SD card slot, refer to your phone’s user manual for more detailed instructions or search online for resources related to your specific phone model.
Once you have located the SD card slot, visually inspect the slot to determine if there is already an SD card inserted. The SD card is typically inserted with the gold contacts facing down and the notched edge aligned with the slot.
Take note that some phones may have a SIM card slot and an SD card slot combined into one. In this case, be cautious not to remove the SIM card mistakenly. The SD card slot is typically positioned beside or above the SIM card slot, and the two are visually distinguishable.
By properly identifying the SD card slot, you will ensure that you are working with the correct compartment and avoid any potential damage to your phone or other components.
Step 5: Push the SD card gently to release it
With the SD card slot identified, it’s time to remove the SD card from your phone. The process involves gently pushing the SD card to release it from its slot.
Follow these steps to remove the SD card:
- Using your fingertip or a small tool, apply gentle pressure to the SD card. You may feel a slight click or resistance as you push on the card.
- Continue applying pressure and release your finger or the tool once you feel the SD card disengaging from the slot.
- Once the SD card is partially released, you can use your fingertips to fully remove it from the slot. Hold the card firmly and pull it out in a straight and controlled manner.
It’s important to be gentle and avoid using excessive force when pushing or pulling the SD card. Applying too much pressure can cause damage to the card or the slot. If you encounter any difficulty in removing the SD card, stop and reassess your approach to ensure you are handling it correctly.
If your phone has an ejector button next to the SD card slot, you can simply press the ejector button to release the card. The button will push the card out slightly, allowing you to remove it easily.
Remember to handle the SD card with care. Avoid touching the gold contacts on the bottom of the card, as any dirt or oil from your fingertips can interfere with its functionality.
Now that you have successfully removed the SD card from the slot, proceed to the next step to safely take it out of your phone.
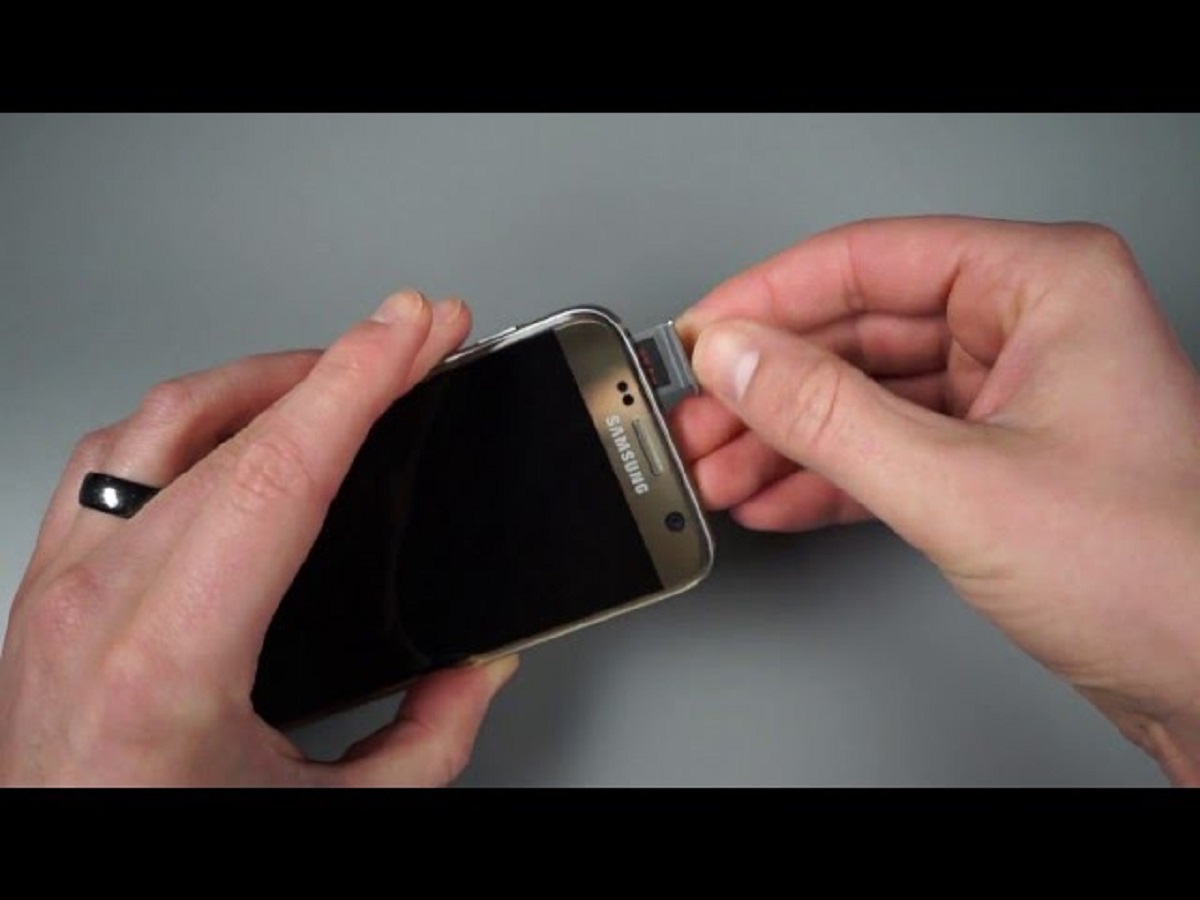
Step 6: Take out the SD card
Now that you have partially released the SD card from its slot, it’s time to safely take it out of your phone. Handling the SD card properly ensures that it remains in good condition and can be easily inserted into another device if needed.
Follow these steps to safely remove the SD card from your phone:
- Hold the partially released SD card firmly between your fingertips.
- Gently pull the SD card out of the slot in a straight and controlled manner.
- Avoid twisting or bending the card as you remove it, as this can cause damage.
Be sure to store the SD card in a safe place to prevent it from getting lost or damaged. A protective case or sleeve can help keep the card safe when it’s not in use.
If you plan to insert the SD card into another device, make sure to clean any dust or debris from the contacts before inserting it. You can use a soft, lint-free cloth or an alcohol wipe to gently clean the gold contacts on the bottom of the card.
Remember that the SD card contains valuable data, so it’s important to handle it with care. Dropping or mishandling the card can result in data loss or physical damage.
Now that you have successfully removed the SD card from your phone, proceed to the final step to prepare your phone for use without the card.
Step 7: Replace the phone’s back cover (if applicable)
If you had to remove the back cover of your phone in step 3, now is the time to replace it. Putting the back cover back on your phone ensures that the internal components and SD card slot are protected.
Follow these steps to replace the back cover:
- Align the back cover with the edges of your phone.
- Gently press the cover back into place, starting from one side and working your way around.
- Make sure the cover fits securely and is free from any gaps or loose areas.
- If there were any clips or latches on the back cover, ensure that they are engaged properly.
Ensure that the back cover is fully secure before proceeding. This helps protect the internal components from dust, debris, and any potential damage.
If your phone has a removable battery, make sure to insert it back into the device before replacing the back cover. Follow the manufacturer’s instructions or refer to your phone’s user manual if you are unsure of the correct battery insertion process.
Once the back cover is securely in place, power on your phone by pressing the power button. Your phone should now be ready to use without the SD card.
It’s important to note that if you removed the back cover to access the SD card, but you still plan to use the phone with a different SD card or without one, you don’t need to replace the back cover. Simply power on your phone as usual.
Congratulations! You have successfully removed the SD card from your phone and replaced the back cover if applicable. Now you can safely use your phone without the SD card or with a different one if desired.
Conclusion
Removing an SD card from your phone may seem like a simple task, but it’s important to follow the proper steps to avoid any damage to the card or your device. By powering off your phone, locating the SD card slot, removing the back cover if applicable, identifying the SD card, gently pushing the card to release it, safely taking it out, and replacing the back cover if needed, you can safely remove an SD card from your phone with ease.
Remember to always power off your phone before removing the SD card to prevent data corruption. Take care when pushing or pulling the card to avoid damage. Also, handle the SD card with care to prevent any dirt or oil from affecting its functionality.
Whether you’re upgrading to a larger SD card, transferring data to a new device, or troubleshooting issues, knowing how to remove an SD card from your phone is a valuable skill. By following the steps outlined in this guide, you can confidently and safely remove an SD card from your phone.
If you’re planning to insert a new SD card into your phone or use your phone without one, make sure to insert the card correctly and format it if needed according to the manufacturer’s guidelines.
Always refer to your phone’s user manual or consult the manufacturer’s website for specific instructions regarding SD card removal, as different phone models may have slight variations in the process.
We hope this guide has been helpful in assisting you with removing an SD card from your phone. By following the steps carefully, you can successfully remove the SD card and utilize it as per your requirements, ensuring smooth operation of your device.