Introduction
Are you looking to remove your Kwikset smart lock? Whether you’re upgrading to a new smart lock model or experiencing issues with your current one, removing a Kwikset smart lock is a relatively simple process that can be done with the right tools and a few easy steps.
Kwikset smart locks have gained popularity for their convenience and security features. However, there may come a time when you need to remove the lock for maintenance, repair, or replacement. By following the correct removal procedure, you can ensure a smooth and hassle-free process.
In this guide, we will walk you through the step-by-step process of removing a Kwikset smart lock. From gathering the necessary tools to cleaning and maintaining the lock afterwards, we’ll cover everything you need to know.
It’s important to note that the steps outlined in this guide are generally applicable to most Kwikset smart lock models. However, slight variations may exist, so it’s always a good idea to consult your specific lock’s user manual for any manufacturer-specific instructions.
Now, let’s dive into the details of this step-by-step guide to remove your Kwikset smart lock and get started on the journey of unlocking a new level of convenience and security for your home.
Step 1: Gather the tools and materials needed
Before you begin the process of removing your Kwikset smart lock, it’s essential to gather all the necessary tools and materials. Having everything on hand will make the removal process smoother and more efficient. Here’s a list of items you’ll need:
- Phillips screwdriver – This will be used to remove screws holding the lock in place.
- Tape measure – Useful for taking measurements and ensuring a proper fit for your new lock, if you plan on installing one.
- Needle-nose pliers – These will come in handy for disconnecting any wires or cables connected to the lock.
- Replacement batteries (optional) – If your smart lock operates on batteries and they need to be replaced, have the new batteries ready.
- Cleaning supplies – It’s a good idea to have some cleaning tools, such as a soft cloth and a mild cleaning solution, to clean the door and lock after removal.
Having these tools and materials readily available will ensure that you can complete the removal process smoothly and efficiently. Make sure you have everything in place before moving on to the next steps.
Now that you have gathered all the necessary tools and materials, you’re ready to proceed to the next step: preparing the door and lock for removal.
Step 2: Prepare the door and lock for removal
Before you can remove your Kwikset smart lock, it’s important to properly prepare the door and lock for the removal process. This will ensure a smooth and efficient removal. Here are the steps to follow:
- Ensure the door is open: Make sure the door is fully open before you begin. This will provide you with easier access to the lock and make the removal process safer.
- Locate the set screws: Look for the set screws on the interior side of the lock. These screws are typically located at the bottom or top of the interior mounting plate. Use a screwdriver to loosen and remove them.
- Remove the battery cover (if applicable): If your Kwikset smart lock operates on batteries, locate and remove the battery cover. This will expose the battery compartment, allowing you to remove the batteries if necessary.
- Disconnect any wires or cables: If your smart lock is wired, carefully disconnect any electrical wires or cables connected to the lock. Use needle-nose pliers to detach the wires, if needed. Make sure to take note of how they are connected for easier reinstallation if required.
By properly preparing the door and lock for removal, you’ll make the process much easier and reduce the risk of causing any damage. Once you’ve completed these steps, you’re ready to move on to the next step: removing the outer cover and mounting plate.
Step 3: Remove the outer cover and mounting plate
Now that you have prepared the door and lock for removal, it’s time to remove the outer cover and mounting plate of your Kwikset smart lock. This step will expose the inner workings of the lock and allow you to proceed with the removal process. Follow these steps:
- Locate the tabs or screws: Look for tabs or screws on the sides or edges of the lock’s outer cover. These tabs or screws secure the cover in place. Depending on your lock model, you may need to use a screwdriver or your fingers to release them.
- Remove the outer cover: Once the tabs or screws are released, gently pull the outer cover away from the lock. Be careful not to force it, as it may still be attached by small connectors or wires. If you encounter any resistance, double-check for any remaining connections.
- Remove the mounting plate: With the outer cover removed, you will now have access to the interior mounting plate. Locate the screws that secure the plate to the door. Use a screwdriver to remove these screws, allowing you to detach the mounting plate from the door.
By following these steps, you should be able to successfully remove the outer cover and mounting plate of your Kwikset smart lock. Keep in mind that the exact method of removing the cover and mounting plate may vary depending on your lock model. Refer to the lock’s user manual if you encounter any difficulties or have specific instructions for your lock.
With the outer cover and mounting plate removed, you are now ready to move on to the next step: disconnecting any wires or cables connected to the lock.
Step 4: Disconnect any wires or cables
Now that you have removed the outer cover and mounting plate of your Kwikset smart lock, it’s important to disconnect any wires or cables that may be connected to the lock. This step is crucial to ensure a safe and proper removal. Follow these steps:
- Inspect for any wires or cables: Take a close look at the interior of the lock and surrounding area to identify any wires or cables connected to the lock. These may be electrical wires or communication cables.
- Use caution when disconnecting: When handling electrical wires, always exercise caution to prevent any electrical shocks or damage. If there are wire connectors, gently detach them by pulling them apart or using needle-nose pliers if needed. Avoid pulling on the wires themselves, as this may damage them.
- Label and document the connections: Before completely disconnecting the wires, it’s a good practice to label or take a photo of each wire and its corresponding connection point. This will help you reconnect everything correctly if needed in the future.
- Set aside the wires or cables: Once disconnected, carefully set aside the wires or cables in a safe place where they won’t get tangled or damaged. You can wrap them in a soft cloth or place them in a small container to keep them organized.
By following these steps, you can safely disconnect any wires or cables connected to your Kwikset smart lock. Remember to exercise caution and take note of the wire connections for future reference. With the wires or cables disconnected, you’re ready to move on to the next step: removing the old batteries (if applicable).
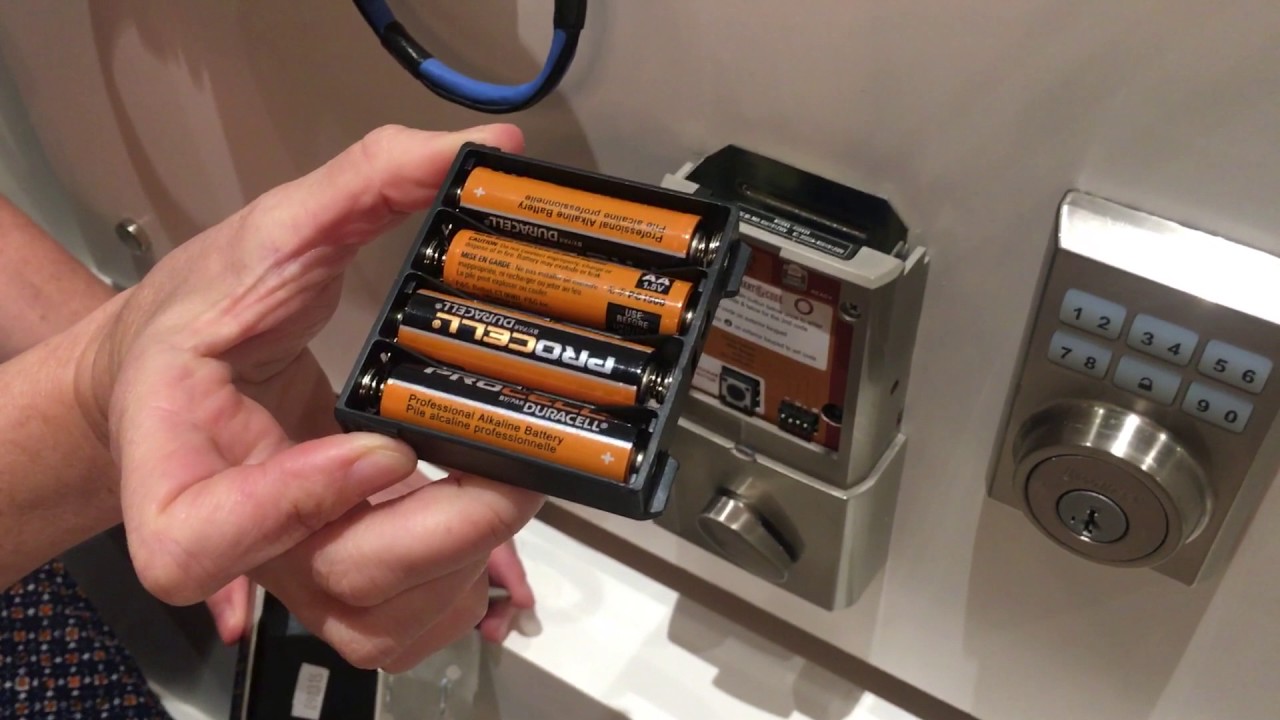
Step 5: Remove the old batteries (if applicable)
If your Kwikset smart lock operates on batteries, it’s important to remove the old batteries before proceeding with the removal process. This step is necessary to ensure the safe removal of the lock and to prevent any potential issues that may arise from leaving old or depleted batteries inside. Follow these steps:
- Locate the battery compartment: Look for the battery compartment on your smart lock. It’s typically located on the interior side of the lock.
- Open the battery compartment: Depending on your lock model, you may need to use a small screwdriver or press a release button to open the battery compartment door.
- Remove the old batteries: Carefully remove the old batteries from the compartment. Pay attention to their orientation as you will need to install new batteries in the same way.
- Properly dispose of the old batteries: Old batteries should be disposed of properly according to local regulations for battery recycling. Check with your local waste management facility for the appropriate disposal method.
By removing the old batteries, you can ensure a clean start when installing a new smart lock or performing any maintenance on your existing lock. It’s always recommended to use fresh batteries when operating a smart lock to ensure optimal performance.
If your Kwikset smart lock is not battery-operated, you can skip this step and proceed to the next step in the removal process.
Now that you have removed the old batteries (if applicable), you’re ready to move on to the next step: removing the interior mounting plate.
Step 6: Remove the interior mounting plate
After removing the old batteries (if applicable), you can proceed to remove the interior mounting plate of your Kwikset smart lock. This step will allow you to detach the lock completely from the door. Follow these steps:
- Inspect the interior mounting plate: Take a close look at the backside of the mounting plate to identify the screws holding it in place. The number of screws may vary depending on your lock model.
- Use a screwdriver to remove the screws: Carefully use a screwdriver to loosen and remove the screws that secure the interior mounting plate to the door. Make sure to keep track of the screws, as you will need them for reinstallation or when installing a new lock.
- Gently detach the interior mounting plate: With the screws removed, gently pull the interior mounting plate away from the door. Be cautious not to force it, as it may still be connected to the lock mechanism by wires or other fasteners.
Upon completing these steps, you should have successfully removed the interior mounting plate of your Kwikset smart lock. Take care to set aside the screws in a safe place for reassembly or when installing a new lock.
Removing the interior mounting plate allows you to fully disconnect the lock from the door. In the upcoming step, we will guide you through the process of carefully removing the smart lock from the door.
Now that you have removed the interior mounting plate, you’re ready to move on to the next step: carefully removing the smart lock from the door.
Step 7: Carefully remove the smart lock from the door
Now that you have removed the interior mounting plate, it’s time to carefully remove the smart lock from the door itself. This step requires precision and attention to detail to avoid causing any damage to the lock or the door. Follow these steps:
- Examine the smart lock: Take a moment to inspect the lock and surrounding area to identify any additional screws, fasteners, or connectors that may be securing the lock to the door. These can vary depending on your specific lock model.
- Release any additional connections: If there are any remaining connectors or fasteners, carefully release them using a screwdriver, pliers, or by following the manufacturer’s instructions. Pay close attention to any wires or cables that may still be connected.
- Gently detach the smart lock: Once all connections and fasteners have been addressed, gently pull the smart lock away from the door. Take caution not to force it or apply excessive pressure as this could damage the lock or the door.
By following these steps, you should be able to safely remove the smart lock from the door. It’s important to handle the lock with care to prevent any accidental damage. Keep the lock and any remaining components in a secure location for future use or disposal.
With the smart lock successfully removed from the door, you can proceed to the next step: cleaning and maintaining the door and lock.
Step 8: Clean and maintain the door and lock
After removing the smart lock from the door, it’s a good practice to take some time to clean and maintain both the door and the lock. This will help ensure optimal performance and longevity of your Kwikset smart lock. Follow these steps to clean and maintain the door and lock:
- Clean the door: Use a soft cloth or sponge and a mild cleaning solution to gently wipe down the surface of the door. Pay attention to any dirt, dust, or grime that may have accumulated around the area where the lock was installed. Be careful not to use abrasive cleaners or scrub brushes that may damage the door’s finish.
- Clean the lock: Clean the smart lock itself using a soft cloth or a cotton swab. This will remove any dirt or debris that may have accumulated during its use. Avoid using any harsh cleaning chemicals that could potentially damage the lock’s components.
- Inspect for any damage: While cleaning, take the opportunity to inspect the door and the lock for any signs of damage or wear. Check for loose screws or broken parts that may need to be replaced. If necessary, consult a professional locksmith or the manufacturer for repair or replacement options.
- Apply lubrication (if applicable): If your smart lock has moving parts that require lubrication, consult the manufacturer’s instructions on the appropriate type of lubricant to use. Apply a small amount of lubricant to the designated areas to ensure smooth operation of the lock.
By cleaning and maintaining the door and lock, you can help prolong their lifespan and maintain their functionality. Regular maintenance will also contribute to the security and reliability of your smart lock.
With the door and lock now clean and well-maintained, you’re one step closer to either reinstalling your Kwikset smart lock or preparing for the installation of a new lock.
Step 9: Prepare for installation of a new smart lock
If you’re planning to replace your Kwikset smart lock with a new one, or install a smart lock for the first time, there are a few important steps you need to take in order to properly prepare for the installation. Follow these steps to get ready for the installation of a new smart lock:
- Read the manufacturer’s instructions: Take the time to carefully read and understand the installation instructions provided by the manufacturer of your new smart lock. Familiarize yourself with the specific steps and requirements outlined for the installation process.
- Measure the dimensions: Use a tape measure to accurately measure the dimensions of your door and ensure compatibility with the new smart lock. Check for any specific size or compatibility requirements mentioned in the manufacturer’s instructions.
- Gather the necessary tools and materials: Refer to the manufacturer’s instructions to determine the tools and materials required for the installation. Make sure you have everything on hand, such as screws, screwdrivers, and any additional components that may be included with the new smart lock.
- Prepare the door: Inspect the door to ensure it is in good condition and doesn’t have any damage or obstructions that could affect the installation. If necessary, clean the door surface and remove any existing hardware or residue from the previous lock.
- Review the wiring (if applicable): If your new smart lock requires wiring, review the manufacturer’s instructions to understand the wiring process. Ensure that any existing wiring is in good condition and properly positioned for the installation.
By properly preparing for the installation of a new smart lock, you can minimize any potential issues or setbacks and ensure a smooth installation process. Taking the time to read the instructions, measure the dimensions, gather the necessary tools, and prepare the door will contribute to a successful installation.
With these steps completed, you’re now ready to proceed with the installation of your new smart lock and enjoy the enhanced convenience and security it provides.
Conclusion
Removing a Kwikset smart lock may seem like a daunting task, but by following the step-by-step process outlined in this guide, you can successfully remove the lock with ease. From gathering the necessary tools and materials to disconnecting wires, removing batteries (if applicable), and detaching the lock from the door, each step plays a crucial role in ensuring a safe and efficient removal process.
Remember to exercise caution throughout the process, especially when handling electrical connections or delicate components. Taking the time to clean and maintain both the door and the lock after removal will contribute to their longevity and performance.
If you’re planning to replace your Kwikset smart lock with a new one, make sure to thoroughly prepare for the installation, following the manufacturer’s instructions and ensuring compatibility with your door’s dimensions. By doing so, you can seamlessly transition to your new smart lock and enjoy the enhanced features and security it provides.
Whether you’re removing a Kwikset smart lock for maintenance, repair, or upgrading to a new model, this guide has provided you with the knowledge and steps necessary to complete the process. By following each step diligently, you can confidently proceed with the removal and installation of your Kwikset smart lock.
We hope this guide has been helpful in assisting you with removing your Kwikset smart lock. If you have any further questions or need additional guidance, don’t hesitate to consult the lock’s user manual or reach out to a professional locksmith for assistance.
Thank you for choosing Kwikset and taking the time to follow this guide. Best of luck with your lock removal and future smart lock endeavors!