Introduction
Whether you’re a new homeowner or a tech-savvy individual, there may come a time when you need to change the battery on your Kwikset smart lock. Kwikset smart locks are known for their convenience and security features, but like any electronic device, they rely on batteries to function properly. In this guide, we will walk you through the step-by-step process of changing the battery on a Kwikset smart lock.
Before we dive into the specifics, it’s important to note that the battery life of a Kwikset smart lock can vary depending on usage and the type of batteries used. On average, you can expect the batteries to last anywhere from six months to two years. However, it’s always a good idea to keep an eye on the battery level indicator or set reminders to check and replace the batteries when needed.
Changing the battery on your Kwikset smart lock is a relatively simple task that can be completed with just a few basic tools and minimal technical know-how. By following the steps outlined in this guide, you’ll be able to keep your smart lock functioning properly and ensure the security of your home.
Before we get started, make sure you have the following tools on hand:
- A small flathead screwdriver
- Fresh batteries (check your specific lock model for the required battery type)
- A clean cloth or towel
Once you have these tools ready, we can move on to the next step: locating the battery compartment on your Kwikset smart lock.
Step 1: Gather the necessary tools
Before you begin the process of changing the battery on your Kwikset smart lock, it’s important to gather the necessary tools. Having these tools on hand will make the process easier and more efficient.
Here’s what you’ll need:
- A small flathead screwdriver: This will be used to remove the battery cover on your smart lock. Make sure it is small enough to fit into the designated slot without causing any damage.
- Fresh batteries: Check your specific Kwikset lock model for the required battery type. It’s always a good idea to have a fresh set of batteries ready before starting the process.
- A clean cloth or towel: This will come in handy if you need to clean any dust or debris from the battery compartment or the lock itself.
Once you have these tools ready, you’ll be able to proceed with confidence, knowing you have everything you need to successfully change the battery on your Kwikset smart lock.
It’s worth noting that using the appropriate tools for the job will help prevent any accidental damage to your smart lock. Forcing or using the wrong tools may result in scratches, dents, or even irreparable damage. So, it’s always better to be safe and prepared before you start the battery replacement process.
With the necessary tools gathered, you’re now ready to move on to the next step: locating the battery compartment on your Kwikset smart lock.
Step 2: Locate the battery compartment
Before you can change the battery on your Kwikset smart lock, you’ll first need to locate the battery compartment. The location of the battery compartment may vary slightly depending on the model of your smart lock, but it is typically found on the interior side of the door.
To locate the battery compartment, follow these steps:
- Stand on the inside of your door, facing the lock.
- Locate the latch that extends into the door frame. This is the part of the lock that extends or retracts when the lock is operated.
- Directly above or below the latch, you should see a small slot or cover. This is where the battery compartment is typically located.
Depending on your specific lock model, the battery compartment may be covered by a small panel that can be easily removed with the use of a screwdriver. In some cases, you may need to gently push or slide the cover in a specific direction to access the battery compartment.
Remember, each smart lock model may have slight variations in design, so it’s important to consult your lock’s user manual or manufacturer’s website for specific instructions on locating the battery compartment.
Once you have successfully located the battery compartment, you’re now ready to proceed to the next step: removing the battery cover.
Step 3: Remove the battery cover
Now that you have located the battery compartment on your Kwikset smart lock, it’s time to remove the battery cover. The battery cover is designed to protect the batteries and keep them securely in place.
Follow these steps to remove the battery cover:
- Take your small flathead screwdriver and insert it into the designated slot on the battery cover. The slot is typically located on the side or bottom of the battery cover.
- Gently twist or pry the screwdriver to lift the battery cover away from the lock. Be careful not to apply too much force, as you don’t want to damage the cover or the lock itself.
- Continue lifting and maneuvering the battery cover until it is completely free from the lock. Set the battery cover aside in a safe place, as you will need it later.
Some lock models may have a different mechanism for removing the battery cover. In such cases, refer to your lock’s user manual for specific instructions on how to remove the cover.
When removing the battery cover, it’s important to be cautious and maintain a steady hand. Avoid using excessive force, as this could result in damage to the lock or the battery cover. Take your time and ensure that the cover is completely detached before moving on to the next step.
With the battery cover successfully removed, you’re now ready to move on to the next step: taking out the old batteries.
Step 4: Take out the old batteries
Now that you have removed the battery cover, it’s time to take out the old batteries from your Kwikset smart lock. Removing the old batteries is a crucial step to ensure optimal performance when you insert the new ones.
Follow these steps to take out the old batteries:
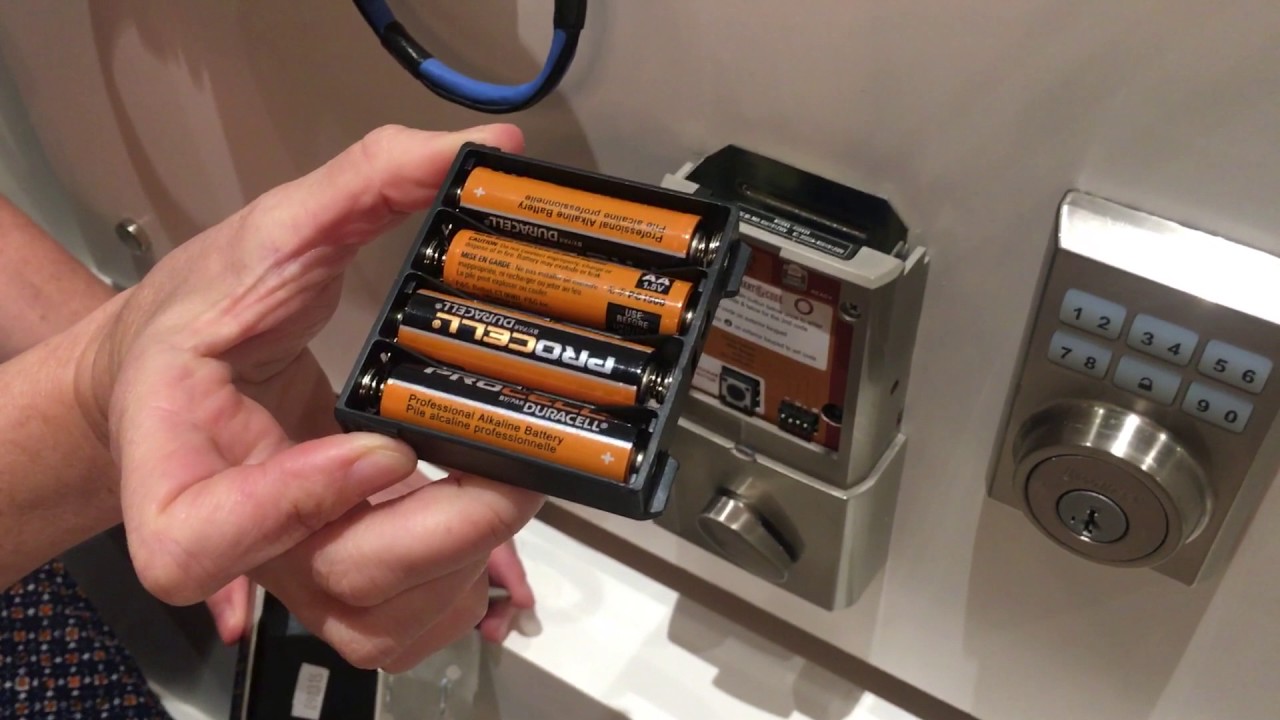
- Inspect the battery compartment to locate the old batteries. They will be housed within the compartment.
- Identify the positioning of the batteries, noting the positive (+) and negative (-) terminals.
- Using your fingers or a small tool, carefully lift the old batteries out of the compartment. Make sure to grip them firmly but gently to avoid any damage.
- Place the old batteries aside for proper disposal. It’s important to recycle them in accordance with the guidelines set by your local waste management facilities or take them to a designated battery recycling center.
Be cautious when handling the old batteries, as they may still have some charge remaining. Avoid touching the terminals directly to prevent any potential short-circuiting or electrical shock.
It’s always a good idea to double-check that you have removed all of the old batteries from the compartment before proceeding to the next step. Leaving old batteries inside the lock can lead to malfunctions and may drain the life of the new batteries faster.
With the old batteries successfully removed, you’re now ready to proceed to the next step: inserting the new batteries.
Step 5: Insert the new batteries
Now that you have removed the old batteries from your Kwikset smart lock, it’s time to insert the new batteries. This step is crucial for ensuring that your lock functions properly and remains secure.
Follow these steps to insert the new batteries:
- Take the fresh batteries that you have gathered for this purpose.
- Inspect the battery compartment to identify the proper orientation for inserting the new batteries. There are usually markings inside the compartment indicating the correct positioning of the positive (+) and negative (-) terminals.
- Align the positive (+) terminal of each battery with the corresponding marking inside the battery compartment. Ensure that each battery is securely seated in its designated slot.
- Continue inserting the remaining batteries, following the correct orientation for each one.
- Once all the batteries are inserted, double-check that they are properly aligned and fully seated in the compartment.
It’s important to note that some lock models may require a specific sequence or order for inserting the batteries. Refer to your lock’s user manual for any specific instructions or guidelines related to the battery insertion process.
Ensure that the batteries are inserted in the correct orientation to avoid any damage to the lock or electrical malfunction. The positive (+) and negative (-) terminals must align with the markings inside the battery compartment.
With the new batteries securely inserted, you’re now ready to move on to the next step: replacing the battery cover.
Step 6: Replace the battery cover
With the new batteries inserted into your Kwikset smart lock, it’s time to replace the battery cover. The battery cover is designed to protect the batteries and ensure they remain securely in place.
Follow these steps to replace the battery cover:
- Take the battery cover that you set aside earlier.
- Align the cover with the battery compartment opening, ensuring that any notches or tabs on the cover align with the corresponding slots on the lock.
- Gently press the battery cover against the lock and align it with the correct positioning until it snaps or slides into place. You should hear a clicking sound when the cover securely locks back into position.
- Ensure that the battery cover is flush with the lock and there are no gaps or misalignments.
It’s important to make sure the battery cover is properly replaced to ensure the batteries are protected and the lock functions correctly. A loose or improperly aligned cover may result in battery drain or compromise the security features of your smart lock.
If you encounter any difficulties in replacing the battery cover, refer to your lock’s user manual for specific instructions or guidelines related to the cover replacement process. Some models may have unique mechanisms or additional steps that need to be followed.
With the battery cover securely replaced, you have successfully completed the crucial step of ensuring the proper functioning of your Kwikset smart lock.
Step 7: Test the lock
After changing the battery and replacing the battery cover on your Kwikset smart lock, it’s important to test the lock to ensure that everything is functioning correctly. Testing the lock will give you peace of mind knowing that your lock is operational and providing the security you need.
Follow these steps to test the lock:
- Close the door and ensure it is properly aligned with the door frame.
- Try locking and unlocking the door using both the keypad and the physical key, if applicable. Test the locking mechanism multiple times to ensure smooth operation.
- Check that the door latch fully extends and retracts without any resistance or sticking points.
- Verify that the lock responds to the keypad inputs or key turns promptly, without any noticeable delays.
- Test any additional features of your specific lock model, such as remote locking or integration with a mobile app, if applicable.
If any issues or anomalies are observed during the testing process, refer to your lock’s user manual for troubleshooting steps or contact the manufacturer’s support for assistance. It’s important to address any problems promptly to maintain the security and functionality of your smart lock.
By performing a thorough test of your Kwikset smart lock, you can ensure that it is operating as intended and providing the convenience and peace of mind you expect from a smart home device.
Once you have successfully tested the lock and confirmed its proper functionality, you can move on to the optional step of resetting the lock codes (if necessary).
Step 8: Resetting the lock codes (optional)
Resetting the lock codes on your Kwikset smart lock can be an optional step after changing the battery. This step is particularly useful if you want to update or modify the access codes for different family members or guests.
Follow these steps to reset the lock codes on your Kwikset smart lock:
- Refer to your lock’s user manual or online resources for specific instructions on how to reset the lock codes. The process may vary depending on your lock model.
- Familiarize yourself with the reset procedure and ensure that you understand the implications of resetting the lock codes. Keep in mind that this will delete all existing codes from the lock’s memory.
- Follow the specific steps provided by the manufacturer to reset the lock codes. This typically involves pressing and holding a combination of buttons on the keypad or using a master code.
- Once the reset process is initiated, wait for the lock to complete the reset. This may take a few seconds or longer, depending on the lock model.
- After the reset is complete, you can proceed to set up new codes according to your preferences. Follow the instructions provided by the manufacturer to add new access codes and configure any additional settings.
It’s important to note that the reset process may vary depending on your lock model. Always refer to the manufacturer’s instructions for the most accurate and up-to-date information on resetting your Kwikset smart lock.
Resetting the lock codes can provide an opportunity to enhance the security of your home and ensure that only authorized individuals have access to your property. It also allows you to conveniently manage and update access codes whenever necessary.
With the lock codes successfully reset (if desired), you have completed all the necessary steps to change the battery on your Kwikset smart lock. Your lock is now ready to provide you with reliable security and convenience.
Conclusion
Changing the battery on your Kwikset smart lock is a simple yet important maintenance task that ensures the continued functionality and security of your lock. By following the step-by-step guide provided in this article, you can confidently replace the battery on your own without the need for professional assistance. Remember to gather the necessary tools, locate the battery compartment, remove the battery cover, take out the old batteries, insert the new batteries, replace the battery cover, test the lock, and optionally reset the lock codes.
Throughout the process, it’s crucial to take the necessary precautions, such as using the right tools, handling the batteries properly, and following any specific instructions provided by the manufacturer. By doing so, you can minimize the risk of damaging your lock and ensure a smooth battery replacement experience.
Regularly checking and replacing the batteries in your Kwikset smart lock will help maintain its optimal performance and provide peace of mind knowing that your home is secure. Remember to keep an eye on the battery life indicator and set reminders to check and replace the batteries as needed.
We hope that this guide has been informative and helpful in guiding you through the battery replacement process for your Kwikset smart lock. By following these steps, you can ensure that your lock continues to provide convenience, security, and peace of mind for you and your family. Should you encounter any difficulties or have further questions, consult the lock’s user manual or reach out to the manufacturer for assistance. Now, go ahead and confidently change the battery on your Kwikset smart lock!