Introduction
Welcome to this guide on how to remove apps from your Jitterbug smartphone. Whether you want to free up some storage space, declutter your home screen, or simply get rid of apps you no longer use, the process is relatively simple. By following a few easy steps, you can quickly and efficiently remove unwanted apps from your device.
The Jitterbug smartphone, designed with seniors in mind, offers a user-friendly interface and simplified features. Although the device is intuitive to navigate, some users may still feel unsure about removing apps. This guide aims to provide you with clear instructions to help you confidently remove apps from your Jitterbug smartphone.
Removing apps not only improves device performance but also allows you to customize your smartphone experience according to your preferences. Whether it’s a preinstalled app that you don’t need or a third-party app that you no longer find useful, you can easily remove it from your Jitterbug smartphone.
In the following sections, we will walk you through the step-by-step process of removing apps from your Jitterbug smartphone. Please note that the exact steps may vary slightly depending on the specific model and operating system version of your device. However, the core process remains the same, and we will provide general instructions that will apply to most Jitterbug smartphones.
Now, let’s get started with our step-by-step guide on how to remove apps from your Jitterbug smartphone.
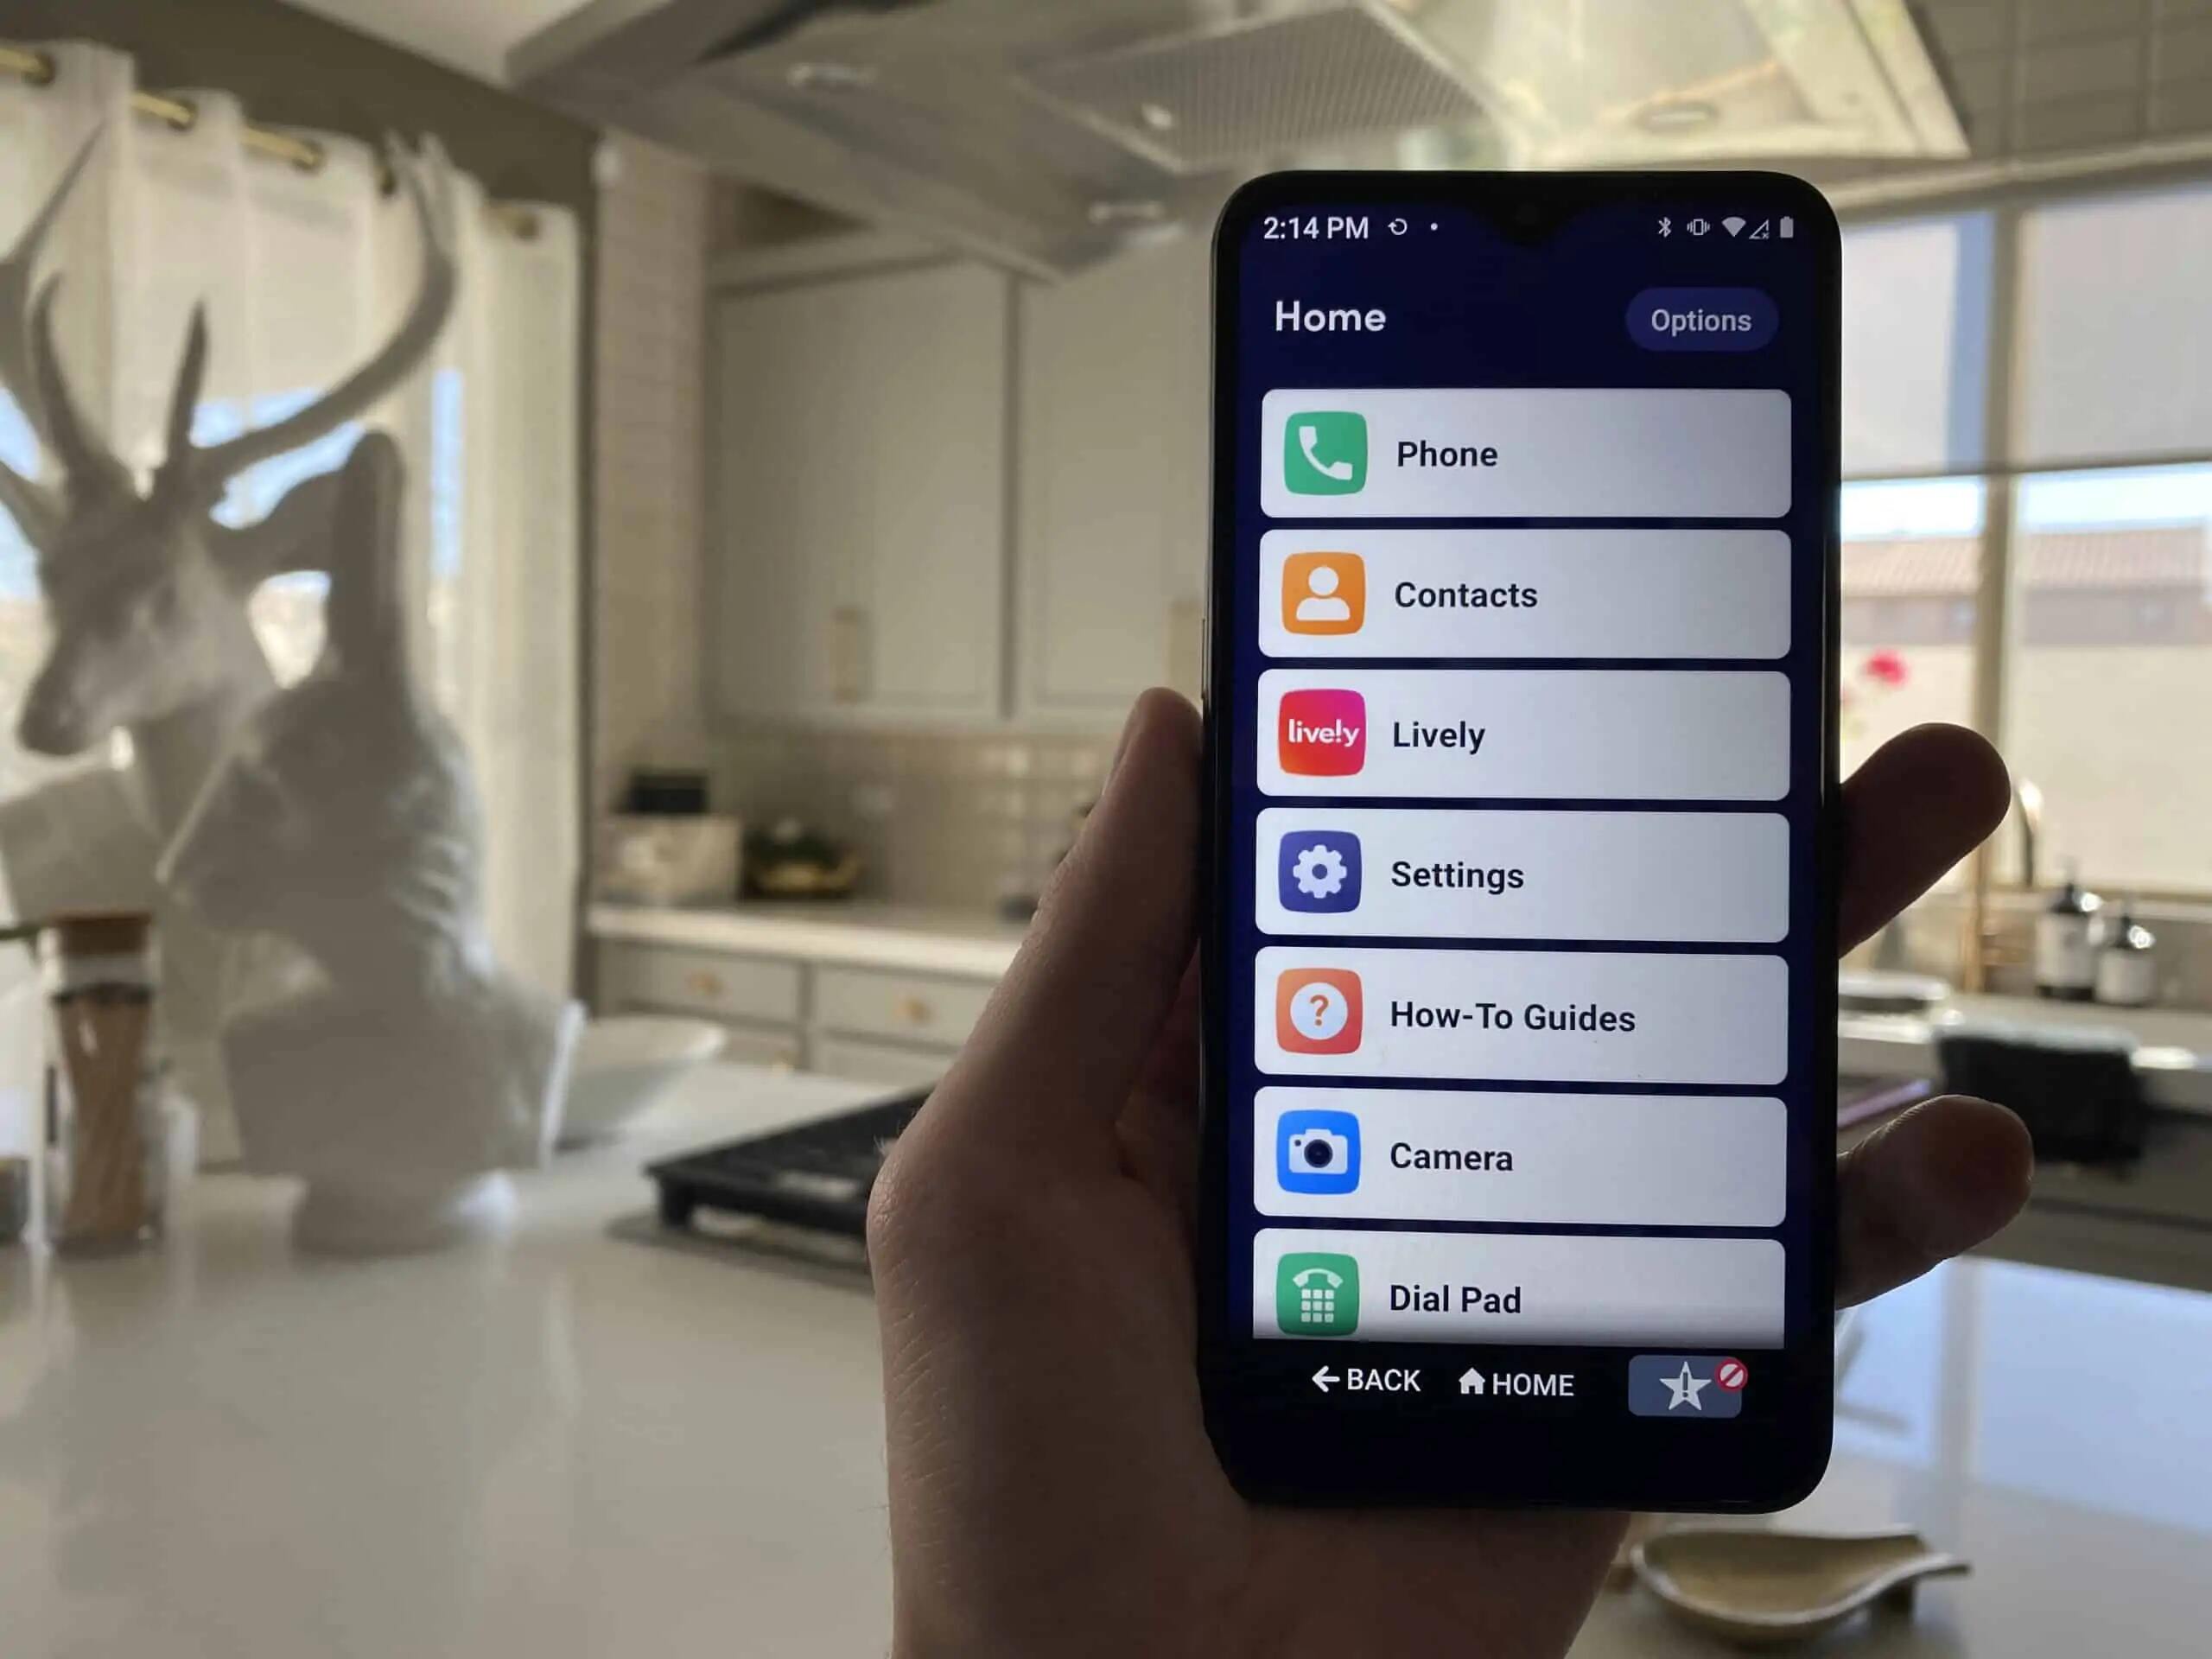
Step 1: Open the app drawer
The first step in removing apps from your Jitterbug smartphone is to open the app drawer. The app drawer is where all of your installed apps are stored, making it easy to access and manage them.
To open the app drawer, locate and tap on the “Apps” icon on your home screen. This icon typically looks like a grid of small squares or dots, and it may be labeled as “Apps” or “App Drawer.”
Once you tap on the app drawer icon, a new screen will open showing all of your installed apps. You can scroll through the list to find the app you want to remove.
If you have numerous apps installed, organizing them alphabetically or by categories can make it easier to locate a specific app. Some Jitterbug smartphones may offer options to sort or search for apps, so feel free to explore these features if available.
After you have successfully opened the app drawer, you are now ready to proceed to the next step: locating the app you want to remove from your Jitterbug smartphone.
Step 2: Locate the app you want to remove
Once you have opened the app drawer on your Jitterbug smartphone, it’s time to locate the app you want to remove. This step allows you to identify the specific app you wish to uninstall from your device.
Scroll through the list of installed apps in the app drawer and visually scan for the app you want to remove. The apps are typically arranged in alphabetical order or in the order they were installed. Take your time to locate the app, especially if you have a large number of apps installed on your device.
If you are having trouble finding the app, you can use the search function provided in the app drawer. Look for a magnifying glass or a search bar at the top of the screen and tap on it. Then, enter the name of the app you want to remove, and the app drawer will display the search results accordingly.
Alternatively, you can also organize your apps into folders or categories to make it easier to locate them. Some Jitterbug smartphones allow you to group apps into folders based on their purpose or category, such as “Games,” “Social Media,” or “Productivity.”
Once you have successfully located the app you want to remove, you are ready to proceed to the next step: pressing and holding the app icon to initiate the uninstallation process.
Step 3: Press and hold the app icon
Now that you have located the app you want to remove from your Jitterbug smartphone, it’s time to initiate the uninstallation process by pressing and holding the app icon. This step allows you to access the app options and prepare for the app removal.
To begin, press and hold your finger on the app icon you wish to remove. You will typically see a menu or options appear on the screen after holding the app icon for a few seconds. This action triggers the interactive mode on your Jitterbug smartphone.
While pressing and holding the app icon, you may notice some additional options or actions that appear, depending on the specific model and operating system version of your device. These options may include the ability to rearrange icons, create shortcuts, or access app information. However, for the purpose of removing an app, we will focus on the uninstallation option.
Continue to hold your finger on the app icon until the options menu is displayed. This menu allows you to customize and manage the selected app.
If you accidentally tap on the app icon instead of holding it, don’t worry! Simply remove your finger from the screen, wait for the app to open if it does, and then try again by pressing and holding the app icon.
With the app icon options menu now visible on your Jitterbug smartphone’s screen, it’s time to move on to the next step: dragging the app to the “Uninstall” or “Remove” option.
Step 4: Drag the app to the “Uninstall” or “Remove” option
After you have accessed the options menu by pressing and holding the app icon on your Jitterbug smartphone, it’s time to proceed with the app removal process. In this step, you will drag the app icon to the “Uninstall” or “Remove” option to initiate the uninstallation.
Look for the “Uninstall” or “Remove” option within the app options menu. It may be represented by a trash bin icon or have the label “Uninstall” or “Remove” next to it. The exact appearance and placement of this option may vary slightly depending on your device’s operating system version and interface design.
Once you have located the “Uninstall” or “Remove” option, continue to hold your finger on the app icon and drag it towards this option. As you drag the app icon, you will notice it moving across the screen, following the movement of your finger.
Take care to ensure that you are dragging the app icon towards the correct option. Accidental release or dragging the app to the wrong area may result in unintended actions, such as placing the app icon on the home screen or creating a shortcut instead of uninstalling the app.
Position the app icon directly over the “Uninstall” or “Remove” option, and release your finger from the screen. This action confirms your intent to remove the selected app from your Jitterbug smartphone.
At this point, a confirmation prompt may appear, asking you to confirm the app removal. The prompt may display additional information about the app’s data and the consequences of uninstalling it. Read the prompt carefully, and if you are sure you want to proceed, confirm the app removal by tapping on the “OK,” “Remove,” or similar button.
With the app icon successfully dragged to the “Uninstall” or “Remove” option and the removal confirmed, you are now ready to move on to the next step: confirming the app removal.
Step 5: Confirm the app removal
After you have dragged the app icon to the “Uninstall” or “Remove” option on your Jitterbug smartphone, it’s important to confirm the app removal before it is permanently deleted from your device. This step ensures that you are intentionally removing the app and allows you to review additional information about the app’s removal.
Once you have released the app icon over the “Uninstall” or “Remove” option, a confirmation prompt will typically appear on the screen. This prompt provides important details about the app’s removal, such as the amount of space that will be freed up, any associated data that will be deleted, and potential consequences of uninstalling the app.
Before confirming the removal, take a moment to review the information provided in the prompt. Consider any potential implications, such as losing app-specific data or disabling certain features. If you are certain that you want to proceed with the app removal, tap on the “OK,” “Remove,” or similar button to confirm your decision.
Keep in mind that some system apps or pre-installed apps may not allow complete removal from the device. In such cases, you may have the option to disable the app instead. Disabling the app hides it from the app drawer and prevents it from running in the background, effectively achieving a similar outcome to removing the app.
After confirming the app removal, your Jitterbug smartphone will proceed to uninstall the app. This process may take a few seconds, depending on the size of the app and your device’s performance. During this time, you may see a progress bar or an uninstallation animation.
Once the app removal process is complete, you will receive a notification confirming the successful uninstallation. The app will no longer appear in the app drawer, and any associated data or settings will be deleted from your device.
With the app successfully removed from your Jitterbug smartphone, you are now ready to proceed to the next step: repeating the process for other apps, if necessary.
Step 6: Repeat the process for other apps
After successfully removing an app from your Jitterbug smartphone using the previous steps, you may find it beneficial to repeat the process for other apps on your device. This step allows you to efficiently remove multiple apps, freeing up storage space and decluttering your smartphone.
To repeat the process for other apps, return to the app drawer on your Jitterbug smartphone. Scroll through the list of installed apps or use the search function to locate the next app you wish to remove. Once you have found the app, press and hold its icon to access the options menu.
Follow the same steps outlined in previous sections by dragging the app icon to the “Uninstall” or “Remove” option and confirming the app removal. Remember to review any prompts or information provided before confirming the removal to ensure you are making an intentional decision.
Continue this process for each app you want to remove from your Jitterbug smartphone. Take your time and be methodical to avoid accidentally removing apps you wish to keep. By repeating the process, you can declutter your device and improve its performance by removing unnecessary apps.
It’s worth mentioning that some apps may be necessary for the proper functioning of your Jitterbug smartphone or may be required by the system. Exercise caution when removing apps and ensure that you are not removing any essential system apps or apps that may cause issues with your device’s stability or functionality.
If you are unsure about the purpose or significance of a particular app, do a quick search or consult the user manual for your Jitterbug smartphone. This will help you determine whether it is safe to remove the app or if it is better to leave it installed on your device.
With each app you remove, your device’s storage space will increase, and you will have a more organized and streamlined smartphone experience. Once you have finished removing all the desired apps, you can enjoy the benefits of a clutter-free Jitterbug smartphone tailored to your preferences.
Now that you are familiar with the process of removing apps from your Jitterbug smartphone, you can confidently manage your installed apps and customize your device to suit your needs.
Conclusion
Removing apps from your Jitterbug smartphone is a straightforward process. By following the step-by-step guide in this article, you can easily free up storage space, declutter your home screen, and customize your smartphone experience according to your preferences.
Throughout this guide, we have covered the essential steps to remove apps from your device. Starting with opening the app drawer, locating the app you want to remove, pressing and holding the app icon, dragging it to the “Uninstall” or “Remove” option, confirming the app removal, and repeating the process for other apps.
It’s important to keep in mind that while removing apps can improve device performance and organization, some apps may be essential for your Jitterbug smartphone’s functionality or stability. Exercise caution and ensure you are not removing any necessary system apps or apps that may cause issues if uninstalled.
By managing your installed apps, you can customize your smartphone to suit your needs and free up valuable storage space for other purposes. Whether you want to remove apps you no longer use, eliminate pre-installed bloatware, or simply declutter your device, the process of app removal on your Jitterbug smartphone is now within your grasp.
Remember to regularly review your installed apps and only keep the ones that truly serve a purpose in your daily life. This will ensure that your Jitterbug smartphone remains organized, efficient, and tailored to your requirements.
We hope this guide has been helpful in assisting you with removing apps from your Jitterbug smartphone. Now, go ahead and take control of your device’s app collection, and enjoy a clutter-free smartphone experience!