Introduction
Chromebooks have become increasingly popular due to their affordability, simplicity, and fast performance. While these devices offer a wide range of applications to enhance productivity and entertainment, there may come a time when you need to remove an app from your Chromebook. Whether it’s to free up storage space or declutter your Launcher, removing unwanted apps can help optimize your Chromebook’s usability.
In this article, we will explore three different methods to remove apps from your Chromebook. Each method offers a unique approach, allowing you to choose the one that best suits your preferences and needs. Whether you want to remove an app from the Launcher, uninstall an app from the Chrome Web Store, or use the Settings menu to manage your apps, we’ve got you covered.
Before we dive into the methods, it’s important to note that removing an app from your Chromebook does not necessarily mean you have to delete it permanently. In most cases, removing an app will simply remove it from your Launcher or the Chrome Web Store. The app will still be available in your Google account, allowing you to reinstall it in the future if needed.
Now, let’s explore the different methods of removing apps from your Chromebook, giving you the freedom to personalize your device and streamline your app experience.
Method 1: Removing Apps from the Launcher
The Launcher is the default app launcher on your Chromebook, similar to the Start menu on Windows or the Dock on macOS. It provides quick access to your installed apps, allowing you to open them with just a click.
To remove an app from the Launcher, follow these simple steps:
- Locate the app icon on your Launcher. You can do this by either scrolling through the list of apps or using the search bar at the bottom of the screen.
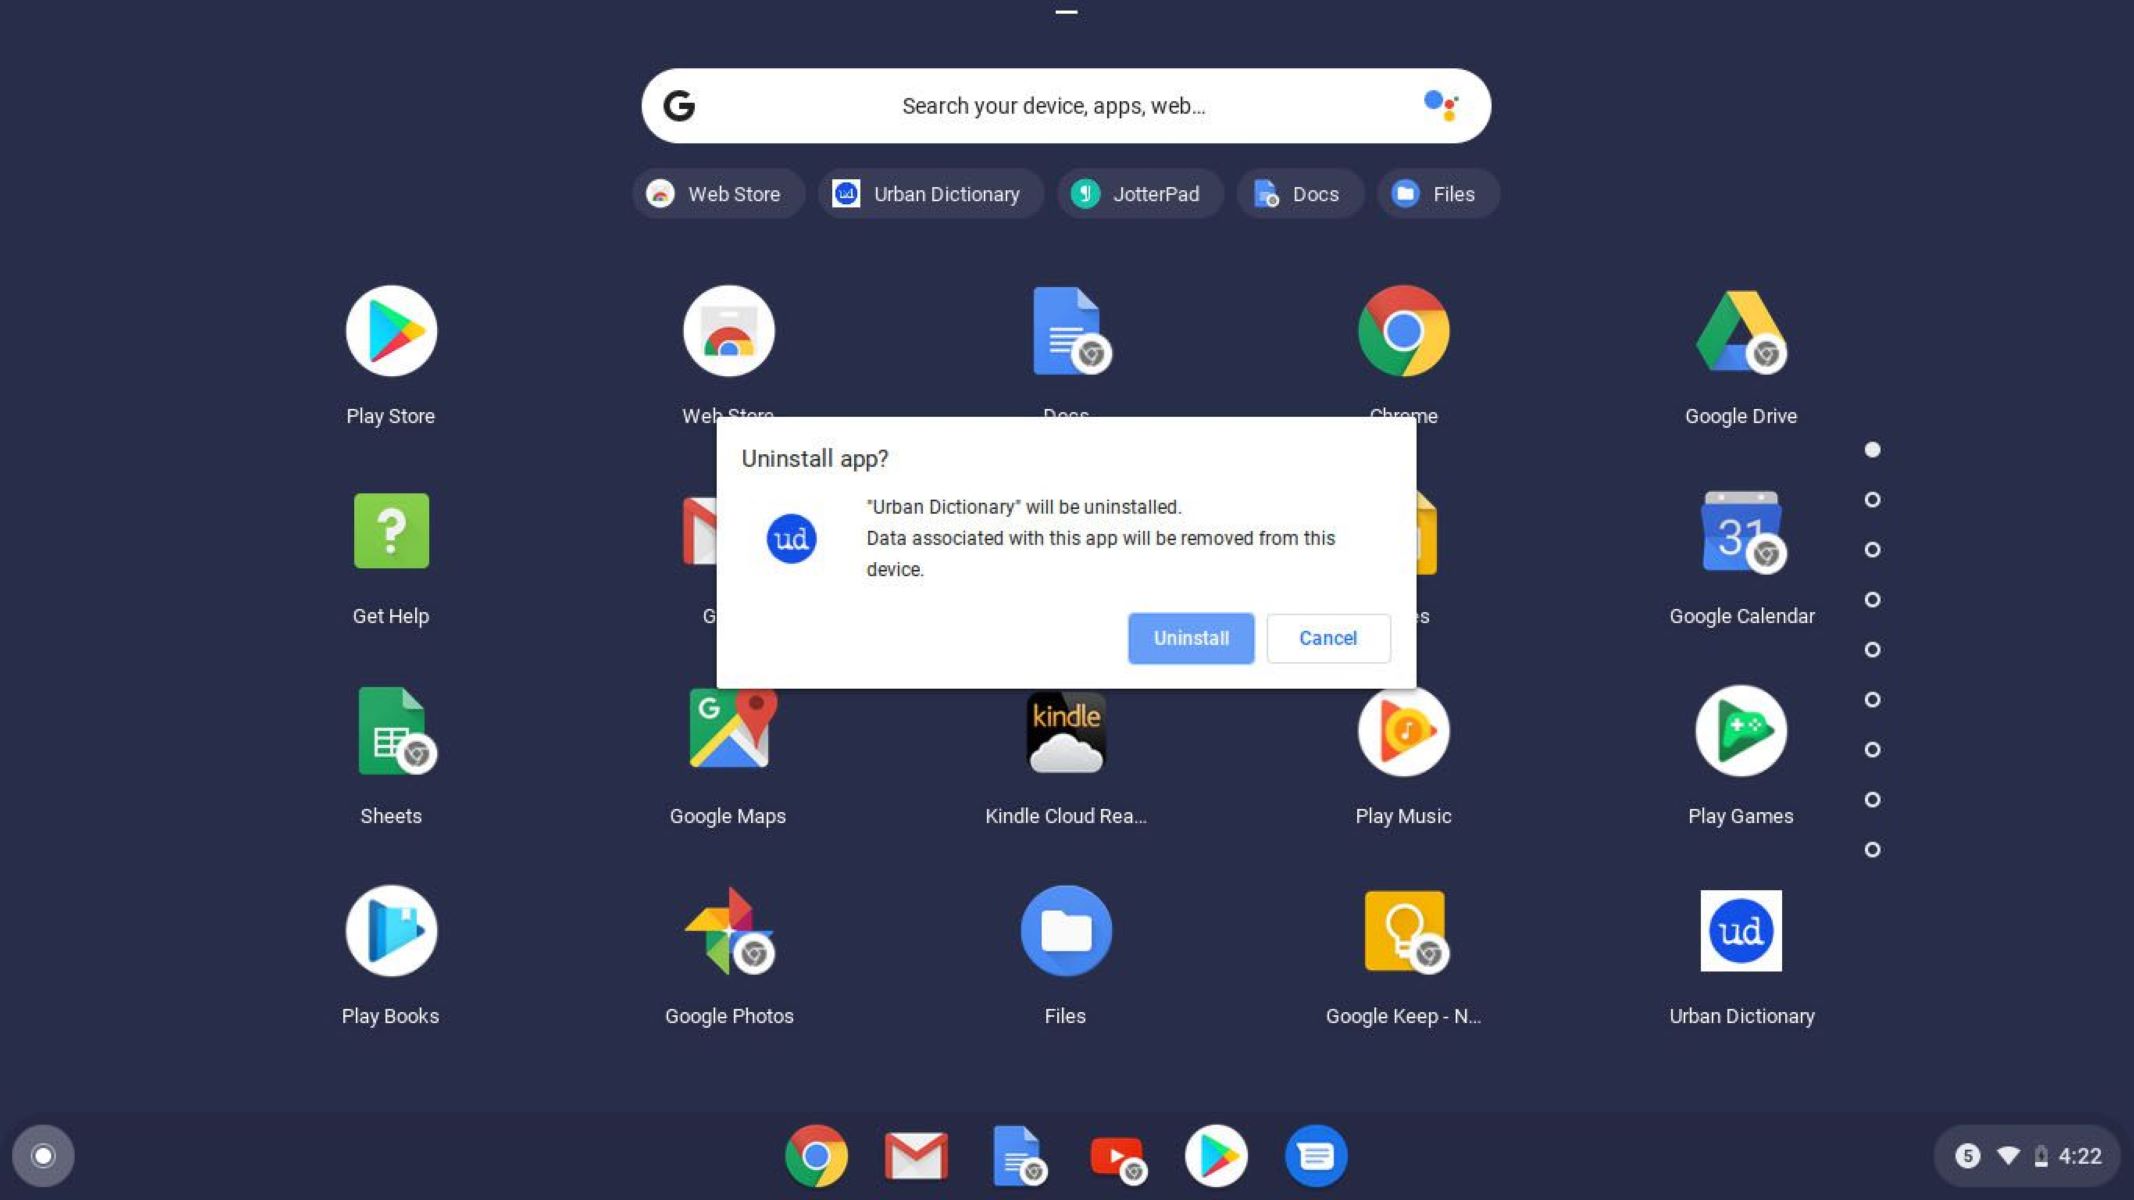
- Once you’ve found the app you want to remove, right-click on its icon. This will bring up a menu of options.
- In the menu that appears, click on “Uninstall” or “Remove from Chrome.” The wording may vary slightly depending on your Chromebook model and version.
- A confirmation dialog box will appear asking if you want to remove the app. Click “Uninstall” or “Remove” to confirm your decision.
- The app will be immediately removed from your Launcher, freeing up space and decluttering your app list.
It’s important to note that removing an app from the Launcher does not uninstall the app from your Chromebook completely. The app will still be available in your account and can be found in the Chrome Web Store for reinstallation if needed.
Removing apps from the Launcher is a straightforward and effective method for quickly decluttering your app list. It allows you to only keep the necessary and frequently used apps visible, making it easier to find and access the apps you need without scrolling through a long list.
Now that you know how to remove apps from the Launcher, let’s move on to Method 2: Removing Apps from the Chrome Web Store.
Method 2: Removing Apps from the Chrome Web Store
The Chrome Web Store is your one-stop shop for discovering and installing apps on your Chromebook. It offers a wide variety of applications, extensions, and themes to enhance your browsing and productivity experience. If you want to remove an app from the Chrome Web Store, you can easily do so by following these steps:
- Open the Chrome Web Store by clicking on its icon in your Launcher or typing “chrome://apps” in the address bar of your Chrome browser.
- Once you’re in the Chrome Web Store, click on the “Apps” category located on the left side of the screen.
- Scroll or search for the app you want to remove. When you find it, click on its icon to open the app page.
- On the app page, locate the “Remove” button, usually located below the app’s description or on the right side of the screen.
- Click on the “Remove” button, and a confirmation dialog box will appear asking if you want to remove the app. Click “Remove” to confirm your decision.
- The app will be removed from the Chrome Web Store, and it will no longer appear in your list of installed apps.
By removing unwanted apps from the Chrome Web Store, you can declutter your browsing experience and only keep the apps that are relevant and useful to you. This can help improve your productivity and make it easier to find the apps you need in the future.
It’s important to note that removing an app from the Chrome Web Store does not uninstall the app from your Chromebook completely. The app will still be available in your Google account, and you can reinstall it from the Chrome Web Store if you change your mind.
Now that you know how to remove apps from the Chrome Web Store, let’s move on to Method 3: Removing Apps from the Settings Menu.
Method 3: Removing Apps from the Settings Menu
If you prefer a centralized location to manage your installed apps on your Chromebook, you can use the Settings menu to remove unwanted apps. The Settings menu provides a comprehensive overview of your Chromebook’s settings, including app management. Here’s how to remove apps from the Settings menu:
- Click on the time and date in the bottom-right corner of your screen to open the system tray.
- In the system tray, click on the gear icon to open the Settings menu.
- In the Settings menu, scroll down and click on “Apps” or “Apps & features,” depending on your Chromebook model and version.
- A list of your installed apps will appear. Scroll through the list or use the search bar at the top to find the app you want to remove.
- Once you’ve located the app, click on the trash can icon or the “Remove” button next to the app’s name.
- A confirmation dialog box will appear. Click “Remove” to confirm the removal of the app from your Chromebook.
- The app will be removed from your Chromebook, and it will no longer appear in your list of installed apps.
Removing apps from the Settings menu provides a centralized approach to managing your installed apps. It allows you to view all your apps in one place and easily remove the ones you no longer need, making it convenient for users who prefer a more organized system.
Remember, removing an app from the Settings menu does not permanently delete the app from your Google account. It simply removes it from your Chromebook, and you can reinstall it in the future if necessary.
With Method 3, you now have a complete understanding of how to remove apps from your Chromebook using the Settings menu.
Now that we’ve explored three different methods to remove apps from your Chromebook, you have the knowledge and flexibility to declutter your device, optimize its performance, and create a personalized app experience that suits your needs.
Conclusion
Removing unwanted apps from your Chromebook is a simple and effective way to optimize its performance, free up storage space, and personalize your app experience. In this article, we explored three different methods to remove apps from your Chromebook: through the Launcher, the Chrome Web Store, and the Settings menu.
The first method, removing apps from the Launcher, allows you to quickly declutter your app list and only keep the necessary and frequently used apps visible. This method is perfect for those who want to streamline their app access and improve productivity.
The second method, removing apps from the Chrome Web Store, provides a way to declutter your browsing experience and remove unwanted apps that you no longer need or use. This method is ideal for users who prefer a centralized approach to managing their installed apps.
The third method, removing apps from the Settings menu, offers a comprehensive and organized way to manage your installed apps. This method is great for those who want a centralized location to view and remove apps from their Chromebook.
Regardless of the method you choose, it’s important to note that removing an app from your Chromebook does not permanently delete it. The app will still be available in your Google account, allowing you to reinstall it if needed.
By following these methods, you can declutter your Chromebook, optimize its performance, and create a customized app experience that best suits your preferences and needs.
So go ahead and start removing those unwanted apps from your Chromebook. Experience a cleaner and more efficient device that enhances your productivity and enjoyment.