Introduction
Welcome to the world of technology, where data security is of paramount importance. With the increasing reliance on external hard drives for storing and transporting data, it’s essential to take steps to protect your valuable information from unauthorized access. One effective way to do that is by password protecting your external hard drive.
By adding a password to your external hard drive, you ensure that only those with the authorized password can access the data stored on it. This added layer of security can give you peace of mind and protect your sensitive information, whether it’s personal documents, work files, or multimedia files.
In this article, we will explore the reasons why you should password protect your external hard drive, discuss various options available to achieve this, and provide step-by-step guides to help you implement password protection using different methods. Whether you’re a Mac user or utilize third-party software, we’ve got you covered.
Before we delve into the different methods, it’s essential to assess the options available to you and choose the one that best suits your needs. Each method has its own pros and cons, considering factors such as ease of use, compatibility, and level of encryption.
This article aims to empower you with knowledge and guide you through the process, ensuring that you can confidently protect your external hard drive and secure your sensitive data. Let’s get started on the journey to safeguarding your information!
Why should you password protect your external hard drive?
In today’s digital age, data security is more important than ever. With the vast amount of personal and sensitive information stored on external hard drives, it’s crucial to take measures to protect it from unauthorized access. Here are some compelling reasons why you should consider password protecting your external hard drive:
- Data Privacy: Your external hard drive may contain personal documents, financial records, or confidential work files. By password protecting it, you prevent anyone without the authorized password from accessing this sensitive information.
- Theft and Loss: External hard drives are portable and can be easily misplaced, lost, or stolen. If your hard drive falls into the wrong hands, a password can act as a critical safeguard, ensuring that your data remains secure even if the physical device is compromised.
- Protection from Malware: Password protecting your external hard drive adds an extra layer of defense against malware and unauthorized software installations. Even if your computer gets infected, the password protection on the external hard drive prevents the malware from accessing your data.
- Confidential Work Files: If you use your external hard drive for work-related purposes, it likely contains confidential business files or intellectual property. By password protecting it, you ensure that only authorized individuals can access and make changes to these critical documents.
- Preventing Unauthorized Sharing: Password protecting your external hard drive can deter the unauthorized sharing of your files. With a password in place, you have control over who can access and share the data stored on the device.
By password protecting your external hard drive, you take a proactive step towards safeguarding your sensitive information, maintaining privacy, and reducing the risk of unauthorized access or data breaches. It gives you peace of mind, knowing that your data is protected, even if your external hard drive ends up in the wrong hands.
Now that we understand the importance of password protecting your external hard drive, let’s explore the various options available to achieve this level of security.
Assessing your options
When it comes to password protecting your external hard drive, you have several options to consider. Each method has its own advantages and may be more suitable depending on your specific needs. Let’s take a closer look at the options available:
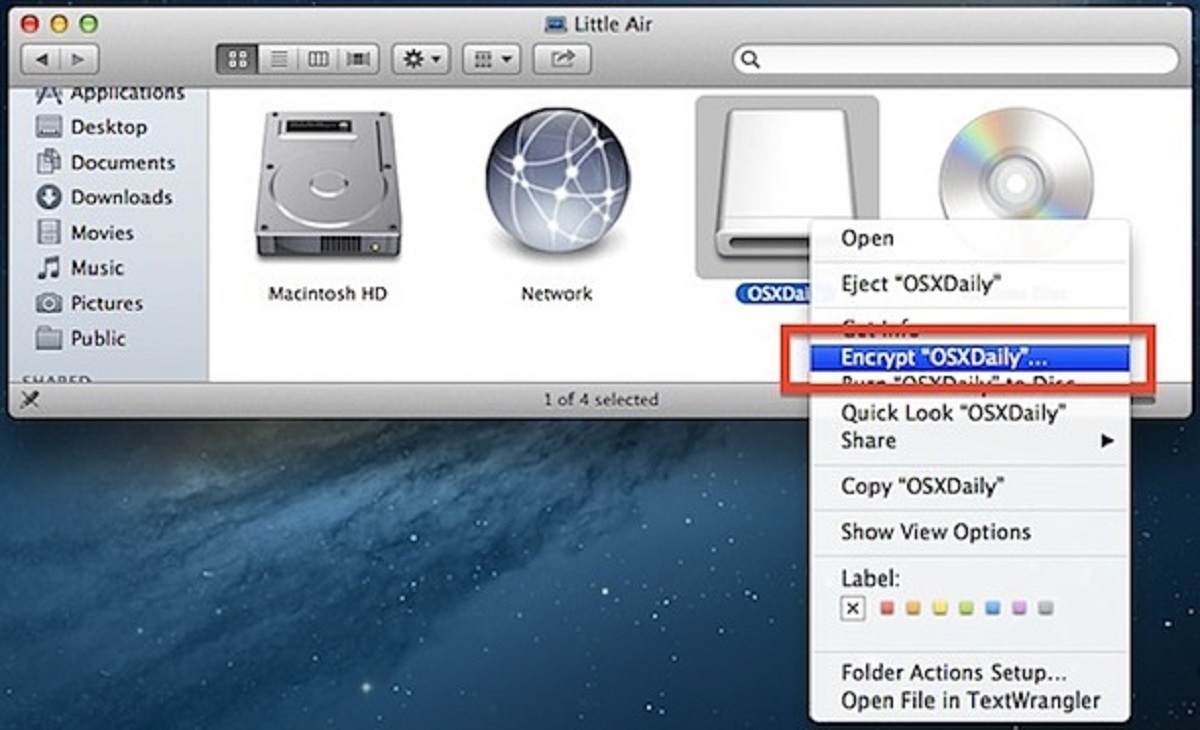
- Using Disk Utility: If you’re a Mac user, you have the built-in Disk Utility tool at your disposal. It allows you to create an encrypted disk image on your external hard drive, effectively password protecting the contents. This method is convenient and does not require the installation of any additional software.
- Using FileVault: Another option for Mac users is FileVault, a built-in disk encryption program. Enabling FileVault will encrypt the entire external hard drive, ensuring that all the data is protected by your login password. This method provides comprehensive encryption and is suitable for users who want to encrypt their entire hard drive.
- Using third-party software: If you’re not a Mac user or prefer more advanced encryption features, third-party software options are available. These software applications offer additional functionalities, such as cross-platform compatibility, advanced encryption algorithms, and password management features.
When assessing your options, consider factors such as ease of use, level of encryption, compatibility with your operating system, and any additional features you may require. Additionally, it’s important to ensure that the chosen method is reliable and reputable to guarantee the security of your data.
In the following sections, we will provide step-by-step guides for each option, allowing you to choose the method that best fits your needs and preferences. Now that we’re familiar with the available options, let’s dive into the step-by-step procedures for password protecting your external hard drive using different methods.
Option 1: Using Disk Utility
If you’re a Mac user, one of the easiest ways to password protect your external hard drive is by using the built-in Disk Utility tool. Here’s a step-by-step guide to help you through the process:
- Connect your external hard drive to your Mac computer.
- Open Disk Utility. You can find it in the Applications > Utilities folder or by searching for it in Spotlight.
- In the Disk Utility window, select your external hard drive from the left-hand sidebar.
- Click on the “File” menu at the top of the screen and choose “New Image” and then “Blank Image”.
- A new window will appear. Enter a name for the encrypted disk image and choose a location to save it. Make sure to select the external hard drive as the destination.
- Select the desired size for the disk image. It should be large enough to accommodate your files.
- Select the encryption option as “128-bit AES encryption” or “256-bit AES encryption” for stronger security.
- Choose a password for the encrypted disk image. Make sure to use a strong and secure password that you can remember.
- Click on the “Save” button and wait for Disk Utility to create the encrypted disk image on your external hard drive.
- Once the disk image is created, you can move your files into it. To access the files, double-click on the disk image file and enter the password when prompted.
By following these steps, you can easily password protect your external hard drive using Disk Utility. It’s a straightforward and efficient method that provides an added layer of security for your sensitive data on a Mac.
Now that you’re familiar with the process of password protecting your external hard drive using Disk Utility, let’s move on to the next option: using FileVault.
Option 2: Using FileVault
If you’re a Mac user and want to encrypt your entire external hard drive, FileVault is an excellent option. Follow these step-by-step instructions to password protect your external hard drive using FileVault:
- Connect your external hard drive to your Mac computer.
- Go to the Apple menu and select “System Preferences”.
- In the System Preferences window, click on “Security & Privacy”.
- Switch to the “FileVault” tab.
- Click on the lock icon in the bottom-left corner and enter your administrator password to make changes.
- Click on the “Turn On FileVault” button.
- Choose whether to enable FileVault for your user account or allow other users to unlock the disk.
- Create a recovery key that can be used to access your data if you forget your password. Choose either to store the recovery key with Apple or to create a personal recovery key.
- Wait for FileVault to encrypt the entire external hard drive. The time required will depend on the size of the drive and the amount of data.
- Once the encryption process is complete, your external hard drive is fully protected. Every time you connect the drive, you will be prompted to enter the password associated with your user account.
Using FileVault ensures that all data on your external hard drive is encrypted and accessible only with your login password. It provides comprehensive protection for your sensitive information and is an effective way to secure your entire hard drive.
Now that you know how to password protect your external hard drive using FileVault, let’s explore the third option: using third-party software.
Option 3: Using third-party software
If you’re not a Mac user or if you prefer more advanced encryption features, you can use third-party software to password protect your external hard drive. There are various options available, each with its own set of features and compatibility. Here’s a general guide to using third-party software to secure your external hard drive:
- Research and select a reputable third-party software program that is compatible with your operating system. Some popular options include VeraCrypt, BitLocker, and DiskCryptor.
- Download and install the chosen software onto your computer.
- Connect your external hard drive to your computer. Ensure that the software recognizes the external drive.
- Launch the software and navigate to the option for creating an encrypted container or partition.
- Specify the size and location for the encrypted container or partition on your external hard drive.
- Choose the encryption algorithm and set a strong password. It’s recommended to use complex and unique passwords to maximize security.
- Follow the prompts to create the encrypted container or partition on your external hard drive.
- Once the process is complete, you can move your files to the encrypted container or partition. Accessing the files will require entering the password specified during the setup.
Using third-party software gives you flexibility and additional encryption options for password protecting your external hard drive. Make sure to choose software from trusted sources and follow the instructions provided by the software developer.
Now that you’re familiar with the three options for password protecting your external hard drive – using Disk Utility, using FileVault, or using third-party software – you can choose the method that best suits your needs and preferences. Remember to consider factors such as ease of use, level of encryption, compatibility, and any additional features you may require.
In the next sections, we will provide step-by-step guides for each option, allowing you to follow along and implement password protection on your external hard drive with confidence.
Step-by-step guide for password protecting your external hard drive with Disk Utility
If you’re a Mac user, Disk Utility provides a convenient way to password protect your external hard drive. Follow the steps below to ensure your data remains secure:
- Connect your external hard drive to your Mac computer.
- Open the “Applications” folder and then navigate to the “Utilities” folder.
- Click on “Disk Utility” to launch the application.
- In the Disk Utility window, select your external hard drive from the left-hand sidebar.
- Click on the “File” menu at the top of the screen, then choose “New Image” and select “Blank Image”.
- A new window will appear. Give your encrypted disk image a name and choose a location to save it. Make sure to select your external hard drive as the destination.
- Next, select the desired size for the disk image. Ensure it’s large enough to accommodate the files you wish to protect.
- From the “Encryption” dropdown menu, select either “128-bit AES encryption” or “256-bit AES encryption” for stronger security.
- Choose a password for the encrypted disk image. Make sure to use a strong and unique password that you can remember.
- Lastly, click on the “Save” button and wait for Disk Utility to create the encrypted disk image on your external hard drive.
- Once the disk image is created, you can move your files into it. To access the files, simply double-click on the disk image file and enter the password when prompted.
By following these steps, you can effectively password protect your external hard drive using Disk Utility on your Mac. Ensure that you choose a strong password and remember it, as it is crucial for accessing your protected files.
Now that you’ve successfully protected your external hard drive using Disk Utility, you can rest assured knowing that your sensitive information is secure. In the next section, we’ll provide a step-by-step guide for password protecting your external hard drive using FileVault.
Step-by-step guide for password protecting your external hard drive with FileVault
If you’re a Mac user, FileVault offers a comprehensive solution for encrypting your entire external hard drive. Follow the steps below to password protect your external hard drive using FileVault:
- Connect your external hard drive to your Mac computer.
- Click on the Apple menu in the top left corner of the screen and select “System Preferences”.
- In the System Preferences window, click on “Security & Privacy”.
- Switch to the “FileVault” tab, then click on the lock icon in the bottom-left corner and enter your administrator password to make changes.
- Click on the “Turn On FileVault” button to initiate the encryption process.
- Choose whether to enable FileVault for your user account or allow other users to unlock the disk.
- Create a recovery key that can be used to access your data if you forget your password. Choose either to store the recovery key with Apple or to create a personal recovery key.
- Wait for FileVault to encrypt the entire external hard drive. The duration of the process depends on the size of the drive and the amount of data.
- Once the encryption process is complete, your external hard drive is now protected. Every time you connect the drive, you will be prompted to enter your login password.
By following these steps, you can effectively password protect your entire external hard drive using FileVault on your Mac. It provides comprehensive encryption and ensures that all data on the drive is accessible only by entering your login password.
Now that you’ve successfully password protected your external hard drive using FileVault, you can have peace of mind knowing that your sensitive information remains secure. In the next section, we’ll explore a third option – using third-party software to protect your external hard drive.
Step-by-step guide for password protecting your external hard drive with third-party software
If you’re not a Mac user or if you prefer more advanced encryption features, you can utilize third-party software to password protect your external hard drive. Follow the steps below to secure your external hard drive using third-party software:
- Research and select a reputable third-party software program that is compatible with your operating system. Some popular options include VeraCrypt, BitLocker, and DiskCryptor.
- Download and install the chosen software onto your computer.
- Connect your external hard drive to your computer. Ensure that the software recognizes the external drive.
- Launch the software and navigate to the option for creating an encrypted container or partition.
- Specify the size and location for the encrypted container or partition on your external hard drive.
- Choose the encryption algorithm recommended by the software and set a strong password. It’s crucial to use complex and unique passwords to maximize security.
- Follow the prompts provided by the software to create the encrypted container or partition on your external hard drive.
- Once the process is complete, you can move your files into the encrypted container or partition. Accessing the files will require entering the password specified during the setup.
Using third-party software gives you flexibility and additional encryption options for password protecting your external hard drive. Make sure to choose software from trusted sources and follow the instructions provided by the software developer.
By following these steps and utilizing the appropriate third-party software, you can effectively password protect your external hard drive and ensure the security of your sensitive data. Now that you have the knowledge and necessary guidance, you can choose the method that best suits your needs to safeguard your external hard drive.
Tips for managing and accessing your password protected external hard drive
Congratulations on successfully password protecting your external hard drive! Now that your data is secure, here are some helpful tips for managing and accessing your password protected external hard drive:
- Remember your password: As the password is the key to accessing your protected files, it’s crucial to remember it. Consider using password management tools or techniques to ensure you won’t forget it.
- Regularly back up your data: It’s always a good practice to back up your data to a separate location. In the event of any issues or data loss, you can restore your files from the backup.
- Keep your software up to date: If you’re using third-party software for password protection, make sure to update it regularly to benefit from the latest security enhancements and bug fixes.
- Store your password in a secure place: While it’s important to remember your password, it’s equally essential to keep it in a secure location to prevent unauthorized access.
- Consider additional layers of security: Depending on the sensitivity of your data, you may want to explore additional security measures such as two-factor authentication or biometric authentication.
- Keep your operating system and antivirus software up to date: Regularly updating your operating system and antivirus software ensures that your computer remains protected against security vulnerabilities and malware attacks.
- Transfer files securely: When transferring files to or from your password protected external hard drive, make sure to do so over secure connections, such as encrypted networks or using secure file transfer methods.
- Protect your external hard drive physically: Store your external hard drive in a safe and secure location to prevent physical tampering or unauthorized access.
- Test your password protection: Periodically test your password protection by attempting to access your files with an incorrect password. This will help ensure that your data remains secure and that the password protection is functioning as expected.
- Seek professional help if needed: If you encounter any difficulties in managing or accessing your password protected external hard drive, don’t hesitate to reach out to professional IT support or the software provider for assistance.
By following these tips, you can effectively manage and access your password protected external hard drive while ensuring the security of your data. Remember, data security is an ongoing process, so it’s important to remain vigilant and stay updated with the latest best practices.
Now that you’re well-equipped with these tips, you can confidently handle and access your password protected external hard drive. In the following section, we’ll wrap up the article and summarize the key points discussed.
Conclusion
Protecting your external hard drive with a password is an essential step in safeguarding your sensitive data from unauthorized access. Whether you choose to use Disk Utility, FileVault, or third-party software, password protecting your external hard drive provides an extra layer of security and peace of mind.
In this article, we explored the reasons why password protecting your external hard drive is important, assessed the various options available, and provided step-by-step guides for each method. Disk Utility offers a convenient option for Mac users, while FileVault provides comprehensive encryption for the entire hard drive. Alternatively, third-party software offers advanced features and flexibility for users on different operating systems.
We also discussed important tips for managing and accessing your password protected external hard drive, including remembering your password, regular data backups, keeping software up to date, and implementing additional layers of security. Following these tips will help ensure the security and integrity of your data.
Remember, data security is an ongoing process, and it’s crucial to remain vigilant and proactive in protecting your sensitive information. By implementing password protection and following best practices, you can confidently protect your external hard drive and the valuable data it contains.
Now that you have the knowledge and tools to password protect your external hard drive, take action and secure your data today. Don’t wait until it’s too late – protect your valuable information and enjoy the peace of mind that comes with knowing your files are safe from unauthorized access.


