What is Overclocking?
Overclocking is the process of increasing the clock speed of a computer component, such as the processor or graphics card, beyond its default or factory settings. In the case of AMD GPUs (graphics processing units), overclocking refers to boosting the core and memory clock speeds to achieve higher performance.
By increasing the clock speeds of an AMD GPU, you can potentially achieve faster processing and improved graphics performance in applications and games. This is because higher clock speeds result in more computational power and faster data transfer, allowing the GPU to render frames and process calculations more quickly.
It is important to note that overclocking is an advanced technique and should be approached with caution. While it can yield significant performance gains, it also increases the heat generated by the GPU and may lead to stability issues if not done properly. Therefore, it is crucial to understand the risks involved and take appropriate precautions when overclocking.
Overclocking is a popular practice among gamers and enthusiasts who strive for the highest possible performance from their AMD GPUs. However, it is essential to consider the limitations of your GPU and the cooling capabilities of your system before attempting any overclocking.
Now that you have a basic understanding of what overclocking is let’s explore the benefits of overclocking an AMD GPU in the next section.
Benefits of Overclocking an AMD GPU
Overclocking an AMD GPU can provide several benefits for gamers and graphics-intensive users. Here are some of the advantages you can expect:
1. Increased Performance: The primary benefit of overclocking is achieving higher performance from your AMD GPU. By increasing the core and memory clock speeds, you can improve the GPU’s processing power and achieve smoother gameplay, faster rendering, and quicker load times.
2. Enhanced Gaming Experience: Overclocking can significantly improve your gaming experience by allowing you to play the latest titles at higher frame rates and better image quality. This can result in more immersive gameplay and a competitive edge in multiplayer games.
3. Better Graphics Rendering: Overclocking your AMD GPU can also enhance graphics rendering capabilities, enabling more detailed and visually stunning visuals in games and other graphics-intensive applications.
4. Cost-Effective Performance Boost: Overclocking provides a cost-effective way to squeeze more performance out of your AMD GPU without having to spend money on upgrading to a higher-end model. This can help extend the lifespan of your GPU and delay the need for a new purchase.
5. Customization and Fine-Tuning: Overclocking allows you to customize and fine-tune your GPU settings according to your specific requirements. You can experiment with different clock speeds, voltage settings, and fan profiles to find the optimal balance between performance and temperature.
6. Unlocking Hidden Potential: Overclocking can reveal the hidden potential of your AMD GPU by pushing it beyond its factory limitations. This can be a rewarding experience for enthusiasts who enjoy exploring the capabilities of their hardware.
While these benefits are enticing, it is important to note that overclocking also carries potential risks. It can lead to increased power consumption, heat generation, and decreased GPU lifespan if not done correctly. It is crucial to follow proper overclocking techniques and take necessary precautions to ensure the safety and longevity of your AMD GPU.
In the next section, we will discuss the necessary steps to prepare for overclocking an AMD GPU.
Preparing for Overclocking
Before diving into the process of overclocking your AMD GPU, it is crucial to take the necessary steps to ensure a smooth and safe overclocking experience. Here are some important preparations to make:
1. Research and Familiarize Yourself: Start by researching your specific GPU model and its overclocking capabilities. Understand the limitations of your GPU and gather information from reputable sources to gain insights into the potential risks and best practices for overclocking an AMD GPU.
2. Ensure Sufficient Cooling: Overclocking generates more heat, so ensuring proper cooling is essential to prevent overheating and potential damage to your GPU. Make sure your cooling system, including fans and heatsinks, is adequate to dissipate the extra heat generated during overclocking.
3. Update GPU Drivers: It is crucial to have the latest GPU drivers installed before attempting any overclocking. Updated drivers often include performance optimizations and important stability fixes that can enhance your overclocking experience.
4. Create System Backups: Before starting the overclocking process, it is recommended to create backups of important files and settings on your system. This ensures that you have a restore point in case any issues arise during the overclocking process.
5. Monitor Hardware Temperatures: Use monitoring software to keep an eye on the temperature of your GPU while overclocking. High temperatures can lead to instability or even hardware damage. Regularly check and maintain optimal temperature levels to ensure a stable overclock.
6. Stability Testing Tools: Download and familiarize yourself with software tools that can stress test your overclocked GPU. These tools will help assess the stability and performance of your overclocked settings, allowing you to tweak them if necessary.
7. Take Incremental Steps: When overclocking, it is best to take small, incremental steps rather than making drastic changes all at once. This allows you to monitor stability and determine the point where your GPU starts to perform suboptimally.
8. Patience and Persistence: Overclocking can be a trial-and-error process. It requires patience and persistence to find the best possible overclock for your AMD GPU. Don’t be discouraged by initial failures or unstable settings; keep tweaking and testing until you achieve the desired results.
By following these preparation steps, you can ensure a safer and more successful overclocking experience for your AMD GPU. In the next section, we will explore the installation of GPU overclocking software.
Installing GPU Overclocking Software
To overclock your AMD GPU, you will need to install specialized overclocking software that allows you to modify the GPU’s core and memory clock speeds, as well as adjust other important settings. Here’s a step-by-step guide on installing GPU overclocking software:
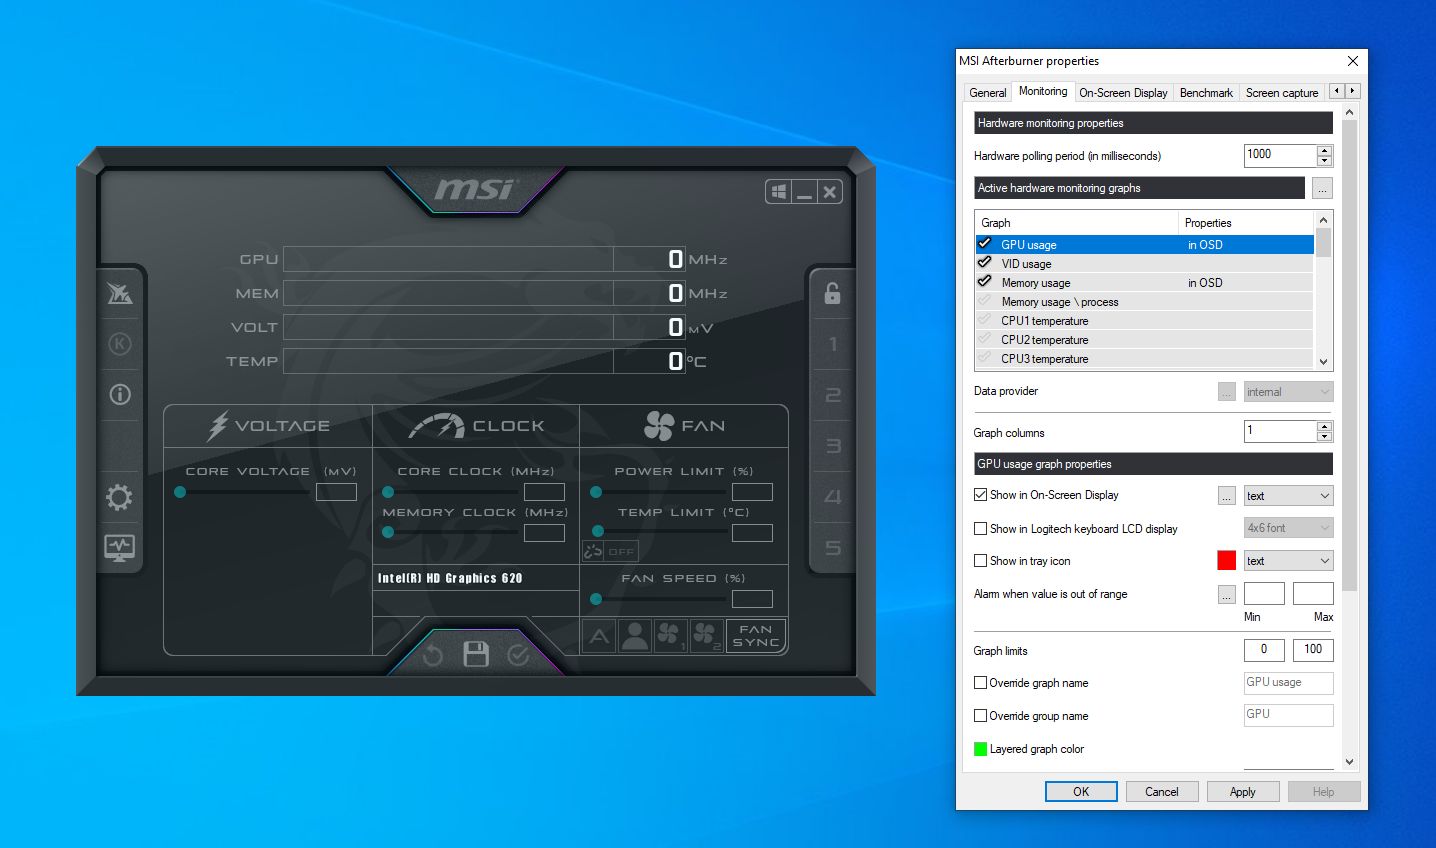
1. Research and Choose Reliable Software: Start by researching and choosing a reliable GPU overclocking software that is compatible with your AMD GPU. Popular options include MSI Afterburner, EVGA Precision X1, and AMD Radeon Software.
2. Download the Software: Visit the official website of the chosen software and locate the download page. Download the latest version of the software that is compatible with your operating system.
3. Run the Installer: Locate the downloaded file and run the installer. Follow the on-screen instructions to proceed with the installation process. Make sure to read and understand any prompts or options presented during the installation.
4. Customize Installation Settings (Optional): Some overclocking software allows you to customize the installation settings. If provided with the option, choose the desired installation location and any additional features or components you may need.
5. Complete the Installation: Once you have customized the installation settings (if applicable), proceed with the installation by clicking the “Install” or “Next” button. The software will then be installed on your system.
6. Launch the Software: After the installation is complete, locate the shortcut icon or browse through the Start menu to find the installed software. Double-click or select the software to launch it.
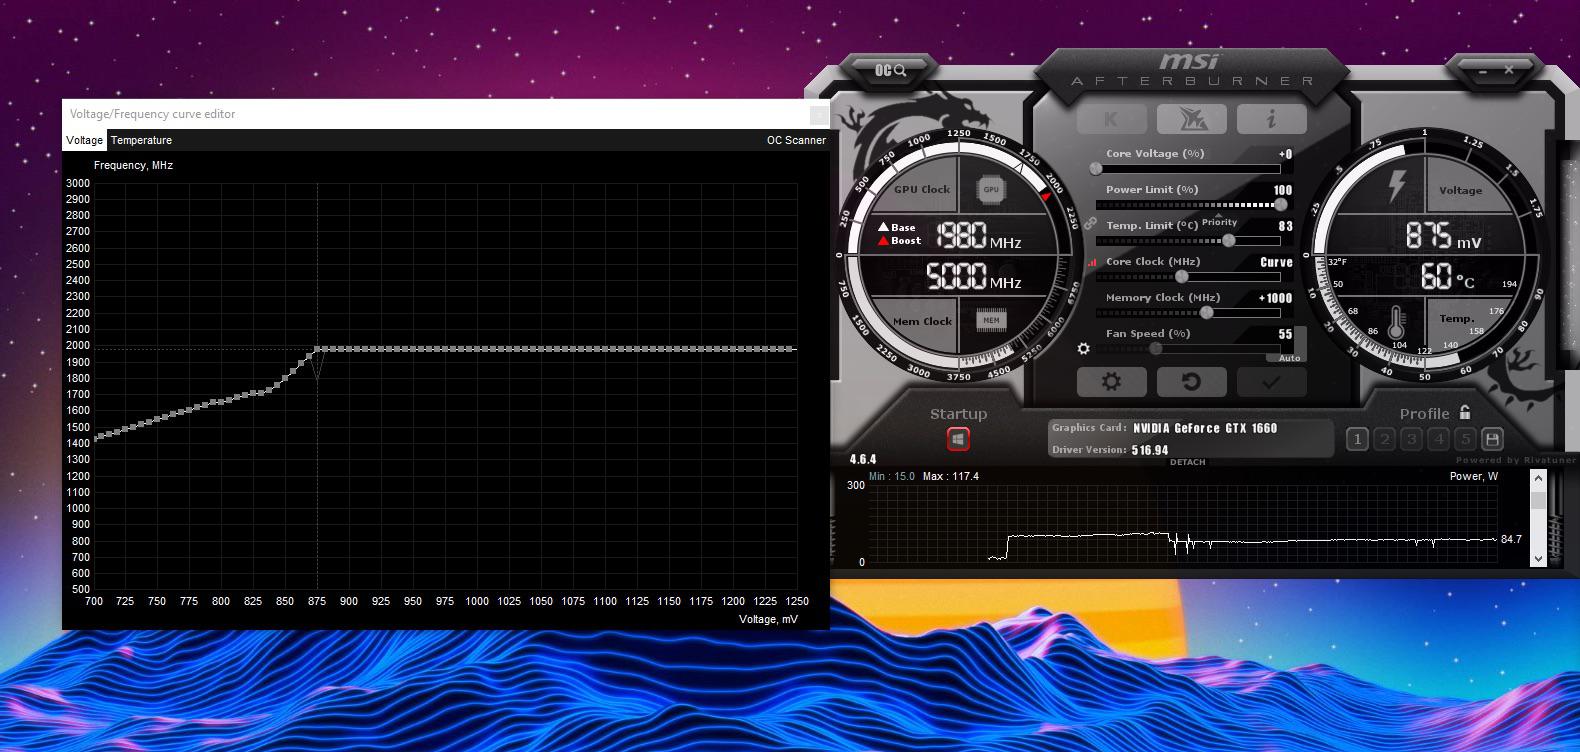
7. Familiarize Yourself with the Software Interface: Upon launching the overclocking software, take some time to explore and familiarize yourself with the user interface. Understand the various options and settings available, such as core clock, memory clock, voltage, fan speed, and power limit adjustments.
8. Ensure GPU Recognition: Verify that the overclocking software recognizes your AMD GPU. This can usually be confirmed by checking the software’s system information or hardware detection section. If your GPU is not detected, ensure that you have the latest drivers installed or seek support from the software’s official forum or customer support.
9. Backup Original GPU Settings: Before making any changes, it is recommended to save a backup of your GPU’s original settings within the overclocking software. This allows you to revert to the default settings if any issues arise during the overclocking process.
By following these steps, you can successfully install GPU overclocking software and be ready to begin adjusting the core and memory clock speeds of your AMD GPU. In the next section, we will dive into the details of understanding AMD GPU overclocking settings.
Understanding AMD GPU Overclocking Settings
Before you start adjusting the core and memory clock speeds of your AMD GPU, it is crucial to understand the various settings available to ensure a successful overclock. Here are some of the key settings you should be familiar with:
1. Core Clock: The core clock is the speed at which the GPU’s processor operates. Increasing the core clock can boost the overall performance of the GPU. However, pushing the core clock too high can lead to instability, increased heat, and decreased GPU lifespan.
2. Memory Clock: The memory clock refers to the speed at which the GPU’s memory operates. Similar to the core clock, increasing the memory clock can enhance performance. It is important to note that the memory clock has a significant impact on gaming performance, particularly in higher resolution and memory-intensive tasks.
3. Voltage: Adjusting the voltage can provide additional power to the GPU, allowing for higher clock speeds. However, increasing the voltage can also increase heat output and power consumption. It is crucial to find a balance between voltage and clock speeds to avoid overheating and stability issues.
4. Fan Speed: The fan speed setting controls the speed of the GPU’s cooling fans. Increasing fan speed can help dissipate heat more effectively, but it also results in more noise. Adjust the fan speed as necessary to maintain optimal temperature levels during overclocking.
5. Power Limit: The power limit setting controls the maximum power consumption of the GPU. Increasing the power limit allows for more stable clock speeds but can also result in higher energy consumption and heat output. Be mindful of your GPU’s power requirements and ensure your system’s power supply can handle the increased demand.
6. Temperature Monitoring: Most overclocking software provides temperature monitoring tools that allow you to keep track of your GPU’s temperature in real-time. It is crucial to monitor the temperature closely during overclocking to prevent overheating and ensure the stability of your settings.
7. Performance Monitoring: Additionally, overclocking software usually offers performance monitoring features that display information such as GPU usage, core clock speeds, memory clock speeds, and fan speeds. These monitoring tools can help you assess the impact of your overclocking settings on performance and stability.
8. Profiles and Saving Settings: Overclocking software often allows you to create profiles to save your preferred settings for different scenarios. This can be useful if you want to switch between different overclocking configurations depending on the task or game you are running.
Understanding these AMD GPU overclocking settings will empower you to make informed decisions when adjusting the clock speeds of your GPU. However, it is important to proceed with caution and make gradual adjustments while carefully monitoring the stability and temperature of your GPU. In the next section, we will discuss the initial steps to take before diving into the overclocking process.
Initial Steps for Overclocking
Before you begin the process of overclocking your AMD GPU, there are several initial steps you should take to ensure a smooth and successful overclocking experience. These steps will help you establish a stable baseline and gather important information for the overclocking process. Here are the initial steps to follow:
1. Check GPU Specifications: Start by checking the specifications of your AMD GPU, such as the default core clock, memory clock, and power limit. Understanding these baseline values will help you set realistic expectations and provide a starting point for your overclocking endeavor.
2. Update GPU Drivers: Make sure your GPU drivers are up to date. Updated drivers often include performance optimizations and stability fixes that can enhance your overclocking results. Visit the AMD website or use software like AMD Radeon Software to download and install the latest GPU drivers.
3. Reset to Default Settings: Reset your GPU settings to default values within the overclocking software. This ensures that you are starting with a clean slate and eliminates any potential conflicts or residue from previous settings or overclocking attempts.
4. Create a System Restore Point: Before proceeding with any overclocking adjustments, create a system restore point as a precautionary measure. This allows you to easily revert back to the previous system state in case your overclocking attempts lead to instability or other issues.
5. Monitor and Record Baseline Performance: Use benchmarking software to measure and record the performance of your GPU at its default settings. This will serve as a baseline reference for comparison when you start overclocking. It will help you gauge the effectiveness of your overclock and identify any performance gains achieved.
6. Familiarize Yourself with Stress Testing: Research and familiarize yourself with stress testing software. Stress tests are critical for assessing the stability of your overclocked GPU. Popular stress testing tools include FurMark, 3DMark, and Unigine Heaven. Understanding how to use these tools will ensure you can properly evaluate the stability of your overclock.
7. Prepare to Monitor Temperatures: Obtain temperature monitoring software or use the built-in monitoring features of your overclocking software to keep track of your GPU’s temperature during the overclocking process. Monitoring temperatures is vital to prevent overheating and ensure the long-term stability of your GPU.
8. Gather Knowledge and Resources: Take the time to gather additional knowledge and resources related to overclocking techniques specific to your AMD GPU model. Read articles, watch tutorials, and participate in forums dedicated to AMD GPU overclocking. This will equip you with valuable insights and help you avoid common pitfalls.
By following these initial steps, you’ll be well-prepared and equipped to start the overclocking process for your AMD GPU. These steps lay the foundation for a successful overclocking journey, allowing you to make informed decisions and maximize the performance potential of your GPU.
Adjusting Core Clock Speed
When overclocking an AMD GPU, one of the crucial settings to adjust is the core clock speed. Increasing the core clock speed can result in improved GPU performance and faster frame rates. However, it’s essential to approach this adjustment with caution to maintain stability and prevent overheating. Here’s a step-by-step guide on how to adjust the core clock speed:
1. Start with Small Adjustments: Begin by making small increments to the core clock speed. Increase the clock speed by a few MHz (megahertz) at a time. It’s important to take gradual steps to ensure stability and avoid overwhelming the GPU.
2. Stress Test and Observe: After adjusting the core clock speed, run a stress test using software like FurMark or 3DMark to evaluate stability and performance. Monitor the GPU temperature and observe for any signs of instability, artifacts, or crashes. If issues arise, reduce the core clock speed slightly.
3. Gradually Increase in Steps: If the initial adjustment passes the stress test without any issues, increase the core clock speed further in small increments. Repeat the stress testing process after each adjustment to assess stability and temperature levels. Continue this step until you find your desired balance between performance and stability.
4. Monitor Temperatures: While adjusting the core clock speed, carefully monitor the GPU temperature to ensure it remains within safe limits. If the temperature exceeds acceptable levels, it may indicate that the core clock speed adjustment is too aggressive. In such cases, consider reducing the clock speed or improving the cooling solution for your GPU.
5. Record Stable Core Clock Speed: Once you find a stable core clock speed that provides improved performance without compromising stability, make a note of this value. This will serve as the final core clock speed for your overclocked AMD GPU settings and can be used as a reference for future adjustments.
6. Test Real-World Performance: After finalizing the core clock speed adjustment, test your GPU’s performance in real-world scenarios such as gaming or rendering applications. Assess the impact on frame rates, load times, and overall smoothness. This will give you a practical understanding of the benefits achieved through the core clock speed adjustment.
7. Fine-Tune and Refine: Overclocking is an iterative process, and you may need to fine-tune the core clock speed further to achieve the best possible performance. Be prepared to repeat the adjustments, stress testing, and monitoring process to achieve your optimum overclocking configuration.
Remember, every GPU is unique, and the maximum stable core clock speed achievable may vary. It’s crucial to proceed with caution during the adjustment process and take the time to monitor and test for stability at each step. By methodically adjusting the core clock speed, you can unleash the full potential of your AMD GPU and enjoy improved performance in your applications and games.
Tweaking Memory Clock Speed
Another important setting to adjust when overclocking an AMD GPU is the memory clock speed. Tweaking the memory clock speed can have a significant impact on GPU performance, particularly in memory-intensive tasks and higher resolutions. However, it’s crucial to proceed cautiously to maintain stability and prevent potential issues. Here’s a step-by-step guide on how to tweak the memory clock speed:
1. Begin with Small Increments: Start by making small increments to the memory clock speed. Increase the clock speed by a few MHz at a time to ensure stability. Taking gradual steps allows you to assess the impact of each adjustment more accurately.
2. Stress Test and Monitor: After adjusting the memory clock speed, run a stress test using software like FurMark or 3DMark to evaluate stability and performance. Monitor the GPU temperature and keep an eye out for any signs of instability, artifacts, or crashes. If issues arise, decrease the memory clock speed accordingly.
3. Observe Real-world Performance: Alongside stress testing, it’s important to observe the real-world performance of your GPU in applications, games, or rendering tasks. Pay attention to factors like frame rates, loading times, and overall smoothness. This will provide insight into the impact of the memory clock speed adjustment on practical performance.
4. Increase Incrementally: If the initial memory clock speed adjustment passes stress testing and real-world performance observations without issues, you can proceed to increase the clock speed further in small increments. Remember to stress test and monitor the GPU temperature after each adjustment.
5. Monitor and Control Temperature: When tweaking the memory clock speed, it’s crucial to closely monitor the GPU temperature. Higher memory clock speeds generate more heat, so ensure that your GPU stays within safe temperature limits. Consider enhancing your cooling solution if necessary to prevent overheating and maintain stability.
6. Refine and Optimize: Overclocking is an iterative process, and optimizing the memory clock speed requires experimentation and fine-tuning. Keep repeating the adjustment, stress testing, and monitoring cycle to find the most stable and optimal memory clock speed for your AMD GPU.
7. Document Stable Memory Clock Speed: Once you determine a stable and satisfactory memory clock speed, make a note of this value for future reference. This recorded stable memory clock speed will serve as a reference point or baseline for your overclocked settings.
8. Balance Core Clock and Memory Clock: Optimizing the memory clock speed should be done in harmony with the core clock speed adjustments. Fine-tune both settings to find the best balance that maximizes performance while maintaining stability and a safe operating temperature.
Remember that every GPU has unique capabilities, and the maximum stable memory clock speed achievable can vary. Proceed cautiously and take the necessary time to monitor and test for stability at each step. By optimizing the memory clock speed, you can unlock the full potential of your AMD GPU and experience improved performance in memory-intensive tasks and higher resolutions.
Monitoring and Stress Testing your Overclock
When overclocking your AMD GPU, it’s crucial to monitor its performance and stress test it to ensure stability and reliability. Monitoring and stress testing allow you to assess the effectiveness of your overclocking settings and identify any potential issues. Here’s a step-by-step guide on how to monitor and stress test your overclock:
1. Use Monitoring Software: Install GPU monitoring software, such as GPU-Z or HWMonitor, to keep track of key metrics like temperature, clock speeds, fan speed, and GPU usage. Monitoring software provides real-time information about your GPU’s performance and helps you identify any abnormalities or excessive heat.
2. Monitor GPU Temperatures: Pay close attention to your GPU’s temperature while stress testing. High temperatures can indicate inadequate cooling or an unstable overclock. Ensure that temperatures stay within safe limits by monitoring and adjusting fan speeds or investing in additional cooling solutions if necessary.
3. Conduct Stress Tests: Use stress testing software like FurMark, MSI Kombustor, or 3DMark to put your overclocked GPU under heavy load. These tests simulate demanding scenarios and push the GPU to its limits, helping you identify any stability issues or artifacts. Run the stress test for an extended period to ensure that the GPU can sustain optimal performance over time.
4. Observe Stability during Stress Tests: During stress tests, keep a close eye on your GPU’s performance and monitor for signs of instability. This includes visual artifacts, system crashes, or abnormal heat levels. If any issues arise, it may indicate that your overclocked settings are too aggressive or that additional adjustments need to be made.
5. Record Stress Test Results: Maintain a record of the stress test results, noting any observations or issues encountered. This documentation will help you track the performance and stability of your overclock over time and assist in troubleshooting any potential problems that arise in the future.
6. Gradual Adjustments: If stability issues arise during stress testing, you may need to make adjustments to your overclocked settings. This could involve dialing back clock speeds, modifying voltage settings, or refining other parameters. Gradually fine-tune your overclock based on the stress test results to find the balance between performance and stability.
7. Continued Monitoring: After stress testing and adjustments, continue monitoring your GPU’s performance during regular usage. Monitor temperatures, clock speeds, and overall system stability to ensure that your overclock remains stable and reliable in real-world scenarios and intensive applications.
Regular monitoring and stress testing are essential to maintain the stability and longevity of your overclocked AMD GPU. By staying vigilant and addressing any issues that arise, you can optimize your GPU’s performance while keeping it within safe operating parameters.
Safe Overclocking Practices
While overclocking can offer noticeable performance improvements for your AMD GPU, it’s crucial to follow safe practices to ensure the longevity and stability of your hardware. Here are some safe overclocking practices to keep in mind:
1. Understand Your Limits: Familiarize yourself with the specifications and limitations of your AMD GPU. Each GPU has a different overclocking potential, and it’s essential to know the maximum values for core clock, memory clock, and voltage to avoid pushing your hardware beyond its capabilities.
2. Take Small Incremental Steps: When adjusting clock speeds or voltage, make small increments to avoid sudden and drastic changes. Gradual adjustments allow you to monitor the impact on stability and temperatures, reducing the risk of damaging your GPU due to extreme overclocking.
3. Monitor Temperatures: Keep a close eye on your GPU’s temperature during the overclocking process. High temperatures can lead to instability, reduced lifespan, or even total failure. Use monitoring software to continuously track temperature levels and adjust cooling solutions if necessary.
4. Use Reliable and Tested Software: Stick to reputable and reliable overclocking software provided by AMD or trusted third-party sources. These tools are designed to help you safely modify clock speeds, voltage, and other settings without causing harm to your GPU.
5. Save and Backup Original Settings: Before making any changes, save a backup of your GPU’s original settings within the overclocking software. This will allow you to easily revert to the default settings if your overclock becomes unstable or causes issues. It’s always good practice to have a reference point to restore to if needed.
6. Stress Test for Stability: Utilize stress testing software to verify the stability and performance of your overclocked settings. Stress tests simulate demanding scenarios and allow you to assess whether your GPU can handle the increased clock speeds under prolonged load. This helps identify any instability or overheating issues.
7. Be Mindful of Power Consumption: Overclocking can increase power consumption, potentially putting additional strain on your power supply. Ensure that your power supply unit (PSU) is capable of delivering sufficient and stable power to your overclocked GPU to avoid any power-related issues.
8. Properly Ventilate and Cool Your System: Effective cooling is crucial when overclocking. Ensure that your system has adequate airflow, including proper case ventilation and cooling solutions for both the CPU and GPU. Consider additional cooling options such as aftermarket fans or liquid cooling if necessary.
9. Know When to Stop: It’s crucial to recognize when to stop pushing your GPU. If you reach a point where adjustments lead to diminishing returns or significant instability, it may be best to revert to lower clock speeds or consider other optimization methods.
10. Proceed with Caution: Always remember that overclocking voids the warranty of your GPU. Proceed with caution and understand the risks involved. When overclocking, you assume responsibility for any potential damage that may occur.
By following these safe overclocking practices, you can optimize the performance of your AMD GPU while minimizing the risk of damaging your hardware. Overclocking is a balance between pushing the limits and maintaining stability, and taking the necessary precautions will help you achieve the desired performance enhancements while keeping your GPU safe and reliable.
Troubleshooting Common Issues
When overclocking your AMD GPU, you may encounter common issues that can affect stability or performance. It’s important to be aware of these issues and know how to troubleshoot them effectively. Here are some common issues you may encounter while overclocking your AMD GPU and their possible solutions:
1. System Instability: If you experience system crashes, freezes, or blue screens of death (BSOD) after overclocking, it may indicate an unstable overclock. To troubleshoot, revert to the default clock speeds or reduce the overclock settings and stress test again to determine the stable limits of your GPU.
2. Artifacts or Visual Glitches: Artifacts are graphical anomalies that can appear on the screen, such as flickering, pixelation, or distortion. If you notice artifacts during stress testing or while using GPU-intensive applications, it may indicate an unstable overclock. Reduce the memory or core clock speeds until the artifacts disappear.
3. Excessive Heat: Overclocking can generate additional heat, potentially leading to high GPU temperatures. Ensure that your cooling system, including fans, heatsinks, and thermal paste, is functioning properly and appropriately sized for your overclock. Consider increasing fan speeds, improving case airflow, or upgrading your cooling solution to manage heat effectively.
4. Power Limit Exceeds: If you encounter power-related issues, such as system shutdowns or instability, it may indicate that the power limit is being exceeded. Reduce your overclock settings or adjust the power limit within the overclocking software to ensure that your GPU operates within its power delivery capabilities.
5. Driver Instability: Overclocking may sometimes cause conflicts with GPU drivers, resulting in crashes or instability. Ensure that you have the latest drivers installed from the official AMD website and consider using Display Driver Uninstaller (DDU) to clean uninstall previous drivers before installing new ones.
6. Incompatibility with Applications or Games: Some applications or games may not function properly with an overclocked GPU due to variations in programming and optimization. If you encounter issues with specific applications, try reducing the overclock settings or creating a separate profile in the overclocking software specifically for those applications.
7. Insufficient Cooling: If you consistently experience overheating or unstable overclocking even with proper adjustments, it may indicate that your cooling solution is inadequate. Consider upgrading to a more powerful cooling solution or adjusting fan speeds to effectively dissipate heat generated during overclocking.
8. Hardware Degradation: Over time, excessive overclocking or high voltage settings can potentially degrade the lifespan of your GPU. If you notice performance degradation or instability after extended periods of overclocking, consider reducing the overclock settings to ensure long-term reliability.
9. BIOS or Firmware Issues: Firmware or BIOS updates from the GPU manufacturer may sometimes affect overclocking stability. Ensure that you have the latest BIOS version for your graphics card and consider reverting to a previous version if necessary to resolve any compatibility or stability issues.
10. Consult Support and Community: If you encounter persistent issues or require additional guidance, reach out to the manufacturer’s support channels or participate in online communities dedicated to GPU overclocking. They can provide valuable insights, tips, and solutions based on their experiences.
Remember to approach troubleshooting with patience and a methodical mindset. The key is to systematically identify and adjust the problematic settings until you achieve a stable and reliable overclock for your AMD GPU.
Final Thoughts and Closing Remarks
Overclocking an AMD GPU can be an exhilarating experience, allowing you to squeeze extra performance out of your hardware. However, it is crucial to approach overclocking with caution, following safe practices and closely monitoring your GPU’s performance to ensure stability and longevity.
Throughout this guide, we have explored various aspects of overclocking an AMD GPU, from understanding the basics of overclocking to adjusting core and memory clock speeds, monitoring, and stress testing. By following these steps and adhering to safe practices, you can optimize your GPU’s performance and enjoy improved gaming experiences and graphics rendering capabilities.
Remember that every GPU is unique, and the overclocking potential can vary. It is essential to find the right balance between performance gains and stability for your specific GPU model. Patience, persistence, and thorough monitoring will help you achieve the best results without compromising the safety of your hardware.
Lastly, it is important to acknowledge the potential risks associated with overclocking as it voids the warranty of your GPU and can lead to hardware damage if not performed correctly. Proceed with caution and take responsibility for your actions when overclocking your AMD GPU.
With the knowledge and understanding gained from this guide, along with additional research and experimentation, you are well-equipped to embark on your overclocking journey. Maximize the potential of your AMD GPU and enjoy a performance boost that enhances your gaming and graphics-intensive activities.
Happy overclocking!