Understanding CPU Performance
The CPU (Central Processing Unit) is often referred to as the “brain” of a computer. It performs calculations and executes instructions, allowing the computer to carry out various tasks. Understanding how CPU performance works is essential for optimizing your computer’s overall speed and responsiveness.
CPU performance can be measured in terms of clock speed, number of cores, cache size, and architecture. Clock speed, measured in gigahertz (GHz), determines how many instructions the CPU can process per second. Generally, a higher clock speed means better performance, but it is not the only factor to consider.
The number of cores determines how many tasks the CPU can handle simultaneously. A CPU with multiple cores can execute multiple instructions concurrently, leading to improved multitasking capabilities. Additionally, having a larger cache size allows the CPU to store frequently accessed data, reducing the need to fetch it from slower memory sources.
Another aspect to consider is the CPU architecture, such as Intel’s x86 and AMD’s Ryzen. Different architectures have varying instruction sets and optimizations, affecting the CPU’s performance in specific tasks. Researching the specific architecture of your CPU can help you understand its strengths and limitations.
To monitor your CPU performance, you can use various tools like Task Manager on Windows or Activity Monitor on Mac. These utilities provide real-time information on CPU usage, including individual core utilization and temperature. By monitoring the CPU usage, you can identify if your computer is experiencing high CPU loads or bottlenecks that may be impacting performance.
Understanding the basics of CPU performance is crucial for troubleshooting and improving the overall speed of your computer. By being aware of clock speed, number of cores, cache size, and architecture, you can make informed decisions about optimizing your CPU’s performance.
Monitoring CPU Usage
Monitoring CPU usage is an essential step in identifying potential bottlenecks and optimizing performance. By keeping track of how your CPU is being utilized, you can pinpoint processes or applications that are hogging system resources and causing slowdowns. Here are some methods you can use to monitor CPU usage:
- Task Manager or Activity Monitor: Both Windows and Mac operating systems come equipped with built-in system monitors that display CPU usage statistics. Access the Task Manager on Windows by pressing Ctrl + Shift + Esc, and the Activity Monitor on Mac by navigating to Applications > Utilities > Activity Monitor. These tools provide real-time information on CPU usage, showing which processes are using the most resources.
- Third-party Performance Monitoring Software: There are various third-party software options available that provide more advanced CPU monitoring capabilities. Programs like HWMonitor, Core Temp, and NZXT CAM offer detailed insights into CPU temperature, clock speed, and core utilization. These tools can help you track performance over time and identify any unusual patterns or spikes in CPU usage.
- Command Line Tools: For users comfortable with command-line interfaces, there are command-line tools available for monitoring CPU usage. On Windows, you can use tools like WMIC (Windows Management Instrumentation Command-line) or PowerShell to gather system information, including CPU usage. On Mac and Linux, the “top” command provides real-time CPU utilization information.
- Resource Monitor: Windows users can access the Resource Monitor utility, which provides a more detailed view of CPU usage. To open the Resource Monitor, press the Windows key, type “Resource Monitor,” and select it from the search results. The Resource Monitor offers an in-depth analysis of CPU usage, including per-process CPU usage and an overview of resource-consuming applications.
Regularly monitoring CPU usage can help you identify any potential performance issues and resource bottlenecks. By analyzing the data provided by monitoring tools, you can optimize your system by closing unnecessary background processes, updating or replacing hardware, or adjusting power settings to ensure efficient CPU utilization.
Identifying Bottlenecks
Bottlenecks occur when a component or process becomes a limiting factor in the overall performance of your computer system. Identifying these bottlenecks is crucial for optimizing CPU performance and improving the overall speed and responsiveness of your system. Here are some common bottleneck scenarios and methods to identify them:
- CPU Usage: High CPU usage is a common bottleneck, causing system slowdowns and unresponsiveness. Monitoring CPU usage using tools like Task Manager or Activity Monitor can help you identify processes or applications that are consuming excessive CPU resources. If you notice consistently high CPU usage even during normal tasks, it may be necessary to optimize or upgrade your CPU.
- Memory: Insufficient memory (RAM) can also lead to performance bottlenecks. If your system frequently uses swap space or experiences excessive page file usage, it indicates that your computer is relying on slower storage devices instead of faster RAM. You can monitor memory usage using task manager tools and consider upgrading your RAM if you consistently max out your available memory.
- Storage: Slow storage devices, such as traditional hard drives (HDD) instead of solid-state drives (SSD), can become a bottleneck, resulting in longer load times for applications and files. Monitoring disk usage and response times can help you identify if your storage is causing performance limitations. Consider upgrading to an SSD or using techniques like disk cleanup and defragmentation to optimize storage performance.
- Network: If you frequently perform tasks that require network connectivity, a slow or unstable network connection can cause performance bottlenecks. Measure network performance using tools like speed tests or network monitoring software to identify any network-related issues. Upgrading your network equipment or optimizing network settings can help alleviate these bottlenecks.
Identifying bottlenecks requires a systematic approach, taking into account multiple factors that can impact overall system performance. By monitoring CPU usage, memory, storage, and network performance, you can pinpoint the areas that are causing bottlenecks and prioritize your optimization efforts accordingly. Addressing these bottlenecks through hardware upgrades, software optimization, or network adjustments can greatly improve the overall performance of your system.
Optimizing CPU Performance
Optimizing CPU performance is crucial for ensuring efficient and smooth operation of your computer. By following these tips, you can maximize the capabilities of your CPU and enhance overall system responsiveness:
- Keep Your System Updated: Regularly update your operating system, drivers, and software to ensure compatibility and performance improvements. Manufacturers often release updates that include bug fixes, security patches, and optimizations for CPU utilization.
- Manage Startup Programs: Limit the number of programs that launch at startup. Excessive startup programs can consume CPU resources and slow down the boot time. Use the Task Manager or System Configuration (Windows) or the Login Items section in System Preferences (Mac) to manage startup programs.
- Close Unnecessary Background Processes: Identify and close any unnecessary background processes that are using CPU resources. Task Manager (Windows) or Activity Monitor (Mac) can help you identify these processes. Be cautious when ending processes to avoid terminating essential system functions.
- Optimize Power Settings: Adjusting power settings can have a significant impact on CPU performance. Note that high-performance power settings may lead to increased power consumption, resulting in reduced battery life for laptops. Access power settings through Control Panel (Windows) or System Preferences (Mac).
- Use Performance-Enhancing Software: Consider installing software designed to optimize CPU performance. Tools like CCleaner, Advanced SystemCare, or CleanMyPC (Windows) can help clean up temporary files, optimize system settings, and improve overall performance.
- Upgrade Hardware: If your CPU is outdated or struggling to handle modern software and applications, it may be time to upgrade your hardware. Research compatible and higher-performing processors that suit your needs. Consult with a professional or refer to your device’s documentation for specific upgrade instructions.
- Monitor CPU Temperature: Overheating can lead to throttling and decreased CPU performance. Use monitoring software to keep an eye on your CPU temperature. If temperatures are consistently high, consider cleaning the CPU cooling system, applying new thermal paste, or upgrading your cooling solution.
By implementing these optimization techniques, you can enhance CPU performance, resulting in quicker response times, smoother multitasking, and increased overall efficiency. Experiment with different adjustments to find the optimal balance between performance and power consumption for your specific needs.
Updating Drivers and Software
Keeping your drivers and software up to date is essential for optimal CPU performance. Outdated drivers and software can cause compatibility issues, performance bottlenecks, and system instability. Here are some important considerations when it comes to updating drivers and software:
- Device Drivers: Device drivers act as intermediaries between your hardware devices and the operating system. It is crucial to regularly update drivers, especially for critical components like the graphics card, network adapter, and chipset. Visit the manufacturer’s website or use driver update software to ensure you have the latest drivers installed.
- Operating System Updates: Operating system updates often include performance improvements, stability fixes, and security patches. Regularly check for updates and install them to optimize CPU performance. Enable automatic updates for your operating system to ensure you stay up to date.
- Software updates: Applications and software programs frequently release updates to enhance performance, fix bugs, and add new features. These updates may include optimizations specifically targeting CPU utilization. It is advisable to enable automatic updates for your software or periodically check for updates and install them manually.
- BIOS/UEFI Updates: The Basic Input/Output System (BIOS) or the Unified Extensible Firmware Interface (UEFI) is responsible for initializing hardware components during the boot process. Manufacturers often release updates that improve compatibility, stability, and performance. Check your motherboard manufacturer’s website for BIOS/UEFI updates and follow their instructions to update the firmware.
- Firmware Updates: Some hardware devices, such as solid-state drives (SSDs), have firmware that can be updated. Firmware updates can deliver improved performance, compatibility, and stability. Visit the manufacturer’s website or use their specific software tools to check for and apply firmware updates.
By regularly updating your drivers and software, you ensure that your CPU can take advantage of the latest optimizations and bug fixes. This can result in improved performance, enhanced stability, and better compatibility with the latest applications and games. Remember to create backups and follow manufacturer instructions when updating firmware or performing BIOS/UEFI updates to minimize the risk of data loss or system damage.
Managing Multitasking
Multitasking is a common practice that allows you to work on multiple tasks simultaneously. However, inefficient multitasking can strain your CPU and impact overall performance. By managing multitasking effectively, you can optimize CPU usage and improve system responsiveness. Here are some tips for managing multitasking efficiently:
- Prioritize Tasks: Identify the most critical tasks that require high CPU usage or are time-sensitive. Prioritize these tasks and focus on completing them one at a time to avoid unnecessary strain on your CPU and ensure better performance.
- Close Unnecessary Applications: When multitasking, it’s common to have numerous applications running simultaneously. However, keeping too many applications open can consume CPU resources. Close any unnecessary applications to free up CPU resources for the tasks at hand.
- Use Task Manager or Activity Monitor: Task Manager (Windows) or Activity Monitor (Mac) can provide insights into CPU usage by different applications and processes. Monitor CPU usage and identify resource-intensive applications that may be hindering performance. Consider closing or minimizing these applications when not in use.
- Utilize Virtual Desktops: Take advantage of virtual desktops, a feature available on most operating systems. Virtual desktops allow you to separate tasks and applications into different desktop environments, reducing clutter and helping you focus on specific tasks without the distraction of unrelated applications.
- Use Resource-Light Applications: Opt for lightweight applications that have minimal impact on CPU usage. For example, choose lightweight web browsers, text editors, or office suites that don’t overload your CPU when running in the background.
- Manage Browser Tabs: Web browsers can consume a significant amount of CPU resources, especially when running multiple tabs simultaneously. Keep the number of open tabs to a minimum, close unused tabs, and consider using extensions or plugins that unload background tabs to optimize CPU usage.
- Consider Upgrading Hardware: If you frequently engage in resource-intensive multitasking, upgrading your hardware may be necessary. Investing in a CPU with more cores and higher clock speeds, along with additional RAM, can significantly enhance multitasking capabilities.
Efficiently managing multitasking is essential for optimizing CPU performance and ensuring a smooth user experience. By prioritizing tasks, closing unnecessary applications, utilizing virtual desktops, and choosing resource-light applications, you can make the most of your CPU resources and achieve better overall system performance.
Adjusting Power Settings
Adjusting power settings can have a significant impact on CPU performance and overall system efficiency. By tweaking power settings, you can optimize how your CPU utilizes its resources, allowing for better performance and longer battery life for laptops. Here are some tips for adjusting power settings effectively:
- Power Plans: Operating systems offer predefined power plans that determine various settings related to CPU performance and power usage. Choose a power plan that aligns with your needs. For example, the “High Performance” plan prioritizes performance but consumes more power, while the “Power Saver” plan conserves power but may reduce CPU performance.
- Processor Power Management: Within power plan options, you can adjust specific processor power management settings. For example, you can modify the minimum and maximum processor state, which determines the level of CPU performance when running on battery or plugged into a power source.
- System Cooling Policy: Some power plans offer settings related to the system’s cooling policy. You can specify whether to prioritize performance or power savings. Choosing the “Active” or “Aggressive” cooling policy can prevent the CPU from overheating and protect performance, but it may result in increased fan noise.
- Turn Off Background Processes: Adjust power settings to minimize background activity when your computer is idle. Enabling options like “Put the computer to sleep” or “Turn off the display” can reduce the strain on the CPU while saving power.
- Customize Power Settings: If the predefined power plans do not meet your specific requirements, you can customize power settings to fine-tune CPU performance and power consumption. This allows you to activate individual power-saving options while maintaining control over the CPU’s maximum performance when needed.
Optimizing power settings can have a noticeable impact on CPU performance and overall system efficiency. By selecting the appropriate power plan, adjusting processor power management, customizing power settings, and managing background processes, you can strike the right balance between performance and power consumption for your specific needs. Regularly assess and adjust power settings based on your usage patterns to ensure optimal CPU performance and extended battery life for laptops.
Cleaning and Cooling the CPU
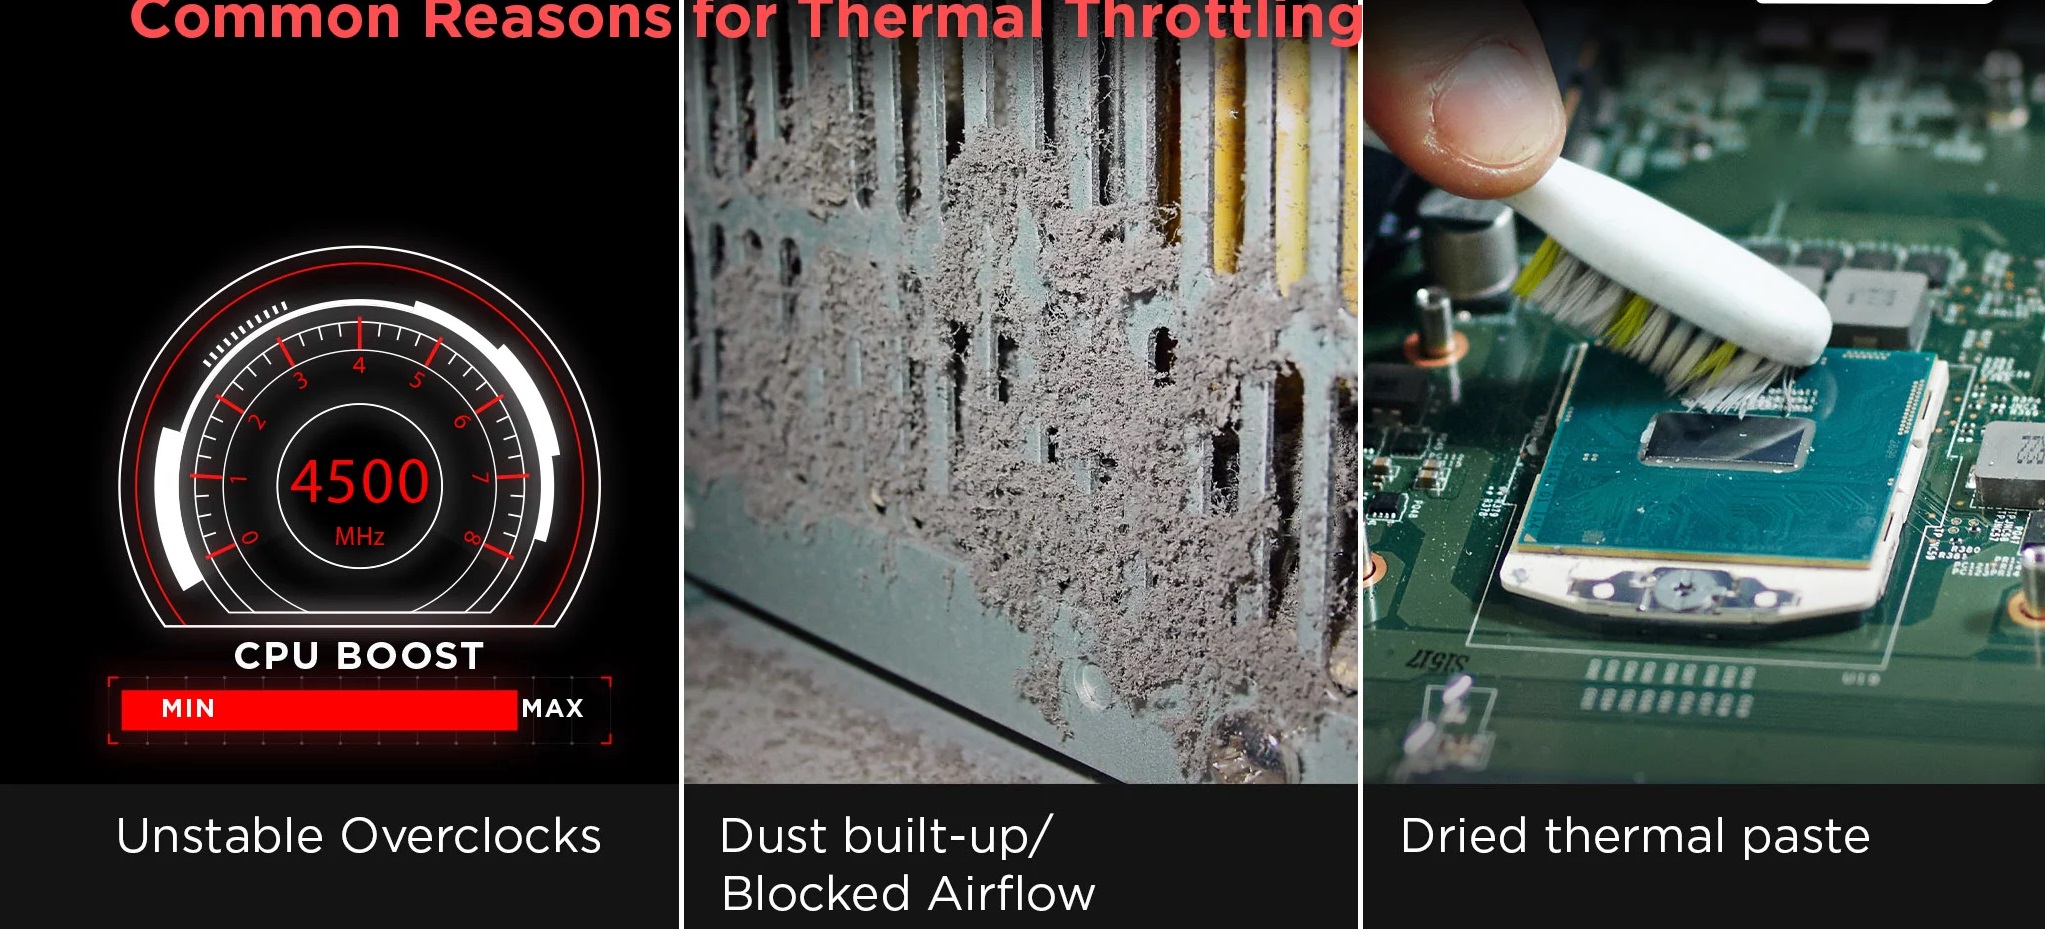
Maintaining clean and efficient cooling for your CPU is vital for optimal performance and longevity. Over time, dust and other debris can accumulate on the CPU cooler and within the computer case, hindering airflow and causing the CPU to overheat. Here are some tips for cleaning and cooling your CPU:
- Remove Dust and Debris: Use compressed air or a soft brush to carefully remove dust and debris from the CPU heatsink, fan blades, and surrounding components. Take caution not to damage any delicate parts while cleaning. It’s recommended to perform this cleaning routine periodically, every few months or when the system becomes noticeably dusty.
- Clean or Replace CPU Thermal Paste: The thermal paste between the CPU and heatsink plays a crucial role in transferring heat. Over time, the thermal paste may dry out or become less effective. Clean off the old thermal paste using isopropyl alcohol and apply a fresh layer before reseating the heatsink. This will ensure optimal heat dissipation from the CPU.
- Ensure Proper Airflow: Adequate airflow is essential for cooling the CPU. Ensure that all fans in the case are functioning correctly and positioned to facilitate optimal airflow. Remove any obstructions that may impede the intake or exhaust of air, such as cables, dust filters, or objects blocking fan vents.
- Consider Upgrading Cooling Solution: If you find that your CPU temperatures are consistently high, despite proper cleaning and airflow management, consider upgrading your cooling solution. Aftermarket CPU coolers or liquid cooling systems can provide more efficient heat dissipation and help maintain lower CPU temperatures, especially during demanding tasks or overclocking.
- Monitor CPU Temperatures: Use temperature monitoring software to keep track of your CPU temperatures. High CPU temperatures can lead to performance throttling and reduced lifespan. By monitoring temperatures, you can quickly identify any cooling issues or potential overheating problems and take appropriate action.
- Ensure Proper Case Ventilation: Ensure that your computer case has proper ventilation to dissipate heat effectively. Consider installing additional case fans, if possible, and make sure that airflow is directed towards the CPU and other critical components. Using dust filters on intake fans can also help prevent dust accumulation and maintain a cleaner environment for the CPU.
Effective cleaning and cooling of the CPU are essential for maintaining optimal performance and extending the lifespan of your computer. By periodically removing dust, applying fresh thermal paste, ensuring proper airflow, and considering upgraded cooling solutions when necessary, you can keep your CPU operating at its best, even during intensive tasks or prolonged usage.
Overclocking the CPU
Overclocking the CPU involves increasing its operating frequency beyond the manufacturer’s specified limits. This can result in improved performance and faster processing speeds. However, overclocking should be approached with caution as it may void warranties, generate excessive heat, and potentially lead to instability or damage if not done correctly. Here are some important factors to consider when overclocking your CPU:
- CPU Capability: Not all CPUs are created equal and have the same overclocking potential. Some CPUs are more overclock-friendly than others due to factors like architecture, quality of silicon, and power delivery capabilities. Thoroughly research your specific CPU model to determine its overclocking potential.
- Overclocking Tools: Most motherboards provide overclocking tools within the BIOS (Basic Input/Output System) or UEFI (Unified Extensible Firmware Interface). These tools allow users to adjust CPU settings, such as clock speed, voltage, and multiplier, to achieve desired overclocking results. Familiarize yourself with the settings and features of your motherboard’s overclocking tools.
- CPU Cooling: Overclocking increases the CPU’s power consumption and generates more heat. Adequate cooling is essential to prevent thermal throttling and potential damage. Ensure that you have a robust cooling solution, such as an aftermarket CPU cooler or liquid cooling system, to maintain stable temperatures under overclocked conditions.
- Stability Testing: After overclocking, it is essential to stress test your CPU to ensure its stability. Stress testing tools such as Prime95 or AIDA64 can simulate heavy CPU workloads to verify stability and check for errors or crashes. Run these tests for an extended period to ensure that your overclocked CPU can handle sustained loads without issues.
- Gradual Approach: Overclocking should be done gradually. Incrementally increase settings such as clock speed or voltage and test stability after each adjustment. This approach allows you to find the optimal balance between performance and stability while minimizing the risk of damage or instability.
- Monitor Temps and Voltages: Keep a close eye on CPU temperatures and voltages during overclocking. Excessive temperatures or voltages can lead to system instability or damage. Use monitoring software to track these values and ensure they remain within safe limits even under heavy overclocked loads.
- Manage Expectations: Overclocking results can vary, and not all CPUs will achieve the same level of overclocking. It’s crucial to manage your expectations and be aware that the extent of your CPU’s overclocking potential will depend on various factors. Understand that the gains from overclocking might not always be significant and may not justify the risks involved.
Overclocking the CPU can provide a performance boost for certain tasks and applications. However, it should only be undertaken by experienced users who understand the implications and risks involved. Careful research, proper cooling, stress testing, and monitoring are essential to ensure a stable and successful overclocking experience.
Upgrading the CPU
Upgrading the CPU can significantly improve the performance of your computer, especially if you have an older or lower-performing processor. A CPU upgrade involves replacing your existing processor with a newer and more powerful model that is compatible with your motherboard. Here are some important considerations when upgrading the CPU:
- Compatibility: Ensure that the new CPU is compatible with your motherboard. Research the specifications and socket type of your motherboard to determine which CPUs are supported. Check the manufacturer’s website or user manual for compatibility lists or use online tools that can determine the compatibility between the CPU and motherboard.
- Performance Gains: Understanding your specific performance needs will help you choose the right CPU. Consider the tasks you primarily use your computer for, such as gaming, video editing, or office productivity. Research CPUs with the necessary features and specifications to meet your performance requirements.
- Budget: Set a budget for your CPU upgrade and explore options within that range. Prices can vary significantly depending on the performance level and brand of the CPU. It’s important to strike a balance between performance and cost-effectiveness for your specific needs.
- Power Supply: Ensure that your power supply can handle the increased power requirements of the new CPU. Upgrading to a more powerful CPU may necessitate upgrading your power supply to provide adequate power to all components of your system.
- Cooling: Consider the cooling requirements of the new CPU. More powerful CPUs generate more heat, and you may need an upgraded cooling solution, such as an aftermarket CPU cooler or liquid cooling system, to keep temperatures in check for optimal performance and longevity.
- Installation: Installing a new CPU requires careful handling to avoid damaging the delicate pins or sockets. Refer to the manufacturer’s instructions or seek professional assistance if you are not comfortable with the installation process. It’s crucial to apply thermal paste correctly and ensure that the CPU is securely seated in the socket.
- BIOS Update: Depending on the compatibility between your motherboard and the new CPU, you may need to update your motherboard’s BIOS or UEFI to support the upgraded processor. Check the motherboard manufacturer’s website for BIOS updates and follow their instructions for the update process.
Upgrading the CPU can breathe new life into your computer and improve its performance significantly. However, it’s important to carefully research compatibility, consider performance needs and budget, evaluate power supply and cooling requirements, and follow proper installation procedures. By following these steps, you can ensure a successful CPU upgrade and enjoy enhanced performance in your computer system.