Introduction
The Samsung Galaxy A21 is a popular smartphone known for its sleek design and advanced features. However, there may come a time when you need to open up your Galaxy A21 to perform repairs or access the internal components. Whether you want to replace a faulty battery or upgrade the memory, opening your phone correctly is crucial to avoid causing any damage.
In this guide, we will walk you through the step-by-step process of opening a Samsung Galaxy A21 phone. You don’t need to be a tech expert to perform these tasks, but it does require some basic tools and careful handling. By following our instructions, you’ll be able to safely open your phone and gain access to its internal components.
Before we proceed, it’s essential to note that opening your phone may void the warranty. Therefore, if your phone is still covered by warranty, it’s recommended to take it to an authorized service center for any repairs or maintenance. However, if you’re confident in your ability to handle the task, let’s get started on opening the Samsung Galaxy A21!
Tools Needed
Before you begin opening your Samsung Galaxy A21, make sure you have the following tools ready:
- Small Phillips screwdriver: This tool will be required to remove the screws holding the back cover and internal components in place.
- Plastic prying tool: To safely pry open the back cover without causing any damage, it’s recommended to use a plastic opening tool.
- Tweezers: Tweezers will come in handy for disconnecting ribbon cables and handling small components.
- Anti-static wrist strap: While not essential, an anti-static wrist strap will help prevent any static discharge that could potentially damage delicate electronic components.
- Patience: Opening a phone can be a delicate and time-consuming process, so it’s important to have patience and take your time.
It’s important to note that using the correct tools when opening your phone will help prevent any unnecessary damage and ensure a smooth disassembly process. Make sure you have all the necessary tools handy before proceeding with the steps outlined in this guide.
Step 1: Power off the Phone
The first step in opening your Samsung Galaxy A21 is to power off the device. This is an important safety precaution to avoid any potential electrical shocks or damage while working on the phone’s internal components.
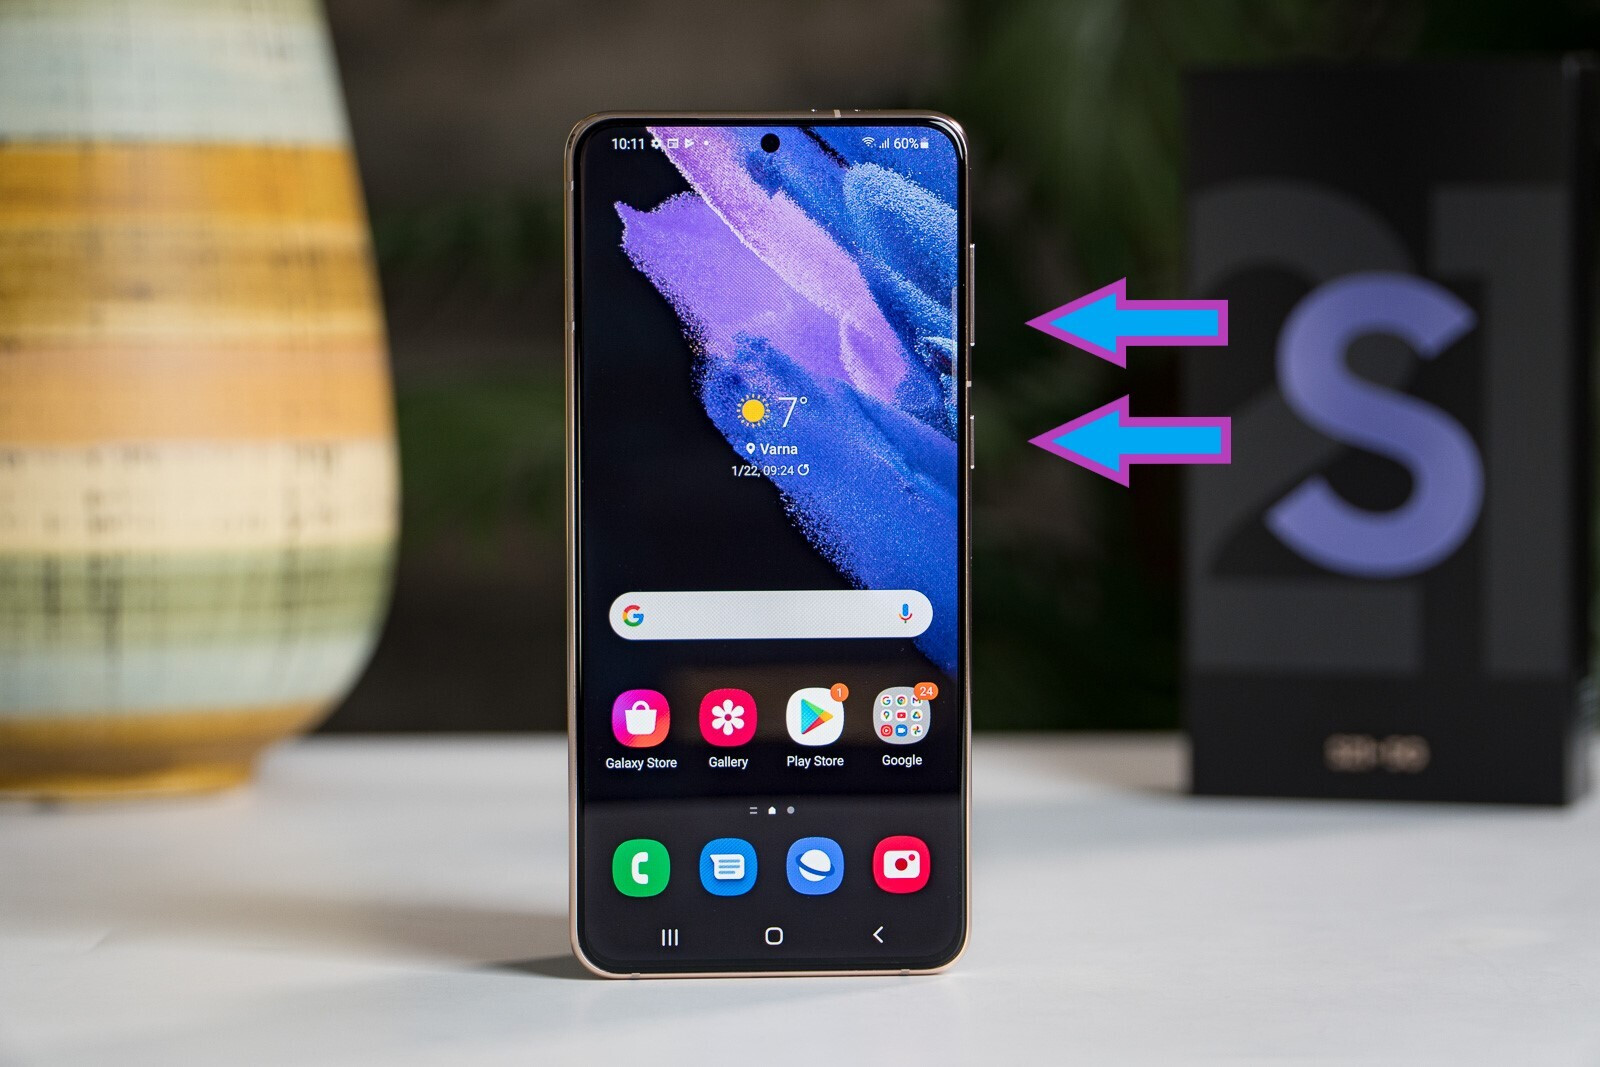
To power off your Galaxy A21, press and hold the power button located on the side or top of the phone (depending on the model) until a power menu appears on the screen. From the menu, select the option to power off the device. Wait for a few seconds until the phone completely shuts down.
Once the phone is powered off, double-check that it is turned off by pressing the power button again. If the screen remains blank and there are no indicators of power, you can be sure that the phone is safely turned off.
It’s important to note that removing or disconnecting any components while the phone is still powered on can lead to short circuits or damage to the internal circuitry. Therefore, always make sure to power off your Samsung Galaxy A21 before proceeding with any disassembly or repair work.
Step 2: Remove the SIM Card Tray
Before you can proceed with opening your Samsung Galaxy A21, you’ll need to remove the SIM card tray. The SIM card tray houses both the SIM card and the microSD card, if applicable. Removing the SIM card tray will make it easier to access the internal components of the phone.
To remove the SIM card tray, locate the small pinhole on the side or top of your Samsung Galaxy A21. This pinhole is the SIM card tray eject slot. Take a SIM card eject tool or a small paperclip and insert it into the pinhole.
Apply gentle pressure until the SIM card tray pops out slightly. Then, carefully pull out the tray from the phone. Be cautious not to use excessive force or bend the tray as it can damage both the tray and the phone.
Once the SIM card tray is removed, set it aside in a safe place where it won’t get lost or damaged. You can now proceed to the next step in opening your Samsung Galaxy A21.
It’s important to note that removing the SIM card tray is a standard procedure before opening most smartphones. By removing the tray, you minimize the risk of damaging the SIM card or the tray itself during the disassembly process. Always take care when handling the tray and store it safely until the phone is reassembled.
Step 3: Locate the Back Cover Notches
Once you have removed the SIM card tray from your Samsung Galaxy A21, the next step is to locate the notches on the back cover. These notches are essential for prying open the back cover of the phone.
Turn your attention to the back of the Samsung Galaxy A21. Carefully inspect the edges of the phone, especially along the sides and corners. You should be able to identify small notches or gaps between the back cover and the frame of the phone.
The purpose of these notches is to allow you to insert a prying tool and separate the back cover from the phone. These notches are strategically placed to ensure leverage and proper disassembly of the device.
Take note of the location and number of notches. Different phone models may have varying notch positions, so make sure to familiarize yourself with your specific Galaxy A21.
Identifying the notches will help you insert the plastic prying tool accurately and minimize the chances of causing any damage to the back cover or internal components.
Once you have located the notches, you’re ready to move on to the next step of prying open the back cover of your Samsung Galaxy A21.
Take your time to carefully inspect and identify the notches before proceeding. Avoid applying excessive force or using other objects that may cause scratches or dents on the phone.
Step 4: Pry Open the Back Cover
Now that you have located the notches on the back cover of your Samsung Galaxy A21, it’s time to pry open the back cover. This step requires caution and precision to avoid any damage to the phone.
Take your plastic prying tool and insert it into one of the notches you identified in the previous step. Apply gentle yet steady pressure to separate the back cover from the phone’s frame. Slowly move the prying tool along the edge of the phone, gradually releasing the clips that hold the back cover in place.
Continue working your way around the edges of the phone, using the prying tool to lift and separate the back cover. Be patient and take your time to avoid applying excessive force, as this can lead to the back cover breaking or the clips getting damaged.
If you encounter resistance while prying open the back cover, double-check that you have released all the clips along that edge. Sometimes, additional clips may be hidden, so gently press on any areas that still seem attached and continue prying until the back cover is completely separated.
Once the back cover is loose, carefully lift it off, revealing the internal components of your Samsung Galaxy A21. Set the back cover aside in a safe place where it won’t get scratched or damaged.
With the back cover removed, you now have access to the battery, motherboard, and other internal components of your Samsung Galaxy A21. Take a moment to observe the layout and familiarize yourself with the different parts.
Remember to handle the back cover with care, especially if it is made of glass or contains any delicate components. The back cover plays a crucial role in protecting the internal components, so take measures to avoid dropping or damaging it.
Step 5: Disconnect the Battery Connector
With the back cover of your Samsung Galaxy A21 removed, you can now proceed to disconnect the battery connector. This step is crucial to ensure the safety of your phone and prevent any accidental damage during the disassembly or repair process.
Locate the battery connector on the motherboard of your Galaxy A21. It is usually a small rectangular connector with a ribbon cable attached to it. Take note of its position and orientation.
Using a pair of tweezers or a plastic opening tool, gently and carefully lift the retaining flap that secures the battery connector in place. Be extra cautious not to put excessive pressure on the connector or damage the surrounding components.
Once the retaining flap is lifted, you can carefully slide the ribbon cable out of the battery connector. Take your time and ensure that the cable is fully disconnected from the connector.
Disconnecting the battery connector ensures that there is no power flowing through the phone’s internal components, minimizing the risk of short circuits or damage while working on your Galaxy A21.
It’s important to remember that when reassembling the phone, you will need to reconnect the battery connector securely to ensure proper functioning. So, take note of the position and orientation of the cable before proceeding further.
With the battery connector disconnected, you can now move on to the next steps in accessing and working on the other internal components of your Samsung Galaxy A21.
Handle the battery connector and its ribbon cable with care, as they are delicate components. Avoid bending, twisting, or applying excessive force to prevent damage.
Step 6: Remove the Screws
After disconnecting the battery connector in your Samsung Galaxy A21, the next step is to remove the screws securing the internal components. These screws keep the motherboard and other components in place within the phone’s frame.
Take your small Phillips screwdriver and carefully locate the screws that need to be removed. These screws are typically located around the edges or on the motherboard itself.
Using the appropriate size bit on your screwdriver, apply gentle pressure and turn counterclockwise to loosen and remove each screw one by one. Keep the screws in a safe place, such as a small container or magnetic tray, to prevent them from getting lost during the disassembly process.
It’s important to keep track of the different screw sizes and their positions, as they may vary in length or shape. Consider creating a diagram or taking pictures as a reference for reassembly.
Once all the screws have been removed, carefully set them aside and take note of their placement for when you’re ready to reassemble the phone.
Removing the screws allows you to gain further access to the internal components of your Samsung Galaxy A21, such as the motherboard, cameras, or speaker modules.
Remember to handle the screws and screwdriver with care to avoid stripping the screws or damaging the screwdriver tip.
With the screws removed, you’re now ready to proceed to the next steps of releasing the ribbon cables and removing the motherboard from your Galaxy A21.
Step 7: Release the Ribbon Cables
With the screws removed from your Samsung Galaxy A21, the next step is to release the ribbon cables that connect various internal components to the motherboard. These ribbon cables are essential for transmitting data and power between different parts of the phone.
Take a closer look at the motherboard and identify the ribbon cables that are connected to it. They usually have a thin and flat appearance and are secured by small connectors or latches.
Using a pair of tweezers or a plastic opening tool, gently lift the connectors or release the latches that hold the ribbon cables in place. Take your time and be careful not to apply excessive force or damage the connectors.
As you release each ribbon cable, carefully slide it out of its connector. Avoid pulling on the cables forcefully or bending them, as this can result in damage to the cables or the connectors.
Some phones may have multiple ribbon cables that need to be disconnected, such as those for the display, camera module, or fingerprint sensor. Make sure to release all the necessary ribbon cables before proceeding.
Take note of the orientation and position of each ribbon cable as you disconnect them. This will help you ensure proper reassembly of the phone later on.
Once all the ribbon cables are disconnected, you can proceed to the next steps of removing the motherboard and accessing the internal components of your Samsung Galaxy A21.
Handle the ribbon cables with care, as they are fragile and can be easily damaged. Avoid twisting or pulling on them forcefully, and be gentle when manipulating the connectors or latches.
Step 8: Take Out the Motherboard
Now that you have released the ribbon cables connecting the motherboard to other components in your Samsung Galaxy A21, it’s time to take out the motherboard itself. Removing the motherboard will give you access to the internal components that may need repair or replacement.
To remove the motherboard, carefully lift it from the phone’s frame, making sure not to damage any surrounding components or connectors. Hold the motherboard by its edges to provide stability and prevent accidental slips or drops.
Before lifting the motherboard, take note of any additional screws or connectors that may still be securing it in place. Locate and remove these if necessary, being mindful of their size and placement.
Once the motherboard is free from any attachments, gently lift it out of the phone’s frame. Be cautious not to bend or twist the motherboard, as it can be fragile.
Set the motherboard aside in a safe place, such as an anti-static bag or a clean surface, to prevent any damage or static discharge. Avoid placing it on conductive surfaces or near magnetic objects.
With the motherboard removed, you now have better access to other components, such as the camera modules, speaker, or charging port. Take this opportunity to inspect the components for any signs of damage or wear.
Remember to handle the motherboard with care, as improper handling can result in irreparable damage to the delicate electronic components. Treat it as a valuable and fragile part of your phone.
By removing the motherboard, you are one step closer to accessing and working on specific internal components of your Samsung Galaxy A21.
Step 9: Access the Internal Components
With the motherboard removed from your Samsung Galaxy A21, you now have the opportunity to access and work on the specific internal components that may require attention, such as the battery, cameras, or charging port.
Inspect the internal components and identify the ones you wish to address. Each component may require different steps to access and repair, so refer to specific guides or instructions for the particular component you are working on.
To replace the battery, for example, you may need to remove additional screws or connectors that secure it in place. Similarly, if you are focusing on the camera module, you may need to remove specific screws or detach additional cables.
Take note of the appropriate steps and follow the recommended procedures to access and work on the desired internal component. Use the correct tools, such as screwdrivers or tweezers, as necessary to safely remove or replace the component.
As you proceed with accessing the internal components, take care to keep track of any screws, connectors, or other small parts. Consider using a magnetic tray or small containers to organize and secure these components to prevent loss or confusion during reassembly.
During this step, pay attention to any signs of damage, wear, or corrosion that may require additional repair or replacement. Clean the internal components if necessary and address any issues before proceeding with reassembly.
Remember to refer to reliable sources, guides, or official documentation for instructions specific to the component you are working on. Following proper procedures ensures the integrity of your Samsung Galaxy A21 and minimizes the risk of further damage or malfunction.
By accessing and working on the internal components, you have the opportunity to address specific issues or upgrade certain parts of your Samsung Galaxy A21 to enhance its overall functionality and performance.
Step 10: Reassemble the Phone
After successfully addressing the necessary repairs or modifications to the internal components of your Samsung Galaxy A21, it’s time to reassemble the phone and put everything back together. This step ensures that the phone functions properly and looks aesthetically pleasing.
Begin by carefully placing the motherboard back into the phone’s frame. Ensure that it aligns properly with the screw holes and any connectors or latches are properly engaged. Take extra care to avoid damaging any surrounding components or cables.
If there were any screws removed during the disassembly process, now is the time to reinsert them into their respective locations. Refer to any documentation or photographs you took earlier to ensure screws are placed correctly.
Next, reconnect the ribbon cables by gently sliding them back into their corresponding connectors. Take note of the orientation and position of each cable to ensure a proper connection. If any connectors have latches, make sure to secure them back into place.
Once the ribbon cables are reconnected, carefully lower the battery into its designated area and attach its ribbon cable to the motherboard. Ensure that the battery is properly aligned and seated in its position.
With the internal components properly reassembled, it’s time to put the back cover back on. Line up the edges of the back cover with the phone’s frame and gently press down until it snaps into place. Ensure that all the clips are securely aligned and engaged.
If you removed the SIM card tray earlier, insert it back into its slot until it is flush with the phone. Make sure it is properly aligned and securely seated.
Finally, power on your Samsung Galaxy A21 to confirm that all the components are functioning as they should. Check for any abnormalities and test the various features to ensure everything is in working order.
Congratulations! You have successfully reassembled your Samsung Galaxy A21, completing the process of opening and repairing or modifying its internal components. Take pride in your accomplishment, knowing that you have not only gained valuable knowledge but also extended the life and functionality of your device.
Conclusion
Opening up and accessing the internal components of your Samsung Galaxy A21 can be a daunting task, but with the right tools, careful handling, and step-by-step guidance, it is achievable. Whether you are looking to perform repairs, replace components, or simply explore the inner workings of your device, following the proper procedures is crucial for a successful outcome.
In this guide, we have outlined the ten essential steps to safely open your Samsung Galaxy A21. From powering off the phone and removing the SIM card tray to releasing ribbon cables, removing screws, and accessing internal components, each step plays a vital role in the disassembly and reassembly process.
Always remember to exercise caution when handling delicate components, using the appropriate tools for each task, and keeping track of screws and connectors. Taking your time and following precise instructions will aid in avoiding unnecessary damage and ensure a seamless repair or modification process.
However, it is important to note that opening your Samsung Galaxy A21 may void the warranty. If your device is still covered under warranty or if you feel uncomfortable performing the tasks outlined in this guide, it is recommended to seek professional assistance from an authorized service center.
By successfully completing the process of opening your Samsung Galaxy A21 and accessing its internal components, you have gained valuable knowledge and the ability to perform basic repairs or upgrades. This not only saves you time and money but also provides a sense of satisfaction and empowerment as a smartphone owner.
Remember, proper maintenance and care play a significant role in the longevity and optimal performance of your device. Always follow instructions, handle components with care, and seek professional help for complex repairs or unfamiliar tasks.
We hope this guide has been helpful in guiding you through the process of opening your Samsung Galaxy A21. Whether you are replacing a battery, upgrading the camera module, or simply satisfying your curiosity, may your journey of exploration and tinkering be rewarding and successful!