Introduction
Welcome to the guide on how to open an Acer tablet! Whether you need to repair a faulty component or upgrade your device, knowing how to properly open your tablet is essential. Opening a tablet can seem intimidating at first, but with the right tools and a little guidance, you’ll be able to access the internal components without any trouble.
Before we begin, it’s important to note that opening your tablet may void any existing warranties. If your device is still under warranty, it’s best to contact the manufacturer or an authorized service center for assistance. However, if you’re confident in your technical abilities and understand the risks involved, let’s dive into the world of tablet disassembly.
In this guide, we’ll provide you with step-by-step instructions on how to safely open your Acer tablet. You’ll learn the tools you need, which screws to remove, how to detach the back cover, and any additional steps required to access the internal components. Please note that the exact process may vary depending on the specific Acer tablet model you own, so be sure to consult the user manual or online resources for any model-specific instructions.
Remember to proceed with caution, take your time, and be gentle when handling delicate components. Accidental damage may occur if excessive force is applied or if the steps are not followed properly. We highly recommend reading through the entire guide before starting the process to familiarize yourself with the steps involved.
So, without further ado, let’s get started on opening your Acer tablet and unleashing its inner workings!
Tools Needed
Before you can begin opening your Acer tablet, you’ll need the following tools:
- Small Phillips-head screwdriver: Most tablets use small screws, so a miniature or precision screwdriver is recommended. Make sure it fits the screws on your specific tablet model.
- Plastic pry tool or guitar pick: These tools are ideal for gently prying open the back cover without causing any damage. Avoid using metal tools that may scratch or dent the tablet.
- Tweezers: A pair of fine-tipped tweezers can come in handy for handling small components or disconnecting cables.
- Suction cup (optional): Some tablets may have a suction cup attachment point on the back cover. If your tablet has this feature, a suction cup can help lift the cover without applying excessive force.
These are the basic tools you’ll need to successfully open your Acer tablet. However, depending on your specific tablet model or the repairs you plan on making, you may require additional tools. For example, if you’re replacing a cracked screen, you might need a heat gun or a hairdryer to loosen adhesive.
It’s important to have a clean and well-organized workspace when working with delicate electronics. Consider using an anti-static mat or wrist strap to prevent static electricity from damaging the tablet’s internal components. Additionally, have a small container or magnetic mat to keep track of the screws you remove during the disassembly process.
Now that you’re familiar with the tools needed, let’s proceed to the next steps to open your Acer tablet.
Step 1: Power off the Tablet
Before you begin opening your Acer tablet, it’s important to power off the device to avoid any potential damage or accidents during the disassembly process. Here’s how to do it:
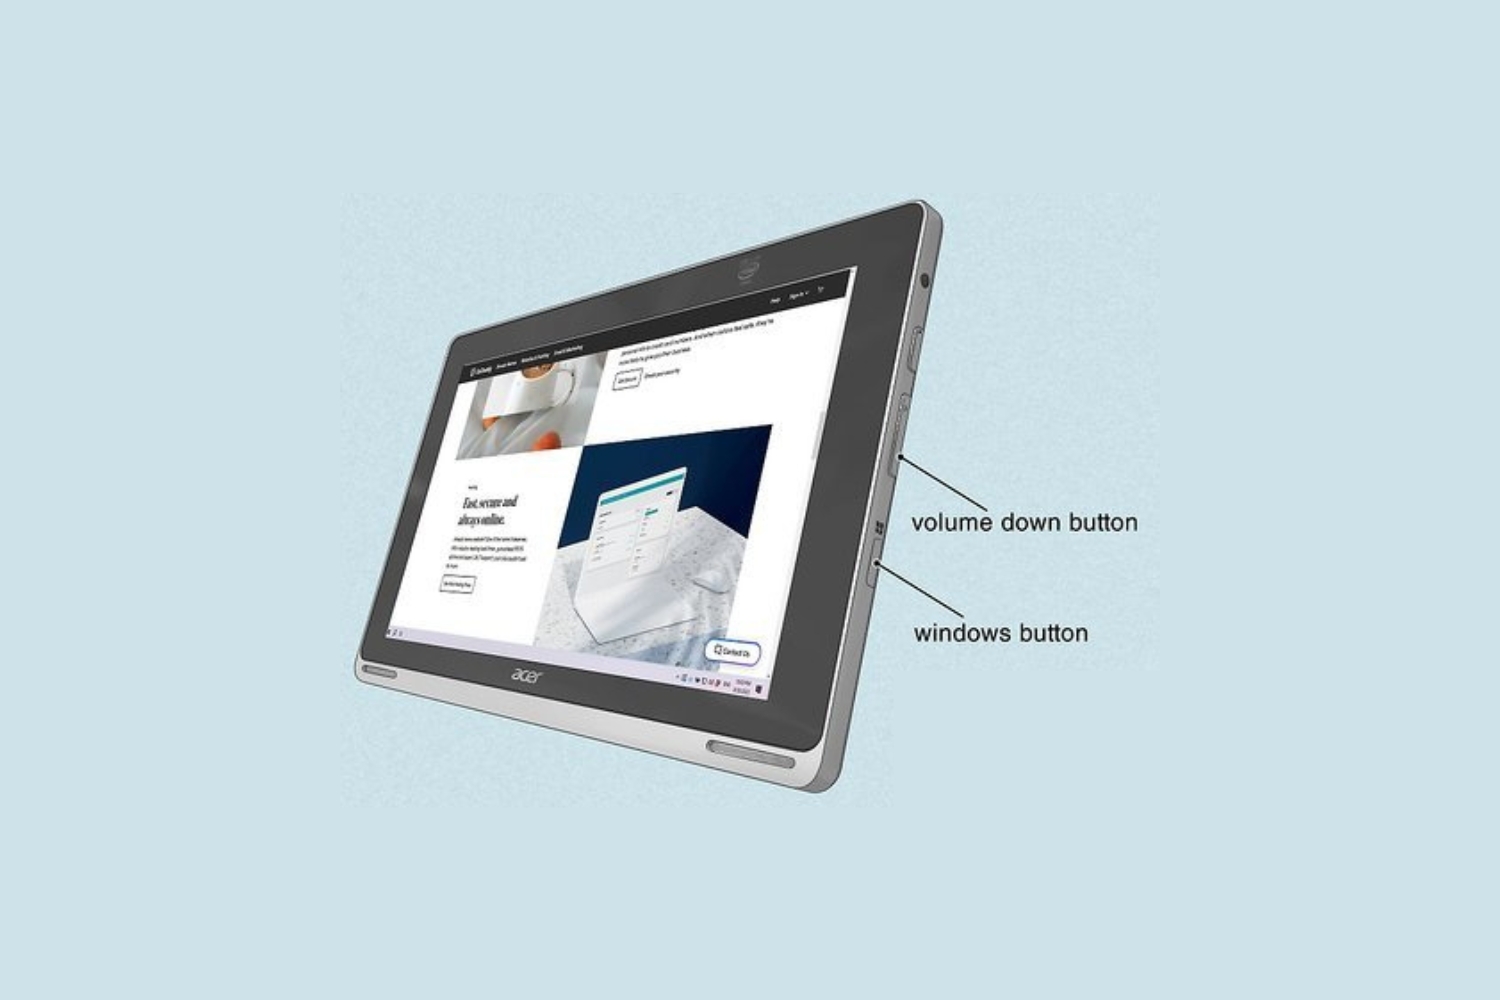
- Press and hold the Power button on your Acer tablet until the power menu appears on the screen.
- Select “Power off” or a similar option to shut down the tablet.
- Wait for the device to power down completely. This step is crucial to ensure the safety of both you and the tablet’s internal components.
Once the tablet is powered off, you can proceed to the next steps and prepare for the actual disassembly process.
It’s worth noting that some Acer tablet models may have specific instructions for powering off the device. If you’re unsure of the exact steps for your particular model, refer to the user manual or visit the Acer support website for assistance.
By ensuring the tablet is powered off before proceeding, you minimize the risk of accidentally damaging any sensitive components. Take your time with this step, and only move on when you’re absolutely certain that the tablet is completely powered off.
Now that your Acer tablet is safely powered off, let’s move on to the next step in opening the device.
Step 2: Locate the Screws
Once you have powered off your Acer tablet, the next step is to locate the screws that hold the back cover in place. These screws may be hidden under rubber covers or located in specific corners or edges of the tablet. Here’s how to find them:
- Inspect the edges and corners of your Acer tablet to identify any visible screws. Look for small holes or markings that indicate the presence of screws.
- If you notice rubber covers on the edges or corners, gently pry them off using a plastic pry tool or a guitar pick. These covers often conceal the screws beneath.
- Take note of the number and size of the screws, as different tablets may have varying configurations.
Keep in mind that not all tablet models have visible screws, and some devices may use alternative methods to secure the back cover, such as adhesive or clips. If you cannot locate any screws on the exterior of your tablet, consult the user manual or online resources for specific instructions on accessing the internal components.
Remember to handle the tablet with care during this step to avoid accidentally damaging the device or scratching the screen. Use the appropriate tools, such as a plastic pry tool or guitar pick, to gently remove any rubber covers without applying excessive force.
With the screws now located, you are one step closer to opening your Acer tablet. Let’s proceed to the next step and remove these screws to access the internal components.
Step 3: Remove the Screws
Now that you have located the screws holding the back cover of your Acer tablet in place, it’s time to remove them. Removing the screws will allow you to access the internal components of the device. Here’s how to proceed:
- Using a small Phillips-head screwdriver that matches the size of the screws on your tablet, carefully unscrew each one. Make sure to keep the screws in a safe place or store them in a container to prevent loss.
- Set aside the screws in a logical order, noting their placement if they are of different sizes or lengths. This will help during reassembly to ensure that each screw is returned to its correct position.
- Be cautious while removing the screws and ensure that you apply consistent and gentle pressure. Avoid using excessive force, as this can strip the screws or damage the threads.
It’s important to remember that different Acer tablet models may have varying numbers and placements of screws. Refer to the user manual or online resources specific to your tablet model for any specific instructions or diagrams related to screw removal.
By removing the screws, you have taken a significant step towards accessing the internal components of your Acer tablet. The next step will involve opening the back cover to reveal the tablet’s inner workings, so let’s move on to it.
Step 4: Open the Back Cover
With the screws removed, you can now proceed to open the back cover of your Acer tablet. Opening the back cover will grant you access to the internal components that may need to be repaired or upgraded. Follow these steps to safely open the back cover:
- Take a plastic pry tool or a guitar pick and insert it into the seam between the back cover and the body of the tablet.
- Gently pry the back cover away from the tablet’s body using a combination of upward pressure and sliding the tool along the edges.
- Continue to work your way around the edges, releasing the clips or adhesive that hold the back cover in place. Exercise caution and be patient during this process to avoid damaging the cover or inadvertently pulling on any internal components.
- Once the clips or adhesive have been loosened, carefully lift off the back cover. If you encounter any resistance, double-check for any screws or additional fasteners that may still be securing the cover in place.
It’s worth noting that some Acer tablet models may have a specific opening mechanism or require additional steps to remove the back cover. If you’re unsure about the correct method for your tablet model, consult the user manual or seek guidance from online forums or support resources.
As you open the back cover, take note of any cables or connectors that may be attached to it. These should be disconnected carefully in the next step to avoid causing any damage.
Now that you’ve successfully opened the back cover, you’re one step closer to accessing the internal components of your Acer tablet. Let’s move on to the next step and disconnect the tablet’s battery.
Step 5: Disconnect the Battery
Now that you have successfully opened the back cover of your Acer tablet, it’s time to disconnect the battery. Disconnecting the battery ensures that no power is flowing through the device, minimizing the risk of electric shock or accidental damage during the disassembly process. Follow these steps to disconnect the battery:
- Locate the battery inside your Acer tablet. It is usually a rectangular or square-shaped component.
- Identify the battery connector, which is a small plug or cable attached to the motherboard.
- Gently and carefully unplug the battery connector from the motherboard. You may need to use a pair of fine-tipped tweezers or your fingers for this step. Take care to avoid pulling on the wires or exerting excessive force.
- Once the battery connector is disconnected, double-check that it is fully detached from the motherboard.
Some tablets have a battery that is integrated into the device and cannot be easily disconnected. If this is the case with your Acer tablet, it may be best to proceed with caution and avoid tampering with the battery directly. Instead, focus on accessing the other internal components carefully.
Disconnecting the battery ensures that no power is running through the tablet, minimizing the risk of electrical damage or hazards. It’s an essential step to ensure your safety and protect the tablet’s delicate internal components.
Now that the battery is disconnected, we can move on to the next step – removing any additional components that may need to be accessed or replaced.
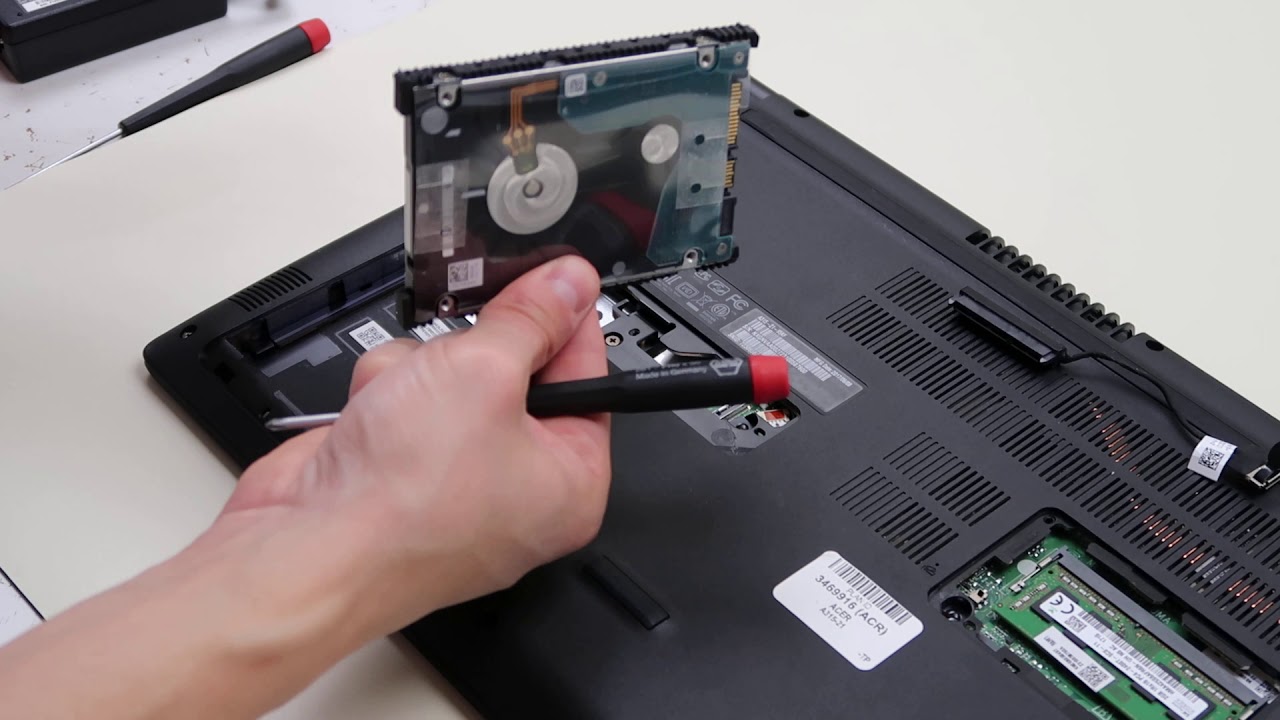
Step 6: Remove Additional Components (if necessary)
After disconnecting the battery, you may need to remove additional components to access specific internal parts or perform repairs or upgrades. Not all tablets will require this step, but if necessary, follow these instructions:
- Refer to the user manual or online resources specific to your Acer tablet model to identify the components that need to be removed for your intended task.
- Using the appropriate tools, such as a screwdriver or tweezers, carefully remove any screws, connectors, or clips that secure the additional components.
- Take note of the order and position of the components as you remove them to ensure proper reassembly later.
- Store the removed components in a safe place to prevent loss or damage.
The specific components that may need to be removed can vary greatly depending on the tablet model and the intended repair or upgrade. It could include items such as the camera module, speakers, microphone, or any other components that obstruct access to the internals.
It’s crucial to exercise caution when removing additional components to prevent accidental damage or misplacement. Take your time, refer to any available resources, and be mindful of any delicate cables or connectors that may be attached to these components.
If you’re uncertain about removing specific components or encounter any difficulties during this step, it’s recommended to seek guidance from a professional or consult the Acer support website for further assistance.
Once you have removed any necessary additional components, you’re ready to proceed with reassembling your Acer tablet. Let’s move on to the next step.
Step 7: Close the Tablet
Now that you have completed the necessary repairs or upgrades, or simply accessed the internal components of your Acer tablet, it’s time to close the device and reassemble it. Follow these steps to ensure a secure and proper closure:
- Inspect the back cover and ensure it is clean and free from any dust or debris.
- Align the back cover with the tablet’s body, taking care to position it correctly and match any clips or slots.
- Apply gentle pressure and press down on all edges of the back cover to secure it in place.
- Listen for the clicks or confirm that the back cover is flush and snug against the tablet’s body.
If your Acer tablet originally had adhesive securing the back cover, ensure that it is properly aligned and pressed down to maintain a secure bond. It may be necessary to warm the adhesive with a heat gun or hairdryer and apply gentle pressure until it adheres firmly.
Remember to be patient and apply even pressure when closing the tablet. Avoid using excessive force that could potentially damage the device or its components.
Now that the tablet is closed, it’s time to move on to the final step of securing the back cover with screws.
Let’s proceed to the next step and complete the reassembly process of your Acer tablet.
Step 8: Screw the Cover Back
With the back cover securely in place on your Acer tablet, it’s time to screw it back together. This step ensures that the tablet remains properly assembled and prevents any potential issues or damage. Follow these steps to screw the cover back:
- Take the screws that were previously removed and identify their respective positions.
- Gently insert each screw into its designated hole and carefully tighten them. Use a small Phillips-head screwdriver that matches the size of the screws.
- Ensure that the screws are tightened properly, but be cautious not to overtighten and risk damaging the tablet’s casing or the threads of the screws.
- Double-check that all screws are tightened uniformly, ensuring a consistent and secure fit for the back cover.
When screwing the cover back, it’s important to follow the correct pattern and order as indicated in the user manual or any specific instructions for your Acer tablet model. This helps to ensure that the pressure is distributed evenly and that the cover is aligned properly.
Take your time during this step to ensure that each screw is tightened in the correct position. Be mindful not to mix up the screws and refer to any notes or labels you may have made during the disassembly process.
Now that the back cover is securely fastened with screws, your Acer tablet is almost ready for use. The final step involves powering on the device and making sure everything is functioning correctly.
Let’s proceed to the next step and power on your Acer tablet.
Step 9: Power on the Tablet
Now that you have successfully reassembled your Acer tablet and secured the back cover with screws, it’s time to power on the device. Follow these steps to ensure a smooth startup:
- Ensure that the tablet is placed on a dry and stable surface.
- Locate the power button and press it to turn on the tablet.
- Wait for the device to boot up and for the operating system to load.
- Once the tablet has powered on, check for any error messages or unusual behavior.
During the startup process, it is normal for the device to take a few moments to fully initialize. Give it some time to complete the startup sequence and don’t panic if it appears to be slower than usual.
Once the tablet has powered on, navigate through the interface and ensure that everything is functioning as expected. Check for any issues such as display abnormalities, unresponsive touch input, or malfunctioning buttons. If you notice any problems, double-check the reassembly process to ensure that all components are correctly connected.
If everything appears to be working properly, congratulations! You have successfully opened, repaired, or upgraded your Acer tablet.
Keep in mind that if you encounter any persistent issues or are unsure about any steps taken during the process, it is always recommended to seek assistance from a professional technician or contact Acer’s customer support for further guidance.
With your Acer tablet powered back on and fully functional, you can now enjoy using your device with peace of mind knowing that you have successfully completed the process of opening and reassembling it.
Conclusion
Congratulations on successfully opening and reassembling your Acer tablet! By following the step-by-step guide and utilizing the necessary tools, you have gained the knowledge and confidence to access the tablet’s internal components for repairs or upgrades.
Remember, opening a tablet should be approached with caution, as it may void any existing warranties. If your device is still under warranty, it is best to consult the manufacturer or authorized service center for assistance.
Throughout the process, it is crucial to exercise patience, attention to detail, and gentle handling of the tablet and its components. Avoid using excessive force or rushing through the steps, as this can lead to accidental damage or misalignment of the internal parts.
Always refer to the user manual or consult online resources specific to your Acer tablet model for any model-specific instructions or troubleshooting tips.
If you encounter any difficulties or are unsure about any aspect of the process, it is recommended to seek professional assistance or contact Acer’s customer support for guidance.
Opening your Acer tablet can provide you with the opportunity to perform necessary repairs, replace faulty components, or even upgrade certain features. It allows you to extend the life of your tablet and tailor it to your specific needs.
Remember to always practice safe handling and proper disposal of any removed components or old parts to minimize environmental impact.
We hope that this guide has been helpful in your journey of opening and reassembling your Acer tablet. Enjoy exploring the inner workings of your device and making the most of its capabilities.
Happy repairing or upgrading!