Introduction
Are you running out of storage space on your computer and looking for a way to move your Native Instruments files to an external hard drive? Look no further! In this guide, we will walk you through the step-by-step process of moving your Native Instruments installation to an external hard drive.
Native Instruments is renowned for its high-quality software and virtual instruments used by musicians, producers, and DJs worldwide. However, the extensive libraries associated with Native Instruments can quickly consume a significant amount of storage space on your computer’s internal drive. By transferring these files to an external hard drive, you can free up valuable space while still accessing and utilizing all the features and functionalities of Native Instruments software.
Before we dive into the process, let us assure you that the process is straightforward and can be completed by users of all levels of technical expertise. Whether you are a seasoned music professional or a hobbyist, follow the steps outlined in this guide to effortlessly move your Native Instruments files to an external hard drive.
By moving your Native Instruments installation to an external hard drive, you can also enjoy the added benefit of portability. You can easily connect your external hard drive to any computer or laptop and access your music production setup and instruments without any hassle. Additionally, this approach allows you to create backups of your Native Instruments files, ensuring that your hard work and precious music projects are always safe and secure.
So, without further ado, let’s dive into the step-by-step process of moving your Native Instruments installation to an external hard drive. Ensure that you have your external hard drive handy, and let’s get started!
Step 1: Prepare the External Hard Drive
Before you can start moving your Native Instruments files to an external hard drive, you need to ensure that the hard drive is properly prepared. Follow these steps to get your external hard drive ready:
- Connect the external hard drive to your computer using the USB cable provided. Make sure the drive is properly connected and recognized by your system.
- Format the external hard drive. This step is crucial to ensure compatibility with your computer’s operating system and Native Instruments software. Depending on your operating system (Windows or macOS), follow the appropriate instructions to format the drive:
- For Windows users: Right-click on the external hard drive icon and select “Format.” Choose the file system format as NTFS and click “Start” to begin the formatting process.
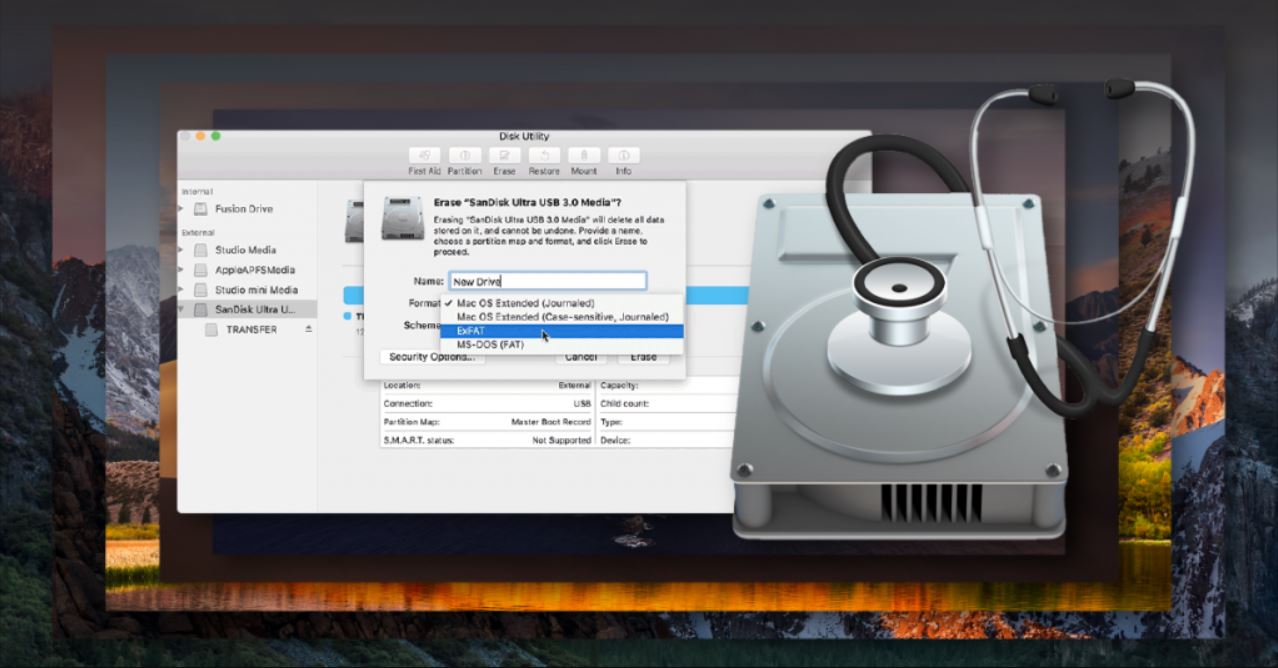
- For macOS users: Open “Finder” and navigate to “Applications” > “Utilities” > “Disk Utility.” Select the external hard drive from the list and click on the “Erase” tab. Choose the file system format as “Mac OS Extended (Journaled)” and click “Erase” to format the drive.
- Give your external hard drive a recognizable name. This step is optional but recommended for easier identification. Right-click on the external hard drive icon and select “Rename” (Windows) or click on the name of the drive in Disk Utility and enter the desired name (macOS).
Once you have completed these steps, your external hard drive is ready to become the new home for your Native Instruments files. Keep in mind that formatting the drive will erase any existing data on it, so make sure you have a backup if necessary.
With your external hard drive prepared, you are one step closer to freeing up valuable space on your computer’s internal drive and improving the overall performance of your Native Instruments software. In the next step, we will guide you on how to locate the Native Instruments installation folder on your computer.
Step 2: Locate the Native Instruments Installation Folder
In order to move your Native Instruments files to the external hard drive, you need to know the location of the Native Instruments installation folder on your computer. Follow the steps below to locate the folder:
- Open the Native Instruments application on your computer. This can be Native Access, Kontakt, Maschine, or any other Native Instruments software that you have installed.
- Once the application is open, navigate to the preferences or settings section. The location of this section may vary depending on the specific application you are using. Look for options like “Preferences,” “Settings,” or “Options.”
- In the preferences/settings section, find the option for “Installation Folder” or “Library Location.” This will show you the current location of the Native Instruments installation folder on your computer’s internal drive.
- Make a note of the current installation folder path. You will need this information in the next step when you copy the folder to the external hard drive.
Once you have located the Native Instruments installation folder, you are ready to proceed to the next step. Keep in mind that the path to the installation folder may vary depending on your specific setup and operating system.
Having the correct folder location is crucial for successfully transferring your Native Instruments files to the external hard drive. In the next step, we will guide you through the process of copying the Native Instruments folder to the external hard drive without any hassle.
Step 3: Copy the Native Instruments Folder to the External Hard Drive
Now that you have located the Native Instruments installation folder on your computer, it’s time to copy it to the external hard drive. Follow these steps to successfully transfer the Native Instruments folder:
- Open the File Explorer (Windows) or Finder (macOS) on your computer.
- Navigate to the location of the Native Instruments installation folder that you noted in previous step.
- Click and drag the Native Instruments folder to the external hard drive folder. Alternatively, you can right-click on the folder and select “Copy,” then navigate to the external hard drive folder and right-click again to select “Paste.”
- Wait for the file transfer to complete. This process may take some time depending on the size of your Native Instruments folder and the speed of your external hard drive.
- Once the transfer is complete, double-check that the Native Instruments folder is successfully copied to the external hard drive. You can do this by opening the external hard drive folder and ensuring that all the files and subfolders from the Native Instruments installation folder are present.
By copying the Native Instruments folder to the external hard drive, you have successfully moved your files to a more spacious storage location. This will free up valuable space on your computer’s internal drive and ensure easy accessibility to your Native Instruments software and libraries.
Please note that it’s essential to keep the folder structure intact while copying the Native Instruments folder. Altering the folder structure or deleting any essential files may cause issues with your software installation and functionality.
In the next step, we will guide you on how to update the Native Instruments application preferences to reflect the new folder location on the external hard drive.
Step 4: Update Native Instruments Application Preferences
After successfully copying the Native Instruments folder to the external hard drive, it’s important to update the application preferences to reflect the new folder location. This will ensure that the Native Instruments software can locate and access the files on the external hard drive. Follow these steps to update the application preferences:
- Open the Native Instruments application that you use (Native Access, Kontakt, Maschine, etc.) on your computer.
- Navigate to the preferences or settings section within the application. Look for options like “Preferences,” “Settings,” or “Options.”
- In the preferences/settings section, locate the option for “Installation Folder” or “Library Location.”
- Click on the option to change the folder location. Use the file explorer (Windows) or finder (macOS) to navigate to the newly copied Native Instruments folder on the external hard drive.
- Select the folder and click “OK” or “Apply” to update the preferences.
Ensure that the new folder location is correctly displayed in the preferences or settings of your Native Instruments application. This will indicate that the application is now set up to access the files from the external hard drive instead of the original internal drive location.
It’s essential to update the application preferences in order to avoid any confusion or errors when launching the Native Instruments software. By directing the software to the correct folder on the external hard drive, you can ensure seamless playback and utilization of your Native Instruments files.
In the final step, we will guide you on how to test the external hard drive setup to ensure that everything is working properly.
Step 5: Test the External Hard Drive Setup
Now that you have completed the previous steps and updated the Native Instruments application preferences, it’s time to test the external hard drive setup to ensure that everything is working correctly. Follow these steps to perform a quick test:
- Close the Native Instruments application if it is currently open on your computer.
- Disconnect the external hard drive from your computer.
- Restart your computer to clear any temporary settings and preferences.
- Once your computer has restarted, reconnect the external hard drive to your computer using the USB cable.
- Open the Native Instruments application again.
Upon opening the application, it should automatically detect the new location of the Native Instruments folder on the external hard drive. The software should load all your instruments, samples, and preferences without any issues.
Test some of your saved projects or load a virtual instrument from the Native Instruments library to ensure that everything is working properly. If everything functions as expected, congratulations! You have successfully moved your Native Instruments files to the external hard drive.
If you encounter any issues during the testing phase, double-check the following:
- Ensure that the external hard drive is connected and recognized by your computer.
- Verify that you correctly followed the previous steps to copy the Native Instruments folder to the external hard drive and update the application preferences.
- Check that the external hard drive has enough space to accommodate all your Native Instruments files.
- If problems persist, you may need to repeat the previous steps or seek assistance from Native Instruments customer support.
By testing the external hard drive setup, you can confirm that your Native Instruments software is functioning properly and that you can continue creating music without any interruptions.
Congratulations! You have successfully completed the process of moving your Native Instruments files to an external hard drive. Enjoy the additional storage space and the convenience of having your music production setup on a portable device. Happy creating!
Conclusion
Moving your Native Instruments files to an external hard drive is a valuable solution for freeing up space on your computer’s internal drive and ensuring easy accessibility to your music production setup. Throughout this guide, we have provided you with a step-by-step process to seamlessly transfer your Native Instruments installation to an external hard drive.
By following these steps, you have successfully prepared the external hard drive, located the Native Instruments installation folder, copied the files to the external hard drive, and updated the application preferences. Finally, you have tested the external hard drive setup to ensure everything is working correctly.
Now that your Native Instruments files are securely stored on the external hard drive, you can enjoy the benefits of both increased storage space and portability. You no longer have to worry about a cluttered internal drive affecting the performance of your computer, and you can easily connect your external hard drive to other devices and continue working on your music projects.
Remember to keep your external hard drive in a safe place and consider creating backups to protect your valuable Native Instruments files. It is always a good practice to have multiple copies of your music projects, especially when working with creative content that is irreplaceable.
We hope this guide has been helpful in assisting you with the process of moving your Native Instruments files to an external hard drive. Now it’s time to unleash your creativity and continue producing incredible music with the convenience of a spacious and portable storage solution.
Happy music-making!